
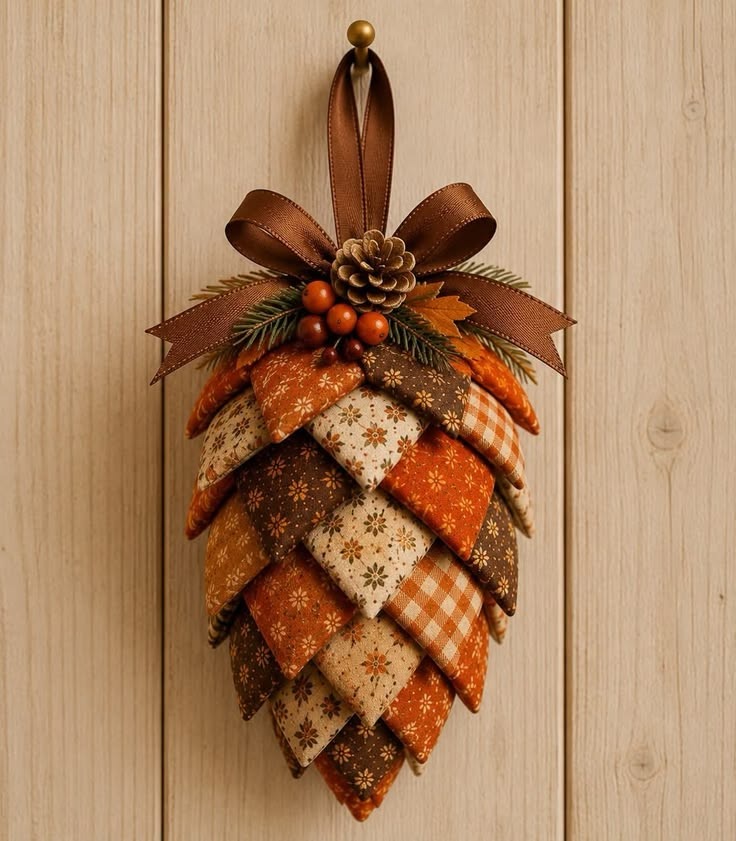
The Fabric Pinecone-Shaped Ornament Pattern is a beautiful way to transform ordinary fabric scraps into an elegant, nature-inspired decoration that brings warmth and personality to your home. With its overlapping fabric scales, rich autumn colors, and charming rustic details, this handmade ornament captures the natural beauty of a pinecone while adding the softness and creativity of traditional sewing crafts. Whether you enjoy DIY fabric ornaments, seasonal decorations, or beginner-friendly sewing projects, this design offers a rewarding opportunity to create something truly special. The combination of orange, cream, brown, and gingham fabrics gives the finished ornament a cozy farmhouse appearance that works especially well with fall and Christmas decorating styles. Best of all, the project can be customized with different fabrics, ribbons, and embellishments to match almost any decorating theme. By following this detailed tutorial, you will learn how to prepare the fabric pieces, build the pinecone shape, arrange the decorative layers, and finish your ornament with a professional-looking bow.
One of the most appealing features of this Fabric Pinecone-Shaped Ornament Pattern is its layered construction, which creates the illusion of natural pinecone scales without requiring complicated sewing techniques. Each fabric piece is folded into a pointed shape and positioned carefully over the previous layer, gradually forming a textured, three-dimensional ornament. The process is similar to traditional folded-fabric ornament making, a popular craft among quilting enthusiasts and people who enjoy working with small pieces of fabric. This technique is especially useful for using leftover cotton fabric from previous quilting or patchwork projects. Instead of throwing away beautiful scraps, you can turn them into a decorative accessory that looks thoughtfully designed and handcrafted. The project also encourages creativity because you can experiment with different prints, colors, and fabric combinations. Even beginners can achieve attractive results when they work patiently and follow the correct layering sequence.
Another wonderful aspect of this handmade fabric pinecone ornament is its versatility throughout the year. Although the warm colors shown in the reference image make it particularly suitable for autumn, Thanksgiving, and rustic Christmas decorations, the same construction method can be adapted for many other occasions. Red and green fabrics create a traditional Christmas ornament, while cream and gold materials produce an elegant winter decoration. Soft pastel fabrics can give the design a delicate spring appearance, and natural linen or neutral cotton creates a timeless farmhouse look. The finished ornament can be displayed on a decorative hook, attached to a wreath, suspended from a mantel, or incorporated into a seasonal wall arrangement. Its handmade character also makes it a thoughtful gift for friends and family members who appreciate traditional crafts. In this complete tutorial, you will discover practical measurements, recommended materials, folding techniques, assembly instructions, and finishing ideas to help you recreate the beautiful ornament illustrated in the photograph.
Materials and Preparation for the Fabric Pinecone-Shaped Ornament Pattern
The first step in creating your Fabric Pinecone-Shaped Ornament Pattern is selecting the appropriate materials. For a design similar to the reference image, choose quilting cotton in warm, coordinated colors such as burnt orange, chocolate brown, beige, ivory, and copper. Small floral prints, gingham checks, and vintage-inspired patterns work especially well because they add visual interest without overwhelming the ornament. Medium-weight cotton is generally easier to fold and shape than thick upholstery fabric. You can use several different prints to create a patchwork appearance or repeat three coordinating fabrics for a more organized design. Before cutting, press the cotton to remove wrinkles and improve the accuracy of the folds. Prewashing is optional for a decorative ornament that will not be laundered, but avoid mixing prewashed and unwashed fabrics if you want consistent handling.
DISCOVER MORE FREE PATTERNS HERE!
For this project, gather approximately six to eight coordinating fabric prints, a lightweight foam egg or elongated craft form, a ruler, fabric scissors or a rotary cutter, an iron, and a suitable pressing surface. You will also need straight pins with small heads, preferably rust-resistant pins designed for craft projects. A hot glue gun can help secure certain embellishments, although the main fabric layers can be attached using pins when working with a foam base. Prepare a piece of brown satin ribbon approximately 45–60 cm long for the decorative bow, along with an additional 20–25 cm piece for the hanging loop. Optional decorations include a small natural pinecone, artificial evergreen sprigs, miniature berries, and fabric or felt leaves. Choose lightweight embellishments so the finished ornament remains balanced when suspended.
The dimensions of the ornament can be adjusted according to your preferences, but a foam base approximately 15 cm tall and 8 cm wide is a practical starting point for a medium-sized hanging decoration. This produces a substantial ornament that is easy to handle while allowing enough room for multiple layers of folded fabric. A longer foam egg is preferable to a perfectly round ball because it creates the tapered silhouette visible in the photograph. If you cannot find an elongated foam form, you can carefully shape a suitable craft foam block using appropriate tools and protective precautions. The base does not need to look perfectly smooth because the folded fabric will cover its surface. However, it should be symmetrical enough to support evenly arranged rows of decorative scales.
For the fabric scales, begin by cutting approximately 60–80 squares measuring 7 × 7 cm. This is an estimated quantity for the suggested base size; the exact number depends on the width of the folded pieces, how closely you overlap them, and the shape of your foam form. Cutting a few additional squares is helpful because it allows you to maintain your preferred color arrangement without stopping to prepare more fabric. For a fuller, larger ornament, increase the quantity accordingly. A rotary cutter and cutting mat can make this process faster, especially when preparing multiple ornaments. Try to cut each square accurately because consistent dimensions help create uniform folds and a balanced appearance.
Before assembly, organize your fabric squares into separate groups according to color or print. This makes it easier to distribute the different fabrics throughout the ornament rather than accidentally placing too many identical pieces together. For example, alternate orange floral fabric with brown prints, cream fabric, and gingham checks to recreate the varied yet coordinated appearance of the reference design. You can also create a repeating pattern in which each row shifts slightly in color placement. Arrange several squares on your work surface to preview the combinations. The goal is to create a harmonious mix of warm tones while ensuring that individual fabric scales remain visually distinct.
Finally, prepare a clean and well-lit workspace with enough room for cutting, folding, pressing, and assembling the ornament. Keep your pins in a magnetic pin holder or secure container, and place the foam base on a small stand or folded towel to prevent it from rolling. If using hot glue, protect the work surface with a heat-resistant mat and handle the glue gun carefully to avoid burns. This is also a good time to decide where the finished ornament will hang and how strong the hanging loop needs to be. Good preparation makes the construction process smoother and helps you focus on the decorative details that give this DIY fabric pinecone decoration its distinctive handmade charm.
How to Fold and Assemble the Fabric Pinecone Scales Step by Step
The most important technique in this Fabric Pinecone-Shaped Ornament Pattern is creating the folded fabric scales. Start with one 7 × 7 cm cotton square, placing the wrong side of the fabric facing upward. Fold the square in half diagonally to create a triangle, bringing two opposite corners together. Press the fold gently with an iron to establish a crisp edge. Next, fold the triangle in half again, bringing the two outer corners together to form a smaller, thicker triangle with a pointed tip. Press lightly without flattening the layers excessively. This folded triangle will become one decorative scale. For the reference-inspired appearance, the finished scales should retain a soft, slightly padded look rather than appearing completely flat.
Repeat the folding process with the remaining fabric squares, keeping the folded edges consistent. If you prefer a slightly fuller scale, avoid pressing the second fold too firmly, allowing the fabric to maintain a small amount of natural volume. For thinner cotton fabrics, you can experiment with a tiny piece of lightweight batting inside selected folds, although this will increase bulk and may require more space between rows. The reference ornament has rounded, dimensional layers, so maintaining some softness is important. Prepare enough folded pieces to complete the first several rows before attaching them to the base. This allows you to concentrate on positioning and symmetry during assembly.
Begin covering the foam base at its narrow bottom tip, where the final ornament will taper into a pointed shape. Place one folded triangle with its pointed end directed downward, extending slightly beyond the bottom of the foam form. Secure the upper portion of the folded piece with small-headed pins, placing them where the next layer will conceal them. Add two or three additional folded triangles around the bottom point, overlapping their edges to create a neat foundation. Adjust the pieces until the foam is completely hidden and the lower end resembles the tip of a natural pinecone. This first section is particularly important because it establishes the overall direction of the decorative scales.
Once the bottom point is secure, begin building the next row approximately 2–2.5 cm above the first set of visible tips. Position each folded triangle so its point faces downward and overlaps the row below. The new pieces should cover the upper attachment points of the previous row, creating a continuous layered surface. Arrange the triangles around the circumference of the foam base, maintaining relatively even spacing. As you work toward the wider middle section, the number of pieces required for each row may increase. Avoid forcing the pieces into a rigid arrangement; instead, adjust the overlap to follow the natural curvature of the base.
Continue adding rows in a staggered pattern, positioning the points of the new triangles between those in the previous row whenever possible. This arrangement creates the characteristic overlapping texture of a fabric pinecone ornament and prevents obvious vertical gaps. Alternate your selected fabric colors to distribute the prints evenly throughout the design. For example, place a cream floral triangle beside a brown print, followed by an orange piece and a gingham square. Check the ornament from different angles as you work, making sure that no exposed foam or visible pinheads remain. If a section appears uneven, reposition the fabric before moving to the next row.
As you approach the upper portion of the foam base, the circumference will gradually decrease, so you may need fewer fabric scales in each row. Overlap the triangles more closely to maintain a smooth transition without creating excessive bulk. The final rows should sit neatly beneath the area where the ribbon bow and greenery will be attached. Secure any loose edges with concealed pins or a small amount of suitable craft glue. Inspect the ornament carefully, paying attention to the symmetry of the layers and the overall silhouette. When the folding and layering are complete, you should have a beautiful textured pinecone shape with a pointed bottom, rounded upper body, and an attractive patchwork arrangement.
Adding the Ribbon Bow, Greenery, and Rustic Decorative Details
The decorative finishing elements transform the basic Fabric Pinecone-Shaped Ornament Pattern into the elegant hanging ornament shown in the reference image. Begin by selecting a brown satin ribbon with a subtle sheen and enough body to hold a structured bow. A ribbon approximately 2.5–4 cm wide works well for a medium-sized ornament. The warm brown color complements the orange and cream fabrics while creating a rustic, natural appearance. If you prefer a different style, consider copper, dark green, burgundy, or antique gold ribbon. Wired ribbon is another option because it can be shaped into fuller loops that maintain their form over time. Before attaching the bow, test its size against the ornament to ensure it looks balanced.
Create the hanging loop first by folding a 20–25 cm ribbon strip in half and bringing the ends together. Secure the ends firmly to the top of the foam base using a suitable mechanical anchor or other attachment designed to support the ornament’s weight. A small embedded loop fitting intended for foam crafts can provide a stronger attachment than glue alone. Cover the attachment area with a small fabric patch if necessary. The finished loop should extend far enough above the ornament to hang comfortably from a hook or decorative peg. Gently test the connection before adding the remaining embellishments, making sure that the ornament hangs straight and the loop does not pull free.
Next, create a generous bow using the longer ribbon strip. Form two large loops, cross them at the center, and secure them with a smaller piece of matching ribbon or a strong thread. Adjust the loops until they appear symmetrical, then trim the ribbon tails at an angle or into decorative V-shaped ends to reduce fraying. The bow in the reference image features broad loops and long tails that extend outward on both sides, giving the ornament an elegant finishing touch. Position the bow near the top of the pinecone, directly beneath the hanging loop. Secure it firmly while keeping the central knot accessible for the decorative pinecone embellishment.
To recreate the natural woodland appearance, add small artificial evergreen sprigs beneath the bow. Arrange the greenery so it extends horizontally from both sides of the ornament, creating a soft frame around the upper fabric layers. You can use artificial pine branches, cedar-style foliage, or other lightweight greenery commonly available in craft supplies. Trim the stems to approximately 6–10 cm, depending on the ornament’s size, and tuck their ends beneath the ribbon. Secure them with floral wire, pins suitable for the base, or small amounts of craft glue. Avoid covering too much of the folded fabric because the layered scales should remain the main feature of the design.
Small decorative berries and autumn leaves add another level of texture and color. Choose miniature orange or copper berries that coordinate with the warm fabric prints, and group them in clusters of three to five near the center of the bow. A few artificial maple or oak leaves can also be tucked beneath the greenery to emphasize the seasonal theme. In the reference photograph, the combination of orange berries, small leaves, and evergreen branches creates a natural transition between the brown ribbon and the patterned fabric. Arrange these details carefully so they look organic rather than overcrowded. Remember that a small number of well-positioned embellishments often creates a more sophisticated appearance than excessive decoration.
Complete the top arrangement by attaching a miniature natural pinecone at the center of the bow. A small pinecone approximately 3–4 cm tall is ideal for the suggested ornament size. If using a natural pinecone, make sure it is completely dry and free from dirt or insects before incorporating it into the project. You can lightly brush its edges with antique gold craft paint to create a subtle decorative highlight. Attach it securely with appropriate craft adhesive or floral wire, keeping it centered over the ribbon knot. Allow any adhesive to cure fully before hanging the ornament. The combination of folded fabric scales, satin ribbon, berries, greenery, and a miniature pinecone gives the finished piece its charming rustic farmhouse ornament appearance.
Creative Variations, Display Ideas, and Care Tips for Your Handmade Ornament
One of the greatest advantages of the Fabric Pinecone-Shaped Ornament Pattern is the freedom to experiment with different colors and fabric styles. The autumn-inspired version shown in the photograph combines earthy browns, burnt orange, beige, and cream, making it ideal for fall decorating. However, you can create an entirely different appearance by choosing traditional Christmas fabrics in red, green, gold, and ivory. For a winter-inspired design, combine silver-gray, white, and pale blue fabrics with a matching satin bow. Those who enjoy modern farmhouse decor may prefer natural linen, cream cotton, and muted brown gingham. The construction technique remains the same, allowing you to make several variations from one basic method.
Another creative option is to incorporate leftover materials from quilting and sewing projects. Scrap fabric ornaments are an excellent way to use small pieces of cotton that might otherwise remain unused in a sewing basket. You can combine floral prints, checks, stripes, and solid fabrics to create a charming patchwork effect. For a more coordinated design, select fabrics from the same collection or color family. If you enjoy vintage-inspired crafts, consider using reproduction cotton prints with tiny flowers and delicate patterns. The small scale of the ornament makes it especially suitable for showcasing fabrics with fine details. Each finished piece will have a slightly different personality depending on the fabrics you select.
The ornament can also be adapted to different sizes. A miniature version made with a foam base approximately 8–10 cm tall is suitable for Christmas trees, gift packages, and small seasonal arrangements. For a larger statement piece, choose a base approximately 20–25 cm tall and increase the fabric square dimensions proportionally. Larger ornaments may require additional reinforcement around the hanging loop because the combined weight of the fabric, pins, and embellishments increases. Always test the finished piece before suspending it. When adjusting the size, keep the fabric scales proportional to the base so the overlapping pattern remains attractive and the overall silhouette resembles a natural pinecone.
Displaying your handmade fabric pinecone ornament is another opportunity to express your decorating style. Hang it from a wooden peg on a farmhouse-style wall, attach it to a decorative wreath, or suspend it from a sturdy branch arrangement in a seasonal centerpiece. Several ornaments in different sizes can be grouped together to create an eye-catching display. During autumn, combine them with pumpkins, dried leaves, and warm-colored textiles. At Christmas, pair them with evergreen garlands, wooden ornaments, and soft ribbon accents. Because the ornament has a dimensional design, it looks especially attractive when displayed where its layered fabric scales can be appreciated from multiple angles.
Proper care will help preserve the appearance of your DIY fabric pinecone decoration for many seasons. Since the ornament contains folded cotton, foam, pins, and decorative embellishments, it should not be placed in a washing machine or submerged in water. Instead, remove dust gently with a soft brush or a low-pressure air blower. Keep the ornament away from excessive moisture, direct heat, and prolonged strong sunlight, which may fade the fabrics or damage adhesives. When the decorating season ends, store it in a sturdy box with enough space to protect the ribbon loops and layered fabric. Acid-free tissue paper can help cushion the ornament without flattening its shape.
Finally, consider making several ornaments as handmade gifts for family members, friends, or fellow craft enthusiasts. A carefully chosen fabric combination can reflect the recipient’s favorite colors or decorating preferences, making the gift feel personal and meaningful. You can also create matching ornaments for a coordinated holiday collection or use the same technique to make decorations for seasonal craft displays. If gifting an ornament, include a small care note explaining that it is intended for indoor decorative use and should be kept away from young children and pets because it may contain pins and small embellishments. With thoughtful construction and careful finishing, this Fabric Pinecone-Shaped Ornament Pattern can become a treasured part of your handmade seasonal decor.
Frequently Asked Questions About the Fabric Pinecone-Shaped Ornament Pattern
1. Is the Fabric Pinecone-Shaped Ornament Pattern suitable for beginners?
Yes. This project is suitable for patient beginners because it uses basic fabric cutting, folding, and layering techniques. You do not need advanced quilting skills or experience with complicated sewing patterns. The most important steps are cutting consistent squares, folding them neatly, and arranging the scales with even overlap. Beginners may find it helpful to practice folding several pieces before attaching them to the foam base. Working slowly during the first few rows will make the remaining construction easier.
2. What type of fabric works best for making a pinecone ornament?
Lightweight to medium-weight quilting cotton is generally the best choice. It folds easily, holds its shape well, and is available in countless colors and patterns. Cotton fabrics with small floral prints, gingham checks, or subtle seasonal motifs are particularly attractive. Avoid very thick fabrics because they can create excessive bulk between the layers. Stretchy fabrics are also less suitable because they may distort during folding and positioning.
3. How many fabric squares are needed for one ornament?
For a medium-sized foam base measuring approximately 15 cm tall and 8 cm wide, plan to cut around 60–80 fabric squares measuring 7 × 7 cm. This is a starting estimate rather than a fixed requirement. The actual number depends on the size of the base, the thickness of the fabric, and the amount of overlap between the scales. Preparing extra pieces ensures that you can complete the ornament without interrupting the assembly process.
4. Can I make this ornament without a sewing machine?
Absolutely. The folded-fabric version described in this tutorial can be assembled without a sewing machine. The fabric pieces are folded and attached to a foam base using small-headed pins, while the decorative embellishments can be secured with suitable craft adhesive or wire. This makes the project accessible to people who enjoy handmade decorations but do not own sewing equipment. However, take care to conceal and secure all pins properly.
5. Can I use a different material instead of a foam base?
Yes, although the attachment method may need to change. A lightweight papier-mâché form or a firmly stuffed fabric shape can provide an alternative foundation. With a non-foam base, you may need to hand-sew or glue the fabric scales instead of pinning them. The main requirement is a stable, elongated shape that supports the overlapping layers. Choose a base that is lightweight enough to hang securely once decorated.
6. How long does it take to complete a fabric pinecone ornament?
Most crafters can expect the project to take approximately two to four hours, depending on experience, ornament size, and the complexity of the embellishments. Cutting and folding the fabric squares usually requires the most repetitive preparation. The assembly stage becomes faster once you establish a consistent layering technique. Beginners may need additional time to adjust the rows and create a balanced shape.
7. How can I prevent the fabric scales from becoming loose?
Use appropriately sized craft pins and insert them securely into the foam base, ensuring that each attachment point is concealed beneath the next fabric layer. Avoid placing too many pins in the same small area because this can weaken the foam. If necessary, use a tiny amount of fabric-safe craft adhesive to reinforce selected edges. Before displaying the ornament, inspect every layer to confirm that the scales remain firmly attached.
8. Can I use Christmas-themed fabrics for this pattern?
Yes. Christmas fabrics are an excellent choice for this design. Red and green floral prints, gold accents, snowflake patterns, and classic holiday gingham can transform the ornament into a festive decoration. You can replace the autumn leaves with holly-style foliage, use red decorative berries, and finish the top with a green or burgundy bow. The folded-fabric construction remains exactly the same.
9. What is the best way to make the ornament look fuller and more dimensional?
The secret is maintaining consistent overlap while allowing the folded fabric to retain a little natural volume. Avoid pressing the triangles completely flat after their final fold. Position the scales close enough to hide the attachment points but not so tightly that the layers become compressed. A slightly rounded foam base also helps create a fuller appearance. Experiment with the spacing before permanently securing each row.
10. Can the finished ornament be used outdoors?
This project is best suited for indoor decorating. Ordinary quilting cotton, craft foam, ribbon, and artificial embellishments may deteriorate when exposed to rain, humidity, or strong sunlight. If you want to display the ornament on a covered porch, protect it from moisture and bring it indoors during unfavorable weather. For long-lasting results, an indoor location is the safest choice.
11. How do I keep the hanging ribbon securely attached?
Choose a hanging attachment that is designed to support the completed ornament’s weight. A small embedded loop fitting or another secure mechanical attachment can be used with a suitable foam base. Avoid relying exclusively on a small amount of hot glue, especially for heavier ornaments. Test the hanging loop gently before displaying the piece, and make sure the attachment remains hidden beneath the bow and greenery.
12. Can I sell ornaments made using this tutorial?
You can create your own handmade ornaments using the techniques described here. If you plan to sell finished decorations, focus on producing original color combinations and decorative arrangements. Make sure that all materials are securely attached and that your product descriptions accurately explain the materials and intended use. Small handmade ornaments can be appealing seasonal products, particularly when they feature distinctive fabric combinations and careful finishing.
13. How should I store my fabric pinecone ornament after the holidays?
Place the ornament in a clean, dry storage box lined with soft tissue paper. Avoid stacking heavy objects on top because the pressure may flatten the fabric scales or damage the ribbon bow. Store it away from moisture, excessive heat, and direct sunlight. Before displaying it again, gently reshape the ribbon loops and remove any accumulated dust with a soft brush.
14. Can children participate in making this ornament?
Older children may enjoy choosing fabric combinations and helping fold the squares under adult supervision. However, the project includes sharp scissors, small pins, hot glue, and decorative berries that can present safety risks. Adults should handle cutting tools, pin placement, and hot glue application. The finished ornament is intended as a decoration rather than a toy and should be kept out of reach of small children and pets.
15. What makes this fabric pinecone ornament different from traditional Christmas ornaments?
Unlike flat fabric decorations or ordinary round ornaments, this project features a three-dimensional surface created from overlapping folded fabric scales. The combination of patchwork colors, a tapered pinecone silhouette, natural greenery, and a decorative satin bow produces a distinctive handcrafted appearance. It also provides an opportunity to reuse fabric scraps and create seasonal decorations that coordinate with other handmade sewing projects.
Conclusion: Create a Beautiful Handmade Fabric Pinecone Ornament
The Fabric Pinecone-Shaped Ornament Pattern combines simple crafting techniques with beautiful textures, warm colors, and thoughtful decorative details. Throughout this tutorial, you learned how to choose coordinating quilting cotton, prepare an elongated foam base, cut and fold fabric squares, and assemble the overlapping layers that create the distinctive pinecone shape. You also discovered how to add a hanging ribbon, decorative bow, greenery, berries, and a miniature pinecone to achieve a charming rustic finish.
One of the most rewarding parts of this project is the opportunity to personalize every detail. By changing the fabric prints, colors, ornament dimensions, and embellishments, you can create decorations for autumn, Christmas, or other seasonal occasions. The project is also an enjoyable way to use leftover quilting materials while practicing careful folding and fabric arrangement. With patience and attention to detail, even a beginner can create an attractive handmade fabric ornament that brings warmth and character to a home.
Now it’s your turn to experiment with this lovely DIY Fabric Pinecone-Shaped Ornament Pattern! Whether you follow the autumn-inspired design in the photograph or create your own color combination, the finished ornament can become a beautiful addition to your seasonal decorations.
EASILY FIND THE FREE PDF FOR THIS PATTERN HERE!
We would love to hear your sincere opinion! What did you think of this fabric pinecone tutorial? Which fabric colors would you choose for your ornament? Please share your honest feedback, creative ideas, and suggestions in the comments. Your experiences and recommendations can inspire other sewing and quilting enthusiasts to explore new possibilities with this delightful handmade project.