
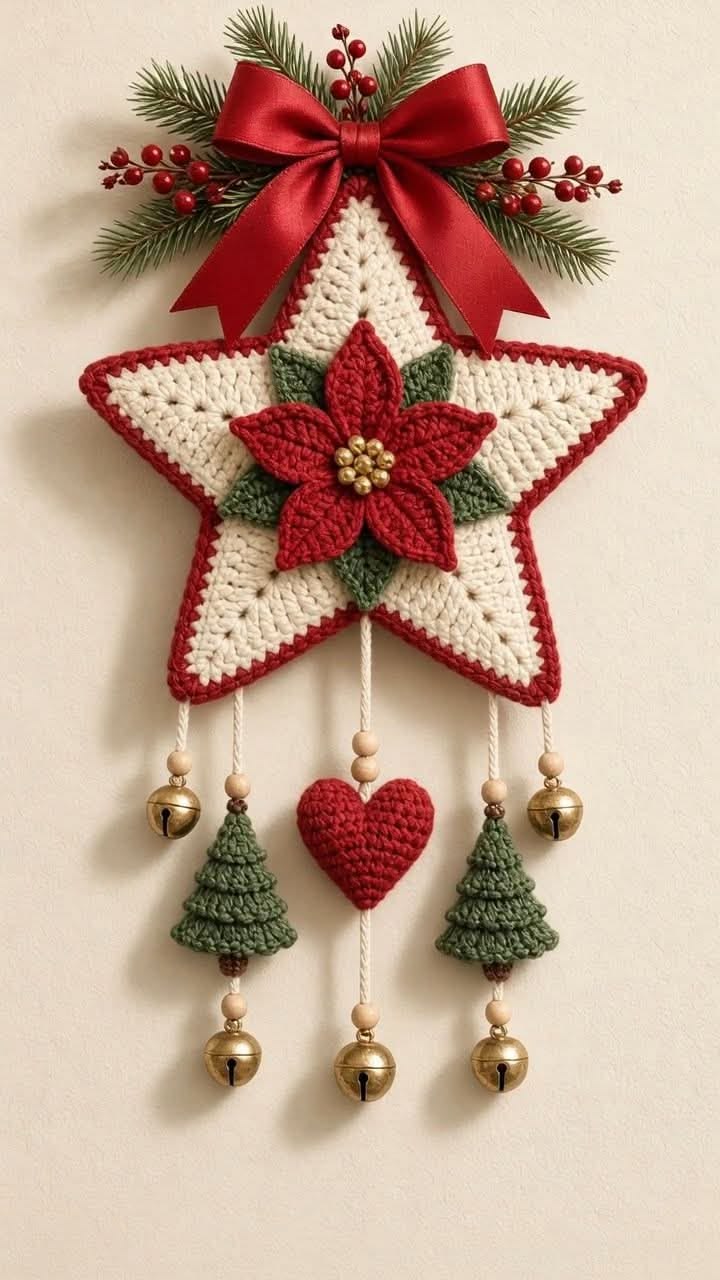
The Crochet Christmas Star Wall Hanging Tutorial Pattern is a beautiful way to bring handmade warmth, traditional Christmas colors, and festive charm into your home. This decorative crochet project combines a large cream-colored star, a vibrant red poinsettia flower, green leaves, miniature Christmas trees, a small crochet heart, and delicate hanging bells. The result is an elegant handmade Christmas wall decoration that looks wonderful on a living room wall, near a fireplace, or as part of a festive entryway display. Whether you enjoy making seasonal decorations for your family or creating thoughtful handmade gifts, this project offers an opportunity to explore several enjoyable crochet techniques while producing something truly memorable.
One of the most appealing features of this Crochet Christmas Star Wall Hanging Tutorial Pattern is the combination of textures and decorative elements. The central star provides a soft, structured foundation, while the raised poinsettia petals create a lovely three-dimensional effect. Small crocheted Christmas trees and a charming red heart hang beneath the star, accompanied by wooden beads and golden jingle bells. At the top, a large red ribbon bow, evergreen sprigs, and artificial red berries complete the festive arrangement. Each element contributes to the overall design, creating a decoration that feels both traditional and creative. Although the finished piece looks elaborate, it becomes much easier to make when the project is divided into manageable steps.
This detailed Crochet Christmas Star Wall Hanging Tutorial is written using US crochet terminology, making it suitable for crocheters throughout the United States. The instructions explain the materials, basic stitches, construction techniques, assembly process, and finishing details needed to recreate the decoration inspired by the reference photograph. The pattern uses familiar techniques such as single crochet, half double crochet, double crochet, increases, decreases, and working in rounds. Some experience with basic crochet is helpful, but patient beginners can also follow the instructions one section at a time. Since the original photograph does not include written stitch counts or a construction chart, the pattern below is an original, photo-inspired interpretation designed to achieve a similar appearance rather than an exact reproduction of an unpublished pattern.
1. Materials, Crochet Stitches, and Preparation for the Christmas Star Wall Hanging
Before starting your Crochet Christmas Star Wall Hanging Tutorial Pattern, gather the necessary supplies and organize your yarn colors. For a decoration similar to the photograph, choose cream or ivory yarn for the main star, Christmas red for the poinsettia and edging, and muted forest green for the leaves and miniature trees. Medium-weight cotton yarn is an excellent option because it creates well-defined stitches and holds decorative shapes nicely. A 3.5 mm or 4 mm crochet hook usually works well with this type of yarn, depending on your personal tension. You will also need a yarn needle, scissors, stitch markers, fiberfill, a measuring tape, and optional fabric stiffener for the finished star.
DISCOVER MORE FREE PATTERNS HERE!
The decorative accessories are equally important for achieving the Christmas-inspired appearance. Prepare a wide red satin ribbon for the bow, artificial evergreen branches, small red berry picks, wooden beads, and five small golden jingle bells. You will also need strong cotton cord for suspending the ornaments beneath the star. Choose bells with secure attachment loops and inspect all decorative components before assembly. If the decoration will be displayed in a home with small children or pets, position it well out of reach because beads, bells, and artificial berries can become choking hazards if detached. The finished project is intended as a decorative wall hanging rather than a toy.
Understanding the US crochet abbreviations will make the instructions easier to follow. The main stitches used in this pattern are:
-
MR: Magic ring
-
ch: Chain
-
sl st: Slip stitch
-
sc: Single crochet
-
hdc: Half double crochet
-
dc: Double crochet
-
tr: Treble crochet
-
inc: Increase, working two stitches into one stitch
-
dec: Decrease, combining two stitches into one
-
BLO: Back loop only
-
FLO: Front loop only
-
st/sts: Stitch/stitches
-
rep: Repeat
-
FO: Fasten off
To make the crochet Christmas star, the tutorial uses a flat five-point construction with a central pentagon and separately worked triangular points. This approach gives you control over the shape and makes it easier to achieve the five distinct arms shown in the photograph. The main star can be made with two matching layers, creating a more substantial decoration. For the example measurements, aim for a finished star approximately 28–32 cm wide, although the exact dimensions will depend on yarn thickness, hook size, and stitch tension. Work a small sample before beginning if you want a particular finished size.
The Christmas poinsettia crochet flower is the central decorative feature and should stand out from the cream star. Its five red petals are arranged around a cluster of golden beads, with several green leaves positioned behind them. The petals are worked individually, using increases to widen their centers and decreases to create pointed tips. A slightly smaller crochet hook can help produce firm, well-defined petals. The green leaves are constructed using a similar method, but they should be longer and narrower than the red petals. When layered together, these elements create the raised floral design that gives the ornament its distinctive appearance.
Finally, prepare a comfortable workspace with good lighting and enough room to arrange all the pieces before sewing them together. Keeping the star, flower, leaves, trees, heart, and hanging cords separated during construction will help prevent tangling. Consider using a blocking mat and rust-resistant pins to shape the star points and flower petals. Consistent tension is especially important for this handmade crochet Christmas decoration, since uneven stitches can cause the star to curl or the points to appear asymmetrical. Taking time to prepare the materials and practice unfamiliar stitches will make the following stages much more enjoyable.
2. Step-by-Step Crochet Christmas Star Base Pattern
The foundation of the Crochet Christmas Star Wall Hanging Tutorial Pattern is the large cream-colored star. Begin by making a flat pentagon that will serve as the center of the design. With cream yarn, create a magic ring and work five single crochet stitches into it. Pull the ring closed and join with a slip stitch. In the following round, work three single crochet stitches into each stitch, creating five groups of three stitches for a total of fifteen. Place a marker in the middle stitch of each group to identify the five corners. These markers will help you maintain the pentagonal structure as the center grows.
Continue expanding the pentagon by working increases at the five marked corners. For Round 3, work one single crochet into each stitch, except at the marked corner stitches, where you will work three single crochet stitches into one stitch. This adds ten stitches and produces twenty-five stitches in total. Repeat the same method for subsequent rounds, always relocating the markers to the center stitch of each new corner increase. The stitch counts will progress from 25 to 35, 45, 55, 65, and 75. After Round 8, the pentagon will have fifteen stitches along each side, including its corner stitches. Fasten off the yarn, leaving a tail for weaving in.
Next, create the five crochet star points directly along the sides of the pentagon. Each point will be worked in turned rows over fifteen stitches. Attach cream yarn at one corner of the pentagon and work one single crochet into each of the fifteen stitches along that side, including both corner stitches. Chain one and turn. For the next row, work a single crochet decrease over the first two stitches, single crochet across until two stitches remain, and work another decrease over the final two stitches. Chain one and turn again. Repeat this decrease sequence until only one stitch remains, forming a triangular point. Fasten off and repeat the process along the other four sides. Each point is worked independently, and the shared corner stitches help keep the five arms connected to the central pentagon.
Once all five points are complete, examine the overall shape. The star should have five clearly defined arms with reasonably straight sides and pointed tips. If one point looks slightly wider than the others, check that you began with the same number of stitches and decreased consistently on both edges. For a sturdier crochet Christmas wall hanging, make a second identical star layer. Place both layers together with their right sides facing outward, carefully aligning all five points. You may insert a thin piece of flexible craft interfacing between the layers if additional support is needed. Avoid heavy stuffing, since the decoration in the reference image has a relatively flat, padded appearance.
The red border adds contrast and visually connects the cream star to the poinsettia. With the two star layers aligned, join red yarn along an outer edge and work single crochet stitches through both layers to secure them together. Work approximately one stitch per row edge, adjusting the spacing to prevent puckering. At each outward-facing star tip, work three single crochet stitches into the tip stitch to maintain a sharp shape. At each inward corner, use a single crochet decrease across the neighboring edge stitches when necessary to keep the indentation neat. Continue around the entire star, then join with a slip stitch and fasten off. For a more textured decorative crochet edging, an additional round of reverse single crochet can be added, although a simple red border is closer to the photograph.
After completing the star base, lightly block the piece to improve its symmetry. Dampen the crochet fabric with water, gently reshape it on a blocking mat, and pin each point into position. Allow it to dry completely before removing the pins. If your yarn is especially soft, a small amount of fabric stiffener may help maintain the star’s outline, but test the product on a separate yarn sample first. The completed star should feel structured enough to support the poinsettia and hanging decorations without sagging. At this stage, you have created the essential foundation for your Crochet Christmas Star Wall Hanging Tutorial Pattern, and the remaining steps will focus on transforming it into a festive ornament.
3. Crochet Poinsettia Flower, Green Leaves, Christmas Trees, and Heart
The raised crochet poinsettia flower gives this Christmas wall hanging its most recognizable decorative detail. Begin with red yarn and make five individual petals. For each petal, chain two and work three single crochet stitches into the second chain from the hook. Chain one and turn. In the next row, work two single crochet stitches into the first stitch, one single crochet into the center stitch, and two single crochet into the final stitch, producing five stitches. Continue increasing at both ends of each row until the petal reaches eleven stitches across. Work one row evenly, then decrease at both ends of each following row until one stitch remains. Fasten off, leaving a long tail for assembly. Repeat until you have five matching pointed petals.
Arrange the five red petals in a circular formation, allowing their wider sections to overlap slightly near the center. Use a yarn needle and red yarn to secure the lower ends together, creating a five-petal poinsettia. For additional texture, work a round of slip stitches along the outside edge of each petal before assembly. The flower should measure approximately 13–16 cm across, depending on the yarn and hook used. Sew a small cluster of gold-colored beads securely into the center to resemble the poinsettia’s decorative flower buds. If you prefer an entirely crocheted design, replace the beads with six or seven small yellow bobble stitches. This alternative is especially useful when avoiding detachable embellishments.
The crochet green leaves are worked using a similar shaping technique. With forest green yarn, chain two and work three single crochet stitches into the second chain from the hook. Increase at both ends of each row until the leaf reaches nine stitches across, then work two rows evenly. Decrease at both ends of subsequent rows until one stitch remains. Make five leaves and weave in the ends, leaving one sewing tail on each leaf. Position the leaves behind the poinsettia petals so that their pointed tips extend between the red sections. Secure the leaves together at their bases before attaching the complete flower arrangement to the center of the star. This layered construction creates the dimensional floral effect visible in the reference photograph.
To make the two miniature crochet Christmas trees, begin at the top of each tree and work downward in expanding rounds. With green yarn, make a magic ring and work four single crochet stitches into it. For Round 2, work two single crochet stitches into each stitch, giving eight stitches. Round 3 is worked evenly. For Round 4, repeat one single crochet followed by an increase four times, producing twelve stitches. Round 5 is worked evenly. Continue expanding the tree in alternating increase and even rounds, adding four stitches during each increase round. Stop when the tree reaches approximately 7–9 cm in height. For the final round, work two double crochet stitches into every second stitch to create a slightly ruffled lower edge. Add a short brown crocheted trunk beneath each tree if desired.
The hanging crochet Christmas heart adds a sweet handmade touch beneath the central point of the star. With red yarn, make a magic ring and work six single crochet stitches into it. Increase in every stitch for the second round, producing twelve stitches. Work one additional round evenly, then fasten off. Make a second identical cup without fastening off. Join the two cups with a slip stitch and crochet around their combined outer perimeter, working twenty-four stitches while closing the small gap between the cups with a few sewing stitches. Continue in rounds, gradually decreasing four stitches per round at evenly spaced positions until the heart narrows into a pointed bottom. Add a small amount of fiberfill before closing the final opening. Fasten off and weave in the yarn tail securely.
After completing the flower, leaves, trees, and heart, arrange everything on a flat surface before final assembly. Place the poinsettia at the center of the star, making sure the red petals extend outward without completely covering the cream background. Position the green leaves behind the flower so their tips remain visible. Place the two miniature trees beneath the left and right lower sections of the star, and position the red heart directly below the central bottom point. This arrangement closely reflects the balance and symmetry of the photographed Crochet Christmas Star Wall Hanging Tutorial Pattern. Adjust the spacing until all the decorative pieces look proportionate, then prepare to attach the hanging cords and accessories.
4. Assembling, Decorating, and Finishing the Crochet Christmas Wall Hanging
The final assembly transforms the individual crocheted pieces into a complete Christmas star wall hanging decoration. Begin by attaching the poinsettia to the center of the star. Thread a yarn needle with matching red yarn and sew through the lower portions of the flower petals, securing them to the cream star base. Work carefully to avoid flattening the raised petals. The flower should remain slightly elevated, creating the dimensional effect shown in the photograph. Attach the green leaves underneath the flower if they have not already been secured. Once everything is positioned correctly, gently pull on the flower to confirm that it is firmly attached and will not shift when the decoration is hung.
Next, prepare five lengths of sturdy cotton cord, each approximately 20–30 cm long before trimming. These cords will support the decorative elements hanging beneath the star. Attach one cord near each of the two outer lower points, one beneath each side section, and one at the central lower point. The two outer cords will carry golden bells, the two inner cords will carry the miniature crochet Christmas trees, and the center cord will support the red heart. Use reinforced stitches when attaching the cords to the star, passing the yarn needle through both star layers when possible. This helps distribute the weight and reduces the risk of the decorative elements pulling loose.
Thread wooden beads onto the cords to create the charming rustic appearance of the reference design. For the outer hanging strands, position a wooden bead above each golden jingle bell. For the two tree strands, place a bead above each miniature tree and another bead beneath it, followed by a golden bell. On the central strand, place two wooden beads above the crochet heart and one bead beneath it, finishing with another bell. Adjust the lengths so the heart hangs in the center and the two trees sit at similar heights. Secure each bead and bell with strong knots or reinforced thread attachments, and check that the cords cannot slip through the beads. The combination of crochet ornaments, wooden beads, and Christmas bells adds movement and texture to the finished design.
The upper decoration provides the finishing touch that makes this Crochet Christmas Star Wall Hanging Tutorial Pattern especially festive. Create a generous bow using wide red satin ribbon, allowing two long ribbon tails to fall over the upper section of the star. Gather a few artificial evergreen sprigs and small red berry branches into a compact arrangement. Secure the greenery to a lightweight backing or a sturdy hanging loop positioned behind the top star point. Attach the bow over the center of the greenery, hiding the attachment area. If using hot glue, apply it only to the artificial decorations and suitable backing material, taking care not to damage the yarn. For a more durable construction, use strong sewing thread or floral wire with all sharp ends completely covered.
Before hanging your handmade Christmas crochet decoration, inspect the entire project for loose yarn ends, unsecured accessories, and uneven cords. Use a yarn needle to weave in any remaining tails, passing them through several stitches to prevent unraveling. Gently steam or reshape the star if necessary, keeping heat away from plastic berries, synthetic ribbon, and other heat-sensitive materials. Test the hanging loop by lifting the ornament over a soft surface and checking whether the star remains balanced. If it tilts to one side, adjust the position of the upper loop or redistribute the decorative greenery. Because the design includes small bells and beads, it should be displayed securely away from children, pets, open flames, and heat sources.
The finished Crochet Christmas Star Wall Hanging Tutorial Pattern is ideal for adding a cozy handmade accent to seasonal home décor. It can be displayed on a decorative wall hook, an interior door, or a sheltered indoor holiday display. The cream star creates a gentle contrast with the bright red poinsettia, while the green trees and golden bells reinforce the traditional Christmas color palette. You can personalize the project by changing the yarn colors, using embroidered flower centers instead of beads, or replacing the bells with soft crochet ornaments. With careful assembly and proper storage after the holiday season, this festive decoration can become a treasured part of your family’s Christmas traditions for years to come.
Frequently Asked Questions About the Crochet Christmas Star Wall Hanging Tutorial Pattern
1. Is this Crochet Christmas Star Wall Hanging Tutorial Pattern suitable for beginners?
Yes, motivated beginners can make this decoration, although it is best suited to crocheters who already understand basic stitches. The star uses single crochet, increases, decreases, and simple shaping techniques. The poinsettia petals and miniature ornaments require additional patience, but each component can be completed separately. If you are new to crochet, practice making a small triangle and a simple flower petal before beginning the complete project. Working slowly and checking your stitch counts will help you achieve a neat result.
2. What type of yarn is best for a crochet Christmas star wall hanging?
Medium-weight cotton yarn is one of the best choices for this project because it offers stitch definition, durability, and enough structure for decorative shapes. Cotton blends can also work well, especially when they contain fibers that help the finished piece retain its form. Acrylic yarn is another affordable option, although it may require additional blocking or stiffening. Choose yarns of similar thickness for the star, poinsettia, leaves, and miniature ornaments to maintain consistent proportions.
3. How much yarn do I need to complete the Christmas star decoration?
The exact amount depends on your yarn weight, hook size, and finished dimensions. For a star approximately 28–32 cm wide, a practical starting estimate is 100–150 g of cream yarn, 50–80 g of red yarn, and 30–50 g of green yarn. These quantities are estimates rather than guaranteed consumption figures. The decorative accessories require only small amounts of additional material. Having a little extra yarn available is helpful, especially if you decide to add more edging or make larger ornaments.
4. How do I keep the crochet star points from curling?
Curling usually occurs when stitch tension is too tight, decreases are uneven, or the edges are not shaped consistently. Use a hook that allows the stitches to lie relatively flat, and check that every star point begins with the same number of stitches. Blocking is particularly helpful for this design. Lightly dampen the finished star, pin each point into the desired shape, and allow the fabric to dry completely. A lightweight stiffener can provide extra structure when needed.
5. Can I make the crochet Christmas star larger or smaller?
Absolutely. To make a larger star, add more expansion rounds to the central pentagon and begin each triangular point with the corresponding larger stitch count. You can also use thicker yarn and a larger crochet hook. For a smaller version, use finer yarn and a smaller hook, or stop increasing the pentagon earlier. Remember that changing the star size may require adjusting the poinsettia, leaves, and hanging ornaments so the overall design remains balanced.
6. How do I make the crochet poinsettia flower look three-dimensional?
The key is to crochet the petals separately and layer them instead of attaching them completely flat. When sewing the petals together, secure mainly their lower sections, allowing the pointed ends to remain slightly raised. Place the green leaves behind the red petals and add a decorative center. Using a firm yarn tension also helps the flower maintain its shape. You can gently curve the petals with your fingers after blocking to create a more natural appearance.
7. Can I make this Christmas wall hanging without bells or wooden beads?
Yes. The bells and wooden beads are decorative rather than essential to the crochet construction. You can replace them with crocheted balls, small stars, soft tassels, or additional miniature hearts. This is also a good option if you prefer a quieter decoration without jingling sounds. Soft crocheted embellishments can reduce the number of detachable hard components, although all hanging cords and attachments should still be secured carefully.
8. How long does it take to crochet the complete Christmas star wall hanging?
The project may take approximately 8–15 hours, depending on your crochet experience, working speed, and the amount of decorative detail you include. The main star is generally the most time-consuming section because it involves creating two layers and shaping five points. The poinsettia and miniature ornaments require additional time for stitching and assembly. Beginners may prefer to divide the project into several sessions, completing one or two components each day.
9. Can I wash the finished crochet Christmas decoration?
The crocheted components can often be cleaned gently, but the complete decoration contains accessories that may not tolerate washing. Artificial greenery, ribbons, wooden beads, and metal bells can be damaged by moisture. For routine maintenance, carefully remove dust with a soft brush or a low-suction vacuum attachment. If the crocheted sections become dirty, spot-clean them with a damp cloth and mild detergent. Allow the decoration to dry thoroughly before storing or displaying it again.
10. How should I store my crochet Christmas wall hanging after the holidays?
Store the decoration in a clean, dry container where it will not be compressed. Wrap the star loosely in acid-free tissue paper or a soft cotton cloth to protect the stitches and flower petals. Keep the hanging cords arranged separately to prevent tangling. If possible, avoid placing heavy decorations on top of the star, since pressure may distort the points or flatten the poinsettia. Store the container away from excessive humidity, direct sunlight, and extreme temperatures.
11. Can I sell finished decorations made using this tutorial?
This tutorial provides an original construction approach inspired by the photographed design. If you make your own finished decorations, you can generally sell your handmade work, subject to applicable laws and any rights associated with other designs or materials you incorporate. Use your own product photographs and descriptions rather than copying someone else’s promotional images. Providing accurate information about materials, dimensions, and decorative components will also help customers understand what they are purchasing.
12. What makes this crochet Christmas wall hanging different from a traditional star ornament?
Traditional crochet star ornaments are often small, flat decorations intended for Christmas trees. This wall hanging is a more elaborate decorative arrangement combining a large five-point star with a raised poinsettia, miniature trees, a crochet heart, hanging bells, wooden beads, and a festive ribbon bow. Its layered construction creates visual depth, while the suspended ornaments add movement. These details make it especially suitable for wall displays and handmade holiday decorating.
13. What is the best way to hang the completed crochet Christmas star securely?
Use a strong hanging loop attached through reinforced stitches at the upper center of the star. The loop should be secured to both layers of the crocheted foundation or to an internal support structure. Choose a wall hook rated for more than the decoration’s total weight. Avoid hanging the ornament by the ribbon bow alone, since decorative ribbon may not provide sufficient support. Check the hanging loop periodically, especially if the decoration contains heavier metal bells.
14. Can I use different Christmas colors for this pattern?
Yes. Although red, cream, and green create a classic Christmas appearance, this crochet Christmas wall hanging pattern can be adapted to many decorating styles. White and silver produce a winter-inspired design, while burgundy and gold create a more traditional, elegant look. Soft pink, sage green, and ivory work beautifully for a vintage-inspired Christmas theme. You can also use multicolored yarn for the star and coordinate the poinsettia and hanging ornaments with your preferred holiday palette.
15. What are the most important tips for achieving a professional-looking finished decoration?
Consistent stitch tension, accurate shaping, and careful assembly make the biggest difference. Count your stitches regularly, especially when forming the star points and poinsettia petals. Block the star before attaching decorative elements, and arrange every component on a flat surface to check the proportions. Use matching yarn or strong thread for invisible seams, and hide loose ends securely. Finally, inspect the finished wall hanging from a distance to confirm that the flower is centered, the hanging cords are balanced, and the upper bow complements the overall design.
Conclusion: Create a Beautiful Handmade Crochet Christmas Star Wall Hanging
The Crochet Christmas Star Wall Hanging Tutorial Pattern brings together several enjoyable crochet techniques in one festive handmade project. Throughout this tutorial, you learned how to prepare your materials, understand essential US crochet abbreviations, construct a five-point cream star, add a contrasting red border, and create a dimensional poinsettia with green leaves. You also explored how to crochet miniature Christmas trees and a small stuffed heart before assembling the decorative hanging cords, wooden beads, golden bells, and Christmas ribbon bow.
Beyond its decorative appeal, this handmade crochet Christmas wall hanging offers plenty of opportunities for personalization. You can experiment with different yarn colors, adjust the size of the star, change the flower details, or create alternative hanging ornaments. Each modification allows you to develop your crochet skills while making a Christmas decoration that reflects your own creative style.
EASILY FIND THE FREE PDF FOR THIS PATTERN HERE!
Whether you are preparing your home for the holiday season, making a meaningful handmade gift, or simply enjoying a relaxing crochet project, this Crochet Christmas Star Wall Hanging Tutorial Pattern is a lovely way to celebrate Christmas through creativity and craftsmanship. We would love to hear your sincere opinion! ❤️🎄 What do you think of this crochet Christmas star wall hanging? Would you choose the traditional red, cream, and green colors, or would you create your own combination? Share your honest feedback, experiences, and suggestions in the comments. Your ideas can inspire other crochet enthusiasts and help make future Christmas crochet tutorials even more useful, creative, and enjoyable!