
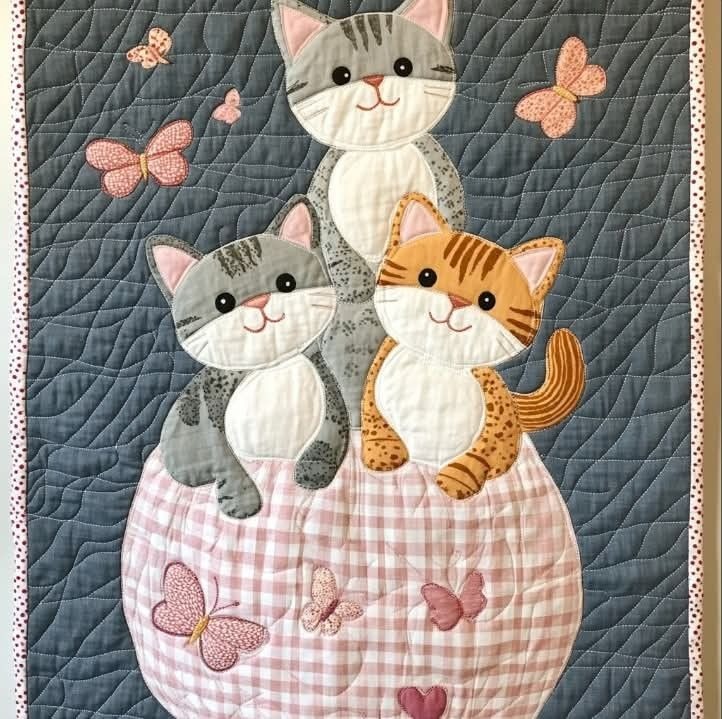
The Three Cats in a Basket Patchwork Panel Pattern is a delightful sewing project that combines adorable feline appliqué, soft fabric textures, decorative butterflies, and beautiful quilting techniques. This charming design features three playful cats sitting together inside a pink gingham basket, surrounded by delicate butterflies against a beautifully quilted gray background. The combination of cheerful colors, carefully stitched details, and dimensional fabric appliqué creates a handmade decoration that feels warm, inviting, and full of personality. Whether you are an experienced quilter or a sewing enthusiast looking for a creative challenge, this cat patchwork panel offers an enjoyable opportunity to practice several traditional sewing techniques while creating something truly special. The finished piece can become a wall hanging, a decorative quilt block, or a thoughtful handmade gift for someone who loves cats and fabric crafts.
One of the most appealing characteristics of the Three Cats in a Basket patchwork panel Pattern is its combination of simple shapes and intricate finishing details. The cats have rounded faces, pointed ears, expressive embroidered features, and contrasting fabric bodies that give each character a unique personality. Two gray cats and one orange tabby create visual balance, while the oversized pink basket adds softness and a playful touch. Small butterfly appliqués scattered throughout the composition bring movement and color to the background. The carefully quilted surface enhances the appearance of the entire project, making the individual shapes stand out without overwhelming the design. This tutorial explains how to recreate the pictured composition using fabric appliqué, basic embroidery, machine quilting, and traditional patchwork finishing methods.
Creating a Three Cats in a Basket Patchwork Panel is also an excellent way to use leftover quilting cotton, small fabric scraps, and favorite prints from your sewing collection. Instead of requiring large amounts of expensive material, this project allows you to combine coordinated fabrics in a creative and economical way. The most important elements are choosing suitable fabric colors, preparing accurate templates, arranging the appliqué pieces carefully, and stitching each layer securely. Throughout this guide, you will learn how to prepare the background, cut the basket and cat shapes, assemble the appliqué, embroider the facial details, and complete the decorative quilting. With patience and attention to detail, you can create a beautiful handmade cat quilt wall hanging inspired by the reference image, even if you are still developing your confidence with more detailed appliqué projects.
1. Materials and Fabric Preparation for the Three Cats in a Basket Patchwork Panel Pattern
The first step in making the Three Cats in a Basket Patchwork Panel Pattern is gathering the necessary materials and choosing a harmonious fabric palette. The pictured design uses charcoal gray for the quilted background, pink and white gingham for the basket, light gray prints for two cats, and warm orange fabric for the third cat. Cream-colored fabric forms the cats’ faces and bellies, while soft pink accents appear inside their ears and on their noses. Small floral or patterned scraps can be used for the butterflies. Selecting quilting cotton with a similar weight and texture helps the pieces lie flat and makes the stitching process easier. Fabrics with subtle prints work particularly well because they add texture without distracting from the overall composition.
DISCOVER MORE FREE PATTERNS HERE!
For a finished panel measuring approximately 45 cm × 55 cm, prepare one piece of dark gray quilting cotton measuring 50 cm × 60 cm, along with a matching piece of quilt backing fabric and a piece of low-loft batting of the same size. You will also need approximately 35 cm × 30 cm of pink gingham fabric for the basket and several smaller pieces of gray, orange, cream, and pink cotton for the cats. Additional supplies include lightweight fusible web, coordinating sewing thread, embroidery floss, fabric scissors, a rotary cutter, a cutting mat, a quilting ruler, pins or fabric clips, and a sewing machine. An appliqué or open-toe presser foot is helpful for stitching around curved shapes, although it is not essential. These measurements are suggested for recreating the design and can be adjusted according to your preferred panel size.
Before cutting the fabrics, wash and press them if you normally prewash your quilting materials. This helps reduce the possibility of uneven shrinkage after the project is completed. Use a medium iron temperature appropriate for cotton and remove wrinkles carefully, especially from the gingham fabric. Straight, smooth fabric makes tracing templates and cutting curved shapes much easier. If your fabric is lightweight or stretches slightly, consider using a temporary stabilizer during the embroidery process. When working with fusible appliqué, always follow the manufacturer’s instructions regarding iron temperature, pressing time, and whether steam should be used. Proper preparation creates a more professional appearance and helps prevent fabric distortion during the later quilting stages.
Next, prepare the templates for the cats, basket, butterflies, and decorative details. The cat appliqué pattern requires separate shapes for each head, body, belly, ear interior, front paw, and tail. The basket can be drafted as a large rounded shape with a gently curved upper edge, similar to the pink gingham container shown in the photograph. A practical starting size is approximately 34 cm wide and 25 cm high, although its final dimensions should be adjusted to fit the arrangement of the cats. For the cats, use heads approximately 12–14 cm wide and bodies approximately 15–20 cm tall. The rear cat should appear slightly taller than the two cats in front. These are original working measurements inspired by the image, rather than measurements taken from an existing printable template.
When transferring the templates onto fabric, remember that fusible raw-edge appliqué and traditional turned-edge appliqué require slightly different preparation methods. For fusible appliqué, trace the reversed shapes onto the paper side of the fusible web and cut the fabric along the intended outline. For turned-edge appliqué, add approximately 0.6 cm around the outer edges to create a seam allowance that can be folded underneath. Raw-edge appliqué is often easier for beginners because the fusible web holds the shapes in place while they are stitched. Turned-edge appliqué offers a softer, more traditional finish but requires additional preparation. Both techniques can produce attractive results when used carefully and consistently throughout the project.
Finally, organize all the cut fabric pieces before beginning the assembly. Separate the basket pieces, gray cat pieces, orange cat pieces, facial details, and butterfly shapes into individual groups. Label the templates if necessary so that similar-looking pieces are not confused. Lay the dark gray background on a clean table and place the basket near the bottom, leaving enough room for the three cats above it. The tallest gray cat should occupy the upper central area, while the smaller gray cat sits toward the lower left and the orange tabby appears toward the lower right. This initial arrangement establishes the recognizable composition of the Three Cats in a Basket Patchwork Panel Pattern and makes the following steps much easier.
2. Creating the Basket and Three Cat Fabric Appliqués
Begin assembling the patchwork basket appliqué by cutting the large rounded basket shape from the pink gingham fabric. The photograph features a soft, generously sized basket with a curved silhouette and a subtle sense of volume. To achieve a similar appearance, position the basket near the bottom of the gray background and check that its width comfortably accommodates the three cats. If using fusible web, attach it to the wrong side of the gingham fabric before cutting the final shape. Peel away the paper backing and temporarily position the basket without permanently fusing it until the overlapping cat pieces have been arranged. The upper edge should appear to pass in front of the cats’ lower bodies, creating the impression that they are sitting inside the basket.
The tallest cat is positioned at the back of the composition and serves as the central character. Cut its head from light gray fabric, its muzzle and belly from cream cotton, and the inner ears from pale pink fabric. The head should be slightly rounded, with two triangular ears extending upward. Create a long, gently curved body that extends downward behind the front cats and basket. Add subtle gray printed fabric or small darker patches to suggest a tabby pattern. When arranging the pieces, make sure the head sits naturally above the body and the cream belly follows the central curve. The gray cat fabric appliqué should remain visible between the two front cats, giving the finished design depth and dimension.
Next, assemble the smaller gray cat on the left side of the panel. This cat has a slightly tilted head, a rounded body, and a cheerful expression that gives the project a playful personality. Cut the head and body from coordinating gray cotton, then prepare a cream muzzle, a cream belly, and two small pink ear interiors. Position the head at a gentle angle rather than perfectly upright. This small adjustment makes the character appear more expressive and helps distinguish it from the taller cat behind it. Add front paws that extend toward the basket edge, using darker gray fabric or stitched details to define their shape. The cat quilt appliqué should overlap the basket slightly so that the character looks comfortably seated inside it.
The orange tabby cat on the right introduces a warm contrasting color that brightens the entire panel. Choose an orange or golden cotton fabric with subtle printed markings, or create the stripes with embroidery and small appliqué shapes. Cut a rounded head, pointed ears, a compact body, and a curved tail that extends toward the right side of the composition. The tail is an important visual feature because it adds movement and helps balance the two gray cats. Use cream cotton for the muzzle and belly, soft pink fabric for the inner ears, and darker brown thread for the tabby stripes. Position the orange cat slightly in front of the rear gray cat, allowing its paws and tail to remain clearly visible.
Once all three cats have been arranged, carefully review the order of the overlapping pieces before fusing or stitching them. In general, attach the rear cat’s body first, followed by the front cats’ bodies, tails, and lower details. The basket should cover the lower portions of the cats, while their visible paws can be placed over its upper edge. Faces, muzzles, ear interiors, and belly shapes should be added according to their natural layering. Work from the background toward the foreground, temporarily lifting pieces when necessary to maintain the correct overlap. When satisfied with the placement, fuse the appliqués in manageable sections, following the fusible web instructions. This method prevents accidental shifting and helps preserve the proportions of the Three Cats in a Basket patchwork panel.
Secure the appliqué edges using a narrow zigzag stitch, blanket stitch, or another decorative machine stitch suitable for quilting cotton. A narrow zigzag stitch measuring approximately 1.5–2 mm wide can work well for many curved areas, but test the settings on fabric scraps before sewing the actual panel. Use coordinating thread for a subtle appearance or slightly contrasting thread to emphasize the outlines. Stitch slowly around the ears, cheeks, paws, and curved tail, stopping with the needle down whenever you need to pivot the fabric. For small details, hand blanket stitching can provide additional control. The goal is to create smooth, secure outlines that preserve the soft, friendly appearance of the three cats without making the appliqué look overly rigid.
3. Embroidering Cat Faces, Adding Butterflies, and Quilting the Background
The embroidered facial details are essential to the personality of the Three Cats in a Basket Patchwork Panel Pattern. Each cat features dark rounded eyes, a small pink nose, a smiling mouth, and delicate whiskers. Begin by marking the facial positions lightly with a removable fabric marker. Place the eyes symmetrically on either side of the nose, allowing enough room for the muzzle and mouth. You can create the eyes using black embroidery floss and satin stitches, small circles of black fabric, or securely stitched fabric appliqués. Embroidered or fabric eyes are preferable for a flat wall panel because they maintain a smooth surface and avoid the loose components associated with decorative buttons. Keep the expressions simple and gentle to match the cheerful style of the reference image.
For the noses, use pale pink embroidery floss or small triangular pieces of pink cotton. Position each nose at the center of the cream muzzle, slightly below the eyes. Create the mouth with a short vertical stitch extending downward from the nose, followed by two small curved lines that form a friendly smile. A backstitch or stem stitch works well for these details. Add three delicate whiskers on each side of the face using gray or brown embroidery floss. The orange tabby can have darker whiskers and more pronounced forehead stripes, while the gray cats can feature softer stitched markings. These small differences make each embroidered cat appliqué look individual while preserving a coordinated design.
The butterflies provide a charming decorative element and help fill the empty spaces surrounding the cats. The reference composition includes several butterflies floating around the upper portion of the panel and additional butterflies decorating the basket. Create butterfly templates in different sizes, approximately 3–7 cm wide, using rounded wings and narrow central bodies. Choose soft pink, peach, cream, or patterned fabrics that complement the gingham basket. Cut the butterfly wings as individual pieces or as one symmetrical shape, depending on your preferred appliqué method. Position the largest butterflies near the upper left and right corners, with smaller butterflies scattered naturally between them. Avoid arranging every butterfly in a perfectly straight line, since a slightly irregular placement creates a more natural and lively appearance.
Attach the butterfly appliqués using the same stitching technique selected for the cats. A narrow blanket stitch or small zigzag stitch helps secure the delicate curves without overwhelming the shapes. For the butterfly bodies, use yellow or brown embroidery floss to create short satin stitches or a narrow line of dense stitching. Antennae can be embroidered with a fine backstitch, adding a tiny French knot at each tip if desired. On the basket, arrange two or three butterflies across the pink gingham fabric, leaving enough open space for the fabric pattern to remain visible. A small pink heart near the bottom of the basket can complete the decorative arrangement. These details enhance the butterfly fabric appliqué design and tie the different sections of the panel together.
After completing the appliqué and embroidery, prepare the project for quilting. Place the backing fabric wrong side up on a flat surface, center the batting over it, and position the decorated panel right side up on top. Smooth all three layers carefully, removing wrinkles and avoiding unnecessary stretching. Secure the quilt sandwich with quilting safety pins or temporary basting spray suitable for fabric. The reference image features a dark gray background with flowing, curved quilting lines that resemble gentle waves or organic leaf shapes. To recreate this effect, use free-motion quilting or a walking foot to stitch graceful curved lines around the cats and butterflies. Begin in a central area and work outward, distributing the quilting evenly to prevent puckering.
The machine quilting techniques used in this project can be adapted to your experience level. Beginners may prefer gentle, evenly spaced wavy lines made with a walking foot, while experienced quilters can experiment with free-motion curves and flowing decorative motifs. Use gray thread that blends into the background, allowing the quilting texture to remain visible without competing with the colorful appliqués. Around the cats, consider adding a small amount of outline quilting to emphasize their silhouettes. The basket can receive subtle curved stitching or a few vertical quilting lines to suggest fabric folds and fullness. Avoid excessive quilting over the embroidered faces, since dense stitching could distort their expressions. The completed quilting should create texture, stability, and a soft three-dimensional appearance.
4. Finishing the Patchwork Panel and Creative Ways to Display It
Once the quilting is complete, the Three Cats in a Basket Patchwork Panel Pattern is ready for its final finishing steps. Begin by inspecting the entire panel for loose threads, uneven stitches, or small areas that may require reinforcement. Trim the excess batting and backing fabric, then square the panel using a quilting ruler and rotary cutter. If you started with the suggested measurements, the finished dimensions can be approximately 45 cm × 55 cm, depending on how much fabric was trimmed during squaring. Take your time with this step because straight, even edges make the final binding easier to attach. If the appliqué extends close to the panel edges, ensure that no important decorative details will be removed during trimming.
Choose a binding fabric that complements the colors used in the design. A soft pink print, cream fabric with tiny dots, or coordinating gray cotton can all work beautifully. The reference image includes a narrow light-colored border with small decorative dots, creating a delicate frame around the quilted background. To make a similar binding, cut fabric strips approximately 6.5 cm wide, join them into one continuous length, and press the strip in half lengthwise with wrong sides together. Attach the folded binding to the front of the quilt using a 0.6 cm seam allowance, mitering the corners carefully. Fold the binding to the back and secure it with hand stitching or a neat machine stitch. A consistent binding width creates a polished appearance and helps protect the edges.
For a quilted wall hanging, consider adding a fabric hanging sleeve to the back of the panel. Cut a strip of coordinating fabric approximately 8 cm wide and slightly shorter than the finished panel width. Fold the short ends inward, stitch them neatly, and fold the strip lengthwise to create a sleeve. Position it near the upper edge of the backing and secure it with hand stitching, making sure the stitches do not show on the front. A lightweight wooden dowel can then be inserted through the sleeve to support the panel when displayed. Alternatively, fabric hanging loops can be added before the binding is completed. Choose a hanging method that supports the panel evenly and prevents the upper edge from sagging over time.
The finished cat patchwork wall decoration can be displayed in many different spaces. Its soft colors and friendly design make it suitable for a sewing room, craft studio, cozy reading corner, or a room decorated with handmade textiles. It can also become a decorative pillow front if the dimensions are adjusted and the finishing method is changed accordingly. For a pillow, choose a suitable backing construction and avoid raised embellishments that may feel uncomfortable during use. Another possibility is to incorporate the design into a larger quilt by surrounding it with coordinated patchwork blocks. This flexibility makes the pattern appealing to quilters who enjoy adapting individual designs to different projects.
Personalizing the Three Cats in a Basket patchwork panel is one of the most enjoyable parts of the creative process. You can change the cats’ colors to resemble beloved pets, replace the pink gingham with floral cotton, or choose a lighter background for a completely different mood. Small embroidered flowers, decorative hearts, or additional butterflies can be added without changing the main composition. For a more traditional country-style appearance, consider using muted brown, cream, and dusty rose fabrics. For a brighter modern version, experiment with turquoise, coral, yellow, and playful geometric prints. Whatever color combination you select, maintain enough contrast between the cats, basket, and background so that the individual shapes remain clearly visible.
Proper care will help preserve the beauty of your handmade patchwork panel for many years. If the piece is intended primarily for wall display, occasional gentle dusting may be sufficient. When washing is necessary, check that all appliqué edges and embroidered details are securely attached. Use a gentle wash method suitable for the selected fabrics, avoiding harsh detergents and excessive agitation. Lay the panel flat to dry whenever possible, reshaping it gently while damp. If ironing is needed, place a pressing cloth over the embroidered and appliquéd areas to protect the decorative stitching. With careful finishing and maintenance, your three-cat quilt panel can remain a cherished handmade decoration and a beautiful example of your growing sewing skills.
Frequently Asked Questions About the Three Cats in a Basket Patchwork Panel Pattern
1. Is the Three Cats in a Basket Patchwork Panel Pattern suitable for beginners?
Yes, this project can be adapted for beginners who have basic sewing machine experience. The most challenging elements are cutting curved appliqué shapes, arranging overlapping pieces, and stitching around small details. Beginners can simplify the process by using lightweight fusible web and a narrow zigzag stitch instead of more advanced hand appliqué techniques. Starting with a larger panel can also make the individual pieces easier to handle. Practicing the facial embroidery and curved stitching on fabric scraps before working on the final panel is highly recommended.
2. What is the best fabric for making a cat patchwork panel?
100% quilting cotton is an excellent choice because it is easy to cut, press, stitch, and coordinate with other prints. Cotton fabrics are available in a wide variety of colors and patterns, making them ideal for creating the cats, basket, and butterflies. Choose fabrics with a similar weight for the most consistent results. Very thick fabrics may create bulky overlapping seams, while extremely lightweight materials can wrinkle or stretch during appliqué.
3. How large should the finished Three Cats in a Basket panel be?
A finished size of approximately 45 cm × 55 cm works well for a decorative wall hanging. However, the design can be enlarged or reduced according to your intended use. A smaller version might become a pillow front or decorative quilt block, while a larger version could serve as the centerpiece of a baby quilt or lap quilt. When resizing the pattern, maintain the proportions between the basket, cats, and butterflies to preserve the balanced composition.
4. Can I make this pattern without a sewing machine?
Yes. The entire project can be completed using hand sewing techniques, although it will require more time. Traditional needle-turn appliqué or hand blanket stitching can be used to secure the fabric shapes. Facial features and decorative details can be embroidered by hand, while the background can be quilted using small running stitches. Hand sewing creates a distinctive traditional appearance and allows precise control around delicate shapes.
5. What is the difference between patchwork and appliqué in this project?
Patchwork generally involves joining separate pieces of fabric together to create a larger fabric surface. Appliqué involves placing fabric shapes on top of a background and stitching them in position. The Three Cats in a Basket design primarily uses appliqué to create the cats, basket, butterflies, and decorative details. The completed project also incorporates quilting techniques, which join the decorative top, batting, and backing into a finished textile panel.
6. Do I need fusible web to make the cat appliqués?
Fusible web is helpful but not required. It temporarily or permanently bonds the fabric shapes to the background, depending on the product, making them easier to stitch without shifting. If you prefer not to use fusible web, you can secure the pieces with fabric glue designed for temporary basting, small hand stitches, or traditional appliqué pins. For beginners, fusible web is often the easiest method because it simplifies positioning and helps maintain the shape of small fabric pieces.
7. How can I prevent puckering when sewing the appliqué?
Puckering can occur when the fabric stretches, the thread tension is too tight, or the appliqué is not adequately stabilized. To reduce this problem, press the fabric before sewing, use a suitable needle, and avoid pulling the fabric while stitching. Lightweight stabilizer can help support delicate areas, especially during dense embroidery. Testing your stitch settings on fabric scraps is another effective way to achieve smooth results.
8. What quilting design works best for the gray background?
Gentle curved lines, flowing waves, and organic free-motion quilting patterns work especially well with this design. These quilting motifs create movement while complementing the rounded shapes of the cats and butterflies. Straight-line quilting can also be used for a simpler modern appearance. The most important consideration is maintaining an even quilting density and ensuring that the background texture does not distract from the appliqué.
9. Can I use fabric scraps for the butterflies and cats?
Absolutely. This is an excellent scrap fabric quilting project because many of the decorative pieces require only small amounts of material. Leftover gray prints, orange cotton, cream fabric, and pink scraps can be combined to create the individual characters. Mixing subtle patterns adds personality and texture. Before cutting, make sure the scraps are large enough to accommodate the templates and are in good condition.
10. How long does it take to complete the Three Cats in a Basket Patchwork Panel Pattern?
The time required depends on your sewing experience, the appliqué method, and the complexity of the quilting. A beginner may need approximately 10–16 hours spread across several sessions, while an experienced quilter may complete the project more quickly. Preparing the templates, cutting the individual pieces, and embroidering the cat faces often require the greatest attention to detail. Working slowly and carefully usually produces better results than rushing through the assembly.
11. Can I turn this patchwork panel into a decorative pillow?
Yes. The design can be adapted into a pillow by adjusting the background dimensions and adding a suitable pillow backing. A square version measuring approximately 40 cm × 40 cm is a practical option. Keep the cats and basket centered, leaving enough space around the edges for seam allowances. Use flat embroidery and securely stitched appliqués to maintain comfort and durability.
12. What should I do if the appliqué edges begin to fray?
A small amount of fraying may occur with raw-edge appliqué, particularly after repeated handling or washing. To reduce this problem, secure the edges with a sufficiently close zigzag or blanket stitch. Fusible web can also help stabilize the fabric. If you prefer completely enclosed edges, use turned-edge appliqué instead. Always check the stitching around curved areas and small details before completing the final quilting.
13. How can I make the three cats look more realistic?
Choose fabrics with subtle printed textures that resemble natural cat fur, such as gray marbled cotton or orange striped prints. Add carefully positioned embroidered markings around the forehead, cheeks, and tail. Slightly varying the shape and angle of each cat’s head can also create more lifelike expressions. However, maintaining the simple rounded shapes is important if you want to preserve the sweet, whimsical character of the original design.
14. Is this patchwork design a good handmade gift?
The Three Cats in a Basket Patchwork Panel Pattern makes a thoughtful gift for cat lovers, quilting enthusiasts, and people who appreciate handmade home decorations. You can personalize the cats to resemble someone’s pets or select colors that match their home. Adding a small embroidered date or personal message on the backing can make the finished piece even more meaningful.
15. How can I improve the professional appearance of my finished quilt panel?
Accurate cutting, careful pressing, consistent stitching, and neat binding are the most important factors. Take time to arrange the appliqué pieces before sewing and maintain smooth curves around the cats and basket. Use thread colors that complement the fabrics and avoid overly dense quilting in delicate areas. Finally, square the panel carefully and attach the binding evenly. These finishing details make a significant difference in the overall appearance of a handmade quilt.
Conclusion: Create Your Own Three Cats in a Basket Patchwork Panel Pattern
The Three Cats in a Basket Patchwork Panel Pattern is a beautiful combination of creativity, traditional sewing skills, and charming fabric design. Throughout this tutorial, we explored how to choose coordinated quilting cotton, prepare appliqué templates, assemble three expressive cats, construct the pink gingham basket, embroider delicate facial features, and add decorative butterflies. We also covered background quilting, binding techniques, and practical finishing methods that help transform individual fabric pieces into a complete decorative wall hanging.
One of the greatest advantages of this DIY cat patchwork project is its versatility. You can follow the soft gray, pink, and orange color palette shown in the inspiration image or experiment with your own favorite fabrics. Whether you choose machine appliqué or traditional hand stitching, the most rewarding part is watching the three cats gradually come to life through carefully selected shapes, colors, and embroidered details. Every handmade version will have its own personality, making the finished panel a meaningful expression of your creativity.
EASILY FIND THE FREE PDF FOR THIS PATTERN HERE!
We hope this Three Cats in a Basket Patchwork Panel Pattern tutorial inspires you to explore new quilting techniques and create a delightful decoration for your home or a special gift for someone you love. Remember that beautiful patchwork does not require perfection; it develops through patience, practice, and the enjoyment of working with fabric. Now we would love to hear from you! 🐱🧵💕 What do you think of this adorable three-cat patchwork design? Would you choose the original colors, or would you create your own combination? Please leave your honest opinion, share your experience, and tell us your suggestions for future sewing and quilting tutorials. Your ideas and feedback are always welcome and can inspire even more creative handmade projects!