
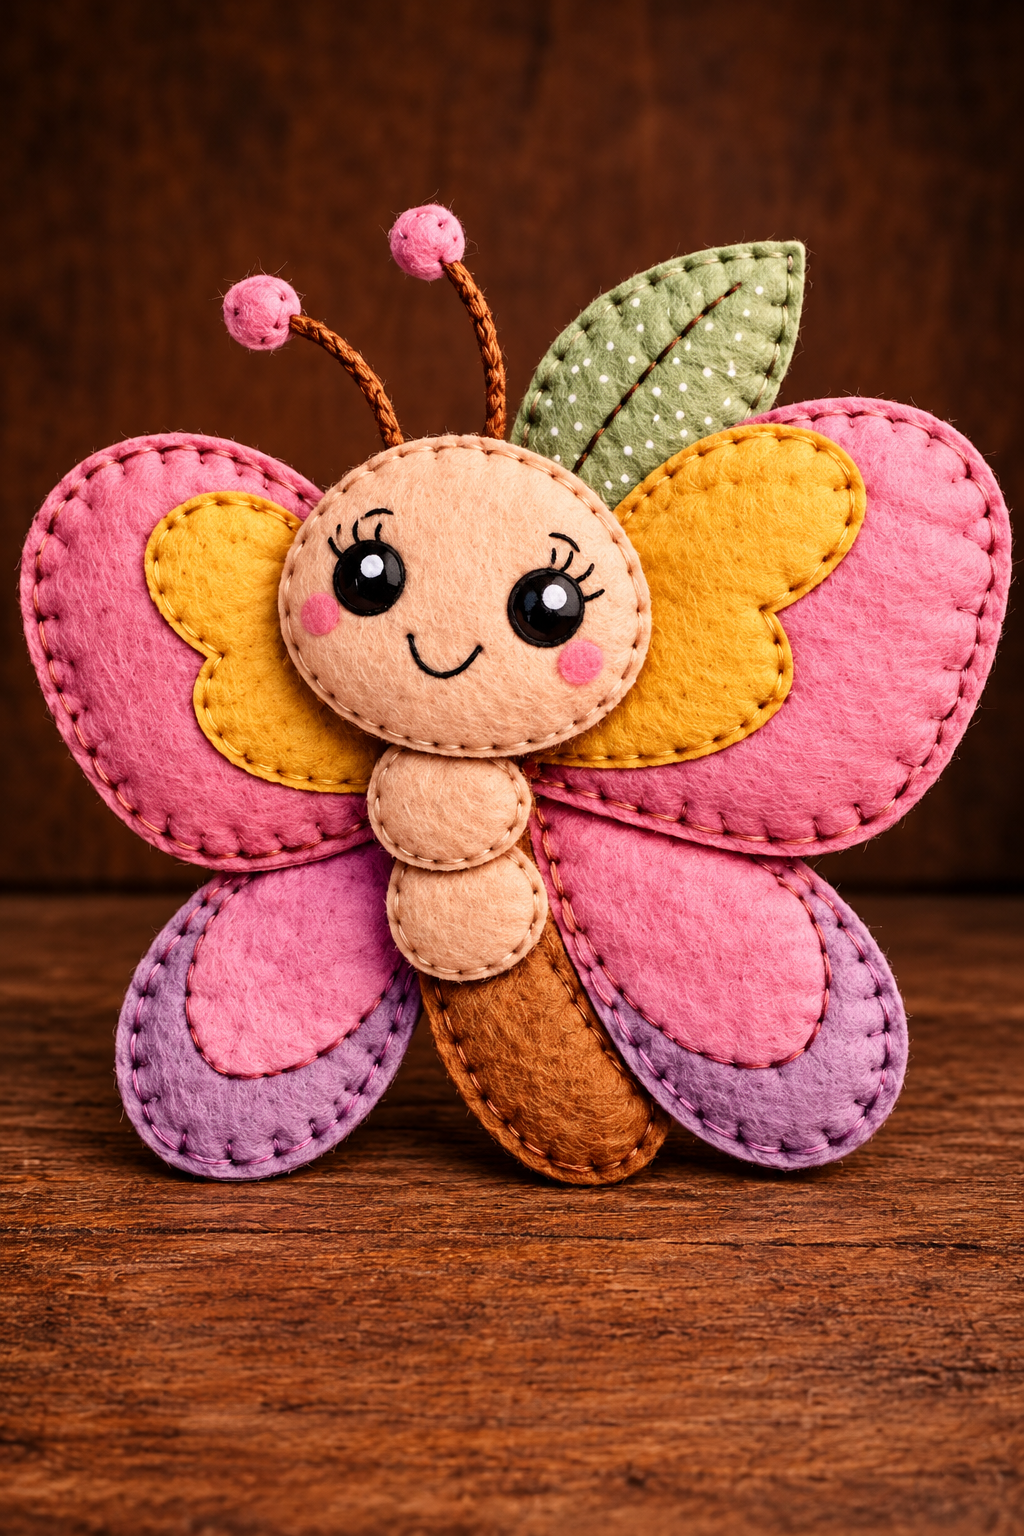
The Felt Butterfly Tutorial Pattern is a delightful sewing project that transforms colorful pieces of felt into an adorable, handmade butterfly with charming details and a cheerful personality. This beautiful design features soft pink wings, golden-yellow decorative sections, lavender accents, a peach-colored face, and delicate embroidered features. The combination of bright colors, visible stitching, and gently padded shapes creates a lovely three-dimensional appearance that makes this butterfly especially appealing. Whether you enjoy creating handmade decorations, personalized gifts, or small fabric ornaments, this felt butterfly pattern offers an enjoyable opportunity to practice basic hand-sewing techniques. The project is suitable for beginners who want to develop their crafting skills while creating something attractive and meaningful. With a little patience, a few affordable materials, and careful attention to the details, you can recreate the butterfly inspired by the reference image.
One of the most appealing characteristics of this DIY felt butterfly is its layered construction, which allows different colors and shapes to work together harmoniously. The large pink upper wings form the main silhouette, while the lavender lower wings provide balance and a softer contrasting color. Golden-yellow appliqué pieces decorate the upper wings, and smaller pink sections enhance the lower portions. At the center, a rounded peach-colored head displays expressive black eyes, rosy cheeks, and a smiling mouth embroidered with dark thread. Two curved brown antennae with small pink tips extend above the head, adding personality to the finished decoration. A small green leaf-shaped accent behind the head introduces another interesting visual detail. Every element contributes to the butterfly’s playful appearance, making this handmade felt butterfly an excellent project for anyone who enjoys decorative sewing and creative fabric crafts.
Another wonderful advantage of this Felt Butterfly Tutorial Pattern is that it can be customized according to your favorite colors, preferred size, and intended use. You might create a pastel butterfly for a nursery decoration, a brightly colored version for a spring display, or a more elegant design using coordinated neutral fabrics. Felt is particularly convenient for this type of project because its edges do not fray easily, allowing beginners to work with small shapes without complicated finishing techniques. The pattern can be sewn entirely by hand, making it accessible even if you do not own a sewing machine. Throughout this tutorial, you will learn how to prepare the materials, create the individual pattern pieces, assemble the decorative wings, embroider the facial features, and finish the butterfly with soft padding. By following the instructions carefully, you can produce a beautiful felt butterfly ornament that reflects the appearance of the reference design while adding your own handmade character.
Materials and Preparation for the Felt Butterfly Tutorial Pattern
Before beginning your Felt Butterfly Tutorial Pattern, gather the materials and organize your workspace. For a butterfly measuring approximately 20 cm wide and 22 cm tall, including the antennae, you will need pink, lavender, golden-yellow, peach, brown, and sage-green craft felt. Choose felt that is approximately 1–2 mm thick, preferably with a soft but reasonably firm texture. You will also need black and white felt scraps for the eyes, embroidery floss in coordinating colors, a hand-sewing needle, sharp fabric scissors, polyester fiberfill, sewing pins or clips, and a fabric marking pencil. Optional materials include a small amount of fabric glue, embroidery scissors, and a ribbon for hanging the finished butterfly.
DISCOVER MORE FREE PATTERNS HERE!
The first step is preparing the felt butterfly pattern pieces. Because the reference photograph does not include a printable template, the following measurements provide an approximate pattern designed to recreate its proportions. Draw the shapes on paper before transferring them to felt. Create two large rounded upper-wing shapes, each approximately 9 cm wide and 10 cm tall, and two lower-wing shapes, each approximately 7 cm wide and 8 cm tall. Draw a rounded head measuring approximately 8 cm wide and 7 cm tall, along with a tapered body measuring approximately 4 cm wide and 10 cm tall. These measurements can be adjusted to achieve a larger or smaller finished butterfly.
Next, prepare the smaller decorative components that give this felt butterfly sewing project its distinctive appearance. Draw two golden-yellow inner-wing pieces, approximately 6 cm wide and 6 cm tall, with gently curved edges. Create two smaller pink appliqué shapes for the lower wings, approximately 5 cm wide and 5 cm tall. For the central body, draw two rounded peach-colored segments measuring approximately 3.5 cm wide and 3 cm tall. You will also need a green pointed leaf shape measuring approximately 4 cm wide and 7 cm tall, two small pink circles for the antenna tips, and two pink cheek circles approximately 1 cm in diameter.
Once your paper templates are ready, transfer each shape onto the corresponding felt color. Cut two matching layers for every padded wing, head, and body section so the finished butterfly has a neat front and back. The decorative appliqué pieces only need one layer each because they will be sewn onto the front surface. For the head, cut two peach-colored ovals. For the main body, cut two brown felt pieces, and prepare the smaller peach segments separately. Work slowly around rounded edges, using small, controlled scissor movements to create smooth curves. Accurate cutting is important because the felt butterfly pattern relies on symmetrical shapes and carefully positioned decorative details.
Understanding a few basic sewing methods will make this beginner felt sewing tutorial much easier to follow. The blanket stitch is ideal for joining two layers of felt while creating a decorative border around the edges. The running stitch can be used for simple decorative lines and attaching appliqué pieces. Backstitch works especially well for embroidered facial details, including the smiling mouth and eyelashes. Small straight stitches can secure the antennae and reinforce areas that require additional strength. Practice these stitches on a scrap of felt before sewing the actual butterfly if you are unfamiliar with hand embroidery.
Finally, organize the cut pieces on a clean, flat surface before assembling the butterfly. Arrange the pink upper wings at the top, position the lavender lower wings beneath them, and place the brown body in the center. Add the golden-yellow inner-wing decorations, pink lower-wing appliqués, and peach-colored head to visualize the final arrangement. The reference design uses overlapping shapes to create depth, so avoid placing every component on the same level. Take a photograph of your arrangement if you would like a visual guide during assembly. This preparation stage helps ensure that the handmade felt butterfly decoration maintains a balanced and attractive appearance throughout the sewing process.
How to Sew and Assemble the Colorful Felt Butterfly Wings
Begin assembling the felt butterfly wings by preparing the large pink upper sections. Place the two matching felt layers for one upper wing together, aligning their curved edges carefully. Thread your needle with embroidery floss in a coordinating pink or slightly darker shade. Sew around the outer edge using a blanket stitch, keeping the stitches approximately 0.4 cm apart and 0.3 cm deep. Leave a small opening near the inner edge where the wing will eventually connect to the body. Insert a thin layer of polyester fiberfill, spreading it evenly to create a soft, gently rounded appearance. Close the opening with additional blanket stitches, and repeat the process for the opposite upper wing.
Next, prepare the lavender lower wings using the same technique. Place the matching felt pieces together, secure them with clips, and stitch around the edges with lavender or dark pink embroidery floss. Add a modest amount of fiberfill before closing each wing completely. The lower wings should appear slightly smaller than the upper wings, creating the familiar butterfly silhouette shown in the reference image. Avoid overstuffing the pieces, because excessive filling can distort the shape and make the final assembly difficult. A lightly padded wing should feel soft while maintaining its intended outline. This technique is particularly useful for creating 3D felt butterfly decorations with a professional-looking finish.
Now attach the golden-yellow decorative shapes to the upper wings. Position one yellow appliqué piece on the front of each pink wing, leaving enough pink felt visible around the outside to create a colorful border. The yellow shapes should follow the general curves of the larger wings while remaining slightly smaller. Secure each piece temporarily with a few small pins or a minimal amount of fabric glue. Using golden-yellow or brown embroidery floss, sew around the appliqué edges with small running stitches. Maintain an even distance between stitches to achieve the charming handmade appearance visible in the photograph. These decorative layers are essential for reproducing the colorful felt butterfly pattern.
After completing the upper-wing decorations, move to the lavender lower wings. Place the smaller pink appliqué shapes onto the front of each lavender wing, positioning them toward the upper and inner portions. This arrangement allows the lavender felt to remain visible around the lower edges, creating an attractive two-tone effect. Sew the pink pieces into place using running stitches or small blanket stitches. For a slightly more dimensional appearance, you can place a very thin layer of fiberfill beneath each appliqué before completing the stitching. However, keep the padding minimal so the decorative shapes remain smooth and do not overpower the larger wing structure.
Once all four wings are prepared, arrange them into the complete butterfly wing assembly. Position the two upper wings so they extend outward and slightly upward from the center. Place the lower wings underneath, allowing them to overlap the upper sections near the middle. Check that both sides appear reasonably symmetrical, although slight handmade variations are perfectly acceptable. Use temporary stitches to secure the overlapping areas before attaching the body. For additional stability, cut a small oval of firm felt measuring approximately 5 cm wide and 7 cm tall and sew it behind the central wing junction. This hidden support piece helps keep the wings aligned without changing the butterfly’s appearance.
To complete this stage, inspect the wing edges, decorative stitching, and overall proportions. Make sure that no fiberfill is visible through the seams and that all appliqué pieces are securely attached. If the wings appear uneven, gently reshape the padding with your fingers and adjust the central overlap before permanently securing the pieces. You may also add a few subtle decorative stitches near the edges to emphasize the handmade texture. The completed wings should resemble four soft, colorful petals arranged around the center of the butterfly. With the wing structure finished, your DIY felt butterfly craft is ready for its adorable face and body details.
Creating the Butterfly Face, Body, Antennae, and Decorative Details
The face is one of the most important features of this Felt Butterfly Tutorial Pattern, because it gives the decoration its friendly personality. Begin by placing one peach-colored head piece on your work surface. Lightly mark the positions of the eyes, cheeks, and mouth with a removable fabric pencil. For the large expressive eyes shown in the reference image, cut two black felt circles approximately 1.5 cm in diameter and two tiny white circles for highlights. Position the eyes evenly on the upper half of the face, leaving sufficient space for the smiling mouth beneath them. Sew the black circles securely using small stitches, and attach the white highlights to create a cheerful, sparkling expression.
After securing the eyes, embroider the eyelashes and smiling mouth with black embroidery floss. Use backstitch to create a gently curved smile approximately 2.5 cm wide, positioned between and below the eyes. Add three short eyelashes to the outer upper edge of each eye, following the playful appearance of the reference butterfly. Keep the embroidery stitches small and consistent so the facial features remain delicate. Next, attach the two pink cheek circles below the eyes using tiny stitches around their edges. The rosy cheeks provide a soft contrast against the peach-colored felt and enhance the friendly expression of your cute felt butterfly ornament.
With the facial embroidery complete, place the second peach-colored head piece behind the decorated front. Align the edges and sew around the oval using blanket stitch with peach or light brown embroidery floss. Leave an opening of approximately 3 cm near the bottom of the head. Add small amounts of polyester fiberfill until the head becomes softly rounded, taking care not to stretch the felt or distort the facial features. Close the opening securely with matching stitches. The finished head should have a smooth, padded appearance and remain proportionate to the colorful wings. This three-dimensional construction is one of the defining characteristics of the stuffed felt butterfly pattern.
Now create the central body using the two brown felt pieces. Place them together and stitch around the edges, leaving a small opening for fiberfill. Add enough stuffing to give the body a slightly raised appearance, then close the seam. Position the two smaller peach-colored oval segments on the upper front of the brown body, allowing them to overlap slightly. Stitch around each segment with coordinating thread, adding a tiny amount of padding beneath them if desired. The reference butterfly has a segmented body with soft rounded sections that extend downward from the head. Keep the lower brown portion visible beneath the peach segments to maintain the layered design.
The antennae add another charming detail to this felt butterfly craft tutorial. Cut two narrow brown felt strips approximately 7 cm long, or use brown embroidery floss wrapped around flexible fabric-covered craft wire. If using wire, bend and cover all cut ends securely so no sharp points remain exposed. Curve the antennae gently outward and attach a small pink felt ball or stuffed circle to the tip of each one. For a completely soft construction, braided embroidery floss or narrow sewn felt tubes are suitable alternatives to wire. Secure the lower ends behind the butterfly’s head with several strong stitches. If the decoration is intended for a young child, avoid wire, buttons, beads, and other small detachable components.
To recreate the additional detail visible behind the butterfly’s head, prepare a small sage-green leaf-shaped felt accent. Cut two matching pointed leaf pieces, and add a simple embroidered center vein using dark green or brown floss. You may also add tiny white decorative dots to imitate the patterned fabric in the reference image. Sew the leaf pieces together with a blanket stitch, using a very small amount of padding if desired. Position the completed leaf behind the upper right side of the head, allowing its pointed tip to extend above the wing. Attach it securely to the central structure. This final decorative element adds texture and visual interest to the hand-sewn felt butterfly design.
Final Assembly, Finishing Techniques, and Creative Uses
With the wings, head, body, antennae, and decorative leaf completed, you can begin the final assembly of your Felt Butterfly Tutorial Pattern. Lay the wing structure flat with the decorated side facing upward. Position the brown body vertically over the central wing junction, making sure that it covers the overlapping seams. Secure the body using strong hand stitches along its back and side edges. Next, position the peach-colored head above the body so that it overlaps the upper body segments slightly. The head should sit prominently in front of the wings, just as it does in the reference photograph. Check the placement carefully before stitching everything permanently into position.
Attach the head by sewing through its back layer and into the central body support, keeping the stitches hidden whenever possible. Avoid pulling the thread too tightly, because this can flatten the padded head and change its rounded shape. Make several small reinforcing stitches near the lower portion of the head to prevent it from tilting forward. If necessary, add a hidden felt reinforcement patch behind the head and body junction. Once the head is secure, gently adjust the antennae so they curve naturally upward. The completed butterfly should have a balanced silhouette, with the wings extending evenly from both sides and the central body positioned straight.
The next step involves checking the quality of the stitching and completing any necessary adjustments. Examine the blanket stitches around the wings, head, and body, looking for loose threads or uneven seams. Trim excess embroidery floss carefully and secure thread ends on the back of the decoration. If the felt edges appear slightly irregular, make small corrections with sharp scissors without cutting through the stitches. You can also use a soft brush to remove loose fibers or lint from the surface. These finishing details help give the handmade felt butterfly a neat appearance while preserving the warmth and character of hand sewing.
If you plan to use the butterfly as a hanging ornament, attach a narrow ribbon or fabric loop to the back of the upper central section. A loop measuring approximately 8–10 cm long is usually sufficient for hanging the decoration on a hook, decorative branch, or wall display. Sew the ribbon securely through a reinforced felt backing rather than attaching it to the delicate head alone. For a wall decoration, you may instead sew a small hanging tab behind the upper wings. If you prefer to display the butterfly on a shelf, add a firm felt backing and position the wings so they support the decoration against a stable surface. These simple adjustments make the felt butterfly ornament pattern suitable for several decorative purposes.
There are many creative ways to personalize this DIY butterfly sewing project. You can replace the pink wings with turquoise, lavender, coral, or pastel yellow felt, depending on the desired color palette. Floral fabric appliqués, embroidered dots, tiny stitched hearts, or contrasting wing borders can make each butterfly unique. For a spring-themed decoration, combine several butterflies in coordinating colors and arrange them as a wall hanging. Smaller versions can be used as decorative gift toppers or embellishments for handmade fabric projects. You can also enlarge the pattern to create a soft decorative cushion, provided you adjust the stuffing, seams, and supporting structure accordingly.
To keep your finished felt butterfly decoration looking beautiful, store it in a clean, dry place away from excessive moisture and prolonged direct sunlight. Felt can collect dust over time, so gently clean the surface with a soft brush or lint roller. If a small stain appears, use a slightly damp cloth and mild soap to clean the affected area without soaking the entire ornament. Allow the butterfly to air-dry completely before displaying or storing it. Avoid machine washing unless all materials used in the project are specifically suitable for that treatment. With proper care, your handmade butterfly can remain an attractive part of your seasonal decorations or craft collection for years.
Frequently Asked Questions About the Felt Butterfly Tutorial Pattern
1. Is the Felt Butterfly Tutorial Pattern suitable for beginners?
Yes. This felt butterfly sewing pattern is suitable for beginners who have basic cutting and hand-sewing skills. The project uses simple shapes, accessible materials, and straightforward stitches such as blanket stitch, running stitch, and backstitch. Beginners may need additional time to complete the facial embroidery and layered wing details, but these techniques become easier with practice.
2. What type of felt is best for making a butterfly ornament?
Soft craft felt measuring approximately 1–2 mm thick works well for most decorative butterfly projects. Wool-blend felt is another excellent option because it generally provides a pleasant texture and good durability. Choose felt that is easy to cut, holds its shape, and does not stretch excessively when stitched.
3. Can I make this felt butterfly without a sewing machine?
Absolutely. The entire Felt Butterfly Tutorial Pattern can be completed using hand-sewing techniques. In fact, visible hand stitching contributes significantly to the charming appearance of the reference design. A sewing machine is not necessary for assembling the wings, attaching the appliqués, embroidering the face, or joining the padded components.
4. How long does it take to complete a felt butterfly?
A beginner may need approximately four to six hours to complete the project, depending on their sewing experience and the level of decorative detail. More experienced crafters may finish a butterfly in two to four hours. Preparing the templates and cutting the pieces in advance can make the assembly process more efficient.
5. What can I use instead of polyester fiberfill?
Small pieces of clean, unused fabric batting or soft stuffing material can be used as alternatives. However, polyester fiberfill is generally convenient because it is lightweight, easy to distribute, and helps the wings and body maintain their rounded shapes. Avoid using heavy stuffing materials that could distort the felt.
6. How can I make the butterfly wings symmetrical?
The easiest method is to create one paper template for each wing shape and flip it over when tracing the opposite side. This ensures that the left and right wings are mirror images. After cutting, arrange the pieces together and compare their sizes before stitching. Small differences can be corrected with careful trimming.
7. Can I use fabric glue instead of sewing the pieces?
Fabric glue can help temporarily position appliqué pieces, but stitching is recommended for the main structural components. Hand-sewn seams are generally more secure for padded wings and decorative elements. Glue may also stiffen the felt or create visible marks if applied excessively.
8. How do I make the butterfly larger or smaller?
You can resize the paper templates while maintaining the same proportions between the wings, head, and body. For example, increasing every measurement by 50% will produce a noticeably larger butterfly. Remember to adjust the decorative pieces, embroidery details, and stuffing quantity to match the new dimensions.
9. Can this butterfly be used as a decoration in a child’s bedroom?
Yes, the finished butterfly can be used as a decorative wall hanging or nursery ornament when securely mounted out of reach. For projects intended for young children, avoid detachable decorations, exposed wire, and small components that could present choking or injury hazards. This tutorial describes a decorative craft rather than a tested infant toy.
10. What is the best stitch for joining felt pieces?
The blanket stitch is one of the most popular choices for joining felt because it creates a decorative edge while holding two fabric layers together. Running stitch is useful for attaching decorative appliqués, while backstitch is especially effective for embroidered facial features. Combining these techniques creates the detailed appearance of the butterfly shown in the photograph.
11. Can I sell butterflies made from this tutorial?
You can create your own handmade butterflies using the techniques explained in this article. If you plan to sell finished items, use your own original templates and decorative choices, and ensure that your materials and finished products comply with any applicable product safety and labeling requirements. Commercial use of someone else’s separately supplied pattern or artwork may require permission.
12. How do I prevent the felt from becoming wrinkled or misshapen?
Avoid overstuffing the wings and body, and distribute the filling evenly before closing the seams. Use consistent stitch tension and avoid pulling the thread excessively tight. Store the finished butterfly without placing heavy objects on top of it. Proper cutting, careful assembly, and gentle handling will help maintain its shape.
Conclusion: Create Your Own Beautiful Felt Butterfly
The Felt Butterfly Tutorial Pattern is a creative and rewarding project that combines colorful felt, simple hand-sewing techniques, decorative embroidery, and soft dimensional details. Throughout this tutorial, you learned how to prepare the necessary materials, create approximate paper templates, cut symmetrical wing shapes, attach layered appliqués, embroider an expressive face, construct the padded body, and assemble the butterfly into a charming handmade ornament.
The finished design brings together pink and lavender wings, golden-yellow accents, a peach-colored smiling face, delicate antennae, and a small green decorative leaf. Each element contributes to the playful appearance of the butterfly while offering opportunities to develop useful sewing skills. By experimenting with different colors, decorative stitches, and display options, you can adapt this DIY felt butterfly pattern to suit your personal style or seasonal crafting projects.
EASILY FIND THE FREE PDF FOR THIS PATTERN HERE!
Most importantly, handmade crafts are an opportunity to enjoy the creative process and make something meaningful with your own hands. Whether you create this butterfly as a gift, a wall decoration, or an addition to your collection of felt ornaments, the finished project can become a lovely reminder of your creativity and patience. We would love to hear your sincere opinion! What do you think about this Felt Butterfly Tutorial Pattern? Would you choose the same pink and yellow color combination, or would you experiment with different shades? Share your honest feedback, creative suggestions, and ideas for future felt sewing tutorials in the comments. Your experiences and recommendations can inspire other craft enthusiasts to create their own beautiful handmade butterflies!