
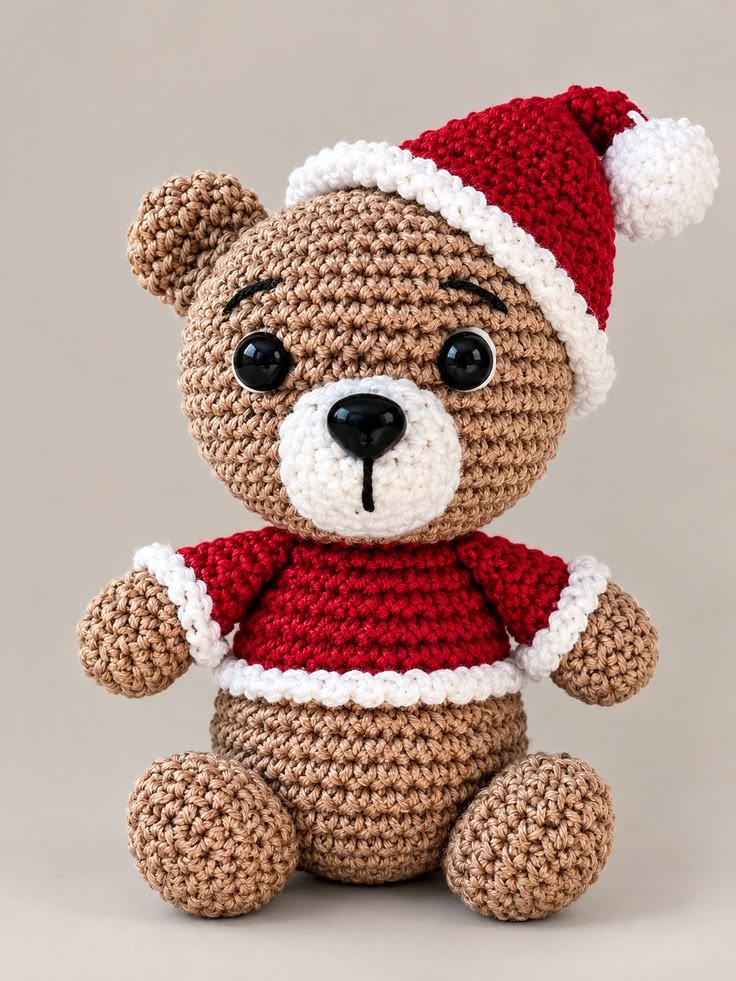
The Crochet Teddy Bear for Christmas Pattern is a delightful holiday project that combines the charm of handmade toys with the warmth of Christmas traditions. Featuring a soft brown teddy bear dressed in a festive red sweater and a matching Santa hat, this adorable Christmas crochet amigurumi makes a beautiful seasonal decoration or a thoughtful handmade gift. Its rounded body, expressive eyes, fluffy white accents, and cheerful appearance create a timeless design that both children and adults can appreciate. Whether you enjoy creating handmade Christmas presents or adding personalized decorations to your home, this pattern offers a wonderful opportunity to practice your crochet skills. The project uses familiar stitches and simple shaping techniques, making it approachable for crocheters who already understand the basics of working in continuous rounds.
One of the most appealing features of this Crochet Teddy Bear for Christmas Pattern is its combination of traditional amigurumi crochet techniques and festive clothing details. The teddy bear has a rounded head, small ears, a softly shaped muzzle, short arms, and two prominent feet that help create its seated appearance. The red Christmas sweater adds vibrant color, while the white trim around the sleeves and waist creates the appearance of a cozy holiday outfit. A pointed Santa hat completes the design, featuring a fluffy white brim and a soft white pom-pom. Each component is crocheted separately or built directly onto the main structure before being assembled into the finished toy. This construction method allows you to adjust the proportions, experiment with different yarn colors, and personalize the teddy bear while maintaining the overall appearance of the original design.
Creating a handmade crochet Christmas teddy bear is also an enjoyable way to develop confidence with increases, decreases, color changes, and decorative finishing techniques. The project primarily uses single crochet (sc), which produces the dense fabric commonly associated with amigurumi toys. By combining single crochet with carefully placed increases and invisible decreases, you can form the rounded shapes needed for the bear’s head, body, arms, and legs. The pattern below uses standard US crochet terminology and includes detailed round-by-round instructions to help you complete each component. Measurements are provided in centimeters, and the suggested materials are suitable for making a medium-sized decorative teddy bear. The instructions are an original interpretation of the photographed design rather than an exact reproduction of an unpublished pattern, so small differences in proportions may occur depending on your yarn, hook size, and tension.
Materials, Crochet Abbreviations, and Preparation for the Christmas Teddy Bear
Before beginning your Crochet Teddy Bear for Christmas Pattern, gather the necessary materials and choose yarn colors that resemble the finished project. Medium-weight cotton or cotton-blend yarn works particularly well because it provides clear stitch definition and helps the stuffed pieces maintain their shape. Choose warm caramel or light brown yarn for the bear, bright Christmas red for the sweater and Santa hat, white yarn for the muzzle and decorative trim, and a small amount of black yarn for the embroidered facial details. You will also need polyester fiberfill, a yarn needle, stitch markers, scissors, and optional black safety eyes and a plastic safety nose. For a bear intended for young children, embroidered facial features are a safer alternative to detachable plastic components.
DISCOVER MORE FREE PATTERNS HERE!
The recommended crochet hook size is 3.0 mm to 3.5 mm, depending on the thickness of your yarn and your personal tension. For amigurumi, the hook should produce a firm fabric with minimal gaps between stitches, preventing the stuffing from showing through. With medium-weight yarn and a 3.0 mm hook, the finished teddy bear may measure approximately 22–28 cm tall, including the Santa hat. This measurement is an estimate rather than a fixed gauge requirement, since different yarn brands and individual crochet tension can noticeably affect the final size. If you prefer a smaller ornament-style bear, choose a thinner yarn and a corresponding smaller hook while following the same stitch counts.
Understanding the crochet abbreviations is essential before starting the pattern. The instructions use US crochet terms, which differ from terminology used in some other countries. The main abbreviations are: MR (magic ring), ch (chain), sc (single crochet), inc (increase, meaning two single crochets in the same stitch), dec (invisible decrease over two stitches), sl st (slip stitch), BLO (back loop only), FLO (front loop only), st (stitch), and FO (fasten off). The abbreviation sc2tog also refers to decreasing two stitches into one, while the notation (sc 4, inc) × 6 means repeating four single crochets followed by one increase six times. Numbers in parentheses at the end of a round indicate the total stitch count.
Most of the teddy bear is worked in continuous spiral rounds, which means you do not join each round with a slip stitch unless specifically instructed. Place a removable stitch marker in the first stitch of every round and move it upward as you work. This small habit makes it much easier to track your progress and maintain the correct number of stitches. When increasing, distribute the additional stitches evenly around the round to create smooth curves rather than angular shapes. When decreasing, use the invisible decrease method by inserting your hook through the front loops of the next two stitches before completing a single crochet. This technique creates a cleaner surface and is especially useful when shaping the head and body.
The Christmas teddy bear amigurumi pattern requires several individual components, so organizing your materials can save time during assembly. Prepare the head, ears, muzzle, body, arms, feet, Santa hat, and decorative trim before completing the final stitching. It is helpful to keep the smaller pieces in a container to prevent them from becoming misplaced. You may also want to take occasional photographs of your progress, particularly when positioning the eyes and ears. Visual references make it easier to maintain facial symmetry and achieve the friendly expression shown in the project image. Remember to leave long yarn tails on pieces that will need to be sewn onto the main body.
Finally, prepare your workspace and decide how the teddy bear will be displayed or used. If the project is intended as a Christmas shelf decoration, you can use plastic safety eyes and a decorative nose for a polished appearance. If you are creating a toy for a baby or toddler, embroider the eyes and nose securely and avoid buttons, beads, loose decorations, or any other detachable small parts. Check the finished toy carefully for secure seams and exposed stuffing. Regardless of its intended purpose, maintain consistent tension throughout the project and stuff each component gradually rather than forcing large amounts of fiberfill into the finished shapes. This preparation will help you create a balanced, attractive teddy bear with smooth curves and neat stitching.
Step-by-Step Crochet Instructions for the Teddy Bear Head, Ears, and Face
The head is the most expressive part of the Crochet Teddy Bear for Christmas Pattern, so begin with the brown yarn and a magic ring. Work Round 1: 6 sc in MR (6). Round 2: inc in each stitch (12). Round 3: (sc 1, inc) × 6 (18). Round 4: (sc 2, inc) × 6 (24). Round 5: (sc 3, inc) × 6 (30). Round 6: (sc 4, inc) × 6 (36). Round 7: (sc 5, inc) × 6 (42). Round 8: (sc 6, inc) × 6 (48). Round 9: (sc 7, inc) × 6 (54). Round 10: (sc 8, inc) × 6 (60). These increases gradually create the rounded upper portion of the teddy bear’s head. Continue working in a spiral and check that your stitch marker remains correctly positioned.
Once the head reaches 60 stitches, continue with Rounds 11–20: sc in each stitch around (60). These rounds establish the height and fullness of the face, creating enough space for the eyes, eyebrows, and muzzle. If using safety eyes, position them between approximately Rounds 15 and 16, leaving about 10–12 stitches between their centers. Adjust the placement slightly to achieve the desired expression before attaching the washers securely. Begin shaping the lower head with Round 21: (sc 8, dec) × 6 (54). Round 22: (sc 7, dec) × 6 (48). Round 23: (sc 6, dec) × 6 (42). Round 24: (sc 5, dec) × 6 (36). Round 25: (sc 4, dec) × 6 (30). Add polyester stuffing firmly but evenly, then work Round 26: (sc 3, dec) × 6 (24), Round 27: (sc 2, dec) × 6 (18), and Round 28: (sc 1, dec) × 6 (12). Fasten off with a long sewing tail, leaving the small opening for attachment to the body.
To create the teddy bear’s rounded ears, make two identical pieces using brown yarn. Begin each ear with Round 1: 6 sc in MR (6). Round 2: inc in each stitch (12). Round 3: (sc 1, inc) × 6 (18). Round 4: (sc 2, inc) × 6 (24). Work Rounds 5–7 with 24 single crochets in each round. Round 8: (sc 2, dec) × 6 (18). Round 9: sc around (18). Fasten off, leaving a long tail for sewing. Flatten each ear gently without adding much stuffing, allowing it to maintain a slightly rounded appearance. Position the ears on opposite sides of the upper head, approximately between Rounds 6 and 12. Because the Santa hat covers part of the head, check the ear placement while temporarily positioning the hat to ensure that both details remain visible.
The white muzzle creates the distinctive teddy bear expression seen in the reference image. Using white yarn, work Round 1: 6 sc in MR (6). Round 2: inc around (12). Round 3: (sc 1, inc) × 6 (18). Round 4: (sc 2, inc) × 6 (24). Round 5: (sc 3, inc) × 6 (30). Round 6: (sc 4, inc) × 6 (36). Rounds 7–8: sc around (36). Round 9: (sc 4, dec) × 6 (30). Fasten off with a long sewing tail. Lightly stuff the muzzle and position it at the center of the lower face, below the eyes. Sew it securely to the head, distributing the stitches evenly so the muzzle maintains a smooth oval-like appearance. If necessary, gently stretch the piece horizontally before attaching it to create a wider, softer facial shape.
For the nose, use black embroidery yarn to create a rounded triangular shape at the upper center of the white muzzle. Begin by outlining a small inverted triangle and filling it with closely spaced satin stitches until the surface looks smooth and slightly raised. From the lower point of the nose, embroider a short vertical line downward to represent the teddy bear’s mouth detail. The original design features a minimal facial expression, so avoid adding too many decorative stitches. Above the eyes, use black yarn to embroider two short, slightly curved eyebrows. These small details make a noticeable difference in the bear’s personality. For an adult decorative project, a securely attached plastic nose can also be used, but embroidered features are preferable when the toy may be handled by young children.
Before moving on to the body, inspect the entire head carefully. The eyes should appear symmetrical, the muzzle should be centered, and the ears should sit comfortably on either side of the head. Add more fiberfill if the head feels too soft, but avoid overstuffing because excessive pressure can stretch the crochet stitches and expose the filling. Gently shape the head with your hands to create a rounded appearance. If the eyebrows appear uneven, remove and rework them before completing the assembly. This attention to detail is particularly important in crochet teddy bear patterns, where small adjustments to the face can dramatically change the finished character. Set the completed head aside while you prepare the body and limbs.
How to Crochet the Teddy Bear Body, Christmas Sweater, Arms, and Feet
The body of this Crochet Teddy Bear for Christmas Pattern is shaped like a rounded pear, with a slightly wider lower section and a narrower upper portion. Using brown yarn, begin with Round 1: 6 sc in MR (6). Round 2: inc around (12). Round 3: (sc 1, inc) × 6 (18). Round 4: (sc 2, inc) × 6 (24). Round 5: (sc 3, inc) × 6 (30). Round 6: (sc 4, inc) × 6 (36). Round 7: (sc 5, inc) × 6 (42). Round 8: (sc 6, inc) × 6 (48). Round 9: (sc 7, inc) × 6 (54). Work Rounds 10–15 with 54 single crochets in each round. This forms the rounded belly and lower body, which will remain brown beneath the Christmas sweater.
To begin the red sweater section, change from brown yarn to Christmas red at the beginning of Round 16. Work Round 16: sc around (54). Round 17: (sc 7, dec) × 6 (48). Rounds 18–19: sc around (48). Round 20: (sc 6, dec) × 6 (42). Rounds 21–22: sc around (42). Round 23: (sc 5, dec) × 6 (36). Rounds 24–25: sc around (36). Round 26: (sc 4, dec) × 6 (30). Rounds 27–28: sc around (30). Begin stuffing the body, distributing the fiberfill evenly throughout the belly and upper torso. Round 29: (sc 3, dec) × 6 (24). Round 30: sc around (24). Fasten off, leaving a long tail for attaching the head. The resulting shape creates a simple crochet Christmas sweater effect directly on the body without requiring a separate garment.
To make the arms, crochet two matching pieces beginning with brown yarn for the paws. Round 1: 6 sc in MR (6). Round 2: inc around (12). Round 3: (sc 1, inc) × 6 (18). Rounds 4–6: sc around (18). Round 7: (sc 1, dec) × 6 (12). Round 8: sc around (12). Change to red yarn at Round 9 and work Rounds 9–14 with 12 single crochets in each round. Lightly stuff the brown paw and lower arm, leaving the upper opening flexible for attachment. Flatten the upper edge and fasten off with a long tail. To create the white cuff, join white yarn around the color-change area and work one round of single crochet, followed by a decorative round of (sl st, ch 2, sl st in the next stitch) repeated around the cuff. These small white loops create the fluffy trim visible on the sleeves.
The teddy bear’s feet are two large rounded pieces that sit prominently at the front of the body. Using brown yarn, work Round 1: 6 sc in MR (6). Round 2: inc around (12). Round 3: (sc 1, inc) × 6 (18). Round 4: (sc 2, inc) × 6 (24). Round 5: (sc 3, inc) × 6 (30). Round 6: (sc 4, inc) × 6 (36). Rounds 7–10: sc around (36). Round 11: (sc 4, dec) × 6 (30). Round 12: (sc 3, dec) × 6 (24). Round 13: (sc 2, dec) × 6 (18). Stuff each foot firmly and work Round 14: (sc 1, dec) × 6 (12). Round 15: dec × 6 (6). Close the opening and weave in the yarn tail. Gently flatten one side of each stuffed foot so the bear can sit more comfortably when displayed.
The white trim around the lower edge of the sweater adds a charming Christmas detail. Join white yarn at the first red round of the body, positioning the decorative stitches around the transition between the brown belly and red sweater. Work a foundation round of evenly spaced single crochet stitches around the circumference, inserting the hook through the surface of the fabric. Next, create a fluffy border using a repeated combination of sl st, ch 2, and sl st in adjacent stitches. Alternatively, use a small bobble stitch for a more textured appearance. The trim should sit slightly outward from the body, resembling the soft white edging of a Santa outfit. Keep the tension relaxed so the decorative border does not pull the body inward or distort the round shape.
Once the body, arms, and feet are complete, begin assembling the main teddy bear. Position the arms on opposite sides of the upper red torso, approximately between Rounds 25 and 28, adjusting their angle so the paws point slightly outward. Sew each arm securely using the long yarn tail, passing through multiple stitches of the body for stability. Next, position the feet at the front of the lower brown belly, making sure both are at approximately the same height. Attach them firmly with a yarn needle, checking that the bear can sit upright. Finally, sew the head onto the narrow upper opening of the body, centering the face above the sweater. Use several passes of yarn around the neck seam to create a strong connection, particularly if the teddy bear will be handled frequently.
Crocheting the Santa Hat, Finishing Details, and Christmas Decoration Ideas
The Santa hat is the finishing feature that transforms this handmade teddy bear into a festive Christmas amigurumi decoration. Begin at the pointed tip using red yarn. Round 1: 6 sc in MR (6). Rounds 2–3: sc around (6). Round 4: (sc 1, inc) × 3 (9). Rounds 5–6: sc around (9). Round 7: (sc 2, inc) × 3 (12). Rounds 8–9: sc around (12). Round 10: (sc 3, inc) × 3 (15). Rounds 11–12: sc around (15). Continue this gradual expansion by adding three evenly spaced increases every third round until the hat reaches approximately 60 stitches. The result should be a long, tapered cone that can bend naturally to one side, creating the characteristic appearance of a Santa hat.
Once the hat reaches 60 stitches, work another three to five rounds of single crochet without increasing. These additional rounds create the wider lower section that will rest around the teddy bear’s forehead. Check the fit by placing the hat over the head before adding the white border. If the hat feels too tight, add another increase round, distributing six increases evenly, then continue with one or two plain rounds. The exact number of rounds may vary because the head circumference depends on your crochet tension. For the white brim, change to white yarn and work two rounds of single crochet. Finish with a decorative round of small bobble stitches or (sl st, ch 2, sl st in the next stitch) to create a fluffy appearance. The white brim should frame the forehead without covering the eyes.
To make the pom-pom, use white yarn and begin with Round 1: 6 sc in MR (6). Round 2: inc around (12). Round 3: (sc 1, inc) × 6 (18). Rounds 4–5: sc around (18). Round 6: (sc 1, dec) × 6 (12). Add a small amount of polyester fiberfill, then work Round 7: dec × 6 (6). Fasten off and close the opening securely. Sew the finished pom-pom to the pointed end of the Santa hat using several strong stitches. If you prefer a more textured appearance, crochet the pom-pom with fluffy yarn or work an additional decorative round of small loops. Avoid leaving long loose strands, especially when the finished teddy bear is intended as a toy.
The next step is positioning the hat on the teddy bear’s head. Place the white brim slightly above the eyes, allowing the red portion to lean gently toward one side. In the reference design, the hat bends toward the bear’s right side from the viewer’s perspective, creating an asymmetrical silhouette that adds personality. Secure the brim to the head with small, nearly invisible stitches using matching yarn. You do not need to sew every stitch around the brim, but attach it at enough points to prevent the hat from slipping or rotating. If you want the pointed end to remain curved, make a few hidden stitches connecting the tip to the side of the hat. This helps maintain the folded appearance without requiring wire or other internal supports.
After completing the main construction, inspect the Crochet Teddy Bear for Christmas Pattern for finishing details. Check that the white sweater trim is evenly distributed and that the sleeve cuffs have a similar texture and thickness. Adjust the arms and feet if necessary, ensuring that the bear appears balanced when sitting. Use a yarn needle to weave in all remaining yarn ends securely, passing them through several internal stitches before trimming. If the head tilts too far forward, reinforce the neck seam with additional stitches. Gently shape the muzzle and feet with your fingers to maintain their rounded appearance. Avoid excessive brushing or pulling on the yarn, particularly when working with cotton fibers that may lose their stitch definition.
This handmade crochet Christmas teddy bear can be displayed in many creative ways throughout the holiday season. Place it on a mantel, arrange it beside wrapped presents, or incorporate it into a festive centerpiece with other handmade decorations. You can also personalize the project by changing the sweater color to forest green, adding embroidered initials, or using cream-colored yarn for a softer vintage-inspired appearance. For a coordinated Christmas collection, make several bears in different sizes using the same pattern with different yarn weights and appropriate hook sizes. The finished teddy bear also makes a thoughtful handmade gift for crochet enthusiasts, family members, or friends who appreciate personalized seasonal decorations. With proper care, it can become a cherished part of your Christmas collection for many years.
Frequently Asked Questions About the Crochet Teddy Bear for Christmas Pattern
Is this Crochet Teddy Bear for Christmas Pattern suitable for beginners?
This project is most suitable for confident beginners or intermediate crocheters who already understand basic amigurumi techniques. The primary stitch is single crochet, but you will also need to know how to increase, decrease, change colors, and sew individual pieces together. Beginners can complete the project successfully by working slowly, counting stitches carefully, and practicing each technique before beginning the final teddy bear.
What is the best yarn for a crochet Christmas teddy bear?
Cotton yarn and cotton-blend yarn are excellent choices because they create a firm fabric with visible stitches. Acrylic yarn is another affordable option, particularly for beginners. Choose yarn that feels comfortable to work with and produces a dense fabric when paired with a slightly smaller crochet hook. Avoid yarns that shed excessively if the teddy bear will be handled frequently.
How much yarn is needed to complete this Christmas teddy bear?
The amount of yarn depends on the final size, yarn thickness, and individual crochet tension. For a medium-sized teddy bear measuring approximately 22–28 cm tall, plan for about 70–100 grams of brown yarn, 35–55 grams of red yarn, and 20–30 grams of white yarn. A small amount of black yarn is also needed for the facial embroidery. These are approximate quantities, so having a little extra yarn available is recommended.
How long does it take to crochet the Christmas teddy bear?
An experienced crocheter may complete the project in approximately six to ten hours, while a beginner may need considerably more time. The head, body, and limbs require careful stitch counting, and the assembly process should not be rushed. Working on one component at a time can make the project more manageable and enjoyable.
Can I make this teddy bear without safety eyes?
Yes. You can embroider the eyes using black yarn or embroidery floss. This option is particularly useful for projects intended for babies and toddlers because plastic safety eyes and noses can become choking hazards if they detach. Embroidered features should be stitched firmly and checked regularly for loose threads.
How do I prevent gaps between crochet stitches?
Use a hook that is slightly smaller than the size normally recommended for your yarn. Maintain consistent tension and avoid pulling the stitches excessively tight. A dense fabric helps prevent polyester stuffing from becoming visible. If gaps appear, try reducing your hook size or adjusting your tension before continuing.
Can I make the Christmas teddy bear larger or smaller?
Absolutely. One of the easiest ways to adjust the size of an amigurumi teddy bear is to change the yarn thickness and hook size while keeping the same stitch counts. Thicker yarn and a larger hook generally produce a larger toy, while thinner yarn and a smaller hook produce a miniature version. Remember that changing the yarn may also affect the amount of stuffing needed.
Why does my teddy bear head look uneven?
Uneven shaping can result from inconsistent tension, incorrect stitch counts, or increases placed in the same positions throughout successive rounds. Count every round carefully and distribute increases evenly. If necessary, stagger increase positions to create a smoother shape. Stuffing the head gradually can also help maintain a symmetrical appearance.
How can I make the Santa hat stay in place?
The most reliable method is to sew the hat directly onto the teddy bear’s head using matching yarn. Position the brim carefully and attach it at several points around the circumference. If you want a removable hat, adjust the brim to fit snugly and consider adding a soft yarn tie, keeping any ties inaccessible to young children.
Can this crochet Christmas teddy bear be washed?
Washing instructions depend on the yarn and stuffing materials used. Many cotton and acrylic yarns can be gently hand-washed, but always check the yarn manufacturer’s care recommendations. Use cool water and mild detergent, avoid twisting the stuffed toy, and allow it to dry completely in a well-ventilated area. Reshape the teddy bear while damp and ensure that the interior stuffing is fully dry before storing it.
What makes this pattern different from a regular crochet teddy bear?
The main difference is the festive Christmas outfit. The red sweater, fluffy white cuffs, decorative waist trim, and pointed Santa hat give the teddy bear its seasonal personality. These details transform a traditional crochet teddy bear pattern into a charming holiday project that can be used for decorating, gifting, or creating a handmade Christmas collection.
Can I sell teddy bears made using this pattern?
Handmade toys based on an original pattern can generally be sold, provided you comply with applicable laws and respect any relevant intellectual property rights. If you plan to sell toys in the United States, review the applicable product safety, labeling, and testing requirements, especially for products marketed to children. Requirements may vary depending on the intended age group, materials, and selling circumstances.
How should I store my crochet teddy bear after Christmas?
Clean the teddy bear if necessary and make sure it is completely dry before storing it. Place it in a breathable fabric bag or clean storage container, away from direct sunlight and excessive humidity. Avoid compressing it beneath heavy decorations because this may distort the stuffing and rounded crochet shapes. Proper storage helps preserve its appearance for future holiday seasons.
Conclusion: Create a Beautiful Handmade Christmas Teddy Bear
The Crochet Teddy Bear for Christmas Pattern is a rewarding holiday project that combines traditional amigurumi techniques with festive decorative details. Throughout this tutorial, you learned how to select appropriate materials, understand essential US crochet abbreviations, shape the teddy bear’s head and body, create rounded ears and feet, and add expressive embroidered facial features. You also explored how to crochet a red Christmas sweater with fluffy white trim, construct a pointed Santa hat, and assemble the individual pieces into a charming finished decoration.
By following the round-by-round instructions and paying attention to stitch counts, stuffing, and assembly, you can create a personalized Christmas crochet teddy bear that reflects your own creativity. The design offers many opportunities for customization, from experimenting with yarn colors to adjusting the size and adding small embroidered details. Whether you display your teddy bear as part of your holiday decorations or give it as a handmade Christmas present, the finished project celebrates the warmth and joy of crafting something special by hand.
EASILY FIND THE FREE PDF FOR THIS PATTERN HERE!
Now it’s your turn to bring this adorable teddy bear to life! 🧸🎄 Have you ever crocheted a Christmas teddy bear, or would this be your first one? Share your sincere opinion about this pattern in the comments, and let us know which part of the project you enjoyed most. We would also love to hear your suggestions for improving the tutorial or creating new Christmas crochet designs. Your ideas and experiences can inspire other crocheters and help make future handmade projects even more enjoyable. ❤️