
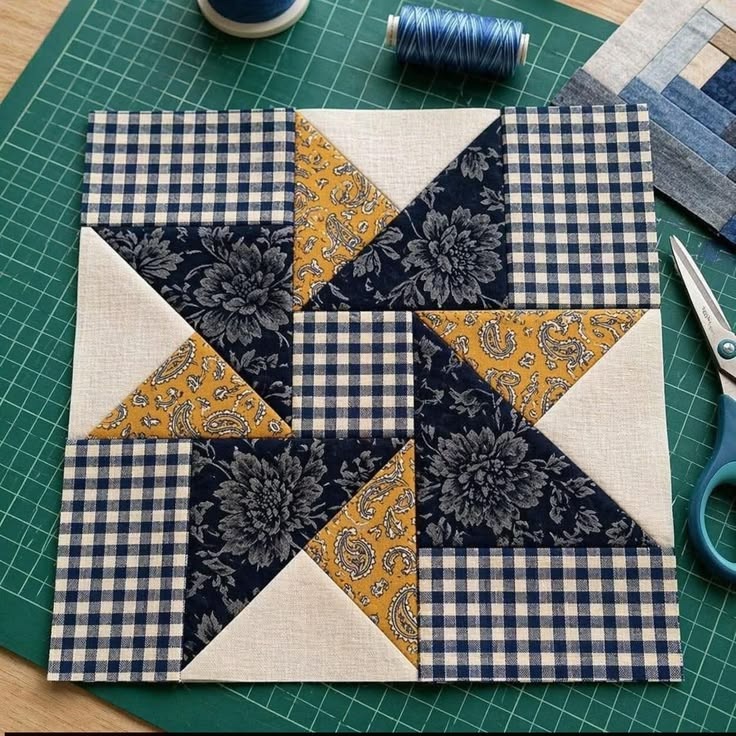
The Patchwork Quilt Block Pattern is a beautiful example of how traditional quilting techniques can transform simple fabric pieces into an eye-catching geometric design. Combining classic patchwork construction with carefully arranged colors, this quilt block features a striking combination of navy blue floral prints, mustard yellow paisley fabric, cream-colored cotton, and blue-and-white gingham. The finished arrangement creates a dynamic pinwheel-inspired design surrounded by balanced rectangular and square sections. Whether you are an experienced quilter or just beginning your sewing journey, this project offers an enjoyable opportunity to practice accurate cutting, careful piecing, and precise seam alignment. With patience and a few basic quilting supplies, you can recreate a charming block that works beautifully in handmade quilts, decorative pillows, table runners, or other creative fabric projects.
One of the most appealing features of this Patchwork Quilt Block Pattern is the way its contrasting fabrics create movement across the surface. The dark floral sections establish a strong visual foundation, while the mustard yellow triangles bring warmth and brightness to the composition. Cream-colored triangles provide contrast and breathing room, helping each geometric shape remain clearly defined. Meanwhile, the gingham sections add a timeless country-inspired appearance that complements both traditional and modern quilting styles. The photograph demonstrates how thoughtful fabric placement can create an intricate-looking design without requiring complicated curved seams or advanced equipment. By learning to organize the individual pieces before sewing, you can achieve a similar appearance while developing valuable skills that will be useful in many future quilting projects.
Creating a handmade patchwork quilt block is also a rewarding way to explore fabric combinations and develop confidence with your sewing machine. Unlike larger quilting projects that may take several weeks to complete, a single quilt block provides an approachable introduction to fabric preparation, rotary cutting, triangular piecing, and block assembly. This tutorial explains how to create a practical interpretation of the photographed design using commonly available quilting cotton and a consistent seam allowance. The suggested measurements produce a block approximately 30 cm square before it is sewn into a larger project. Since the exact dimensions of the photographed block cannot be determined from the image alone, the cutting plan below uses carefully selected proportions to reproduce its visual arrangement. Follow each stage at a comfortable pace, checking measurements as you work, and enjoy watching your colorful fabrics become a coordinated geometric composition.
1. Materials, Fabric Selection, and Preparation for the Patchwork Quilt Block Pattern
Before beginning your Patchwork Quilt Block Pattern, gather the basic materials needed for accurate patchwork sewing. You will need four coordinating quilting cotton fabrics, a rotary cutter, a self-healing cutting mat, a quilting ruler, fabric scissors, matching cotton or polyester thread, straight pins or sewing clips, and an iron with an ironing surface. A sewing machine with a straight-stitch setting is recommended, although experienced hand quilters can also construct the block using traditional hand-piecing methods. Choose good-quality woven cotton because it is generally stable, easy to press, and suitable for creating crisp seams. A removable fabric marker can also be helpful when marking diagonal stitching lines.
DISCOVER MORE FREE PATTERNS HERE!
The fabric arrangement is essential for recreating the appearance of the reference image. Select a navy blue floral fabric for the darkest triangular sections, a mustard yellow paisley fabric for the contrasting accent triangles, and a cream cotton fabric for the lightest portions of the design. The fourth fabric should be a navy-and-white gingham print, which forms the surrounding square and rectangular sections. These four fabrics should have noticeably different values or patterns so that the geometric design remains visible after assembly. If you prefer a different color palette, consider combining burgundy, beige, olive green, and cream, or using traditional Christmas colors for a seasonal interpretation.
For this tutorial, the suggested finished block size is 30 cm × 30 cm, with an unfinished measurement of approximately 31.2 cm × 31.2 cm. Use a consistent 0.6 cm seam allowance, which is close to the standard quarter-inch allowance used by many American quilters. The design will be assembled as a three-by-three grid, with each finished grid unit measuring 10 cm square. Four gingham squares occupy the corners, four pieced units form the middle positions along the sides, and one gingham square sits at the center. This arrangement captures the main visual structure of the photographed block while providing a practical cutting system.
Prepare the gingham fabric by cutting five squares measuring 11.2 cm × 11.2 cm. Four will become the corner sections, while the fifth will form the central square. For the four side units, prepare fabric pieces that will be assembled into contrasting triangular designs. An approachable method uses half-square triangle units, which can be arranged to create the alternating navy, cream, and mustard shapes. To simplify cutting and allow room for accurate trimming, begin with squares measuring approximately 12.5 cm × 12.5 cm for the triangular components. You will need enough pieces of each solid or printed fabric to create the required combinations before trimming them to the desired unfinished dimensions.
Before cutting, press all fabrics to remove folds and wrinkles. Smooth fabric is easier to measure accurately, and a flat surface helps prevent small distortions that could affect the finished block. If you normally prewash quilting cotton, wash and dry all four fabrics consistently before cutting. Prewashing is optional for many quilting projects, but consistency matters because mixing prewashed and unwashed fabrics can sometimes create uneven shrinkage. Once the fabrics are prepared, straighten the edges using your ruler and rotary cutter. Work slowly, keep your fingers away from the cutting blade, and check that the fabric remains aligned with the ruler throughout each cut.
An important part of successful quilt block construction is planning the arrangement before sewing. Lay the gingham squares and triangular fabric pieces on a clean table or design board, following the orientation visible in the photograph. Place gingham squares in the four corners and at the center. Arrange the remaining four units so the dark floral triangles create a rotating movement around the middle. The mustard and cream fabrics should alternate around the darker sections, creating a balanced composition. Take a photograph of your layout before assembling the pieces. This simple habit provides a useful reference if any units become accidentally rotated during sewing.
2. Cutting and Sewing the Geometric Patchwork Pieces
The first sewing technique used in this Patchwork Quilt Block Pattern is the half-square triangle, commonly abbreviated as HST in American quilting instructions. A half-square triangle is a square composed of two triangular fabric sections joined along a diagonal seam. This technique is especially useful for creating pinwheels, stars, chevrons, and other geometric quilt designs. In the photographed project, the side sections contain multiple triangular areas, giving the block its distinctive rotating appearance. For a closer reproduction, the four side units can be made as three-triangle squares rather than simple two-fabric HSTs. The following construction method uses two HSTs within each side unit to create those three visible fabric areas.
Begin by making four oversized navy floral and cream half-square triangle units. Place one navy square and one cream square right sides together, aligning all four edges. Draw a diagonal line from one corner to the opposite corner on the wrong side of the lighter fabric. Stitch 0.6 cm away from both sides of the marked line, then cut directly along the line to separate the two resulting HSTs. Press the seam toward the darker fabric and trim the units square. This two-at-a-time method is an efficient way to practice diagonal piecing and produces matching units that can be used in several quilt projects.
Next, create the mustard accent portions that appear between the navy floral and cream triangles. To reproduce the three-color look more closely, make a second set of HSTs using mustard yellow and navy floral fabric. Press these units carefully, ensuring that the seam lies flat without stretching the diagonal edges. The side units in the image are not simply identical two-color squares; they feature a combination of large dark triangles and smaller contrasting sections. A practical way to approximate that appearance is to construct each side unit from smaller triangular sections, then trim the completed unit to 11.2 cm square. Keep the four side units consistent in size, even if slight adjustments are needed during trimming.
For a more faithful three-triangle construction, cut four cream squares measuring 11.2 cm × 11.2 cm and four mustard squares of the same size, then cut each square once diagonally. Prepare four navy floral squares measuring approximately 12.5 cm × 12.5 cm and cut each diagonally to create oversized dark triangles. For each side unit, join one cream triangle and one mustard triangle along a short straight-grain edge to form a larger pieced triangle. Press this seam, then join the pieced triangle to a navy triangle along the long diagonal edge. Because bias edges can stretch, handle these pieces gently and avoid pulling them while sewing. Trim each completed square to 11.2 cm, keeping the diagonal intersection centered. This construction creates the three-color effect shown in the reference photograph.
Once the triangular units are assembled, check their accuracy using a square quilting ruler. Every side unit should measure 11.2 cm × 11.2 cm before joining the block. The seams should meet cleanly, and the triangular points should remain visible after trimming. If a unit is slightly oversized, trim evenly from the edges while preserving the design’s center. If a unit is undersized, it is usually better to remake it than stretch it to fit. Stretching can distort the fabric and create unwanted ripples in the finished quilt. Consistent measurements are especially important because the block contains several intersections where different fabric sections meet.
Pressing is another essential part of accurate patchwork sewing. Rather than sliding the iron repeatedly across the fabric, lift and lower it gently to flatten the seams. This technique reduces the risk of stretching triangular pieces along their bias edges. You may press seams toward the darker fabric when possible, but consider pressing some seams open if several layers meet at one point. Reducing seam bulk makes it easier to achieve a flat, professional-looking quilt block. After pressing, allow each unit to cool before handling it again. The result should be a collection of crisp, evenly sized pieces ready for final arrangement and assembly.
3. Assembling the Patchwork Quilt Block Step by Step
Now that the individual pieces are ready, begin assembling the Patchwork Quilt Block Pattern into its final geometric arrangement. Lay out the nine units in three horizontal rows, placing the five gingham squares in the four corners and the center. Position the four triangular units at the top middle, left middle, right middle, and bottom middle. Rotate these units until the navy floral triangles appear to move around the center in a pinwheel-like direction. The mustard and cream sections should create contrasting accents on alternating sides. Compare the layout with the reference image, paying attention to the relationship between the dark floral triangles and the surrounding gingham fabric.
Start with the top row, which contains a gingham square, a triangular unit, and another gingham square. Place the first two pieces right sides together and align their edges carefully. Sew along the joining edge using the consistent 0.6 cm seam allowance. Attach the third piece in the same manner, then press the seams. Repeat this process for the middle row, which contains a triangular unit, the central gingham square, and another triangular unit. Finally, assemble the bottom row using the remaining three pieces. Working one row at a time helps maintain the original layout and reduces the chance of accidentally rotating a triangular section.
After completing all three rows, check their measurements before joining them. Each row should measure approximately 31.2 cm wide before final assembly, allowing for small variations caused by fabric thickness and sewing accuracy. If the rows differ slightly, inspect the seam allowances and make adjustments where possible. Avoid forcing the pieces to match by stretching them. Instead, identify whether an individual unit was trimmed incorrectly or whether a seam allowance became too wide. Accurate quilting depends on small, consistent measurements, and correcting these differences early will improve the overall appearance of the finished block.
Join the first and second rows by placing them right sides together. Match the vertical seam intersections and secure them with pins or sewing clips. The gingham sections should align neatly with the triangular units, creating a continuous grid. Sew across the entire width using the same seam allowance, removing pins before they reach the machine needle. Press the joined seam carefully. Then attach the third row, matching the intersections in the same way. Take extra care where multiple seams meet because these areas can become bulky. A walking foot or careful speed control may help the layers feed evenly through the machine.
Once the three rows are connected, turn the block right side up and examine the complete geometric quilt block design. The central gingham square should appear balanced within the surrounding triangular sections, and the four corner gingham squares should create a consistent outer frame. The navy floral pieces form the dominant visual movement, while the mustard yellow and cream triangles add contrast and depth. If any seams appear slightly uneven, evaluate whether they affect the overall construction before making corrections. Small differences are common in handmade sewing, but accurate points and flat seams will make the finished block more attractive and easier to incorporate into a larger quilt.
Give the completed block a final press, making sure it lies flat on the ironing surface. Measure the width and height from edge to edge. The intended unfinished size is approximately 31.2 cm × 31.2 cm, allowing the block to finish at 30 cm square when sewn into a quilt using the same seam allowance. If necessary, square up the outer edges with a rotary cutter and quilting ruler, but avoid cutting into the seam allowances around the triangular points. The block is now ready to become part of a larger quilting project or to be displayed as an individual piece of handmade textile art.
4. Finishing Techniques, Creative Variations, and Quilting Ideas
Completing a Patchwork Quilt Block Pattern opens the door to many creative possibilities. One of the easiest ways to use the finished block is to transform it into a decorative pillow cover. Add coordinating fabric borders if you want a larger finished size, then combine the block with batting and a backing fabric. Quilt the layers together using straight lines, diagonal stitching, or gentle curves that follow the geometric design. Once the quilted front is complete, add an envelope-style or zippered pillow backing. The navy, mustard, cream, and gingham combination is particularly attractive for farmhouse-inspired interiors, cozy living rooms, and traditional bedroom decor.
Another beautiful option is to create a patchwork table runner using three or more matching blocks. Arrange the blocks in a straight line, rotating every other block to produce a more dynamic overall pattern. You can separate the blocks with narrow strips of neutral fabric or sew them directly together for a continuous geometric appearance. Add batting and backing fabric, then quilt through all three layers to provide structure and durability. A coordinated binding around the edges will give the runner a neat finish. This type of project works well for seasonal decorating, handmade gifts, and everyday table settings.
If you want to make a larger handmade patchwork quilt, repeat the block until you have enough units for your desired dimensions. For example, a layout of four blocks across and five blocks down will create a patchwork center approximately 120 cm wide and 150 cm long before adding borders. Because the design contains strong diagonal movement, alternating the orientation of the blocks can produce secondary patterns that become visible only when several blocks are placed together. Experiment with the layout before sewing the rows. Photograph different arrangements and compare how the navy floral sections interact with the gingham squares. This planning stage can be one of the most enjoyable parts of quilt design.
The color palette can also be adapted to suit different decorating styles and personal preferences. For a spring-inspired version, replace the navy floral fabric with soft lavender prints, use pale yellow for the accent triangles, and choose white or cream gingham for the surrounding squares. For autumn decorating, combine rust orange, olive green, deep brown, and natural linen tones. A Christmas variation might feature forest green floral fabric, red plaid, cream cotton, and subtle gold accents. Regardless of the colors you choose, maintaining contrast between the dark, medium, and light fabrics will help preserve the pinwheel-inspired patchwork effect.
When quilting the finished block, consider how the stitching can enhance its geometric structure. Stitch-in-the-ditch quilting follows the seam lines between fabric pieces and creates a subtle appearance. Straight-line quilting can emphasize the diagonal movement of the triangular sections, while simple echo quilting adds parallel lines around selected shapes. If you are comfortable with free-motion quilting, decorative floral motifs can complement the navy floral print. Beginners may prefer evenly spaced straight lines because they are easier to control with a standard sewing machine. Whatever method you choose, use suitable batting and backing fabric, baste the layers securely, and test the quilting design on a fabric sample before working on the finished project.
Proper care will help preserve your completed Patchwork Quilt Block Pattern for years to come. If the block becomes part of a washable quilt, follow the care recommendations for the fabrics, batting, and thread used in construction. Gentle washing with a mild detergent and cool water is often suitable for cotton quilts, provided the materials are compatible. Dry the finished project according to the fabric manufacturer’s recommendations, and avoid excessive heat if delicate materials are present. When storing handmade quilts, keep them in a clean, dry location away from prolonged direct sunlight. With thoughtful construction and proper care, your patchwork creation can remain a cherished part of your home or become a meaningful handmade gift.
Frequently Asked Questions About the Patchwork Quilt Block Pattern
What is a Patchwork Quilt Block Pattern?
A Patchwork Quilt Block Pattern is a set of cutting and sewing instructions used to create a decorative fabric unit from smaller pieces. These units can be combined to make larger quilts, table runners, wall hangings, pillows, and other textile projects. Patchwork blocks often feature geometric shapes such as squares, rectangles, triangles, diamonds, and stars. The design in this tutorial combines gingham squares with contrasting triangular sections to create a rotating, pinwheel-inspired appearance.
Is this Patchwork Quilt Block Pattern suitable for beginners?
Yes, this project is suitable for confident beginners who have practiced basic straight stitching and are ready to work with triangular fabric pieces. The main challenges involve cutting accurate shapes, maintaining consistent seam allowances, and matching seam intersections. Beginners can simplify the construction by practicing half-square triangles before attempting the three-color triangular units. Taking time to press and measure each section will make the project easier and more enjoyable.
What type of fabric works best for patchwork quilt blocks?
High-quality 100% cotton quilting fabric is generally an excellent choice because it is stable, easy to cut, and comfortable to sew. Quilting cotton also comes in an extensive variety of colors and prints, making it ideal for coordinating geometric designs. Lightweight linen blends may work for some projects, but mixing fabrics with significantly different weights or stretch properties can make accurate piecing more difficult. For this block, using four quilting cotton fabrics of similar weight will help produce consistent seams.
What is the standard seam allowance for quilting?
Many American quilting patterns use a ¼-inch seam allowance, which equals approximately 0.635 cm. This tutorial uses a rounded measurement of 0.6 cm for simplicity. The important factor is consistency throughout the project. If you prefer using an exact quarter-inch presser foot, adjust the cutting measurements to match your chosen seam allowance and verify the resulting block size with a test unit.
How can I make my quilt block points more accurate?
Accurate points begin with careful cutting and consistent stitching. Use a sharp rotary cutter, a reliable quilting ruler, and a stable cutting surface. Avoid stretching diagonal fabric edges, and press each seam before assembling larger sections. When joining rows, match the seam intersections with pins or clips. If you notice that points are disappearing into the seams, check whether the units were trimmed too closely or whether the seam allowance is wider than intended.
Can I use fabric scraps to make this quilt block?
Absolutely. A scrap fabric quilt block can be a wonderful way to use leftover quilting cotton from previous sewing projects. Choose scraps that are large enough for the required squares and triangles, and organize them by color value. Even if the prints are different from those in the photograph, the geometric design can remain recognizable when the fabrics have sufficient contrast. Scrappy versions often develop a charming, personal appearance that makes each finished block unique.
How long does it take to complete one patchwork quilt block?
The time required depends on your sewing experience, fabric preparation, and the level of precision you want to achieve. A beginner may need approximately two to four hours to prepare the fabrics, cut the pieces, assemble the triangular units, and complete the block. Experienced quilters may finish more quickly, especially when using efficient chain-piecing methods. It is better to focus on accurate construction than to rush through the project.
Do I need a special sewing machine for patchwork quilting?
No. A standard sewing machine with a reliable straight stitch is usually sufficient for making this block. A quarter-inch presser foot can be helpful, but it is not essential if you can accurately guide the fabric along a marked seam allowance. A walking foot may be useful later when quilting multiple layers together. Basic tools, careful preparation, and consistent sewing habits are more important than having expensive equipment.
How do I prevent my patchwork block from becoming uneven?
Uneven blocks often result from inaccurate cutting, inconsistent seam allowances, or stretched fabric edges. Measure each unit before joining it to another section, and press seams gently rather than pulling the fabric with the iron. Keep the machine’s fabric feed smooth and avoid pushing or stretching the pieces while sewing. Squaring up individual units before final assembly can also help maintain the intended dimensions.
Can this pattern be resized for different projects?
Yes. The Patchwork Quilt Block Pattern can be adapted for smaller or larger projects by scaling the finished grid units and recalculating the cutting measurements. For example, reducing the finished grid unit from 10 cm to 8 cm would create a smaller block measuring approximately 24 cm square before seam allowances are added. When resizing, remember that seam allowances remain constant rather than scaling proportionally. Making a sample block is recommended before cutting fabric for an entire quilt.
What is the difference between patchwork and quilting?
Patchwork refers to the process of joining smaller pieces of fabric to create a larger decorative surface. Quilting refers to stitching together layers of fabric, usually a quilt top, batting, and backing, to create a finished textile. A patchwork block can become part of a quilt, but the block itself is not necessarily quilted until it is layered and stitched with batting and backing. Understanding this distinction helps beginners follow sewing instructions more confidently.
How many blocks are needed to make a full quilt?
The number of blocks depends on the finished block dimensions and the desired quilt size. If each block finishes at 30 cm square, a layout of four blocks across and six blocks down would create a patchwork center approximately 120 cm × 180 cm before adding borders. Larger quilts may require additional blocks, while smaller lap quilts or baby quilts may need fewer. Always plan the overall dimensions before cutting fabric for multiple blocks.
Conclusion
The Patchwork Quilt Block Pattern is a rewarding project that combines classic fabric piecing, thoughtful color placement, and practical quilting techniques. Throughout this tutorial, you learned how to select coordinating fabrics, prepare accurate squares and triangles, construct contrasting geometric units, and assemble a balanced block inspired by the reference photograph. You also explored important finishing techniques, including careful pressing, seam alignment, trimming, quilting, and fabric care.
The combination of navy blue floral fabric, mustard yellow accents, cream cotton, and gingham squares gives this design its distinctive traditional character. By maintaining consistent seam allowances and arranging the triangular units carefully, you can recreate the rotating movement that makes the block visually interesting. The finished design can stand alone as a decorative piece or become part of a larger handmade quilt, pillow, or table runner.
EASILY FIND THE FREE PDF FOR THIS PATTERN HERE!
One of the greatest pleasures of patchwork quilting is discovering how simple fabric shapes can become something beautiful through creativity and patience. Every completed block offers an opportunity to improve your sewing skills, experiment with new colors, and create something meaningful with your own hands. Have you tried making a similar Patchwork Quilt Block Pattern, or would you choose a different fabric combination for this design? Share your sincere opinion, sewing experience, and creative suggestions in the comments. Your feedback and ideas can inspire other quilting enthusiasts and help make future patchwork projects even more enjoyable!