
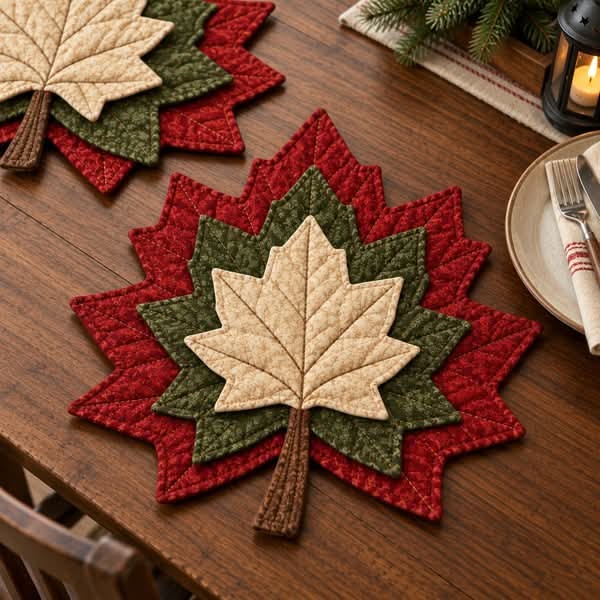
The Maple Leaf Shaped Placemat Pattern is a beautiful way to bring the warmth of autumn, the charm of handmade quilting, and the elegance of seasonal decorations into your home. Inspired by the distinctive shape of maple leaves, this fabric project combines rich colors, decorative stitching, and carefully layered appliqué to create an eye-catching table accessory. Whether you are decorating for Thanksgiving, preparing a cozy fall dinner, or simply looking for a creative sewing project, this maple leaf placemat offers a wonderful opportunity to work with traditional quilting techniques. The design shown in the reference image features three overlapping maple leaf shapes in deep red, forest green, and warm cream, complemented by a brown fabric stem. Together, these elements create a dimensional appearance that resembles real autumn foliage. The result is a decorative and functional piece that can transform an ordinary dining table into a welcoming seasonal setting.
One of the most appealing aspects of this Maple Leaf Shaped Placemat Pattern is its combination of simple materials and detailed craftsmanship. Although the finished design looks sophisticated, it can be recreated by beginners who are comfortable using a sewing machine and willing to practice accurate cutting, fabric layering, and topstitching. The project uses cotton quilting fabrics, lightweight batting, and coordinating threads to achieve a soft yet structured finish. Each leaf layer contributes a different color and texture, while the stitched veins emphasize the natural characteristics of maple foliage. Unlike a traditional rectangular placemat, this project has an irregular silhouette with pointed edges and decorative contours. These features make it particularly attractive for fall-inspired table arrangements, seasonal centerpieces, and handmade gifts. By following the instructions carefully, you can create a piece that feels personal, practical, and beautifully coordinated with your existing autumn decorations.
Creating a handmade maple leaf placemat is also an enjoyable way to explore the art of fabric appliqué and machine quilting. The process begins with designing a maple leaf template, continues through selecting harmonious fabrics, and ends with carefully finishing the edges and decorative stitching. Throughout this tutorial, you will learn how to prepare the pattern, cut accurate fabric shapes, assemble the layers, and add the finishing details that give the project its distinctive appearance. The instructions use centimeters for measurements and familiar American sewing terminology, making the tutorial accessible to readers throughout the United States. The suggested finished size is approximately 38 cm wide by 40 cm long, including the stem, although the dimensions can be adjusted according to your table setting. Because the photograph does not include exact measurements or a printable template, the dimensions below are practical recommendations for recreating the pictured style rather than verified measurements of the original item.
Materials and Fabric Selection for the Maple Leaf Shaped Placemat Pattern
The first step in creating your Maple Leaf Shaped Placemat Pattern is gathering suitable materials. For a project that resembles the reference image, choose three coordinating quilting cotton fabrics: a deep burgundy or Christmas red for the largest leaf, a dark olive or forest green for the middle leaf, and a warm beige or cream fabric for the smallest leaf. You will also need a small piece of brown fabric for the stem. These colors reproduce the warm, layered appearance of the design while providing enough contrast to distinguish the individual shapes. Cotton quilting fabric is recommended because it is relatively easy to cut, press, stitch, and maintain. Prewashing your fabrics can help reduce the possibility of uneven shrinkage after the placemat is completed.
DISCOVER MORE FREE PATTERNS HERE!
For one placemat, prepare approximately 45 × 45 cm of red fabric, 38 × 38 cm of green fabric, and 30 × 30 cm of cream fabric. You will also need approximately 12 × 15 cm of brown fabric for the stem, 45 × 45 cm of backing fabric, and a similar amount of thin cotton batting. These quantities provide reasonable cutting allowances for the suggested finished dimensions. If you plan to make several placemats, purchasing additional fabric from the same collection can help maintain consistent colors and patterns. Small-scale prints, subtle marbled textures, and tone-on-tone quilting cottons are especially suitable because they add visual interest without overwhelming the maple leaf silhouette.
The sewing tools required for this project are commonly found in a home quilting workspace. Prepare a sewing machine, fabric scissors, a rotary cutter, a self-healing cutting mat, a quilting ruler, sewing clips or pins, and a fabric marking pencil. A household iron and pressing surface are also essential for producing neat edges and accurately assembled layers. For stitching, select polyester or cotton thread in red, green, cream, and brown, or use one neutral thread that blends with all the fabrics. A universal sewing machine needle in size 80/12 is appropriate for many quilting cottons, although a quilting needle may work better when sewing through batting and several layers of fabric.
Another important material is lightweight batting, which provides softness and subtle dimension without making the placemat excessively bulky. Cotton batting is a practical choice for this project because it creates a traditional quilted texture and generally handles machine stitching well. Avoid very thick polyester batting if you want the pointed edges of the maple leaf to remain clearly defined. The design relies on precise corners and narrow spaces between the leaf points, so excessive thickness can make turning and topstitching difficult. If you prefer a firmer placemat, a lightweight sew-in stabilizer can be tested with the batting, but the finished item should remain flexible enough to rest naturally on a table.
The maple leaf template determines the overall appearance of the finished placemat. Prepare three separate maple leaf shapes with suggested maximum widths of 38 cm for the red leaf, 30 cm for the green leaf, and 22 cm for the cream leaf. Make the green and cream leaves proportionally shorter as well, so the colored borders remain visible after layering. Each template should include the familiar maple leaf structure, with a prominent central point, two upper side points, and additional angled lobes extending toward the lower edges. The templates should be centered along a common vertical axis. The suggested dimensions describe the approximate finished visible shapes; cutting allowances will be added according to the construction method explained below.
Before cutting your fabric, consider how the completed autumn leaf placemat will coordinate with your dining room. Burgundy and olive green produce a traditional fall palette, while cream adds brightness and highlights the decorative stitching. However, you can also experiment with burnt orange, mustard yellow, copper, chocolate brown, or muted gold. For a Thanksgiving table setting, a combination of rust, dark green, and golden beige can look especially inviting. For Christmas decorations, deep red, evergreen, and ivory create a festive alternative. Regardless of your color choices, selecting fabrics with similar weights will help the layers lie evenly and make the sewing process more predictable.
Creating and Cutting the Maple Leaf Fabric Templates
Begin the Maple Leaf Shaped Placemat Pattern by drawing the largest maple leaf onto a sheet of pattern paper. You can use several sheets taped together if necessary. Draw a vertical centerline approximately 35 cm long, then mark a maximum width of 38 cm across the leaf. Sketch a symmetrical maple leaf silhouette around these guidelines, beginning with the central upper point and working outward to create the characteristic angled lobes. Include the lower sections that taper toward the stem. Do not worry about making the shape perfectly identical to a natural leaf; the goal is to create a balanced, recognizable maple silhouette with enough space between the points to sew comfortably. Cut out the paper template and fold it along the centerline to check that both sides are reasonably symmetrical.
Next, prepare the medium and small leaf templates using the same general shape. The green maple leaf should measure approximately 30 cm wide, while the cream maple leaf should measure approximately 22 cm wide. You can achieve consistent proportions by tracing the original shape and reducing it using a copier or by redrawing it on a smaller grid. Keep the major leaf points aligned so the three layers create a harmonious arrangement when stacked. Place the templates on top of one another to verify that the red border remains visible around the green leaf and that the green border remains visible around the cream leaf. A border of approximately 3–4 cm around much of each layer creates a result similar to the reference photograph, although the width will naturally vary around the pointed sections.
For a clean, turned-edge construction, prepare each leaf as a small quilted fabric unit before stacking the three shapes. Place the red template on the wrong side of the red fabric and trace around it using a removable fabric marker. Add a 0.7 cm seam allowance outside the traced outline, then cut the fabric along the outer cutting line. Use this cut shape to prepare a matching backing piece. Repeat the same process for the green and cream leaves. Cut batting pieces slightly smaller than the traced stitching outlines to reduce bulk along the seams. This method produces individually finished leaves with enclosed raw edges, making the final assembly more durable and visually polished.
The fabric cutting process requires extra care around the sharp points and inward corners of the maple leaf. When using scissors, make smooth, deliberate cuts rather than short, uneven movements that may distort the shape. If you use a rotary cutter, work slowly and use a smaller blade for detailed sections. Mark the central axis of every leaf with a temporary fabric marker or a small fold. These marks will help you align the three layers accurately during assembly. For patterned fabric, pay attention to the direction of the print so that the design appears balanced across the leaf. Press each cut piece flat before sewing, but avoid stretching the bias edges around the angled lobes.
To prepare the brown fabric stem, cut a rectangle measuring approximately 5 × 14 cm. Fold the long edges toward the center, press them, and fold the strip in half lengthwise to enclose the raw edges. This creates a narrow strip approximately 1.25 cm wide, which can be topstitched along both long sides. If you prefer a fuller, quilted appearance, insert a narrow strip of lightweight batting before the final fold. The visible stem in the reference image extends downward from the center of the layered leaves and has decorative stitching that resembles natural wood texture. You can reproduce this effect by adding two or three parallel rows of brown thread along the length of the prepared strip.
Before beginning the actual sewing, arrange all the prepared maple leaf fabric pieces on a flat surface. Position the red leaf at the bottom, the green leaf in the middle, and the cream leaf on top. Align their central axes and adjust the spacing until the three colors form an attractive, evenly layered design. Place the brown stem beneath the lower center of the cream leaf, allowing approximately 7–9 cm to extend below the bottom leaf, depending on your preferred finished length. Take a photograph of this arrangement or mark the placement with temporary chalk lines. This simple preparation will help you maintain the correct proportions throughout the construction process and prevent unnecessary repositioning after the layers have been quilted.
Sewing and Quilting the Layered Maple Leaf Placemat
Start sewing the Maple Leaf Shaped Placemat Pattern by constructing the red base leaf. Place the red front fabric and matching backing fabric with their right sides together. Position the batting against the wrong side of one fabric piece, making sure it stays inside the stitching line. Pin or clip the layers securely, especially around the pointed sections. Using a 0.7 cm seam allowance, stitch around the traced leaf outline, leaving a turning opening approximately 6–8 cm long along a relatively straight lower section. Reduce your sewing speed when approaching each leaf point, stop with the needle down, lift the presser foot, and pivot the fabric to follow the next edge. This technique helps preserve the sharp geometric shape of the maple leaf.
Once the stitching is complete, carefully trim the seam allowances at the outward points without cutting through the stitches. Clip the seam allowances at the inward corners, stopping just before the stitching line. These small adjustments allow the fabric to turn smoothly and reduce bunching around the detailed edges. Turn the leaf right side out through the opening, then use a blunt turning tool to gently shape the corners. Avoid pushing too hard, as sharp tools can damage the fabric or stitches. Press the leaf carefully, folding the seam allowances at the opening toward the inside. Close the opening with a small ladder stitch or secure it later with edge topstitching. Repeat the same procedure for the green and cream leaves.
After turning the pieces, add decorative edge topstitching to each individual leaf. Set your sewing machine to a straight stitch approximately 2.5–3 mm long and sew about 0.3–0.5 cm from the outer edge. This stitching helps keep the layers flat, reinforces the leaf points, and creates the outlined appearance visible in the reference image. Choose thread that closely matches each fabric color for a subtle finish, or select slightly darker thread to emphasize the silhouette. When stitching around inward corners, move slowly and check that the backing fabric remains smooth. If you are new to sewing irregular shapes, practice on a scrap fabric leaf before topstitching the actual placemat.
The next step is creating the quilted leaf veins, which are among the most distinctive features of this design. Using a removable fabric marker, draw a central vein from the lower center of each leaf toward its upper point. Add diagonal branches extending from the central line toward the side lobes, following the natural direction of a maple leaf’s veins. Stitch along these markings using a straight stitch, beginning with the central vein and continuing outward. The cream leaf in the photograph features particularly visible branching veins that create a realistic botanical effect. For the best results, use thread that is one or two shades darker than the fabric. Stitch slowly, and avoid making too many overlapping lines near the center, where the fabric layers may become bulky.
When the three individual leaves are quilted, begin assembling the layered fabric appliqué design. Place the red leaf on your work surface, then center the green leaf over it according to the alignment marks made earlier. Secure the green leaf with a small amount of temporary fabric adhesive, quilting clips where possible, or carefully positioned pins. Sew the green leaf onto the red leaf using a narrow straight stitch approximately 0.3 cm inside its finished edge. Since both leaves already have enclosed raw edges, there is no need for a zigzag or satin stitch to prevent fraying. Position the cream leaf on top of the green leaf and repeat the process. This construction produces the raised, layered appearance of the photographed placemat while keeping the stitching manageable.
Finish the maple leaf placemat sewing tutorial by attaching the prepared brown stem. Slide the upper end of the stem beneath the lower center of the cream leaf, or position it over the lower leaf layers if that produces a neater result with your chosen template. Secure it with matching brown thread, stitching along both sides and across the concealed upper end where necessary. Check that the stem extends straight downward and that it is firmly attached without pulling the leaf layers out of alignment. Give the completed placemat a gentle final press using a pressing cloth and moderate heat suitable for your fabric and batting. At this stage, the project should display three clearly defined maple leaf silhouettes, visible quilted veins, neatly finished edges, and a decorative brown stem.
Finishing, Decorating, and Caring for Your Maple Leaf Shaped Placemat Pattern
The finishing stage of the Maple Leaf Shaped Placemat Pattern focuses on making the completed project neat, attractive, and suitable for everyday decorative use. Examine the edges of all three leaf layers and trim any loose threads. Check the pointed sections for small gaps, uneven stitches, or areas where the backing fabric may have shifted. If necessary, reinforce these sections with a few carefully placed hand stitches. The reference design has a soft, slightly padded appearance, so avoid pressing the entire placemat too aggressively. Instead, use gentle pressure to flatten uneven areas while preserving the texture created by the batting and quilting stitches. A final inspection ensures that the placemat looks finished from both the front and back.
One of the most enjoyable ways to use this autumn maple leaf placemat is as part of a seasonal dining arrangement. Place it on a natural wood table to emphasize the warm red, green, and cream colors. Pair it with neutral dinnerware, linen napkins, and simple fall decorations such as fabric pumpkins, small decorative gourds, or dried floral arrangements. The leaf silhouette naturally draws attention, making it suitable for both individual place settings and decorative displays. Because the project includes raised fabric layers, use stable dishes with flat bottoms and ensure that plates or cups sit evenly. If you intend to use the placemat beneath hot cookware, remember that ordinary quilting cotton and lightweight batting do not automatically provide reliable heat protection.
The Maple Leaf Shaped Placemat Pattern can also be customized for different holidays and interior styles. For a traditional Thanksgiving arrangement, combine burnt orange, mustard yellow, and deep brown fabrics. For a more contemporary farmhouse look, try sage green, oatmeal beige, and muted terracotta. A Christmas-inspired version can feature burgundy, evergreen, and ivory, similar to the colors shown in the photograph. You can even create a matching collection of placemats using different fabric combinations while keeping the same leaf templates. Repeating the design in coordinated colors creates visual harmony without requiring every placemat to look exactly alike.
If you enjoy decorative sewing, consider adding subtle embellishments to your quilted maple leaf placemat. A narrow line of contrasting thread along the veins can make the leaf structure more visible, while small decorative stitches around the edges can create a handcrafted finish. Another option is to use fabrics with a gentle metallic print or a subtle woven texture that reflects autumn sunlight. However, avoid attaching beads, buttons, or raised ornaments to areas where dinnerware will rest. These embellishments may make the surface uneven and complicate cleaning. For a functional table accessory, decorative stitching and fabric selection are usually the most practical ways to add personality without sacrificing comfort or usability.
Proper maintenance will help preserve your handmade fabric placemat for many seasons. Before washing, check the care instructions for the fabric, batting, and thread used in the project. If all materials are machine washable, wash the placemat on a gentle cycle with cool water and mild detergent. A mesh laundry bag can help protect the pointed edges from excessive agitation. Air drying is recommended when possible, particularly for placemats with intricate shapes or several appliqué layers. After drying, press lightly from the wrong side using a pressing cloth. Avoid harsh bleaching products that could fade the deep red and green fabrics or damage decorative stitching. Store the placemat flat whenever possible to prevent creases in the leaf points.
Completing this DIY maple leaf placemat is a rewarding experience because the finished piece combines creativity with useful sewing skills. During the project, you practice pattern drafting, fabric preparation, accurate cutting, turned-edge construction, appliqué attachment, and decorative machine quilting. These techniques can be applied to many other projects, including table runners, seasonal wall hangings, fabric coasters, and decorative quilt blocks. You may also enlarge the templates to create a dramatic centerpiece or reduce them to make matching autumn coasters. The most important lesson is that careful preparation and patient stitching can transform a few simple pieces of fabric into a detailed seasonal decoration that feels both traditional and personal.
Frequently Asked Questions About the Maple Leaf Shaped Placemat Pattern
1. Is the Maple Leaf Shaped Placemat Pattern suitable for beginners?
Yes. This project is suitable for confident beginners who have basic experience with a sewing machine. The most challenging parts are cutting the pointed maple leaf shapes, sewing around inward corners, and turning the fabric without distorting the edges. Beginners should practice these techniques on fabric scraps before working with their final materials. Sewing slowly and using accurate seam allowances will make the project easier to complete.
2. What is the recommended finished size for the maple leaf placemat?
The suggested finished size is approximately 38 cm wide and 40 cm long, including the stem. The exact dimensions depend on the shape of your templates and how much of the stem extends below the leaf. You can enlarge the pattern for a more generous table setting or reduce it for a smaller decorative mat. Before cutting fabric, place your intended dinner plate over the paper template to confirm that the finished size will meet your needs.
3. What type of fabric works best for a quilted maple leaf placemat?
100% cotton quilting fabric is an excellent choice because it is easy to sew, press, and maintain. Cotton also offers a wide selection of seasonal colors and prints. Fabrics with subtle textures or small patterns work particularly well because they complement the quilted leaf veins. Very stretchy, slippery, or heavy fabrics may be more difficult to handle, especially around the narrow points and curved sections.
4. Do I need a special sewing machine to make this project?
No. A standard home sewing machine with a straight stitch is sufficient for the main construction and quilting. An adjustable stitch length and a needle-down function can make it easier to pivot around the leaf points, but these features are not essential. A walking foot may help when stitching through multiple quilted layers, particularly during the final appliqué assembly.
5. Can I make the maple leaf placemat without batting?
Yes, although the finished result will look and feel different. Without batting, the leaves will be flatter and less dimensional. If you prefer a thin placemat, you can use a lightweight woven interfacing to provide some structure. However, the soft quilted appearance shown in the reference image is easier to achieve with a thin layer of batting inside each leaf.
6. How do I keep the pointed leaf edges neat?
Accurate cutting and careful seam trimming are essential. After sewing each leaf, trim the seam allowances at outward points and clip inward corners without cutting the stitches. Turn the fabric gently and shape the corners with a blunt tool. Press the edges carefully before adding topstitching. Avoid using excessive force when turning narrow points because this can weaken the seams or damage the fabric.
7. Can the Maple Leaf Shaped Placemat Pattern be made entirely by hand?
Yes. You can replace machine stitching with small, consistent hand stitches. Use a backstitch for strong seams, a ladder stitch for closing turning openings, and a running stitch or backstitch for decorative quilting. Hand sewing takes longer, but it can produce a beautiful traditional appearance. This approach is especially enjoyable for crafters who appreciate slow stitching and detailed handwork.
8. How many placemats should I make for a complete table setting?
The number depends on your dining table and the number of people you usually serve. A set of four or six matching placemats is practical for many households. Before starting a full set, complete one sample placemat to verify the dimensions, fabric colors, and construction method. Once you are satisfied with the result, use the same templates to maintain consistency across the collection.
9. Is this pattern appropriate for Thanksgiving decorations?
Absolutely. The maple leaf is strongly associated with autumn, making this design particularly suitable for Thanksgiving tables, fall gatherings, and seasonal home décor. The combination of burgundy, green, and cream creates a warm atmosphere, while orange, copper, and gold fabrics can produce an even more traditional fall color palette. The placemat also makes a thoughtful handmade gift for someone who enjoys seasonal decorating.
10. How long does it take to complete one maple leaf placemat?
A beginner may need approximately 4–6 hours to draft the templates, cut the fabrics, sew the individual leaves, add quilting, and assemble the final design. Someone with more sewing experience may finish the project more quickly. The time will also depend on the complexity of the leaf shape and the amount of decorative stitching. Preparing several sets of fabric pieces at once can make production more efficient when creating multiple placemats.
11. Can I wash the completed placemat in a washing machine?
Machine washing may be suitable if the cotton fabric, batting, thread, and any stabilizers are washable. Use a gentle cycle and cool water, and avoid aggressive spinning when possible. Prewashing the fabrics before sewing helps reduce the risk of uneven shrinkage. For placemats with delicate decorative stitching, gentle hand washing may provide better long-term protection.
12. How can I make the maple leaf placemat more durable?
Use good-quality quilting cotton, strong coordinating thread, and securely enclosed seams. Reinforce the pointed areas with careful topstitching and make sure the stem is firmly attached. Avoid placing extremely hot cookware directly on the placemat unless you have specifically designed and tested it for that purpose using suitable heat-resistant materials. Regular gentle cleaning and flat storage will also help preserve the fabric and stitching.
13. Can I use fabric scraps for this Maple Leaf Shaped Placemat Pattern?
Yes. This project is an excellent opportunity to use leftover quilting cotton from previous sewing projects. Larger scraps can be used for the individual leaf layers, while smaller pieces may be joined to create patchwork-style leaves. If you use pieced fabric, press the seams carefully and consider reducing bulk around the leaf points. A scrappy version can look especially charming when the fabrics share a coordinated autumn color palette.
14. What is the difference between appliqué and quilting in this project?
Appliqué is the technique of attaching one fabric shape to another fabric surface. In this placemat, the green leaf is attached over the red leaf, and the cream leaf is attached over the green leaf. Quilting refers to stitching through fabric and batting layers to hold them together and create texture. The decorative veins and surface stitching are examples of quilting, while the stacked leaf construction uses appliqué techniques.
15. Can I resize the pattern to make matching coasters or a table centerpiece?
Yes. The maple leaf silhouette is versatile and can be scaled to suit different projects. For coasters, consider a finished width of approximately 12–15 cm, simplifying the smallest details so they remain easy to sew. For a larger decorative centerpiece, you might enlarge the main leaf to approximately 45–50 cm wide. Keep the proportions of the three layers consistent and adjust the stem length accordingly.
Conclusion: Create a Beautiful Handmade Maple Leaf Placemat
The Maple Leaf Shaped Placemat Pattern is a wonderful project for anyone who enjoys sewing, quilting, and creating meaningful seasonal decorations. By combining three coordinating maple leaf shapes, lightweight batting, decorative quilting stitches, and a carefully finished fabric stem, you can create a unique table accessory inspired by the beauty of autumn foliage.
Throughout this tutorial, we explored how to choose suitable quilting fabrics, prepare three maple leaf templates, cut the fabric accurately, construct individual quilted leaves, add realistic vein stitching, and assemble the layers into a finished placemat. We also discussed practical finishing techniques, creative color variations, washing recommendations, and ways to adapt the pattern for other handmade projects.
The most appealing part of this design is its versatility. Whether you choose traditional autumn colors, a festive Christmas palette, or soft neutral tones, the same basic techniques can produce beautiful results. With patience and attention to detail, even a relatively simple collection of fabric pieces can become an attractive decoration that brings warmth and personality to your dining table.
EASILY FIND THE FREE PDF FOR THIS PATTERN HERE!
Now we would love to hear from you! 🍁 Have you ever made a maple leaf placemat or another autumn-inspired quilting project? What colors would you choose for your own Maple Leaf Shaped Placemat Pattern? Please leave your honest opinion, creative suggestions, and sewing experiences in the comments. Your feedback can inspire other readers, help beginners feel more confident, and encourage everyone to discover new ways to enjoy the art of handmade quilting.