
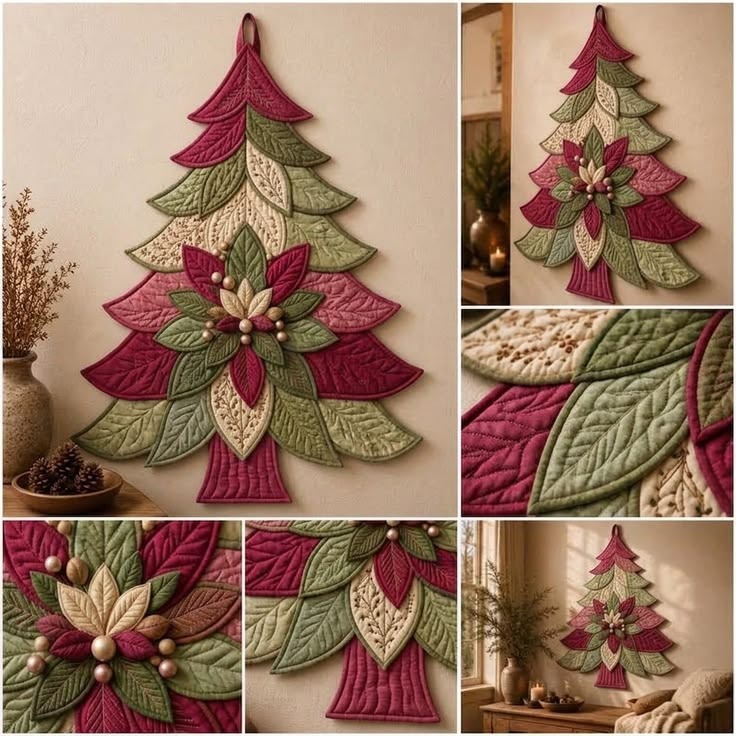
The Fabric Christmas tree wall decoration Pattern is a beautiful way to bring warmth, creativity, and handmade charm into your home during the holiday season. Combining traditional sewing techniques with decorative fabric appliqué, this Christmas project transforms simple pieces of fabric into an elegant wall hanging inspired by the natural beauty of evergreen branches and festive poinsettia flowers. The layered design, delicate quilting stitches, and harmonious combination of burgundy, olive green, dusty rose, and cream fabrics create a sophisticated decoration that feels both traditional and timeless. Whether you enjoy making handmade Christmas gifts or decorating your home with meaningful seasonal projects, this fabric Christmas tree wall hanging offers a wonderful opportunity to explore creative sewing while producing something truly special.
One of the most appealing characteristics of this Christmas fabric decoration pattern is its dimensional appearance. Unlike a traditional flat fabric Christmas tree, this design features overlapping, leaf-shaped branches that create movement, texture, and visual depth. Each fabric section is carefully cut, layered, stitched, and arranged to resemble the flowing branches of a decorated Christmas tree. The central poinsettia-inspired flower adds an elegant focal point, while small pearl-like embellishments introduce a subtle festive sparkle. Decorative quilting stitches follow the natural shapes of the leaves, enhancing their appearance and making the finished piece look beautifully detailed. Although the project may appear complicated at first glance, breaking the construction process into manageable steps makes it accessible to confident beginners and intermediate sewing enthusiasts.
Creating your own Fabric Christmas tree wall decoration Pattern also provides the freedom to personalize the colors, dimensions, and finishing details according to your decorating style. You can reproduce the classic Christmas color palette shown in the reference image or experiment with softer neutral fabrics for a farmhouse-inspired look. The project works beautifully as a living room decoration, an entryway accent, or a handmade holiday gift for someone who appreciates sewing and quilting. In this complete tutorial, you will learn how to select suitable materials, prepare the fabric pieces, construct the layered Christmas tree, create the decorative poinsettia, add quilted details, and finish the wall hanging professionally. All measurements are provided in centimeters, making it easier to follow the instructions and achieve consistent results.
1. Materials and Fabric Preparation for the Christmas Tree Wall Decoration
The first step in creating this fabric Christmas tree wall decoration is gathering the materials needed to achieve the textured, layered appearance of the original design. Choosing high-quality cotton fabrics will make the sewing process easier and help the finished decoration maintain its shape. Quilting cotton is particularly suitable because it is easy to cut, press, and stitch. For a slightly more structured result, you can combine quilting cotton with lightweight fusible interfacing or thin batting. These materials provide stability without making the individual branches too stiff or bulky. The goal is to create soft, defined fabric shapes that overlap naturally while remaining securely attached to the wall hanging.
DISCOVER MORE FREE PATTERNS HERE!
For a finished decoration measuring approximately 45 cm wide and 60 cm tall, prepare the following materials:
-
Burgundy cotton fabric: approximately 50 × 60 cm for the darker branches, flower petals, and decorative accents.
-
Olive green cotton fabric: approximately 50 × 60 cm for the layered evergreen branches and leaves.
-
Dusty rose cotton fabric: approximately 35 × 45 cm for the lighter pink branches and trunk.
-
Cream cotton fabric: approximately 30 × 40 cm for contrasting branches and flower details.
-
Lightweight fusible interfacing: approximately 80 × 100 cm, depending on the construction method.
-
Thin quilt batting: approximately 60 × 80 cm for quilted texture.
-
Coordinating sewing thread: burgundy, green, cream, and rose.
-
Pearl-style beads: approximately 8–12 small beads for the flower center and accents.
-
Fabric scissors or rotary cutter, measuring tape, pins, and sewing clips.
-
Sewing machine, hand-sewing needles, and an iron.
-
Paper, pencil, and fabric marker for creating the templates.
-
Fabric strip for the hanging loop: approximately 6 × 18 cm.
Before cutting any fabric, prepare a paper template that establishes the overall silhouette of the Christmas tree. Draw a central vertical guideline measuring approximately 55 cm. Mark the upper point of the tree, the widest lower branches, and the rectangular trunk. The design in the reference image is made from overlapping leaf-like sections rather than one solid triangular piece. Therefore, create several curved branch templates in different sizes. A practical starting point is to prepare large branches measuring approximately 22 × 12 cm, medium branches measuring 17 × 9 cm, and smaller upper branches measuring 12 × 7 cm. These dimensions are suggested construction measurements rather than exact dimensions taken from the photograph.
The fabric preparation process is important for achieving professional-looking results. If you are using washable quilting cotton, prewash the fabric according to its care instructions to reduce the risk of future shrinkage. Allow the fabric to dry completely and press it with an iron before cutting. Smooth fabric produces more accurate shapes and makes the curved edges easier to sew. If your fabric is delicate or has a special finish, test the iron temperature on a small scrap first. Apply lightweight interfacing to the wrong side of selected fabric pieces when additional stability is needed. Avoid using excessively heavy interfacing, because it may prevent the overlapping branches from lying naturally.
Next, organize your fabrics according to the intended color arrangement. The reference design uses burgundy and dusty rose branches toward the upper and lower sections, with olive green and cream branches positioned throughout the center. This arrangement creates an attractive balance between warm and earthy colors. To reproduce a similar appearance, cut approximately 14–18 branch pieces in different sizes and colors, adjusting the quantity as needed to fill the tree silhouette. Some branches should extend outward more than others, creating the distinctive flowing outline. Place the cut paper templates on the fabric before cutting to visualize the arrangement and avoid wasting material.
Finally, prepare the materials for the decorative flower that will become the centerpiece of the Christmas tree fabric appliqué. The flower in the photograph resembles a layered poinsettia made from elongated fabric petals and leaves. Prepare approximately 5–7 burgundy petals, 5–7 olive green leaves, and 3–5 cream accent petals. The larger petals can measure approximately 10 × 5 cm, while the smaller ones can measure 7 × 3.5 cm. These pieces will be quilted individually before being assembled into the flower. Keep the beads and decorative thread nearby, but wait until the final stages before attaching them. This prevents the embellishments from interfering with the sewing machine during construction.
2. Step-by-Step Instructions for Sewing the Layered Fabric Christmas Tree
Begin constructing the Fabric Christmas tree wall decoration Pattern by preparing the main backing silhouette. Although the decorative branches will cover most of the backing, this foundation provides structural support and keeps the entire project together. Using your paper drawing, cut one Christmas tree-shaped backing from cotton fabric and one matching piece from thin batting. The backing should follow the overall outline of the tree, including the upper point, side branches, and trunk. Keep the foundation slightly inside the final decorative outline so it remains hidden behind the overlapping pieces. If you prefer a firmer decoration, add a layer of lightweight interfacing to the backing fabric before assembling the project.
The next step is constructing the individual fabric Christmas tree branches. For a turned-edge finish, cut two matching fabric shapes for each branch, allowing approximately 0.7 cm for the seam allowance around the template. Place the fabric pieces right sides together and sew around the curved edges, leaving a small opening for turning. Carefully trim the seam allowance around tight curves, making small notches where necessary without cutting through the stitching. Turn each branch right side out and use a blunt turning tool to gently shape the edges. Press the pieces flat and close the openings with small hand stitches or by incorporating them into the later assembly. This technique creates neat, softly padded branches with finished edges.
To reproduce the textured appearance visible in the photograph, add decorative quilting stitches to each branch. Place a small piece of thin batting inside the branch before turning, or quilt the fabric to batting before constructing the finished shape. Begin by stitching a gently curved central vein along the length of each leaf-shaped branch. Add smaller diagonal lines extending toward the edges, following the natural structure of a leaf. You can use straight stitching, free-motion quilting, or decorative machine stitches depending on your experience. Coordinating thread creates a subtle embossed appearance, while slightly contrasting thread makes the quilting more visible. Keep the stitching balanced and avoid overcrowding the smaller fabric pieces.
Once the individual branches are ready, arrange them on a flat surface to form the layered Christmas tree design. Start at the bottom of the tree with the widest pieces, allowing the curved tips to extend outward. Position additional branches above the first row so they overlap the upper edges of the lower pieces. Continue building upward, gradually reducing the branch sizes until you reach the pointed top. Alternate burgundy, olive green, cream, and dusty rose fabrics to achieve the flowing color pattern shown in the reference. Take time to adjust the placement before sewing. A balanced arrangement should resemble a full Christmas tree while preserving the distinctive individual leaf shapes.
After arranging the branches, secure them to the backing foundation. Begin with the lower layers and work toward the top, following the overlapping order established during the layout stage. Pin or clip the pieces carefully, making sure the curved edges remain smooth. Stitch each branch along its concealed upper edge or central attachment area, allowing the outer curved tips to remain slightly raised for dimension. Where additional stability is needed, use small hidden hand stitches beneath overlapping sections. Avoid stitching every branch completely flat, because the raised edges contribute to the textured appearance of the original decoration. Check the overall silhouette frequently to maintain symmetry and prevent the fabric layers from shifting.
Complete the main tree structure by creating the top point and trunk. The upper section can be formed from two or three narrow burgundy branches arranged in a pointed shape. For the trunk, cut a dusty rose rectangle approximately 12 × 16 cm, including seam allowances, and prepare it using the same turned-edge method as the branches. Add vertical quilting lines to imitate the textured trunk shown in the photograph. Position the trunk behind the lowest branches and attach it securely to the backing. At this stage, the basic quilted Christmas tree wall hanging should be recognizable, with its layered branches, pointed top, and softly textured trunk ready for the central floral embellishment.
3. Creating the Poinsettia Flower and Decorative Quilting Details
The central poinsettia is one of the most distinctive features of this Fabric Christmas tree wall decoration Pattern. Its layered petals introduce depth, contrast, and a festive focal point that transforms the fabric tree into an elegant piece of Christmas wall art. Begin by arranging the prepared burgundy, green, and cream petal templates on the corresponding fabrics. Cut matching front and back pieces for each petal, adding a 0.7 cm seam allowance if you are using the turned-edge construction method. For a fuller appearance, include a thin layer of batting inside selected petals. The goal is to create elongated, slightly padded shapes with pointed ends and gently curved sides.
Sew the flower petals individually using the same technique applied to the Christmas tree branches. Place the fabric pieces right sides together, stitch around the edges, and leave a small opening for turning. Trim the seam allowances carefully, turn the pieces, and press them into shape. Once the petals are prepared, add decorative quilting lines to emphasize their natural structure. Stitch one central vein along each petal, followed by smaller diagonal lines extending outward. Burgundy petals look particularly beautiful with coordinating dark red thread, while green and cream petals can be quilted with thread in slightly deeper shades. This subtle contrast helps define the stitching without distracting from the overall design.
Begin assembling the fabric poinsettia appliqué by positioning the largest green leaves in a circular arrangement. Allow their pointed tips to extend outward, creating the foundation of the flower. Place the burgundy petals above the green leaves, rotating them slightly so both colors remain visible. Add the cream petals near the center to introduce brightness and contrast. The photograph shows an organic arrangement rather than a perfectly symmetrical flower, so slight variations in angle and overlap will make the design appear more natural. Before stitching, temporarily secure the petals with sewing clips or small hand-basting stitches. Adjust their positions until the flower looks full and balanced.
Once you are satisfied with the flower arrangement, sew the petals together at their inner ends. Use strong coordinating thread and small stitches to keep the center compact without flattening the outer petals. Position the assembled poinsettia slightly below the middle of the Christmas tree, as shown in the reference image. This placement creates a visually balanced composition and allows the flower to overlap several branches. Attach the flower securely through its central layers and add hidden stitches beneath selected petals if additional support is necessary. Keep the outer tips free wherever possible to preserve the beautiful three-dimensional appearance of the Christmas fabric wall hanging.
The next step is adding the decorative pearl-like beads. The reference decoration features small rounded embellishments clustered around the flower center and between selected petals. Choose lightweight craft beads in cream, champagne, or soft gold tones. Sew the beads individually using a strong hand-sewing thread, passing the needle through each bead several times for security. Position one slightly larger bead near the center and arrange smaller beads around it in a balanced pattern. Avoid adding too many embellishments, because the fabric textures should remain the main feature of the decoration. For homes with small children or pets, ensure that all beads are firmly attached and hang the decoration out of reach, or replace them with embroidered knots.
Finish this stage by reviewing the decorative quilting details throughout the entire project. Examine the branch veins, flower petals, and trunk stitching to make sure they are consistent and securely finished. Add extra quilting lines wherever a fabric section appears too plain, but maintain enough space between the stitches to preserve the soft padded texture. If you are comfortable with free-motion quilting, gentle curved lines can create an elegant botanical effect. Alternatively, a regular sewing machine with a straight stitch can produce equally attractive results when the lines are carefully planned. The combination of layered fabrics, raised petals, and decorative stitches is what gives this handmade Christmas decoration its distinctive quilted appearance.
4. Finishing the Christmas Fabric Wall Hanging and Decorating Your Home
After completing the tree and poinsettia, the next step is preparing the back of the fabric Christmas tree wall decoration. A neat backing hides the construction stitches and gives the project a professional finish. Place the completed decoration face down on a clean surface and inspect the reverse side. Trim any loose threads and check that all branches are firmly attached. Cut a matching backing piece from cotton fabric using the finished tree silhouette as a guide. If the decoration has a very irregular outline, trace the shape onto paper first to create an accurate template. Choose a backing fabric that coordinates with the front, such as burgundy, cream, or olive green.
There are several ways to attach the backing, but a carefully finished hand-sewn edge works particularly well for this layered design. Fold the raw edges of the backing inward by approximately 0.7 cm and press them gently. Position the backing against the reverse side of the tree, making sure it covers the construction stitches without extending beyond the decorative edges. Secure it with small clips or temporary basting stitches. Use a ladder stitch or small whipstitches to attach the backing around the perimeter. Work slowly around the pointed branches and curved edges to maintain the shape. This method creates a tidy finish while avoiding unnecessary machine stitching across the completed appliqué.
Next, create the fabric hanging loop that will support the decoration on the wall. Fold the prepared 6 × 18 cm fabric strip lengthwise with the right sides together and stitch along the long edge using a 0.7 cm seam allowance. Turn the strip right side out and press it flat. Fold it into a loop approximately 7–8 cm tall, depending on the desired hanging length. Position the loop behind the upper point of the Christmas tree, ensuring that it is centered. Secure both ends with several rows of strong stitching before closing the top portion of the backing. Because the decoration contains multiple fabric layers and embellishments, the hanging loop should be firmly attached to a reinforced area.
Once the backing and hanging loop are complete, give the Christmas tree fabric appliqué a final inspection. Gently smooth the branches and adjust any raised petals that may have become flattened during sewing. Remove temporary basting threads and check for loose stitches. If the project needs pressing, use a pressing cloth and a low-to-medium iron setting suitable for the fabric. Avoid placing the iron directly over beads or dimensional flower petals. Steam can help relax minor wrinkles, but excessive heat or pressure may flatten the quilted texture. If necessary, reshape individual branches by hand while the fabric is still slightly warm, taking care to avoid burns.
The finished decoration can be displayed in several beautiful locations throughout your home. Hang it on a neutral-colored wall to emphasize the rich burgundy and olive green fabrics, or place it above a console table decorated with pinecones, greenery, and battery-operated candles. The design also works well in a cozy entryway, dining room, or holiday craft corner. Its soft fabric texture adds warmth without requiring a large amount of space. Keep the decoration away from open flames, hot light fixtures, and moisture. When choosing a hanging hook, make sure it is appropriate for the finished weight of the project and the type of wall surface.
One of the greatest advantages of the Fabric Christmas tree wall decoration Pattern is its versatility. After completing the first version, you can experiment with different sizes and color combinations. A smaller tree measuring approximately 25 × 35 cm can become a charming seasonal accent, while a larger version can serve as a statement wall hanging. You can also replace the poinsettia with fabric stars, embroidered snowflakes, or additional quilted leaves. For a coordinated holiday collection, use matching fabrics to create table runners, decorative cushions, or smaller Christmas ornaments. Store the finished wall hanging flat or loosely wrapped in breathable fabric after the holiday season to protect its shape and embellishments.
Frequently Asked Questions About the Fabric Christmas Tree Wall Decoration Pattern
1. Is the Fabric Christmas tree wall decoration Pattern suitable for beginners?
Yes, this project can be adapted for beginners who already understand basic sewing techniques. The most important skills include cutting fabric accurately, sewing curved seams, turning fabric pieces, and attaching appliqué shapes. Beginners may find it helpful to start with fewer branches and use simple straight quilting stitches. The dimensional poinsettia requires additional patience, but the individual petals are constructed using the same basic method as the tree branches.
2. What is the best fabric for making a quilted Christmas tree wall hanging?
100% cotton quilting fabric is an excellent choice because it is easy to sew, press, and quilt. It also comes in a wide range of Christmas colors and patterns. Cotton fabric combined with thin batting creates the softly padded appearance visible in the reference image. Lightweight linen blends can also work, although they may require additional interfacing for stability. Avoid very stretchy fabrics unless you have experience stabilizing them.
3. Can I make this Christmas tree decoration without a sewing machine?
Absolutely. The entire project can be completed with hand sewing, although it will require more time. Use small backstitches for strong seams, running stitches for decorative quilting, and ladder stitches for invisible closures. Hand quilting can produce particularly beautiful leaf-vein details. A hand-sewn version may have a slightly softer, more traditional appearance, which can be especially attractive in handmade Christmas decorations.
4. How large should the finished fabric Christmas tree be?
The tutorial uses an approximate finished size of 45 cm wide and 60 cm tall, including the tree silhouette but excluding any additional hanging length. These measurements are flexible and can be adjusted according to your available wall space. For a smaller decoration, reduce all template dimensions proportionally. For a larger version, increase the size of the backing, branches, and flower petals while maintaining a balanced arrangement.
5. How do I prevent the fabric branches from losing their shape?
Use lightweight fusible interfacing and thin quilt batting to provide gentle support. Accurate cutting, careful seam trimming, and proper pressing also help maintain smooth curves. Avoid stuffing the branches too heavily, because excessive padding can distort their shape. If the decoration will be displayed for an extended period, secure the larger branches with a few hidden stitches to prevent sagging.
6. What quilting stitches work best for this Christmas fabric appliqué?
Straight stitches, free-motion quilting, and decorative machine stitches are all suitable. For the botanical design shown in the photograph, curved central veins with smaller diagonal branches create a natural leaf effect. Beginners can draw the stitching lines with a removable fabric marker before sewing. Experienced quilters may prefer free-motion quilting for a more organic appearance. Always test the stitching on a fabric scrap before working on the finished pieces.
7. Can I wash the finished Christmas tree wall decoration?
Because the decoration contains dimensional petals, quilted layers, and decorative beads, spot cleaning is generally the safest option. Use a slightly damp cloth to remove small marks and allow the fabric to air-dry completely. If all materials are washable and the embellishments are securely attached, gentle hand washing may be possible, but it can affect the shape of the padded pieces. Always test the fabric for color bleeding before exposing the completed decoration to water.
8. Can I use fabric scraps for this Christmas sewing project?
Yes. This is an excellent Christmas fabric scrap project because the individual branches and flower petals are relatively small. Leftover quilting cotton from previous projects can be combined to create a coordinated or patchwork-inspired tree. Choose scraps with similar weights and textures so the finished pieces behave consistently during sewing. This approach reduces fabric waste and gives the decoration a personal handmade character.
9. How can I make the poinsettia flower look more dimensional?
Use thin batting inside the larger petals and avoid stitching their outer edges directly to the tree. Arrange the green leaves underneath the burgundy petals, then add smaller cream petals toward the center. Slightly overlapping the pieces creates depth. Decorative quilting lines and carefully positioned beads further emphasize the layered appearance. The key is maintaining a balance between secure attachment and softly raised fabric details.
10. How should I store the fabric Christmas tree after the holidays?
Store the decoration in a clean, dry location away from direct sunlight. Place acid-free tissue paper between raised petals if necessary to help preserve their shape. Avoid folding the tree tightly, as this can create permanent creases in the quilted branches. A flat storage box or a breathable fabric bag is ideal. Before displaying the decoration again, inspect the hanging loop and any decorative beads to ensure they remain securely attached.
11. Can I sell decorations made using this sewing method?
Handmade Christmas wall decorations can be a wonderful addition to a small craft business. You can personalize the color combinations, flower arrangements, and quilting details to create original finished pieces. If you use a purchased commercial pattern or someone else’s artwork, check its licensing terms before producing items for sale. For your own original designs, accurate measurements, secure stitching, and careful finishing are important for creating attractive, durable products.
12. What are the most common mistakes when making a layered fabric Christmas tree?
Common mistakes include cutting branches without seam allowances, using batting that is too thick, sewing curved edges too quickly, and attaching the decorative layers before checking the overall arrangement. Another frequent issue is placing too many branches in one area, which can make the tree appear uneven. To avoid these problems, prepare all templates carefully, test your stitching, arrange the pieces before sewing, and work gradually from the bottom of the tree toward the top.
13. Can I change the traditional Christmas colors?
Yes. Although the original design features burgundy, dusty rose, olive green, and cream, you can customize the palette to match your holiday decorations. White, silver, and pale blue fabrics create a winter-inspired appearance, while red, emerald green, and gold produce a more traditional Christmas style. Neutral beige and sage green fabrics are particularly suitable for rustic or farmhouse interiors. The layered structure remains attractive with many different color combinations.
Conclusion: Create a Beautiful Handmade Fabric Christmas Tree Decoration
The Fabric Christmas tree wall decoration Pattern is a rewarding sewing project that combines creativity, traditional quilting techniques, and the timeless beauty of handmade Christmas decorations. By following this tutorial, you have learned how to select suitable cotton fabrics, prepare accurate templates, construct padded fabric branches, arrange overlapping appliqué pieces, and create a dimensional poinsettia flower.
You have also explored the importance of decorative quilting stitches, secure embellishment techniques, neat backing construction, and proper hanging methods. Each of these steps contributes to a finished decoration that is both visually appealing and practical for seasonal display. The combination of textured leaves, carefully coordinated colors, and delicate stitching makes this fabric Christmas tree a lovely addition to a cozy holiday home.
Another wonderful aspect of this project is the opportunity for personalization. Whether you choose the elegant burgundy and olive green palette from the reference image or create your own combination of festive fabrics, the finished decoration will reflect your individual sewing style. With patience, attention to detail, and a little creativity, simple fabric pieces can become a meaningful Christmas keepsake that you will enjoy displaying year after year.
EASILY FIND THE FREE PDF FOR THIS PATTERN HERE!
Now I would love to hear your sincere opinion! 🎄❤️ What do you think of this handmade fabric Christmas tree wall decoration? Would you keep the original colors, or would you choose a different Christmas palette? Please share your honest feedback, creative suggestions, and any ideas that could make this Fabric Christmas tree wall decoration Pattern even more beautiful or easier to create. Your experiences and suggestions can inspire other sewing enthusiasts to try this charming holiday project and discover the joy of making their own Christmas decorations.