
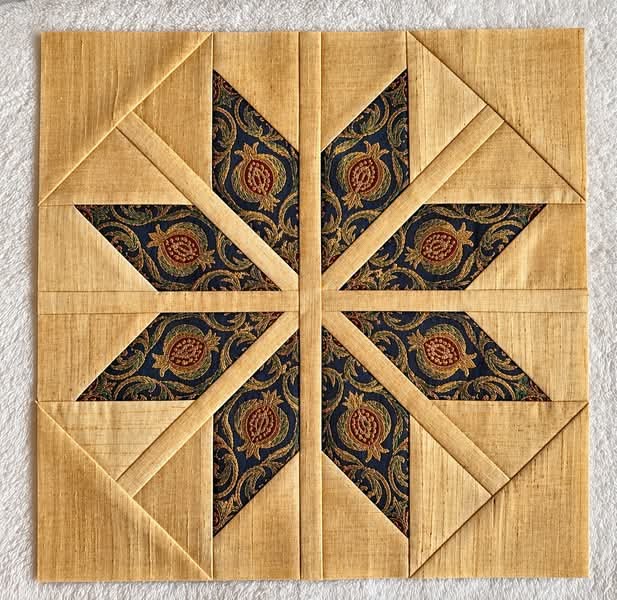
The Star-Shaped Quilt Block Tutorial Pattern is a beautiful quilting project that combines traditional patchwork techniques with a striking geometric design. Featuring eight elegant star points arranged around a central intersection, this quilt block creates a sophisticated appearance using contrasting fabrics and carefully aligned seams. The design shown in the reference image features warm golden-beige fabric paired with dark navy-blue floral prints, creating a wonderful balance between simplicity and decorative detail. Whether you are an experienced quilter or a beginner looking to develop new sewing skills, this star quilt block pattern offers an enjoyable opportunity to explore fabric placement, diagonal construction, and precision piecing. The finished block can become part of a larger quilt, a decorative pillow, a table runner, or a handmade wall hanging. With patience and careful measurements, you can recreate this attractive design while developing valuable skills that will improve your future quilting projects.
One of the most appealing characteristics of this Star-Shaped Quilt Block Tutorial Pattern is its symmetrical arrangement. The eight pointed shapes extend outward from the center, producing a starburst effect that draws attention to the patterned fabric. Unlike simpler patchwork blocks made entirely from squares, this design uses angled pieces and narrow background strips to create movement and visual depth. The surrounding neutral fabric highlights the darker star points while allowing the floral motifs to remain visible. This combination makes the block particularly suitable for traditional, vintage-inspired, and contemporary quilts. Another advantage is the freedom to experiment with different fabric combinations. You can choose Christmas colors, autumn shades, soft pastels, or vibrant prints depending on the final project. Although the reference design has a classic appearance, the same construction principles can produce an entirely different visual effect simply by changing the fabrics.
Creating a successful Star-Shaped Quilt Block Tutorial Pattern begins with understanding the importance of accurate cutting, consistent seam allowances, and careful pressing. These fundamental quilting techniques help the individual pieces fit together smoothly, especially where multiple angled seams meet. For this tutorial, we will use a practical 40 cm × 40 cm unfinished quilt block as our working example, with a finished size of approximately 39 cm × 39 cm after joining it to other blocks. Because the photograph does not provide exact measurements or a printable cutting diagram, the dimensions below are an original construction plan inspired by the illustrated design rather than verified measurements from the original pattern. The method uses four matching square units that are rotated to create the complete eight-pointed star. Each stage will be explained clearly, including fabric preparation, pattern drafting, assembly, pressing, and finishing, so that home quilters in the United States can follow the project from beginning to end.
1. Materials, Fabric Selection, and Measurements for the Star-Shaped Quilt Block
Before beginning the Star-Shaped Quilt Block Tutorial Pattern, gather all the necessary materials and arrange them on a clean, well-lit work surface. You will need approximately 45 cm of golden-beige quilting cotton for the background and 25 cm of dark floral quilting cotton for the star points. These quantities allow some extra fabric for test pieces and cutting adjustments. Choose good-quality, tightly woven cotton because it holds its shape well and is easier to sew accurately than slippery or stretchy fabrics. The reference image uses a dark floral print with gold and reddish details, but you can substitute any patterned fabric that contrasts clearly with your background. If you prefer a modern appearance, consider solid colors or small geometric prints. The most important factor is maintaining enough contrast to make the eight star points stand out.
DISCOVER MORE FREE PATTERNS HERE!
Your basic quilting tools should include a sewing machine, sharp fabric scissors, a rotary cutter, a self-healing cutting mat, a transparent quilting ruler, fine sewing pins or fabric clips, cotton or polyester sewing thread, and an iron. A fabric marking pencil or removable fabric marker will also be helpful when transferring the diagonal cutting lines. For accurate sewing, use a standard 0.5 cm seam allowance throughout this project. This is a metric construction method rather than the traditional American ¼-inch seam, so do not switch between the two allowances during assembly. If your machine has a seam guide, adjust it to maintain the chosen measurement. Consistency is particularly important because even small variations can affect the alignment of the star points.
For the sample block, divide the design into four unfinished 20.5 cm square units, which will be joined in a two-by-two arrangement. After the units are sewn together using 0.5 cm seams, the assembled block will measure approximately 40 cm square. Each smaller unit will contain two dark tapered star shapes pointing toward the central meeting area, along with beige background sections and narrow beige diagonal strips. This approach reproduces the overall visual arrangement of the photograph without requiring a single complicated eight-point intersection. For easier construction, each quadrant can be assembled using a full-size paper foundation template. The paper templates are drafted at the 20 cm finished-unit size, with seam allowances added around the outside.
To draft the quilt block template, draw a 20 cm × 20 cm square on graph paper. Identify the corner that will face the center of the finished star, and draw a diagonal line from that corner toward the opposite outer corner. Add a second diagonal line approximately 1 cm away to represent the narrow beige separating strip. Next, sketch two tapered floral sections, one extending toward the top edge and the other toward the side edge, both directed toward the central corner. Use the reference photograph to guide the proportions, keeping the floral points approximately 4–5 cm wide at their broadest visible sections. Fill the remaining areas with background shapes. The important requirement is that the drafted sections form a complete, nonoverlapping foundation pattern with straight sewing boundaries. Label every section before cutting the paper into working templates or using it for foundation piecing.
A helpful fabric cutting plan begins with preparing four identical paper foundations, each measuring 20 cm square before the outside seam allowances are added. Cut the beige and floral fabrics into rough pieces at least 1.5 cm larger than the corresponding foundation sections on every side. The extra fabric provides room for trimming after sewing and makes angled piecing easier to manage. For the narrow diagonal strips, cut beige fabric strips approximately 2 cm wide, or wider if necessary to cover the drafted strip area after both seam allowances are sewn. If you are using directional floral fabric, arrange the motifs before cutting so the flowers appear balanced throughout the star. Label the four quadrants A, B, C, and D to keep the layout organized.
Finally, prepare the fabrics by pressing them flat and checking that their edges are straight. If you normally prewash quilting cotton, wash both fabrics using the same method before cutting; otherwise, using both fabrics unwashed is also common for decorative quilting projects. Avoid stretching the fabric while pressing, especially along diagonal edges where the weave is more flexible. A little preparation at this stage makes the Star-Shaped Quilt Block Tutorial Pattern much easier to assemble. Keep the reference image nearby, place your paper templates in their final positions, and confirm that the star points will face inward correctly. Once the fabrics and templates are ready, you can begin creating the individual sections.
2. Step-by-Step Cutting and Construction of the Eight-Point Star Design
The first sewing stage involves constructing the four matching units that form the eight-point star quilt block. Begin with the foundation template for quadrant A and position the first floral fabric piece over its designated area. If using foundation paper piecing, place the fabric on the unprinted side of the paper, making sure it completely covers the shape and extends beyond every sewing line. Position the adjoining beige fabric right sides together with the floral piece, following the foundation’s marked seam line. Stitch along that line using a short machine stitch, approximately 1.5–1.8 mm, which will make the foundation paper easier to remove later. Fold the beige fabric open and press gently. Check that it covers its assigned area before moving to the next section.
Continue adding the remaining patchwork fabric pieces according to the order marked on your foundation. The most reliable sequence is to work from the interior sections outward, adding adjacent shapes one at a time. Before sewing each seam, fold the next fabric piece into its finished position to confirm that it will cover the entire area. This simple checking method helps prevent gaps around the angled star points. After stitching, trim the seam allowance to approximately 0.5 cm, open the fabric, and press it flat. Repeat the process until both floral star shapes, the diagonal beige strip, and all background sections have been assembled. The completed quadrant should display two dark floral shapes separated by a narrow light-colored diagonal band.
Once quadrant A is complete, repeat the same procedure for the remaining three star quilt units. You may use the same master template, but remember to rotate or mirror the design appropriately so that all four quadrants form the correct star when assembled. A convenient method is to prepare one foundation for each final orientation rather than relying on memory. Position the templates in a two-by-two arrangement and check the direction of the floral points before sewing. The upper-left quadrant should direct its two floral shapes toward the central area, while the other quadrants rotate around that same point. The finished layout should resemble a star with eight evenly distributed points and four beige corner areas.
After completing the individual units, use a quilting ruler and rotary cutter to trim each foundation-pieced section to 20.5 cm × 20.5 cm, including its outer seam allowances. Make sure the seam lines and printed sections remain correctly positioned inside the trimmed square. Do not cut through the outer seam allowance or remove any of the fabric needed for joining. If the foundation design was drafted as a 20 cm finished square, the extra 0.5 cm on each outer edge produces the required unfinished measurement. Measure all four units individually and compare them before assembly. Matching dimensions are essential because the central seams will need to align precisely when the sections are joined.
Arrange the four units on your work surface in their final positions. The dark floral shapes should now form the recognizable eight-pointed star pattern, with a beige vertical and horizontal intersection running through the center. The diagonal beige strips create a layered geometric effect that makes the block appear more intricate than a standard star. Step back and examine the layout before stitching anything together. Check that the floral prints are balanced, the points face the intended directions, and the beige sections form a symmetrical frame. If a quadrant looks incorrect, rotate or reposition it until the design matches the reference. Taking a photograph of the correct layout can also help you remember the arrangement while sewing.
To finish this stage, join the upper-left and upper-right quadrants with right sides together, using the same 0.5 cm seam allowance. Repeat with the lower-left and lower-right quadrants. Press the upper row’s joining seam toward one side and the lower row’s seam toward the opposite side. This technique, known as nesting seams, helps the center intersections fit together more accurately. Place the two rows right sides together, match the center seams carefully, and secure them with pins. Sew across the entire width, checking that the seams remain aligned. Open the assembled block and press gently from the front. The completed patchwork top should measure approximately 40 cm × 40 cm before being attached to any additional quilt blocks or borders.
3. Pressing, Quilting, and Finishing the Star-Shaped Quilt Block
Proper pressing is one of the most important finishing techniques in the Star-Shaped Quilt Block Tutorial Pattern. After the four quadrants are joined, place the block on an ironing surface and carefully smooth the fabric with your hands. Use a hot iron appropriate for quilting cotton and press each seam without dragging the iron across the fabric. Pressing means lifting and lowering the iron rather than moving it back and forth aggressively. This prevents distortion around the diagonal seams and helps the star maintain its intended geometry. If several seam allowances meet at the center, distribute the bulk as evenly as possible. A flat center will make the block easier to quilt and will produce a more professional appearance.
Inspect the star points and seam intersections before continuing. The floral sections should appear balanced around the center, and the beige strips should have consistent visible widths. Minor variations are normal in handmade patchwork, especially when working with multiple diagonal seams. However, if a point has been caught deeply inside a seam allowance, carefully remove a few stitches and adjust the alignment. Use your ruler to check the overall dimensions and make sure the outer edges remain straight. Avoid aggressively trimming the block smaller simply to correct a minor irregularity. It is better to maintain the intended dimensions whenever possible, particularly if you plan to combine several matching blocks into a larger quilt.
If you want to turn the completed patchwork into a finished quilted wall hanging or decorative panel, prepare a backing fabric and a layer of quilt batting. For a 40 cm block, cut both the batting and backing approximately 45 cm × 45 cm to provide extra material around the edges during quilting. Place the backing fabric wrong side up, center the batting over it, and position the pieced star block right side up. Smooth all three layers carefully to remove wrinkles. Secure them with quilting safety pins or a suitable basting method. This layered arrangement is called a quilt sandwich, and it provides the structure needed to transform a simple patchwork top into a finished quilted project.
For the quilting design, stitch-in-the-ditch quilting is an excellent choice because it follows the existing patchwork seams and preserves the geometric appearance of the star. Begin near the center and work outward, sewing carefully along selected seam lines. You can also add straight-line quilting approximately 0.5–1 cm away from the floral star edges to emphasize their shape. If you prefer decorative stitching, use a walking foot to create evenly spaced parallel lines across the beige background sections. Choose thread that complements the fabric colors, such as golden beige, dark navy, or warm brown. Avoid excessive quilting density if you want the finished panel to remain soft and flexible.
After completing the quilting, remove all basting pins and check the front and back for loose threads. Trim the excess batting and backing so they align with the edges of the quilted block, squaring the project carefully without cutting away important design elements. To finish the edges, prepare approximately 175–185 cm of quilt binding, allowing extra length for joining the ends. A binding strip approximately 6 cm wide can be folded lengthwise and attached around the perimeter using a suitable seam allowance. Sew the binding to the front, fold it around the raw edges, and secure it to the back by hand or machine. Miter the corners neatly for a polished finish. If the block will instead become part of a larger quilt, leave it unbound and join it to the surrounding blocks.
The finished Star-Shaped Quilt Block Tutorial Pattern can be displayed in several ways. A single quilted block makes a charming wall decoration, especially when framed by a coordinating fabric border. You can also create multiple matching blocks and arrange them in rows to make a bed quilt, table runner, or decorative throw. Alternating the background colors or reversing the contrast between the star and surrounding fabric can create exciting secondary patterns. For a traditional appearance similar to the photograph, use warm neutral fabrics with richly detailed floral prints. For a modern variation, try cream backgrounds with deep green, burgundy, or blue star points. The same foundation design can support many creative interpretations.
4. Expert Tips, Creative Variations, and Common Quilting Mistakes to Avoid
One of the best ways to improve your Star-Shaped Quilt Block Tutorial Pattern is to focus on precision rather than sewing speed. Quilting involves many small decisions that influence the final appearance, from how the fabric is cut to how the seams are pressed. Before beginning the full block, consider sewing a small test unit using leftover fabric. This will help you understand the angles, check your foundation pattern, and become comfortable with the order of construction. Use a consistent seam allowance and stop occasionally to verify your measurements. When sewing diagonal shapes, avoid pulling the fabric through the machine because this can stretch the edges. Let the feed dogs move the material naturally while you guide it gently.
Fabric selection also plays an important role in the success of this traditional star quilt pattern. The reference design works beautifully because the golden-beige background creates a strong contrast with the dark floral star points. If both fabrics have similar values, the star may become difficult to distinguish from the surrounding sections. A simple way to evaluate contrast is to photograph the fabrics and view the image in black and white. If the two fabrics still look clearly different, they will probably work well together. Large floral prints can create a dramatic appearance, while smaller prints often provide more consistent color distribution across the individual star points. Always consider how the motifs will appear after the fabric is cut into narrow angled shapes.
Another useful technique is chain piecing, which can save time when making multiple matching blocks. Instead of completing one quadrant entirely before beginning another, sew the same construction stage on several prepared foundations in sequence whenever the pattern allows. This reduces the number of times you need to stop and start the sewing machine. Keep the units labeled so they do not become mixed up, especially when the templates have different orientations. Chain piecing is particularly helpful if you plan to make a larger quilt containing twelve, sixteen, or more star blocks. However, beginners may find it easier to finish one complete quadrant first and use it as a reference for the others.
Common mistakes in eight-point star quilting include inaccurate cutting, inconsistent seam allowances, reversed fabric placement, and excessive pressing. If the completed block appears twisted or uneven, examine the individual units before joining them. Make sure each quadrant has been trimmed to the correct size and that the diagonal strips are positioned consistently. If the center intersection becomes bulky, experiment with pressing the seam allowances in opposite directions or carefully opening the final joining seam. Another frequent problem is accidentally sewing a floral piece with the wrong side facing outward. To prevent this, arrange all fabrics and templates in their correct positions before stitching. These simple checks can save considerable time and reduce the need to remove stitches later.
For quilters who enjoy customization, the Star-Shaped Quilt Block Tutorial Pattern offers many possibilities. A Christmas version might feature burgundy and forest-green star points against a cream background, while an autumn design could use pumpkin orange, mustard yellow, and warm brown. A spring-inspired quilt might combine pastel blue with delicate floral prints. You can also use fabric scraps from previous projects to create a more varied patchwork appearance. If you want to enlarge the design, scale the foundation pattern uniformly rather than changing individual measurements independently. Remember that seam allowances must be added at their original width after scaling the finished design. This helps maintain the correct proportions and ensures that the pieces continue to fit together.
The final recommendation is to treat each handmade quilt block as an opportunity to improve your skills and enjoy the creative process. Perfectly matched points are satisfying, but the character of handmade quilting also comes from the time and attention invested in every seam. Keep notes about the fabrics, measurements, and techniques that worked best for your project. These notes will be valuable when making additional blocks or experimenting with different sizes. Once you become comfortable with the construction, you can combine several blocks into a coordinated quilt or use individual blocks for gifts and seasonal decorations. With practice, this beautiful star design can become a favorite addition to your personal collection of quilting patterns.
Frequently Asked Questions (FAQ) About the Star-Shaped Quilt Block Tutorial Pattern
1. Is the Star-Shaped Quilt Block Tutorial Pattern suitable for beginners?
Yes, this pattern can be completed by motivated beginners who have basic sewing machine experience. However, the angled pieces and central intersections require more precision than simple square patchwork. Using foundation paper piecing can make the construction easier because the sewing lines are marked directly on the template. Beginners should work slowly, press each seam carefully, and complete one test quadrant before cutting all the fabric.
2. What is the best fabric for making an eight-point star quilt block?
High-quality 100% cotton quilting fabric is generally the best choice because it is stable, easy to cut, and comfortable to sew. Choose fabrics with good contrast so the star points remain visible. Traditional floral prints, solid colors, and small geometric patterns all work well. Avoid very stretchy fabrics or heavy upholstery materials when learning this design, as they can make accurate piecing more difficult.
3. What size should the finished quilt block be?
The sample in this tutorial measures approximately 40 cm × 40 cm unfinished and 39 cm × 39 cm finished when joined using 0.5 cm seams. You can create a larger or smaller version by scaling the foundation pattern. Always remember to add the seam allowances after determining the finished dimensions. Keeping the proportions consistent will help preserve the symmetrical appearance of the eight-point star.
4. Can I make this quilt block without foundation paper piecing?
Yes. Experienced quilters can create the design using traditional template piecing or carefully drafted rotary-cut shapes. However, because the block includes several tapered angles and narrow diagonal strips, foundation paper piecing provides a useful guide for accuracy. If you prefer traditional piecing, prepare sturdy templates with clearly marked seam allowances and check the alignment of every piece before sewing.
5. How do I keep the star points sharp and properly aligned?
Accurate cutting, careful pinning, and consistent seam allowances are essential. When joining the four quadrants, match the center seams before stitching the outer edges. Use a quilting ruler to check the units after each major construction stage. Press without stretching the diagonal edges, and avoid trimming the units until all their internal pieces have been assembled.
6. What colors work best for a traditional star quilt?
Traditional combinations often include cream, beige, navy blue, burgundy, forest green, and warm gold. The reference photograph uses a golden-beige background with a dark floral print, creating a classic appearance. For a contemporary design, consider black and white, teal and cream, or soft pastel combinations. The most important consideration is sufficient contrast between the star points and the background.
7. Can this pattern be used to make a full-size quilt?
Absolutely. You can repeat the Star-Shaped Quilt Block Tutorial Pattern to create a larger quilt top. For example, arranging twelve finished blocks in three columns and four rows would create a central patchwork area approximately 117 cm × 156 cm before adding borders. You can also place plain fabric squares between the star blocks to give the design more visual space. The final quilt dimensions will depend on your chosen layout, borders, and finishing method.
8. How should I wash and care for a finished star quilt?
For a finished cotton quilt, follow the care recommendations for the fabrics, batting, and thread used in the project. A gentle wash with mild detergent and cool water is often suitable for washable cotton quilts. Use a color-catching sheet when washing strongly contrasting fabrics for the first time, especially dark blues or reds. Dry according to the batting manufacturer’s instructions and avoid excessive heat if the materials are sensitive to shrinking.
9. Why does my quilt block become smaller after sewing?
Fabric pieces lose some visible width and height when they are joined because the seam allowances are folded inside the seams. This is why quilting patterns distinguish between unfinished measurements and finished measurements. In this tutorial, the 40 cm unfinished block becomes approximately 39 cm square after its outer seam allowances are used. If the block is smaller than expected before joining, check your cutting accuracy and seam allowance settings.
10. What can I make with a single star-shaped quilt block?
A single block can become a decorative pillow front, wall hanging, small table topper, framed textile decoration, or the center of a larger patchwork project. You can add coordinating borders to increase its dimensions or combine it with simple background fabric for a minimalist appearance. This versatility makes the pattern especially appealing for quilters who enjoy creating practical handmade gifts.
11. How long does it take to complete this quilt block?
The time required depends on your sewing experience and the construction method. An experienced quilter may complete the pieced block in a few hours, while a beginner may prefer to divide the project across several sewing sessions. Preparing the templates, cutting the fabrics, and aligning the star points are often the most time-consuming stages. Adding batting, quilting, and binding will require additional time.
12. Can I use leftover fabric scraps for this pattern?
Yes, this design is an excellent opportunity to use coordinated quilting fabric scraps. Choose pieces large enough to cover each foundation section with the necessary seam allowances. For a balanced appearance, use similar fabric values for the eight star points, even if their prints are different. Scrap quilting can give the finished block a charming, personalized appearance while making good use of leftover materials.
Conclusion: Create Your Own Beautiful Star-Shaped Quilt Block
The Star-Shaped Quilt Block Tutorial Pattern is a rewarding project that combines traditional quilting techniques with an elegant geometric design. Throughout this tutorial, we explored how to select coordinating fabrics, prepare accurate measurements, draft foundation templates, construct four matching quadrants, and assemble them into a beautiful eight-point star. We also covered essential finishing techniques, including careful pressing, quilt sandwich preparation, decorative quilting, and binding.
By following these steps, you can recreate a block inspired by the photograph while developing important skills in patchwork quilting, foundation paper piecing, fabric cutting, and precision sewing. The combination of warm background fabric and richly patterned star points makes this design particularly attractive, but you can easily adapt the colors and prints to reflect your personal style.
EASILY FIND THE FREE PDF FOR THIS PATTERN HERE!
Whether you choose to display the finished block as a wall hanging, incorporate it into a larger quilt, or turn it into a decorative gift, the project offers plenty of opportunities for creativity. Remember that quilting is a skill developed through practice, and each completed block helps build confidence and experience. We would love to hear your sincere opinion about this Star-Shaped Quilt Block Tutorial Pattern! What do you think of the design? Which fabric colors would you choose for your own version? Please share your honest feedback, creative ideas, and suggestions for future quilting tutorials. Your experiences and recommendations can inspire other quilting enthusiasts to discover new techniques and enjoy the wonderful art of handmade patchwork.