
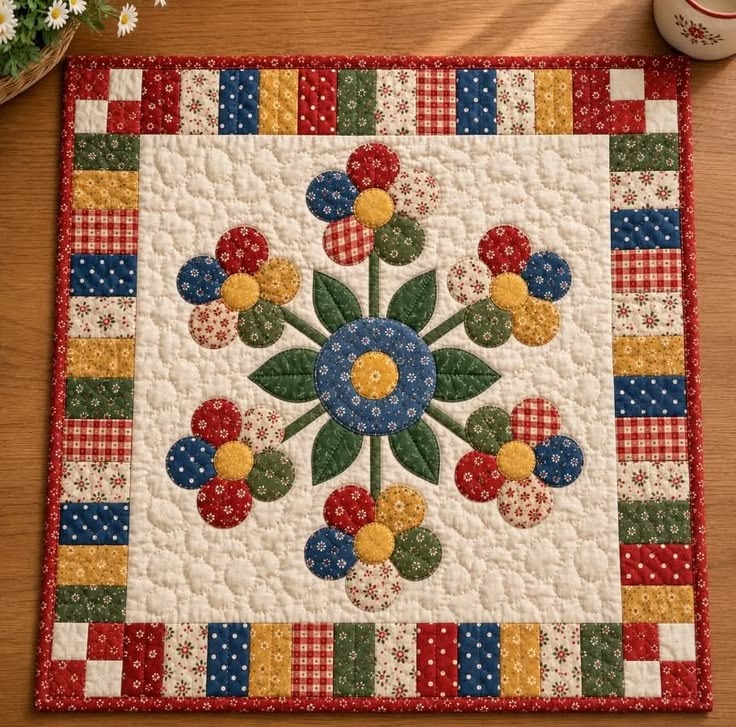
The Patchwork Quilt Tutorial with Floral Appliqué Pattern is a beautiful sewing project that combines traditional patchwork techniques, colorful fabric arrangements, and delicate floral appliqué into one charming handmade quilt. This design celebrates the timeless beauty of quilting through its cheerful flowers, carefully arranged fabric borders, and soft quilted background. Featuring a central blue flower surrounded by smaller blossoms in red, yellow, green, and cream, the pattern creates a balanced composition that feels both nostalgic and welcoming. Whether you are an experienced quilter or someone discovering the joy of sewing for the first time, this floral appliqué quilt pattern offers an opportunity to practice essential quilting skills while creating something meaningful. The combination of cotton fabrics, decorative stitching, and traditional patchwork blocks makes this project especially appealing for anyone who enjoys handmade home decorations.
One of the most attractive characteristics of this Patchwork Quilt Tutorial with Floral Appliqué Pattern is the harmonious combination of geometric borders and organic floral shapes. The center features a large circular flower with a golden-yellow center, surrounded by green leaves and six smaller flowers arranged symmetrically around it. Each blossom contains colorful fabric petals, creating a playful mixture of floral prints, polka dots, and gingham patterns. The surrounding patchwork border introduces additional texture through small rectangular fabric pieces in coordinated shades of navy blue, mustard yellow, forest green, cream, and deep red. This arrangement creates a traditional country-style appearance that works beautifully in farmhouse interiors, sewing rooms, bedrooms, and cozy living spaces. By selecting complementary fabrics and following a consistent construction process, you can recreate the visual character of the reference design while adding your own personal touches.
Learning how to make a patchwork quilt with floral appliqué is also a wonderful way to develop practical sewing skills that can be used in many future quilting projects. Throughout this tutorial, you will learn how to prepare fabric, create accurate appliqué templates, arrange flower petals, sew patchwork borders, assemble quilt layers, and finish the edges with professional-looking binding. The instructions use terminology commonly found in American quilting, including seam allowance, raw-edge appliqué, fusible web, quilt sandwich, free-motion quilting, and double-fold binding. Measurements are provided in centimeters, with helpful references to standard quilting practices used in the United States. The finished project described here is approximately 60 × 60 cm (23.6 × 23.6 inches), making it suitable for a decorative wall hanging, small table topper, or quilted accent panel. The dimensions and template sizes are a practical interpretation of the photograph rather than measurements taken from an original published pattern.
1. Materials, Fabric Selection, and Preparation for the Floral Appliqué Quilt
The first step in creating your Patchwork Quilt Tutorial with Floral Appliqué Pattern is gathering the materials needed for accurate cutting and comfortable sewing. Choose high-quality 100% quilting cotton, preferably in coordinating colors that resemble the original floral arrangement. You will need cream-colored fabric for the background, navy blue for the central flower, green fabric for the leaves and stems, yellow fabric for flower centers, and several red, blue, cream, and patterned cotton scraps for the smaller petals. The patchwork border should include a combination of floral prints, gingham, polka dots, and small geometric designs. Using fabrics with similar visual weight will help create a balanced finished quilt without allowing one particular color or print to dominate the composition.
DISCOVER MORE FREE PATTERNS HERE!
For this approximately 60 × 60 cm quilt, prepare a cream background square measuring 44 × 44 cm, approximately 0.5 meter of assorted patchwork cotton fabrics, and enough additional scraps for the flowers and leaves. You will also need a backing fabric square measuring approximately 70 × 70 cm, low-loft cotton or cotton-blend batting measuring 70 × 70 cm, and approximately 2.6 meters of prepared binding. Other essential supplies include matching sewing thread, a rotary cutter, quilting ruler, cutting mat, fabric scissors, pins, sewing clips, a washable fabric marker, an iron, and a sewing machine. Lightweight fusible web is particularly useful for securing appliqué pieces before stitching. If you plan to use free-motion quilting, prepare a suitable quilting foot and consult your machine’s instructions.
Before cutting, wash your cotton fabrics if you normally prewash quilting materials, especially when working with dark red and navy fabrics that may release excess dye. Use a color-catching sheet during the first wash when appropriate, and allow the fabric to dry completely before pressing. Press each piece carefully to remove wrinkles and create a smooth cutting surface. Consistent fabric preparation helps prevent unexpected distortion when assembling the floral patchwork quilt. If you choose not to prewash, use a consistent approach for the entire project and follow the fabric manufacturer’s care instructions. Always test your chosen fusible web and fabric combination on a scrap before applying heat to the actual quilt pieces.
Next, establish the measurements for the central panel and surrounding border. For this adapted design, the unfinished cream background measures 44 × 44 cm, while the completed patchwork border will measure approximately 9 cm wide on each side. Use a consistent 0.6 cm seam allowance, which is close to the standard ¼-inch seam used in American quilting. The final dimensions may vary slightly depending on your cutting accuracy and the amount of quilting applied. For a beginner-friendly construction method, build the border from fabric strips and corner blocks, then trim each assembled section to the measurements needed to fit the central panel. Accurate measuring is more important than forcing every scrap to have exactly the same width.
To prepare the floral appliqué templates, draw one large circle approximately 10 cm in diameter for the central blue flower and another circle approximately 4 cm in diameter for its yellow center. For each of the six surrounding flowers, create five rounded petal templates approximately 4.5–5 cm across and a smaller circular center measuring about 3.5 cm. Prepare several pointed oval leaf templates measuring approximately 7 × 3.5 cm, along with narrow stem templates approximately 1–1.5 cm wide. These measurements can be adjusted slightly to accommodate your chosen fabric prints. Because the flower arrangement is symmetrical, creating reusable templates from sturdy paper or template plastic will help maintain consistency throughout the floral appliqué pattern.
Finally, organize the fabric pieces by color and intended position before beginning assembly. Place the blue fabric in the center, arrange the green leaves around it, and distribute the six smaller flowers at the top, upper left, upper right, lower left, lower right, and bottom. Use red, blue, cream, mustard, and green petals in different combinations to reproduce the colorful appearance of the reference quilt. Arrange the border fabrics separately so that repeating colors are spaced evenly around the panel. Taking a photograph of your layout can be helpful when you begin sewing, especially if the pieces need to be moved. This preparation stage establishes the visual foundation of your handmade patchwork quilt and reduces the likelihood of placement mistakes later.
2. Step-by-Step Instructions for Creating the Floral Appliqué Design
Begin the floral appliqué quilt tutorial by preparing the cream background panel. Cut the fabric into a precise 44 × 44 cm square, press it thoroughly, and fold it gently in half horizontally and vertically to identify the center. Mark the center using a removable fabric marker or temporary crease. Leave at least 2 cm of clear space around the outer edges for joining the patchwork border. The floral arrangement should remain centered within the visible background, with enough space between the outer petals and the future seams. Before attaching anything permanently, arrange all flowers, stems, and leaves on the background to confirm that the design fits comfortably and resembles the reference image.
Create the central flower by cutting a navy blue circle approximately 10 cm in diameter and a golden-yellow circle approximately 4 cm in diameter. Attach fusible web to the wrong side of each fabric according to the manufacturer’s instructions, then cut the shapes carefully. Position the blue circle at the center of the cream background and place the yellow circle directly over its middle. The photograph shows a decorative blue floral fabric surrounding a bright yellow center, which creates a strong focal point. Once satisfied with the placement, fuse the pieces to the background using the recommended iron temperature and pressing time. Secure the edges with a small zigzag stitch, blanket stitch, or decorative appliqué stitch, using thread that complements the fabric.
Next, construct the six smaller flowers that surround the central design. Each flower consists of five overlapping rounded petals arranged around a contrasting yellow center. Cut approximately 30 petal pieces in total, using red, navy blue, cream, mustard yellow, green, and gingham fabrics. Place the petals in a circular arrangement, allowing their inner edges to overlap slightly beneath the center circle. For an arrangement similar to the photograph, alternate the direction of colors so that no two adjacent flowers look completely identical. Fuse the petals first, then position and fuse each yellow center on top. Stitch around the visible petal edges and centers, taking care to maintain smooth curves and even spacing.
The green stems and leaves are essential for connecting the smaller flowers to the central composition. Cut six narrow green stems, adjusting their lengths to reach from the central flower toward each surrounding blossom. For curved stems, use bias-cut strips or carefully shaped fusible appliqué pieces so the fabric follows the intended direction without excessive wrinkling. Position the stems beneath the flowers and central circle, then add pointed green leaves between the blossoms. The reference design includes leaves radiating from the center, giving the arrangement a natural botanical appearance. Fuse and stitch the stems before attaching the overlapping flowers and leaves whenever possible. This layering order helps conceal raw ends and produces a cleaner fabric flower appliqué.
After arranging all six flowers, examine the design from a distance to check its symmetry and overall color distribution. The upper and lower flowers should align approximately with the vertical center of the quilt, while the remaining four flowers form balanced diagonal groups. Adjust individual petals or leaves before permanently attaching any pieces that have not yet been fused. Once the arrangement is complete, use a coordinating thread to sew around the appliqué edges. A narrow zigzag stitch is particularly useful for securing rounded petals, while a straight stitch positioned close to the edge can create a softer raw-edge appliqué finish. For improved durability, make sure every appliqué component is securely attached without pulling or puckering the background fabric.
Complete this stage by pressing the floral panel gently from the wrong side over a pressing cloth or towel, following the care instructions for your fusible materials. Avoid dragging the iron across the appliqué pieces because this may distort their shapes. Inspect the stitching carefully and trim any loose threads. If you prefer additional texture, use matching embroidery thread to stitch simple veins into the green leaves or add subtle decorative stitching around the flower centers. These details are optional, but they can make the Patchwork Quilt Tutorial with Floral Appliqué Pattern look more dimensional and handcrafted. Set the finished center panel aside while preparing the colorful patchwork border.
3. Sewing the Patchwork Border and Assembling the Quilt Layers
The border is one of the most recognizable features of this patchwork quilt with floral appliqué. It combines narrow fabric rectangles in red, navy, mustard, green, cream, and gingham prints, creating a lively frame around the softer cream background. For an approximately 9 cm finished border, prepare strips measuring about 10.2 cm in the direction perpendicular to the quilt edge, allowing for two 0.6 cm seam allowances. Cut individual rectangles in assorted lengths, commonly between 3.5 and 5 cm along the border. Join them end to end to create colorful patchwork bands. Press each seam carefully, alternating the direction of seam allowances where helpful to reduce bulk. Keep the colors distributed evenly, repeating darker fabrics at regular intervals for a balanced appearance.
Begin by constructing the upper and lower border strips. Sew the rectangular fabric pieces together using the same 0.6 cm seam allowance throughout the project. After joining several pieces, measure the strip and continue adding rectangles until it is long enough to be trimmed to match the 44 cm unfinished width of the central panel. Prepare two strips measuring 44 × 10.2 cm after trimming. Pin one strip to the top edge of the cream background, right sides together, matching the ends and center points. Sew the pieces together without stretching the fabric, then repeat with the lower border. Press the seam allowances toward the patchwork strips when practical. At this point, the panel should measure approximately 44 × 63.2 cm before the side borders are attached.
For the left and right borders, prepare two additional patchwork strips measuring approximately 63.2 × 10.2 cm. The photograph includes small checkerboard-style corner arrangements, so you can create four-patch corner blocks and incorporate them into the ends of the side borders. To make each corner block, cut four squares measuring 5.7 × 5.7 cm, then sew them together in a two-by-two arrangement using the 0.6 cm seam allowance. Each completed corner block should measure approximately 10.2 × 10.2 cm before joining. Use contrasting red and cream fabrics to recreate the traditional checkerboard appearance. Build the middle section of each side strip from assorted rectangles, then attach a corner block at each end. Trim and adjust the assembled side borders to match the actual height of the quilt center with its top and bottom borders.
Attach the completed side borders by placing each strip right sides together with the corresponding edge of the quilt panel. Match the corner seams carefully so the four-patch blocks align with the upper and lower patchwork bands. Pin or clip the borders at the ends, center, and several intermediate points to prevent shifting. Sew slowly using a consistent seam allowance, then press the seams flat before pressing them to one side. Measure the quilt top horizontally and vertically to confirm that the borders are reasonably square. The expected unfinished dimensions are approximately 63.2 × 63.2 cm, which will become approximately 62 × 62 cm after the outer seam allowances are enclosed by binding. If you prefer the smaller 60 cm finished size, trim the outer borders evenly before quilting, preserving sufficient width for the binding.
Once the patchwork top is complete, prepare the quilt sandwich, which consists of three layers: the backing fabric, batting, and decorative quilt top. Place the backing fabric on a clean, flat surface with the wrong side facing upward. Smooth the batting over the backing, then position the quilt top on the batting with its right side facing upward. Ensure that the backing and batting extend beyond the quilt top on every side. Secure the layers using quilting safety pins, temporary basting spray, or long hand-basting stitches. Work from the center outward to remove wrinkles and prevent unwanted folds. Proper basting is especially important when quilting around circular appliqué pieces because uneven tension can distort the flowers.
The reference image features a softly textured cream background with dense, irregular quilting that resembles small pebbles or rounded cloud shapes. To achieve a similar appearance, use free-motion quilting with a coordinating cream thread and create gently connected curves throughout the background. Quilt carefully around the appliqué flowers and leaves to emphasize their shapes. If you are new to free-motion quilting, practice on a separate fabric-and-batting sample before working on the finished project. You may also use a walking foot to create simpler echo-quilted lines around the flowers. Quilt the colorful border with straight lines or subtle decorative stitching that complements the rectangular fabric pieces. Avoid overly dense quilting on the appliqué petals if you want them to retain a slightly raised appearance.
4. Finishing the Floral Patchwork Quilt and Creative Decoration Ideas
After completing the quilting, examine the entire project to make sure all three layers are securely stitched together. Remove the basting pins or temporary stitches, then place the quilt on a large cutting mat. Use a quilting ruler and rotary cutter to trim away the excess batting and backing, keeping the edges straight and the corners square. Measure the quilt diagonally in both directions to check its overall shape. Small differences are common in handmade quilting, but careful trimming will help create a neat finished appearance. This stage is particularly important for the Patchwork Quilt Tutorial with Floral Appliqué Pattern, because its rectangular border and checkerboard corners make uneven edges more noticeable.
Prepare the binding using red floral quilting cotton similar to the outer edge shown in the photograph. Cut enough strips measuring approximately 6.5 cm wide to create a continuous length of at least 2.6 meters, allowing additional fabric for joining and finishing. Join the strips diagonally, trim the seam allowances, and press the seams open to reduce bulk. Fold the long strip in half lengthwise, wrong sides together, and press to create double-fold quilt binding. The red binding provides a strong visual frame around the patchwork border and helps unify the colorful design. If you prefer a softer appearance, consider navy blue, forest green, or cream binding, although red most closely resembles the original project.
Attach the binding to the front of the quilt by aligning its raw edges with the trimmed outer edges. Leave an unsewn tail of approximately 15 cm at the beginning and use a consistent 0.6 cm seam allowance. Sew along the first side, stopping approximately 0.6 cm before the corner. Fold the binding upward to create a diagonal crease, then fold it downward so the new fold aligns with the next quilt edge. Continue sewing around all four sides, creating neat mitered corners. When you approach the starting point, join the binding tails using a diagonal seam, trim the excess, and complete the attachment. Fold the binding over to the back and secure it using small hand stitches or a carefully positioned machine stitch.
For a traditional handmade finish, sew the folded binding to the back using an invisible ladder stitch or small slip stitches. This technique produces a clean front edge while allowing the red fabric to frame the quilt naturally. If you prefer machine binding, use a walking foot and sew slowly to maintain an even line around the entire perimeter. Check the corners to ensure that the folds lie flat without creating excessive bulk. Once the binding is attached, give the quilt a final gentle press and inspect the floral appliqué for any loose threads or unfinished stitching. Your handmade floral patchwork quilt should now display a colorful geometric frame, six cheerful flowers, a central circular blossom, and a beautifully textured quilted background.
This floral appliqué quilt pattern can be adapted in many creative ways without changing its essential construction method. For a spring-inspired version, replace the deep red and mustard fabrics with pastel pink, lavender, pale yellow, and sage green. For a Christmas-themed quilt, emphasize red, forest green, cream, and gold fabrics while keeping the same flower arrangement. A modern variation could use solid cotton fabrics instead of traditional floral prints, creating a cleaner geometric appearance. You can also enlarge the central panel to make a decorative pillow cover or repeat the floral arrangement across multiple blocks to create a larger bed quilt. Maintaining consistent seam allowances and proportionate appliqué templates will help preserve the original design’s balanced appearance.
When caring for your finished quilt, follow the recommendations for the fabrics, batting, and fusible products used during construction. For most washable cotton quilts, a gentle machine cycle with mild detergent and cool water is appropriate, provided all materials are compatible with machine washing. Consider using a color-catching sheet when washing a quilt containing dark red or navy fabrics for the first time. Lay the quilt flat or tumble dry on low if the materials permit. Store it away from prolonged direct sunlight to help preserve the colors. Whether displayed on a wall, placed on a small table, or given as a thoughtful handmade gift, the completed Patchwork Quilt Tutorial with Floral Appliqué Pattern demonstrates the beauty of traditional quilting techniques and the satisfaction of creating something unique by hand.
Frequently Asked Questions (FAQ) About the Patchwork Quilt Tutorial with Floral Appliqué Pattern
1. Is this floral appliqué quilt suitable for beginners?
Yes. This project is suitable for confident beginners who have basic sewing machine experience. The rectangular patchwork borders are relatively straightforward, while the rounded appliqué flowers provide an opportunity to practice cutting curves, positioning fabric shapes, and decorative stitching. Beginners may find it helpful to complete one practice flower before working on the main quilt panel. Using fusible web can make the appliqué process easier by keeping the pieces in place during sewing.
2. What is the best fabric for making a patchwork quilt with floral appliqué?
100% quilting cotton is one of the most practical choices because it is easy to cut, press, sew, and maintain. Cotton also comes in a wide variety of floral prints, gingham patterns, polka dots, and solid colors. Choose fabrics with similar weights to prevent uneven seams and distortion. Lightweight cotton is especially useful for appliqué because it can be layered without creating excessive thickness.
3. What is the finished size of this floral patchwork quilt?
The adapted project described in this tutorial finishes at approximately 62 × 62 cm (24.4 × 24.4 inches) before any optional reduction in border width. It can be trimmed to approximately 60 × 60 cm if desired. The size makes it suitable for a small wall hanging or decorative table topper. To create a larger quilt, increase the background dimensions, enlarge the flower templates proportionally, or add additional patchwork borders.
4. Can I make the floral appliqué without fusible web?
Yes. Fusible web is helpful but not mandatory. You can use needle-turn appliqué, freezer-paper templates, or a traditional turned-edge method to attach the flowers and leaves. These techniques require additional preparation and sewing time, but they can produce beautifully finished edges. Raw-edge appliqué without fusible web is also possible if the pieces are carefully pinned or temporarily secured before stitching.
5. What sewing machine stitch works best for floral appliqué?
A narrow zigzag stitch, blanket stitch, or closely spaced straight stitch can work well depending on the desired appearance. A blanket stitch creates a decorative handmade effect, while a narrow zigzag provides additional edge coverage. Straight stitching close to the fabric edge is suitable for raw-edge appliqué when a softer, slightly textured finish is desired. Always test the stitch length, width, and thread tension on scrap fabric before sewing the actual quilt.
6. How can I prevent the appliqué fabric from puckering?
Puckering often occurs when the fabric is stretched during stitching or when the machine tension is too tight. Begin with a flat, well-pressed background and avoid pulling the fabric through the sewing machine. Lightweight stabilizer beneath the appliqué area may help support delicate stitching. Use an appropriate needle, adjust the stitch settings, and sew slowly around curved edges. Testing your technique on a sample can help identify problems before they affect the finished quilt.
7. Can I sew this patchwork quilt entirely by hand?
Absolutely. Traditional quilting techniques can be completed without a sewing machine. You can join the border rectangles using small running stitches, attach the appliqué flowers with needle-turn stitching, and quilt the layers using hand-quilting stitches. Hand sewing requires more time, but it can create a distinctive heirloom appearance. Use strong cotton quilting thread and maintain consistent seam allowances for accurate assembly.
8. How do I choose the best colors for a floral patchwork quilt?
Start with a balanced color palette containing three or four dominant colors and a few coordinating accents. The reference design uses red, navy blue, green, mustard yellow, and cream, which work together to create a traditional country-style appearance. Distribute the colors evenly around the flowers and border to avoid concentrating too much of one shade in a single area. Small floral prints and gingham fabrics can add interest without overwhelming the central appliqué.
9. What is the difference between patchwork and appliqué in quilting?
Patchwork involves sewing separate fabric pieces together to create a larger fabric surface, such as the colorful rectangular border in this project. Appliqué involves attaching decorative fabric shapes onto a background, such as the flowers, stems, and leaves in the central panel. Combining both techniques allows quilters to create detailed compositions that include geometric structure and decorative imagery.
10. How long does it take to complete this floral appliqué quilt?
The time required depends on sewing experience, the chosen appliqué method, and the complexity of the quilting. A confident beginner may need approximately 10–16 hours spread across several sewing sessions. Experienced quilters may complete the project more quickly, especially when using fusible appliqué and machine quilting. Hand stitching, detailed embroidery, and dense free-motion quilting can increase the overall construction time.
11. Can this quilt be used as a table topper or wall decoration?
Yes. Its square shape and centered floral design make it especially suitable for decorative use. As a table topper, it can brighten a small side table or accent surface. For wall display, attach a hanging sleeve to the back before the final binding is completed. If the quilt will be displayed in a sunny location, consider rotating it occasionally to reduce uneven fading.
12. How should I wash and store a handmade floral appliqué quilt?
Use gentle washing methods appropriate for the materials used in the project. Mild detergent, cool water, and careful drying can help protect the fabric colors and decorative stitching. Avoid harsh bleach and excessive heat. When storing the quilt, make sure it is completely dry, fold it loosely, and place it in a clean, breathable cotton storage bag. Refolding occasionally can help prevent permanent creases.
Conclusion: Creating a Beautiful Floral Patchwork Quilt
The Patchwork Quilt Tutorial with Floral Appliqué Pattern brings together several rewarding sewing techniques in one colorful and practical project. From selecting coordinating cotton fabrics and preparing flower templates to creating the central appliqué arrangement, sewing the patchwork border, quilting the layers, and attaching the final binding, each stage contributes to the beauty of the finished piece. The combination of traditional fabric prints, symmetrical flowers, carefully arranged green leaves, and soft background quilting gives this design a warm, welcoming character that can complement many home decorating styles.
One of the greatest pleasures of quilting is the freedom to make every project personal. You can follow the traditional red, blue, green, yellow, and cream palette shown in the reference design or experiment with different colors and prints to create something entirely your own. The skills developed through this floral appliqué quilt tutorial can also be applied to larger quilts, decorative cushions, wall hangings, and other handmade sewing projects.
EASILY FIND THE FREE PDF FOR THIS PATTERN HERE!
Now I would love to hear from you! Have you ever made a patchwork quilt with floral appliqué, or would this be your first attempt? Share your sincere opinion about this pattern, tell us which fabric colors you would choose, and leave any suggestions for future quilting tutorials. Your experiences, creative ideas, and helpful sewing tips can inspire other quilting enthusiasts to begin their own beautiful handmade projects!