
Advertising
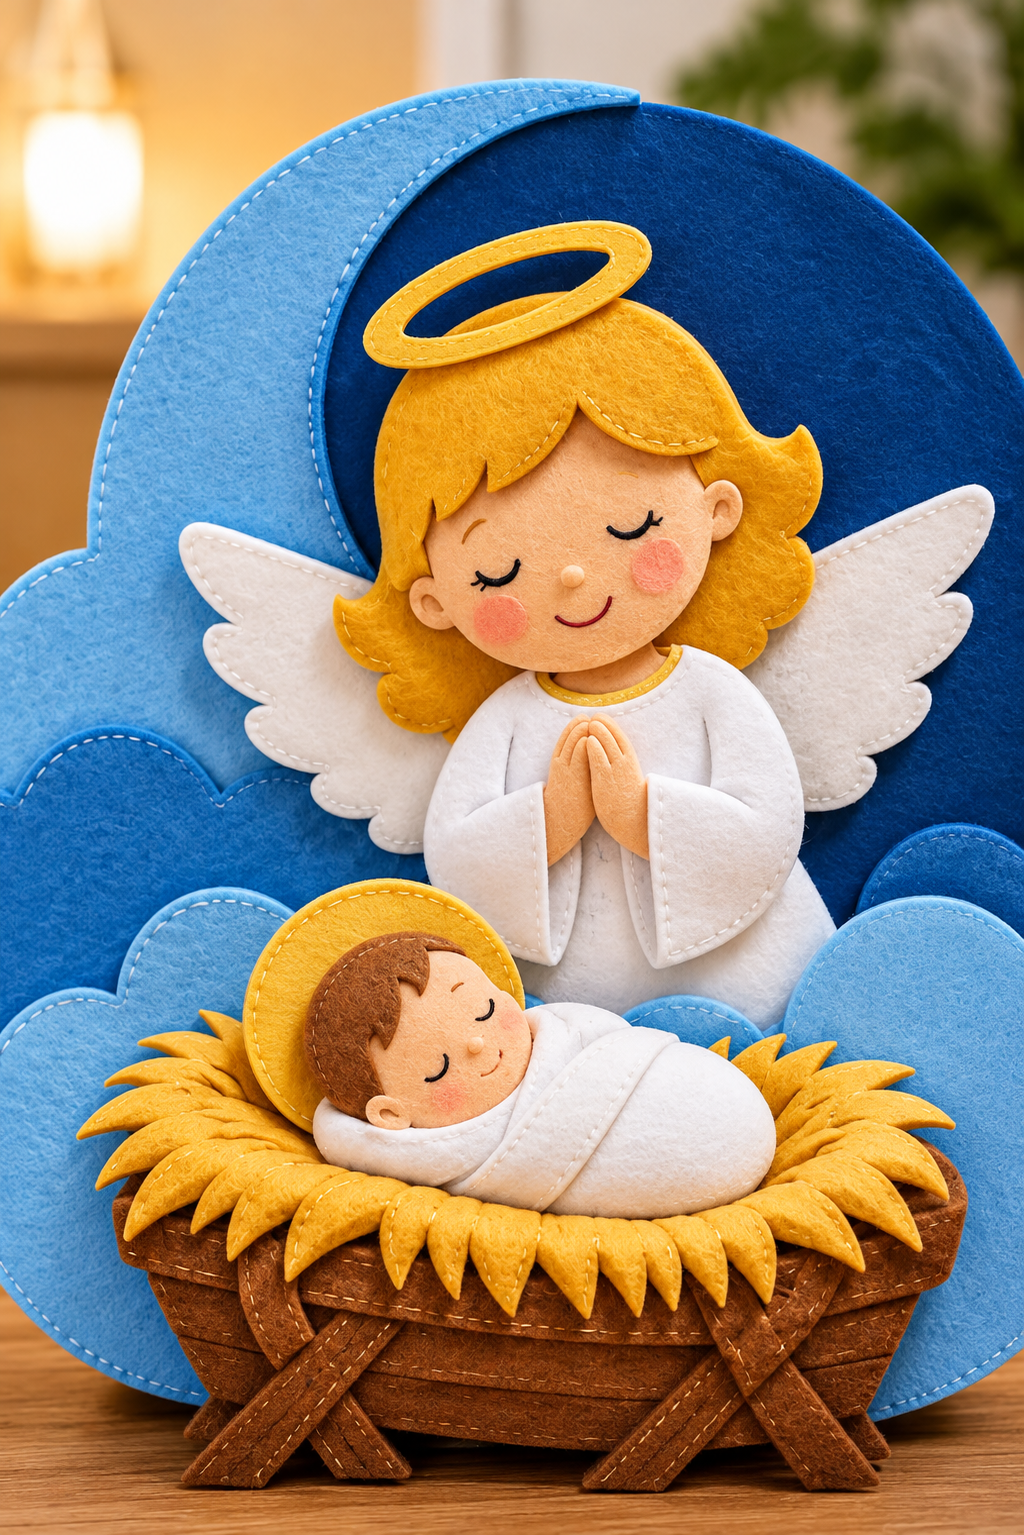
1. Materials and Preparing the Felt Nativity Scene Pattern
Before beginning your felt Christmas nativity craft, gather all the materials and organize them according to color and purpose. You will need dark blue, medium blue, light blue, white, golden yellow, peach, light brown, and dark brown felt. Choose good-quality craft felt with a thickness of approximately 1–2 mm for the decorative appliqué pieces. Slightly thicker felt or an additional layer of stabilizer is useful for the large background because it helps prevent bending. You will also need polyester fiberfill, embroidery floss, hand-sewing needles, sharp fabric scissors, fabric clips, a removable fabric marker, paper for drawing templates, and craft glue suitable for felt. A hot glue gun can be used for certain structural details by adults, although hand stitching is preferable for visible edges and areas requiring flexibility. Optional materials include a small wooden display stand, cardboard reinforcement, and decorative thread for adding personalized finishing touches.DISCOVER MORE FREE PATTERNS HERE!
The suggested finished size of this Felt Nativity Scene Tutorial Pattern is approximately 30 cm wide and 40 cm tall, although the proportions can be adjusted. Begin by drawing a large rounded background measuring approximately 30 cm across and 35 cm high. The top should form a smooth arch, while the lower section should include gently curved cloud shapes. Cut one piece from dark blue felt and another matching piece for reinforcement. Next, prepare a light blue curved section approximately 11 cm wide that follows the upper-left side of the background. This piece creates the layered crescent-like shape visible behind the angel. Draw several additional cloud pieces in medium and light blue, measuring approximately 8–15 cm across. Their scalloped edges should overlap naturally, producing a soft and balanced background without covering the main characters. Preparing the angel requires several individual paper templates. Draw an oval face approximately 9 cm wide and 10 cm tall, a golden hairstyle approximately 12 cm wide, and a white robe measuring around 14 cm across and 15 cm high. The angel’s wings can be approximately 10 cm long on each side, with rounded feather-like edges. Create separate templates for the sleeves, hands, ears, halo, and small decorative collar. The halo should be an elongated oval ring measuring approximately 9 cm wide and 4 cm high, with a smaller oval opening in the center. When designing the angel, remember that the hairstyle should partially overlap the face and that the wings must extend behind the shoulders. These proportions are intended as a starting point rather than exact reproductions of the photograph. For the baby and manger, prepare another collection of templates. Draw a small baby face measuring approximately 5 cm wide and 5.5 cm high, along with a brown hairstyle and two tiny ears. The white swaddling blanket should form an elongated, rounded shape approximately 15 cm long and 8 cm high. Prepare a circular golden backing approximately 9 cm in diameter to sit behind the baby’s head. The manger can measure approximately 23 cm wide and 9 cm high, with a slightly curved upper rim and a narrower bottom. Create several long brown strips to imitate wooden boards, plus diagonal strips for the supporting legs. Finally, draw multiple pointed golden felt shapes to represent the straw surrounding the baby. These pieces should vary in length to make the arrangement appear natural. Once the paper templates are complete, transfer them onto the appropriate felt colors using a removable fabric marker. Trace carefully, keeping the templates flat to prevent distortion. Cut along the marked lines with sharp scissors, making small, controlled movements around curves and pointed sections. For pieces that will be stitched together and stuffed, cut two matching layers and use a narrow seam allowance of approximately 0.3 cm. Decorative appliqué pieces can be cut directly to their finished outlines because their edges will remain visible. Keep each group of cut pieces in a separate container or envelope, labeling them as background, angel, baby, manger, or decorative details. This simple organization method will save time during assembly and reduce the chance of losing small pieces. Before sewing, arrange all the cut felt pieces on a flat surface to preview the finished Christmas felt wall decoration. Place the large blue background at the back, followed by the light blue crescent and cloud layers. Position the angel in the upper center and the baby in the lower center, leaving enough space for the manger. Check that the wings extend evenly on both sides and that the golden halo is clearly visible above the angel’s hair. The manger should overlap the lower clouds slightly, creating the impression that it sits in front of the background. Take a photograph of this arrangement before moving the pieces. This visual reference will help you maintain the correct placement during the sewing process.2. Sewing the Blue Background and Creating the Felt Angel
Begin assembling the felt nativity background by placing the large dark blue felt shape on your work surface. If you want the decoration to stand upright, position a piece of firm craft stabilizer or thin cardboard between two matching felt layers, keeping the reinforcement approximately 0.5 cm away from the outer edge. Attach the light blue crescent-shaped piece to the upper-left section using small running stitches in white embroidery floss. Maintain approximately 0.4 cm between stitches to achieve the delicate handmade appearance shown in the reference image. Continue adding the medium and light blue cloud layers along the lower edges, overlapping them slightly. Secure each cloud with matching or contrasting thread, depending on the decorative effect you prefer. The visible white stitching provides a lovely contrast against the blue felt and emphasizes the rounded cloud shapes. Next, construct the angel’s white wings using the previously prepared templates. Cut two matching pieces for each wing if you want a lightly padded appearance. Place the matching layers together and sew around their edges using a blanket stitch, leaving a small opening for stuffing. Add a very thin layer of polyester fiberfill, making sure the wings remain relatively flat. Close the opening and gently shape the rounded feather sections with your fingers. You can add short decorative running stitches along the edges to highlight the individual feathers. Attach the wings behind the central area where the angel’s robe will sit, positioning them symmetrically. The upper wing tips should extend outward near shoulder height, while the lower sections should curve gently downward. The angel’s face is one of the most expressive elements of this hand-sewn felt nativity pattern. Cut two peach-colored oval pieces and sew them together using matching embroidery floss, leaving a small opening for stuffing. Add a modest amount of fiberfill to create a softly rounded face, then close the opening. Use black embroidery floss and a backstitch to create two gently curved closed eyes with small eyelashes. Embroider a tiny smiling mouth using dark pink or brown thread. Add circular pink felt cheeks or carefully apply a small amount of fabric-safe blush. A tiny stuffed peach felt circle can form the nose. The facial features should be positioned symmetrically, with the eyes approximately halfway down the face and the smile centered below them. Avoid making the features too large, since the peaceful expression depends on their delicate proportions. Create the golden hairstyle by cutting a front section with softly curved bangs and a larger back section with rounded curls. Position the back hair behind the face and secure it with small stitches. Place the front hair over the upper forehead, allowing the bangs to curve naturally around the face. Use golden yellow embroidery floss to add decorative running stitches along the hairline and outer edges. Attach the small peach-colored ears near the sides of the face, partially covering them with the hair. For the halo, cut two elongated golden oval rings and stitch them together along their inner and outer edges. A small amount of lightweight stabilizer can help the halo maintain its shape. Position it above the head at a slight angle, as shown in the photograph, and secure it discreetly to the hair or background. To make the angel’s robe, cut the front and back pieces from white felt and prepare two separate wide sleeves. Sew the robe edges together with white thread, adding a thin layer of stuffing if you want a softly padded appearance. Keep the upper section relatively flat so that the head can be attached securely. The sleeves should be rounded and slightly oversized, extending toward the center of the body. Add curved stitch lines near the sleeve openings to imitate the folds of loose fabric. Create a small golden collar from a narrow strip of yellow felt and sew it around the neckline. This subtle detail connects the white robe with the golden hair and halo, creating a harmonious color palette. Finish the angel by making two peach-colored hands positioned together in prayer. Cut four small hand shapes, sew them in pairs, and add minimal stuffing. Arrange the hands vertically at the center of the robe, with the fingertips pointing upward and the palms touching. Use tiny stitches to hold them in place without flattening their shape. Attach the completed head above the collar, ensuring that the hair overlaps the shoulders slightly. Position the angel over the previously attached wings and secure the robe to the blue background using hidden stitches. Finally, attach the halo above the head, checking that the overall composition remains balanced. Your felt guardian angel decoration should now have the peaceful expression, dimensional features, and soft fabric texture that make the original design so appealing.3. Making Baby Jesus, the Swaddling Blanket, and the Felt Manger
The next stage of the Felt Nativity Scene Tutorial Pattern focuses on creating the sleeping baby. Begin with the peach-colored face pieces, sewing them together in the same manner used for the angel. Add a small amount of polyester fiberfill to create a gently rounded appearance. Embroider two closed eyes using black floss and small curved backstitches. Add a tiny smiling mouth, soft pink cheeks, and a small rounded nose. Cut the brown hairstyle with a curved fringe and attach it to the upper section of the face. Two small peach felt ears can be positioned near the sides. The baby’s expression should remain simple and peaceful, with delicate details that complement the larger angel above. Create the golden circular backing that appears behind the baby’s head. Cut two circles approximately 9 cm in diameter from golden yellow felt and sew them together using matching thread. Add a thin layer of stabilizer between the pieces if necessary. Use small running stitches around the edge to create the same decorative finish used throughout the project. Position the golden circle behind the baby’s head so that it remains visible around the upper and side edges. This element provides contrast against the white blanket and blue background, helping the baby’s face stand out. Secure the head to the circle with discreet stitches, leaving the lower portion available for attaching the swaddling blanket. The felt baby swaddling blanket should have a rounded, cocoon-like appearance. Cut two large white felt shapes measuring approximately 15 cm long and 8 cm high. Sew the outer edges together using white embroidery floss, leaving a small opening for stuffing. Add polyester fiberfill gradually, concentrating slightly more volume in the central area to suggest the baby’s wrapped body. Close the opening carefully. Next, cut two curved white felt strips approximately 2.5–3 cm wide to imitate overlapping folds of fabric. Position the strips diagonally across the body, beginning near the shoulders and extending toward the lower edge. Attach them using small running stitches, following the curved contours to create a soft, realistic wrapped appearance. Once the baby is complete, begin constructing the manger. Cut a large brown felt base approximately 23 cm wide and 9 cm high, shaping the upper edge into a shallow curve. Prepare a second matching piece and insert a thin layer of stuffing or stabilizer between them. Sew around the edges using brown embroidery floss. Add several horizontal brown strips across the front to represent wooden boards. These strips can vary slightly in shade to create depth and texture. Use lighter brown running stitches along the edges of the boards to imitate the visible seams of handmade wooden construction. The upper rim should be slightly thicker than the lower boards, giving the manger a sturdy appearance. Prepare the manger legs using four diagonal brown felt strips approximately 12 cm long and 2 cm wide. Layer or reinforce each strip to prevent it from bending. Position two strips diagonally on the left side and two on the right, creating crossed supports similar to the reference image. Sew the crossing points securely and attach the upper ends behind the manger rim. The lower ends should extend slightly below the main basket, helping create the impression of a freestanding wooden structure. For a wall-mounted decoration, these legs can remain flat against the background. If you plan to display the piece upright on a shelf, attach the finished composition to a firm backing or suitable display stand rather than relying on the felt legs alone. The final part of the manger assembly involves creating the golden straw. Cut approximately 20–30 narrow pointed shapes from yellow and golden felt, varying their lengths between 5 cm and 9 cm. Layer the straw pieces around the upper edge of the manger, allowing some to extend outward and others to overlap the front rim. Secure the lower ends with small stitches, leaving the pointed tips slightly raised for dimension. Arrange the sleeping baby on top of the straw, with the golden circular backing visible behind the head. Attach the baby using hidden stitches through the back of the blanket and into the supporting layers. The completed baby Jesus felt manger decoration should appear soft, comfortable, and securely positioned within the handmade straw bed.4. Assembling, Decorating, and Displaying the Finished Felt Nativity Scene
With the individual components complete, you can begin the final assembly of your DIY felt nativity scene. Place the blue background on a large, clean work surface and arrange the angel and manger according to the original composition. The angel should occupy the upper central area, with the wings extending toward the outer sides of the background. Position the manger directly below the angel, allowing the baby’s golden backing to overlap the lower portion of the robe slightly. Check that the entire arrangement feels visually balanced and that the lower cloud layers remain visible around the manger. Use fabric clips or a few temporary basting stitches to hold the larger elements in place while you adjust their positions. Begin attaching the angel to the background using strong white or matching embroidery floss. Sew through the lower robe and into the background layers, keeping the stitches hidden whenever possible. Secure the shoulders and upper body to prevent the angel from shifting. The wings should already be attached to the background, but additional stitches near their inner edges can provide extra support. Once the angel is firmly positioned, attach the manger below it using brown thread. Sew along the back of the manger rim and around selected lower sections, avoiding visible stitches across the front. If the decoration is intended to stand upright, ensure that the weight of the manger is adequately supported by the reinforced backing or display stand. Add the remaining decorative details to improve the overall appearance of your Christmas felt appliqué project. Inspect the blue cloud layers and reinforce any loose edges with white running stitches. Add small curved stitch lines to the angel’s sleeves, hair, and wings if additional definition is needed. Check the manger boards and diagonal legs for symmetry, adjusting any strips that appear twisted or uneven. The golden straw should frame the baby naturally without covering the face or decorative blanket folds. If desired, add a few tiny embroidered stars to the dark blue background, although the original design achieves a particularly elegant appearance by keeping the background simple. Avoid overcrowding the scene with unnecessary decorations. For a professional finish, pay special attention to the visible stitching. The reference image features small, evenly spaced stitches that outline many of the felt pieces. You can recreate this effect using two strands of embroidery floss and a simple running stitch approximately 0.3–0.4 cm from the edge. Use white thread on the blue clouds and angel’s robe, golden thread on the hair and straw, and brown thread on the manger. Keep your thread tension consistent to avoid puckering the felt. When finishing a seam, secure the thread on the back with a small knot and trim the excess carefully. These details help transform a simple felt craft into a polished handmade Christmas decoration. If you want to hang the completed nativity scene on a wall or door, attach a strong felt loop or fabric ribbon to the upper back of the background. Sew the loop through the reinforced layers rather than attaching it only with glue. For tabletop display, a wooden plate stand or a custom support can hold the decoration upright. Make sure the support is stable and appropriately sized for the finished piece. Because the project includes small decorative elements and potentially removable components, it should be treated as a display decoration rather than a toy for young children. Keep the decoration away from open flames, heaters, and moisture to protect the felt and embroidery. A dry indoor location is ideal for preserving the colors and texture. One of the most enjoyable aspects of this Felt Nativity Scene Tutorial Pattern is the opportunity to personalize the finished project. You can change the angel’s hair color, use different shades of blue for the background, or embroider a family name and year on the reverse side. A smaller version can become a Christmas tree ornament, while a larger composition can serve as a centerpiece for a holiday display. You may also add a few subtle decorative elements, such as small felt stars or a stitched border, while keeping the angel and baby as the main focus. Whatever modifications you choose, preserve the soft shapes, gentle facial expressions, and harmonious colors that give the original design its special character. With careful sewing and thoughtful finishing, your handmade nativity scene can become a meaningful keepsake that you enjoy displaying year after year. Frequently Asked Questions About the Felt Nativity Scene Tutorial Pattern What type of felt is best for making a nativity scene? Good-quality craft felt or wool-blend felt works well for this project. Felt approximately 1–2 mm thick is suitable for most decorative pieces because it is easy to cut, stitch, and layer. A slightly firmer material is recommended for the large background and manger supports. Wool-blend felt often offers excellent durability and a smooth appearance, while polyester craft felt is an affordable alternative for beginners. Can beginners make this Felt Nativity Scene Tutorial Pattern? Yes. The project is suitable for patient beginners who are comfortable learning basic hand-sewing techniques. The most important stitches are the running stitch, blanket stitch, and backstitch. Beginners may find it helpful to practice these stitches on small felt scraps before assembling the decorative pieces. Working on one component at a time makes the project easier to manage. Do I need a sewing machine to complete this project? No. The entire nativity scene can be completed with hand sewing. In fact, hand stitching is particularly useful for attaching small facial details, curved appliqué pieces, and decorative felt layers. A sewing machine may be used for reinforcing certain background sections, but it is not necessary for achieving the handmade appearance shown in the photograph. How long does it take to make a felt nativity scene? The total time depends on your sewing experience and the amount of detail you include. A beginner may need approximately 10–16 hours, spread across several crafting sessions. More experienced crafters may complete the project in less time. Preparing accurate templates and cutting the felt carefully can reduce mistakes during assembly. How can I make the felt angel and baby look three-dimensional? Use small amounts of polyester fiberfill between matching felt layers. The face, robe, wings, and swaddling blanket can all be lightly padded. Avoid overstuffing, since excessive filling can distort the shapes and make the pieces difficult to attach. Layering flat appliqué elements over padded sections also creates attractive depth. What is the best way to attach small felt pieces? Hand stitching provides a secure and flexible attachment for most small felt pieces. Fabric glue can help temporarily position certain decorations before sewing. For permanent attachments, especially those supporting the weight of the angel or manger, stitching is generally preferable. Small details should be attached securely to reduce the risk of pieces becoming detached. Can I resize the Felt Nativity Scene Tutorial Pattern? Absolutely. You can enlarge or reduce the paper templates while keeping the same proportions. When resizing, remember to adjust the amount of stuffing and the width of the decorative stitching. Very small versions may require simplified facial features and fewer straw pieces, while larger versions may benefit from additional reinforcement. How should I clean and store a handmade felt nativity decoration? Remove dust gently with a soft brush or clean, dry cloth. Avoid soaking the decoration because moisture may affect the felt, stuffing, and adhesive. When the Christmas season ends, store the piece in a clean, dry container with tissue paper supporting the raised elements. Avoid placing heavy objects on top, since pressure can flatten the padded details. Can I use this pattern to create handmade Christmas gifts? Yes. A completed felt nativity scene can make a thoughtful handmade gift for relatives, friends, or anyone who appreciates traditional Christmas decorations. Personalizing the back with a stitched date or a short message can make the gift even more meaningful. If you plan to sell finished pieces, use your own original templates and ensure that any third-party patterns or decorative elements permit commercial use. What colors should I use to match the reference image? The main colors are dark royal blue, medium blue, light blue, white, golden yellow, peach, and brown. The background combines several blue shades, while the angel features golden hair, white wings, and a white robe. The baby is wrapped in white felt and surrounded by golden straw inside a brown manger. Maintaining these colors will help you recreate the warm, peaceful appearance of the original design. How can I make the background strong enough for display? Use two layers of firm felt with a lightweight stabilizer between them. For a rigid wall or tabletop decoration, a piece of thin craft board can be inserted between the layers. Keep the reinforcement slightly smaller than the outer felt shape so that the edges can be sewn neatly. A properly reinforced background helps prevent sagging and keeps the angel and manger securely positioned. Is this felt nativity decoration safe for children? The finished project is intended for decorative use rather than as a children’s toy. Small attached pieces, stuffing, and decorative elements may present hazards if they become detached. Keep the decoration out of reach of very young children, and use appropriate supervision if older children participate in the crafting process. Adults should handle sharp needles, scissors, and hot glue equipment. Can I make this nativity scene without using glue? Yes. Every major component can be attached with hand stitching. Small basting stitches can temporarily hold the pieces in position while you work. This method produces a flexible decoration and allows individual components to be repaired more easily if necessary. Glue is optional rather than essential. What makes this felt nativity scene different from traditional Christmas ornaments? This design combines several techniques in a single decorative composition, including padded felt figures, embroidered facial features, layered cloud appliqué, and a dimensional manger. Instead of creating separate ornaments, you assemble the pieces into one unified Christmas scene. The soft textures and peaceful expressions make it especially suitable for a handmade seasonal display. Conclusion: Creating a Meaningful Handmade Felt Nativity Scene The Felt Nativity Scene Tutorial Pattern is a rewarding Christmas sewing project that brings together creativity, traditional handcrafting techniques, and meaningful holiday imagery. Throughout this tutorial, you have learned how to select suitable felt materials, prepare proportional paper templates, cut and organize individual pieces, and create a beautiful layered blue background. You have also explored the techniques needed to construct a peaceful felt angel with embroidered facial features, golden hair, white wings, and a delicate halo. The tutorial also explained how to make the sleeping baby, create a softly padded swaddling blanket, assemble a decorative brown manger, and arrange golden felt straw around the finished figure. By using simple embroidery stitches, careful layering, and lightweight stuffing, you can recreate the charming three-dimensional appearance of the reference image without needing advanced sewing equipment. Beyond its decorative beauty, this handmade felt nativity scene offers an opportunity to create something personal and lasting. It can become part of your Christmas decorating traditions, a thoughtful handmade gift, or a special project shared with family members. Each carefully sewn detail adds character to the finished decoration, making it unique to the person who created it.EASILY FIND THE FREE PDF FOR THIS PATTERN HERE!
Advertising
Advertising