
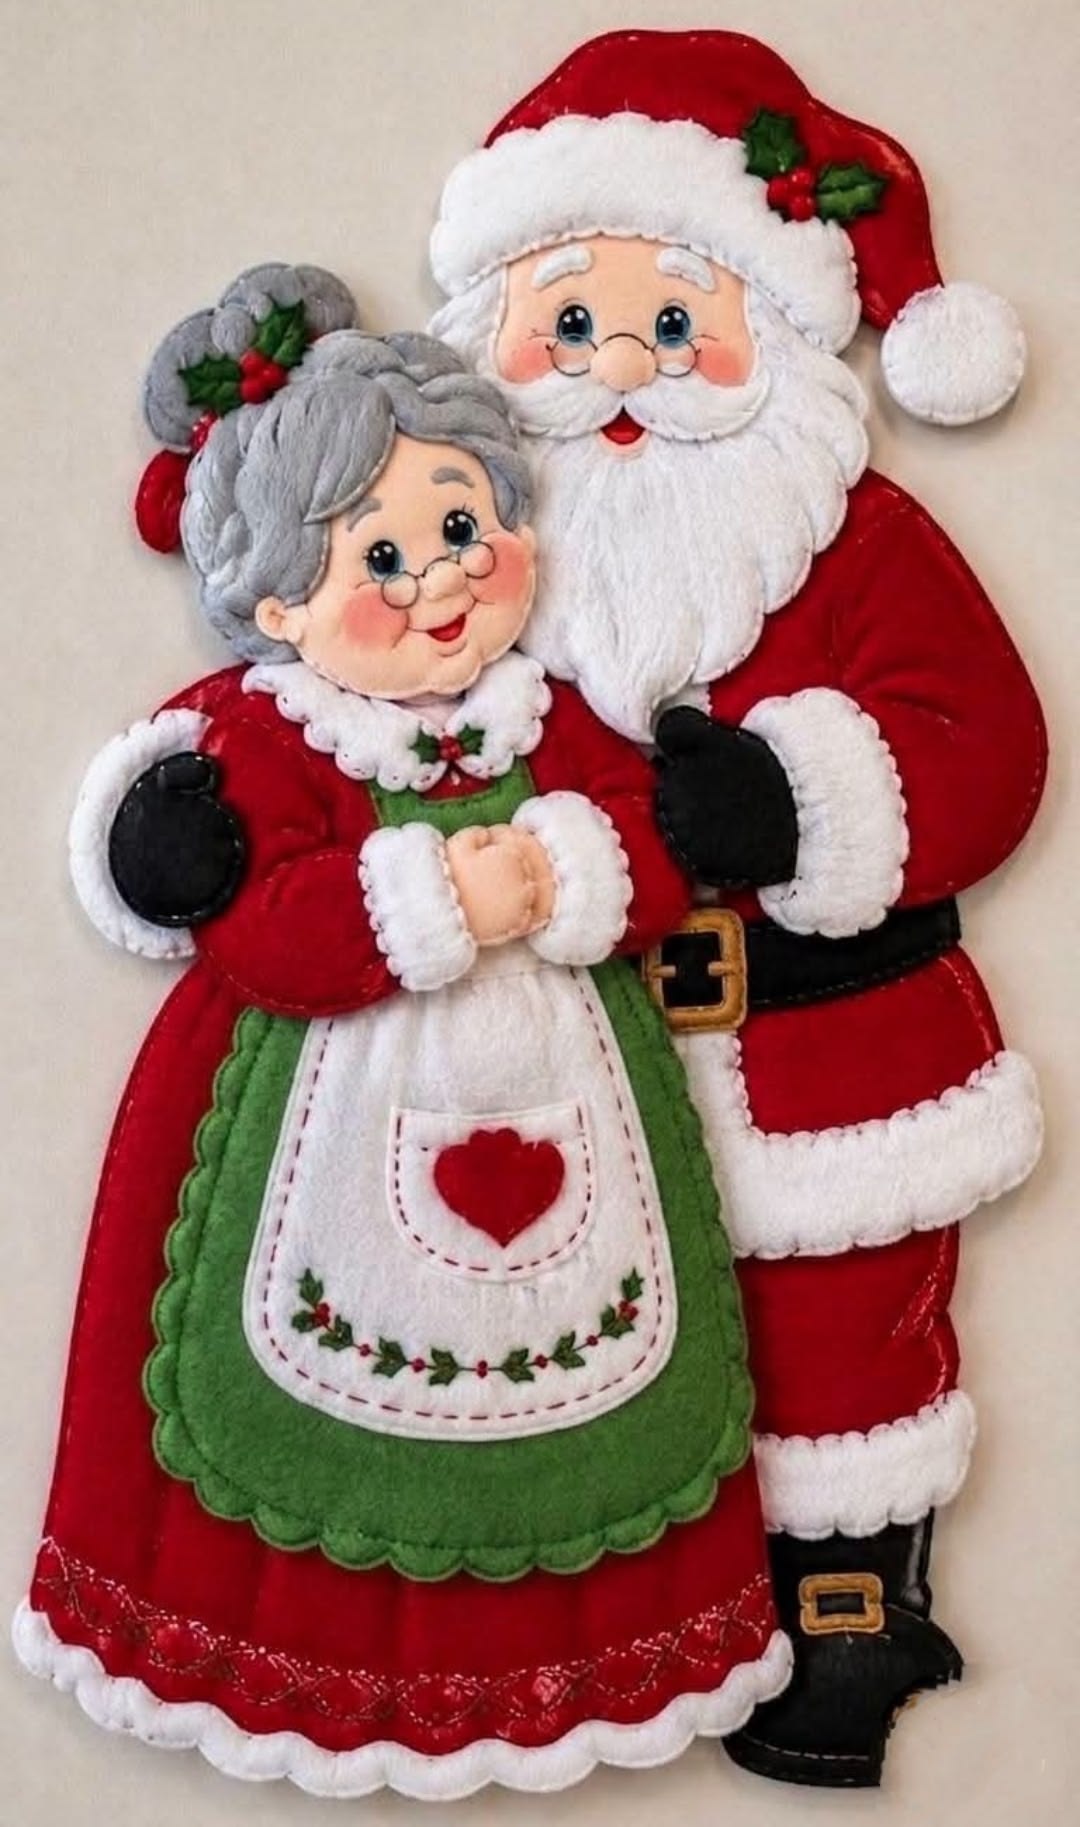
The Santa and Mrs. Claus Felt Figures Pattern is a charming Christmas sewing project that brings warmth, nostalgia, and handmade beauty into holiday decorating. Featuring Santa Claus with his traditional red suit, fluffy white beard, cheerful expression, and festive hat alongside Mrs. Claus in her elegant red dress, green apron, and carefully styled gray hair, this delightful felt decoration captures the spirit of Christmas. The combination of colorful felt, delicate embroidery, and layered fabric details creates a beautiful handcrafted appearance that feels both traditional and timeless. Whether displayed on a wall, incorporated into a Christmas wreath, or used as part of a festive home arrangement, these adorable figures can become treasured seasonal decorations. Best of all, this DIY Christmas felt decoration can be created with basic sewing supplies, patience, and a little creativity, making it a rewarding project for crafters who enjoy handmade holiday ornaments.
Creating your own Santa and Mrs. Claus Felt Figures Pattern is also a wonderful opportunity to explore several traditional sewing techniques. Felt is especially suitable for decorative projects because its edges do not fray easily, allowing beginners to work with detailed shapes without complicated seam finishes. This design combines fabric layering, hand embroidery, appliqué techniques, and light stuffing to achieve a dimensional appearance. Small details, such as Santa’s glasses, Mrs. Claus’s rosy cheeks, the tiny holly leaves, and the embroidered decorations on her apron, help transform simple felt pieces into expressive Christmas characters. Each element contributes to the finished design, while the combination of red, white, green, gray, black, and warm skin tones creates a classic holiday color palette. With careful preparation and a clear construction sequence, even someone with limited sewing experience can recreate a lovely version of this festive couple.
One of the most enjoyable aspects of this handmade Santa and Mrs. Claus felt craft is the freedom to personalize the finished decoration. You can adjust the size of the figures, choose different shades of red or green, add embroidered names, or incorporate decorative stitching that reflects your own style. The reference design features Mrs. Claus standing slightly in front of Santa, creating a layered composition that makes the couple appear affectionate and welcoming. Her white apron, decorated with a red heart and tiny holly motifs, adds a particularly sweet touch, while Santa’s black belt and golden buckle provide a recognizable finishing detail. This tutorial explains how to plan the pattern, prepare the materials, cut the felt components, assemble the characters, and complete the decorative embroidery. By following the instructions carefully, you can create a festive decoration suitable for your home or a thoughtful handmade Christmas gift.
Materials and Preparation for the Santa and Mrs. Claus Felt Figures Pattern
Before beginning the Santa and Mrs. Claus Felt Figures Pattern, gather all the materials needed to construct both characters. Choosing good-quality felt is important because the finished decoration contains several overlapping pieces and small embroidered details. Polyester craft felt works well for beginners, while wool-blend felt offers a softer texture and can provide a more refined appearance. Select felt that is approximately 1–2 mm thick for most appliqué pieces. For the main colors, prepare red felt for Santa’s suit and Mrs. Claus’s dress, white felt for the beard and fur details, green felt for the apron, gray felt for the hair, peach felt for the faces and hands, and black felt for the gloves, belt, and boots. Small amounts of gold, dark green, and additional red felt will be useful for the decorative accents.
DISCOVER MORE FREE PATTERNS HERE!
For this tutorial, the finished decoration will measure approximately 45 cm tall and 31 cm wide, depending on how the characters overlap. These dimensions are a suggested working size inspired by the reference image, rather than measurements taken from an existing printable template. You will need approximately 50 × 70 cm of red felt, 35 × 45 cm of white felt, 30 × 40 cm of green felt, 25 × 30 cm of gray felt, and smaller pieces of the remaining colors. Also prepare embroidery floss in red, white, green, brown, black, and gray. A sewing needle, fabric scissors, paper scissors, pins or sewing clips, washable fabric marker, tracing paper, and polyester fiberfill will complete the essential supply collection. A small amount of fabric glue can help temporarily position delicate components, although stitching provides a more durable finish.
Preparing the felt sewing pattern is the next important step. Because the photograph does not include a measured template, the shapes must be drafted or traced using the image as a visual reference. Begin by drawing a large outline of Santa Claus on paper, approximately 43 cm tall, including his hat, upper body, coat, and boots. Draw Mrs. Claus separately at approximately 38 cm tall, with her full dress, head, hairstyle, and apron. Arrange the paper shapes so Mrs. Claus overlaps Santa’s lower left side, matching the composition of the photograph. The combined decoration should fit within the planned 45 × 31 cm area. Keep the shapes simple initially, as decorative details will be added through smaller appliqué pieces.
Organize the paper templates into separate groups for each character. For Santa Claus, prepare patterns for the face, hat, hat trim, pom-pom, beard, mustache, coat, sleeves, cuffs, gloves, belt, buckle, pants, and boots. For Mrs. Claus, prepare patterns for the face, hair, hair bun, dress, sleeves, cuffs, collar, apron, hands, and decorative pocket. The faces can be approximately 11–12 cm wide, while the apron may measure around 17 cm tall and 15 cm wide at its broadest point. These dimensions are adjustable guidelines intended to help maintain the proportions of the original design. Label every paper template with its name, color, and required quantity before cutting.
A particularly useful technique for this Christmas felt appliqué pattern is preparing a full-size layout guide. Place the main paper outlines on a large sheet and trace the positions of the faces, hands, clothing details, and accessories. This guide helps you understand which pieces should be attached first and which components need to remain visible after the characters overlap. For example, Santa’s beard should cover part of his chest, while Mrs. Claus’s hairstyle should frame her face without hiding her embroidered expression. Keep the guide nearby throughout the project. Taking time to plan the layers reduces mistakes and makes the sewing process much more enjoyable.
Before cutting your final felt pieces, test the basic design using inexpensive paper or leftover felt scraps. Position the faces, beard, apron, and hat on the main silhouettes to check their proportions. Mark the location of the eyes, glasses, cheeks, and holly decorations. For flat appliqué pieces, no seam allowance is necessary when using a blanket stitch or whipstitch around the exposed edges. However, add approximately 0.5 cm seam allowance to any pieces that will be sewn right sides together and turned, such as optional stuffed hands or dimensional decorative sections. Once you are satisfied with the arrangement, transfer the templates onto the corresponding felt colors and cut each piece carefully.
How to Sew Santa Claus with His Traditional Christmas Outfit
Begin constructing Santa Claus by preparing the main body silhouette. Cut two matching pieces of red felt for the body and coat, allowing the overall shape to include the shoulders, torso, and lower clothing. Place one piece aside as the backing and use the other as the decorative front. Cut the red sleeves separately if you want to create additional dimension around the arms. Position the sleeves on the front body piece and secure them with small stitches using matching red thread. A blanket stitch is an excellent choice for visible edges because it creates a decorative finish while holding the felt layers together. Keep the stitches approximately 3–4 mm apart for a neat and consistent appearance.
Next, create Santa’s face using peach-colored felt. Cut a rounded face shape approximately 11 cm wide and position it near the top of the body. Add a small oval nose using peach felt, and lightly stuff it with polyester fiberfill if you want a raised appearance. Create two small black oval eyes, adding tiny white highlights with embroidery floss or very small white felt circles. Embroider curved eyebrows in white thread and use soft pink embroidery or fabric-safe coloring to suggest rosy cheeks. For the cheerful mouth, cut a small red shape and position it below the nose. Attach the facial components with small, nearly invisible stitches, taking care to keep the expression balanced and friendly.
Santa’s beard is one of the most recognizable features of this Santa Claus felt pattern. Cut a large white felt shape that extends from both cheeks to the upper chest, tapering into softly rounded sections near the bottom. Create additional curved white felt pieces for the mustache and sideburns. Layer the pieces so the mustache rests above the beard and slightly overlaps the mouth. You can add gentle curves using embroidery stitches to suggest individual sections of hair. For a fuller appearance, place a very thin layer of polyester fiberfill beneath the beard before securing its edges. Avoid overstuffing, as the beard should remain soft and relatively flat against the body.
To create Santa’s traditional hat, cut two matching red felt pieces approximately 19 cm wide and 15 cm tall, adjusting the shape to curve naturally toward one side. Sew the outer edges together if you want a lightly dimensional hat, leaving the lower edge open. Add a wide strip of white felt across the bottom to represent the fluffy trim. Cut two circular white pieces approximately 5 cm in diameter for the pom-pom, sew around the edge, insert a small amount of fiberfill, and close the opening. Attach the pom-pom to the tip of the hat. Finish by adding two small dark green holly leaves and three red felt berries near the white trim, recreating the charming holiday accent visible in the reference design.
Now assemble the remaining details of Santa’s clothing. Cut two black felt gloves and position them over the ends of the red sleeves, adding thick white cuffs to imitate the soft fur trim of his coat. Prepare a black belt approximately 3 cm wide and place it across the waist. Cut a rectangular buckle from golden-yellow felt and add a smaller black rectangle in the center. For the boots, cut two black felt shapes approximately 9–11 cm tall, depending on the final figure proportions. Add small golden buckles and white felt trim above the boots. Secure all these components with matching embroidery floss, keeping the stitches small and evenly spaced.
Once the decorative front is complete, place the backing behind Santa’s body and secure the outer edges using a blanket stitch or whipstitch. If you prefer a slightly padded decoration, insert a thin layer of polyester fiberfill between the front and back before closing the final opening. Use only enough filling to create gentle dimension without distorting the silhouette. If the hat or boots extend beyond the main body, attach them securely before closing the backing. Check that the belt, gloves, beard, and facial details remain properly aligned. Santa Claus is now ready to be combined with Mrs. Claus after her figure has been completed.
Creating Mrs. Claus with Her Festive Dress, Apron, and Gray Hair
Mrs. Claus brings a beautiful sense of warmth and personality to the Santa and Mrs. Claus Felt Figures Pattern. Begin by cutting two matching red felt dress silhouettes, approximately 38 cm tall, with a gently flared skirt. The dress should be wider near the bottom to create the flowing appearance seen in the reference image. Cut two red sleeves separately and position them so her arms bend inward toward the center of her body. Add white felt cuffs at the wrists and a narrow white decorative trim around the lower edge of the dress. For an elegant finishing touch, embroider a simple repeating pattern near the hem using white thread. Small curved stitches or connected loops can imitate delicate holiday embroidery.
Prepare Mrs. Claus’s face using peach felt, cutting a rounded shape approximately 10 cm wide. Her expression should appear cheerful and gentle, with large black eyes, soft eyebrows, rosy cheeks, and a small smiling mouth. Position the eyes slightly below the center of the face and add tiny white highlights to make them appear lively. Create a small rounded nose using peach felt and add a little stuffing if desired. The mouth can be made with red felt or embroidered using red floss. For the glasses, use fine black embroidery thread to create two small circles connected by a curved bridge. You may also use flexible craft wire, but embroidered glasses are generally more practical for a soft felt decoration.
The gray hairstyle is an especially attractive feature of this Mrs. Claus felt doll pattern. Cut a large gray felt shape to frame the top and sides of the face. Prepare additional curved strips to imitate strands of hair and create the appearance of a neatly arranged hairstyle. Position the front section so it sweeps gently across the forehead. For the braided sections, cut narrow gray felt strips and overlap them in a repeating pattern, securing each section with small stitches. Create a rounded bun using two circular felt pieces with a little fiberfill between them. Attach the bun to the upper side of the head, then decorate it with two small green holly leaves and three red berries.
Next, construct Mrs. Claus’s green apron layer, which adds beautiful contrast to the red dress. Cut a rounded green felt panel approximately 22 cm tall and 19 cm wide, with a softly scalloped lower edge. Position it over the front of the dress, allowing a generous red border to remain visible. Sew around the edges using green embroidery floss and small, evenly spaced stitches. For additional detail, cut a smaller green bodice section and position it above the apron skirt, just beneath the white collar. The green felt should remain visible around the white apron overlay, creating the layered appearance shown in the reference image.
The white apron is one of the most decorative elements of this handmade Christmas felt project. Cut a rounded white felt panel approximately 17 cm tall and 15 cm wide, making it slightly narrower near the top. Position it over the green apron and secure it using a running stitch with red embroidery floss. Cut a small white pocket approximately 7 cm wide and 6 cm tall, with a gently curved lower edge. Decorate the pocket with a red felt heart before sewing it onto the apron. Along the lower section, embroider a delicate holly garland using green stitches for the leaves and small red French knots for the berries. This simple embellishment gives the apron a festive, handcrafted finish.
Complete Mrs. Claus by adding the white collar, hands, and final decorative accents. Cut two rounded white collar pieces with softly scalloped edges and position them beneath her chin. Add tiny green holly leaves and red berries at the center of the collar. For the hands, cut four small peach felt shapes and sew them in pairs, adding a little stuffing if you want them to appear gently rounded. Position the hands together at the front of her body, between the white sleeve cuffs. Secure them with small stitches and adjust the sleeves to create the appearance of folded arms. Finally, place the finished Mrs. Claus figure over Santa’s lower left side to check that the two characters fit together naturally.
Final Assembly, Decorative Embroidery, and Display Ideas
With both characters completed, it is time to assemble the Santa and Mrs. Claus Felt Figures Pattern into one cohesive Christmas decoration. Place Santa Claus on a clean work surface and position Mrs. Claus slightly in front of him, allowing her dress to overlap part of his coat and legs. Adjust the arrangement until both faces remain fully visible and the characters appear naturally connected. The reference design shows Santa standing behind Mrs. Claus with one arm positioned near her shoulder, creating a warm and affectionate composition. Pin or temporarily baste the overlapping sections before sewing so that the figures do not shift during assembly.
To connect the figures securely, use small hidden stitches along the overlapping areas of the shoulders, sleeves, and clothing. Choose embroidery floss that matches the surrounding felt colors to keep the joins discreet. If the decoration will hang on a wall, consider adding a firm backing made from felt or a lightweight fabric stabilizer. This helps prevent the finished piece from bending or sagging over time. For a larger decoration, you can cut a single backing silhouette that follows the combined outer edges of both figures. Attach this backing using a blanket stitch, working carefully around the hat, hair, dress, and boots.
Decorative stitching is what gives this DIY felt Christmas decoration its handmade character. The blanket stitch is used around exposed felt edges, while the running stitch creates attractive decorative outlines. A backstitch is useful for facial details, glasses, and curved embroidery lines. The French knot works beautifully for tiny berries and other small accents. When embroidering the holly decorations, use short green stitches to suggest leaf veins and small red knots to create berries. For the faces, keep the embroidery delicate so the characters maintain their friendly expressions. Consistent stitch spacing will help the finished project look neat and carefully crafted.
If you want the finished figures to have a slightly dimensional appearance, add small amounts of polyester fiberfill beneath selected components. The faces, nose, hands, hair bun, and Santa’s beard are particularly suitable for gentle padding. However, avoid adding too much filling to the entire decoration, especially if it will be displayed against a wall. A flatter design is easier to hang and maintains the layered appliqué appearance of the original project. You can also enhance the visual texture by using slightly thicker felt for the white fur trim or by adding extra embroidered lines to the clothing. These subtle details create depth without making the construction unnecessarily complicated.
There are several lovely ways to display your finished Santa and Mrs. Claus Christmas felt figures. For a traditional wall decoration, sew a small fabric hanging loop to the upper back of Santa’s hat or attach two loops to a reinforced backing for better balance. The figures can also be mounted onto a fabric-covered board and displayed as a framed Christmas decoration. Another option is to incorporate the design into a larger holiday wall hanging, surrounded by embroidered stars, snowflakes, or holly leaves. If you prefer a tabletop arrangement, attach the figures to a stable decorative support that keeps them upright. Keep the decoration away from open flames and excessive moisture to protect the felt and embroidery.
Once the project is finished, inspect every seam and decorative element carefully. Trim loose threads, reinforce any weak stitches, and check that the small holly berries, buckles, and facial components are firmly attached. Because the design contains small decorative pieces, it is best treated as a holiday decoration rather than a toy for young children. To preserve the colors and texture, store the figures flat in a clean, dry container after the Christmas season. Place acid-free tissue paper between delicate raised sections if necessary. With proper care, this handmade felt Christmas ornament can become a cherished part of your holiday decorations for many years.
Frequently Asked Questions About the Santa and Mrs. Claus Felt Figures Pattern
1. Is the Santa and Mrs. Claus Felt Figures Pattern suitable for beginners?
Yes. This project is suitable for patient beginners who already know a few basic hand-sewing techniques or are willing to practice them. The most important skills are cutting felt accurately, using a blanket stitch, making simple embroidery stitches, and layering fabric pieces. Beginners may find it helpful to complete one character at a time and practice the smaller decorative details on scrap felt before working on the final figures.
2. What type of felt is best for making Santa and Mrs. Claus?
Polyester craft felt and wool-blend felt are both suitable choices. Polyester felt is affordable, widely available, and easy to cut, making it ideal for beginners. Wool-blend felt generally offers a softer texture and can be especially attractive for decorative projects. Felt approximately 1–2 mm thick works well for most appliqué components, while slightly thicker felt can be used for the backing.
3. Can I make the Santa and Mrs. Claus Felt Figures Pattern without a sewing machine?
Absolutely. The entire project can be completed using basic hand-sewing techniques. In fact, hand sewing is particularly useful for attaching small felt details such as the eyes, nose, holly leaves, apron decorations, and facial embroidery. A sewing machine can speed up the construction of larger pieces, but it is not necessary to achieve a beautiful finished decoration.
4. How long does it take to complete this Christmas felt decoration?
The time required depends on your sewing experience and the amount of decorative detail you include. A beginner may need approximately 10–16 hours spread across several crafting sessions, while an experienced crafter may finish the project in 6–10 hours. Preparing the paper templates, cutting the felt accurately, and embroidering the facial features usually require the most attention.
5. Can I change the size of the Santa and Mrs. Claus felt figures?
Yes. The design can be enlarged or reduced according to your decorating needs. If you want a smaller ornament, reduce all the paper templates proportionally before cutting the felt. For a larger wall hanging, increase the template dimensions while maintaining the same proportions. Remember that very small versions may require simplified facial features and fewer embroidered details.
6. How can I make the faces look more realistic and expressive?
Focus on the position of the eyes, eyebrows, cheeks, and mouth. Slightly curved eyebrows and small white highlights in the eyes can make the characters appear friendly and cheerful. A softly rounded nose and delicate pink cheeks also add warmth to the expressions. Practice the facial arrangement on paper before sewing the individual features into place.
7. What is the best stitch for attaching felt appliqué pieces?
The blanket stitch is one of the most popular choices because it secures the felt while creating a decorative border. The whipstitch is another good option when you want a less noticeable finish. For embroidered lines and facial details, the backstitch and running stitch are particularly useful. Choosing the appropriate stitch for each section helps create a neat and durable project.
8. Can these felt figures be used as Christmas gifts?
Yes. A handmade Santa and Mrs. Claus decoration makes a thoughtful gift for family members, friends, teachers, and anyone who enjoys traditional Christmas crafts. You can personalize the decoration by adding a family name, a holiday greeting, or the year it was created. These small additions make the project feel especially meaningful and memorable.
9. How should I clean and store my felt Christmas figures?
Use a soft brush or a slightly damp cloth to remove surface dust. Avoid soaking the decoration, as excessive moisture may affect the stuffing, embroidery, and shape of the felt pieces. Allow the figures to air-dry completely if they become damp. For storage, keep them flat in a dry container away from direct sunlight and heavy objects that could crush the raised details.
10. Can I sell decorations made using this tutorial?
Handmade decorations created from your own drafted templates can potentially be sold, provided that you respect any applicable intellectual property rights and local business requirements. If you use a separately purchased commercial pattern, check its licensing terms before selling finished products. For handmade items intended for sale, consistent stitching, secure attachments, and clear product descriptions are especially important.
11. Do I need to add stuffing to the entire decoration?
No. Stuffing is optional and should be used selectively. The reference design has a softly raised appearance, which can be recreated by adding small amounts of polyester fiberfill beneath the faces, nose, hands, and other selected components. If you prefer a traditional flat appliqué decoration, you can omit the stuffing entirely and rely on layered felt for dimension.
12. What can I do if I do not have embroidery experience?
Start with simple stitches such as the running stitch, backstitch, and blanket stitch. Practice on leftover felt until you feel comfortable creating consistent stitches. You can also simplify some decorative details by using carefully cut felt shapes instead of embroidery. For example, small green felt leaves and red circles can replace an embroidered holly garland while still preserving the festive appearance of the project.
Conclusion: Create a Beautiful Handmade Christmas Keepsake
The Santa and Mrs. Claus Felt Figures Pattern is a delightful way to celebrate the holiday season through creativity, sewing, and traditional handmade craftsmanship. From preparing the felt templates and assembling Santa’s cheerful face to creating Mrs. Claus’s elegant hairstyle, festive apron, and embroidered decorations, every stage of this project offers an opportunity to develop useful sewing skills. The combination of felt appliqué, hand embroidery, decorative stitching, and gentle fabric layering produces a charming Christmas decoration filled with personality and warmth.
Throughout this tutorial, you learned how to select appropriate materials, draft the main pattern shapes, cut and organize the felt pieces, construct both characters, and assemble them into a unified holiday display. You also explored finishing techniques, decorative details, and practical storage methods that can help preserve your handmade creation. Whether you follow the traditional red, white, and green color scheme or personalize the design with your favorite Christmas colors, the finished figures can become a beautiful addition to your seasonal decorating collection.
Creating a handmade Santa and Mrs. Claus felt decoration is about more than completing a sewing project. It is also about enjoying the creative process and making something that can bring happiness to your home year after year. Every carefully placed stitch contributes to the character and charm of the finished piece, making each version unique.
EASILY FIND THE FREE PDF FOR THIS PATTERN HERE!
Now we would love to hear from you! Have you ever made Santa and Mrs. Claus decorations using felt? Which detail of this pattern is your favorite: Santa’s fluffy beard, Mrs. Claus’s braided gray hair, or her adorable Christmas apron? Leave your sincere opinion, share your experience, and tell us your suggestions in the comments. Your ideas and feedback can inspire new handmade Christmas projects and help other crafters discover the joy of creating beautiful felt decorations.