
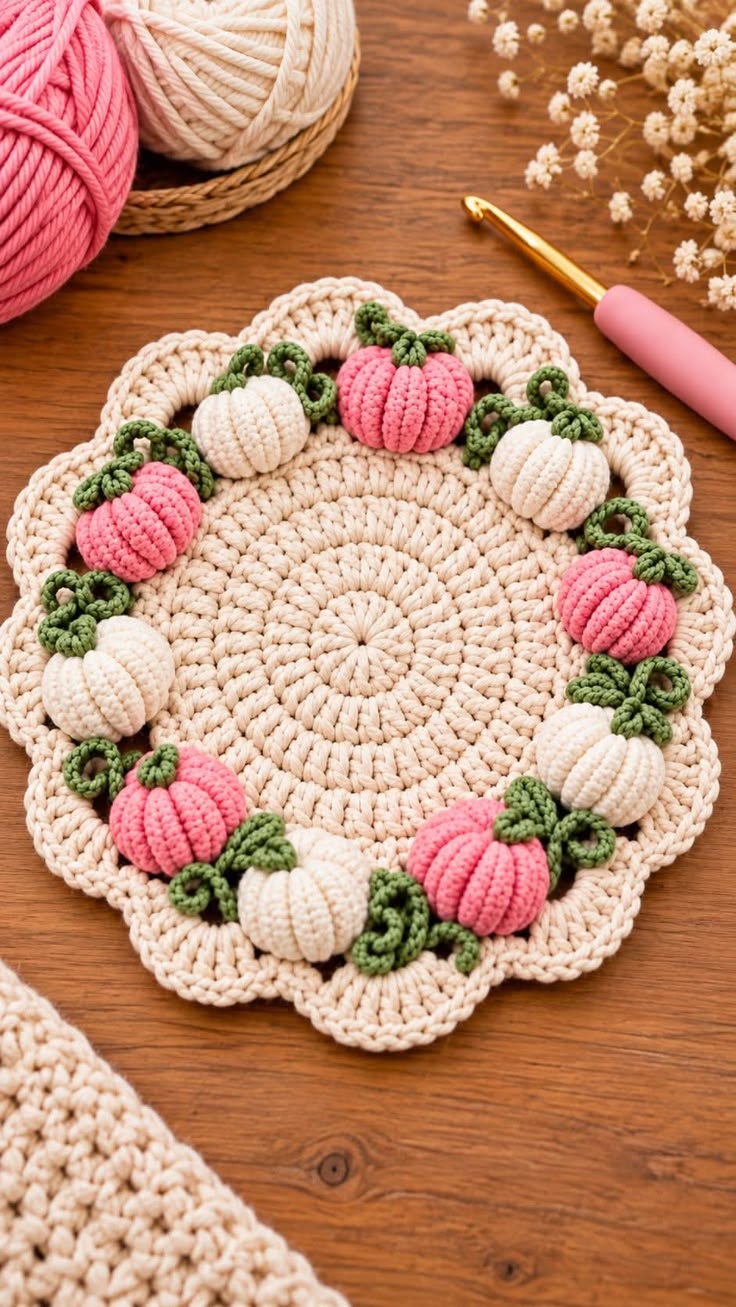
The Crochet Placemat with Pumpkin Wreath Pattern is a charming handmade project that combines the warmth of autumn with the beauty of traditional crochet craftsmanship. Featuring a circular cream-colored base, delicate scalloped edges, and adorable three-dimensional pumpkins in soft pink and ivory, this decorative placemat creates a welcoming atmosphere for seasonal gatherings. The addition of curly green vines gives the design a natural, garden-inspired appearance that makes it especially appealing for fall table decorations, Thanksgiving celebrations, and cozy farmhouse interiors. Whether you enjoy creating handmade gifts or decorating your own dining table, this crochet project offers a wonderful opportunity to experiment with texture, color, and decorative stitches. Its combination of a structured circular foundation and playful pumpkin embellishments makes it an eye-catching centerpiece that can be enjoyed throughout the autumn season.
One of the most attractive qualities of this crochet pumpkin wreath placemat is its versatility. Although the design looks detailed and sophisticated, it can be completed through a series of manageable steps using familiar crochet techniques. The circular foundation is worked in expanding rounds, while the pumpkins are created separately using textured stitches that form their distinctive raised ridges. Small crocheted stems and spiral vines complete the arrangement, creating the appearance of miniature pumpkins resting along the outer edge of the placemat. The soft cream background beautifully complements the pink and ivory pumpkins, but the color palette can easily be customized with traditional orange, sage green, mustard yellow, or rustic brown yarn. This flexibility allows crocheters to adapt the finished piece to different decorating styles without changing the essential structure of the pattern.
Creating your own Crochet Placemat with Pumpkin Wreath Pattern is also a satisfying way to develop important crochet skills while making something useful and decorative. Throughout this tutorial, you will learn how to construct a flat circular base, increase stitches evenly, create a scalloped border, crochet small stuffed pumpkins, and attach decorative vines securely. The instructions use US crochet terminology, making the pattern accessible to American crocheters who are familiar with standard abbreviations and stitch names. Beginners with basic crochet experience can approach the project one section at a time, while intermediate crocheters may enjoy experimenting with different yarn textures and finishing techniques. By following the instructions carefully, you can create a coordinated autumn accessory that brings handmade character, seasonal color, and a personal touch to your home.
1. Materials, Crochet Stitches, and Preparation for the Pumpkin Wreath Placemat
Before beginning the Crochet Placemat with Pumpkin Wreath Pattern, gather the materials needed for both the circular foundation and the decorative pumpkins. For a finished placemat measuring approximately 35–40 cm (14–16 inches) across, choose medium-weight cotton yarn in cream for the base, pink and ivory for the pumpkins, and olive green for the stems and vines. You will also need a 4.0 mm (G/6) crochet hook, a yarn needle, stitch markers, scissors, and a small amount of polyester fiberfill. Cotton yarn is particularly suitable for the foundation because it offers good stitch definition and helps the placemat maintain its shape. A soft cotton or cotton-blend yarn works well for the decorative pumpkins, providing enough flexibility to create their rounded appearance.
DISCOVER MORE FREE PATTERNS HERE!
The following abbreviations are used throughout this US crochet pattern: ch means chain, sl st means slip stitch, sc means single crochet, hdc means half double crochet, dc means double crochet, tr means treble crochet, st means stitch, sp means space, BLO means back loop only, inc means increase, and rep means repeat. The abbreviation MR refers to a magic ring, which creates a tightly closed circular starting point. An increase is made by working two stitches into the same stitch, while a decrease combines stitches to reduce the circumference of a crocheted piece. Unless otherwise stated, the beginning chain of a double crochet round counts as the first double crochet. Understanding these abbreviations before starting will make the instructions easier to follow.
The circular foundation begins with a magic ring, followed by evenly distributed double crochet increases. To make a magic ring, wrap the yarn around your fingers, insert the hook through the loop, draw up a working loop, and secure it with a chain stitch. Work the required stitches into the center of the ring, then gently pull the yarn tail to close the opening. For this placemat, the foundation uses joined rounds rather than a continuous spiral, allowing the stitch pattern to remain organized. Each completed round is joined with a slip stitch to the top of the beginning chain. Use a stitch marker to identify the beginning of each round, especially when working the larger sections of the base.
Maintaining consistent crochet tension is essential when creating a flat circular placemat. If the stitches are too tight, the edges may curl upward, while excessively loose stitches can produce a wavy surface. Begin by making a small practice circle using the recommended yarn and hook size. Check whether the fabric lies flat on a table without stretching or puckering. If the circle begins to form a bowl shape, try a slightly larger hook or relax your tension. If the outer edge becomes noticeably ruffled before the decorative border is added, a smaller hook may help. The goal is to produce a smooth, flexible foundation that can support the pumpkin embellishments without losing its shape.
For the decorative elements, the 3D crochet pumpkins are constructed using a small crocheted rectangle worked in back-loop-only single crochet. This technique creates raised horizontal ridges that become vertical pumpkin segments after assembly. Each rectangle is folded and seamed into a tube, gathered at both ends, and lightly stuffed to create a rounded shape. A yarn needle is then used to pull the center inward, giving the pumpkin its recognizable flattened silhouette. This construction method is approachable for beginners because it relies primarily on single crochet stitches. The pumpkin stems and vines are created separately using green yarn, with tightly worked chains and increases producing the curling tendrils.
The colors shown in the inspiration design create a soft, romantic interpretation of traditional autumn decorations. Cream, blush pink, ivory, and olive green work beautifully together because they balance warm neutrals with gentle seasonal accents. For a more traditional Thanksgiving placemat, replace the pink pumpkins with burnt orange or pumpkin spice yarn. A modern farmhouse variation might feature ivory pumpkins, sage green vines, and a natural beige foundation. Before crocheting, arrange your chosen yarn colors beside one another to confirm that the shades complement each other. Planning the palette in advance will help create a harmonious finished design and prevent unnecessary changes during assembly.
2. Step-by-Step Instructions for Crocheting the Circular Placemat Base
The foundation of the Crochet Placemat with Pumpkin Wreath Pattern is a circular double crochet motif that gradually expands outward. Using cream cotton yarn and a 4.0 mm hook, begin with a magic ring. Round 1: Ch 3, work 11 dc into the ring, pull the tail to close, and join with a sl st to the top of the beginning ch-3. You should have 12 dc, counting the beginning chain. Round 2: Ch 3, work 1 dc into the same stitch, then work 2 dc into each remaining stitch around. Join with a slip stitch for a total of 24 dc. These first two rounds establish the center of the placemat and provide the foundation for the expanding circular pattern.
Continue increasing evenly to maintain the round shape. Round 3: Ch 3, work 2 dc into the next stitch, then repeat 1 dc in the next stitch, 2 dc in the following stitch around, ending with 36 dc. Round 4: Ch 3, work 1 dc into the next stitch, then 2 dc into the following stitch; repeat the established increase sequence to finish with 48 dc. Round 5: Work 3 individual dc between increases, producing 60 dc. Round 6: Work 4 individual dc between increases, producing 72 dc. Round 7: Work 5 individual dc between increases, producing 84 dc. For these and subsequent rounds, the beginning ch-3 counts as the first stitch in the first group of individual double crochets. Join each round neatly before proceeding.
As the circular base grows, continue the same mathematical increase pattern. Round 8: Work 6 individual dc between increases for 96 stitches. Round 9: Work 7 individual dc between increases for 108 stitches. Round 10: Work 8 individual dc between increases for 120 stitches. Round 11: Work 9 individual dc between increases for 132 stitches. Round 12: Work 10 individual dc between increases for 144 stitches. Continue increasing by 12 stitches per round until the circle reaches approximately 28–32 cm (11–12.5 inches) in diameter. Depending on yarn thickness and personal tension, you may need approximately 14–17 rounds. Check the fabric after every few rounds and gently flatten it on a table to make sure the increases are distributed evenly.
Once the circular foundation reaches the desired diameter, add a transitional round that creates a clean surface for the decorative edging. Work one sc in every stitch around, joining with a slip stitch at the end. This round helps stabilize the outer edge and creates a firm foundation for the scalloped border. If your base has 180 stitches, for example, the single crochet round should also contain 180 stitches. Avoid adding unnecessary increases during this stage, because the goal is to maintain the existing circumference. If your stitch count is not divisible by six, make a few evenly spaced adjustments during this round so that the following scallop pattern repeats neatly around the entire placemat.
To create the scalloped crochet border, use the following repeat: Skip 2 stitches, work 7 dc into the next stitch, skip 2 stitches, work 1 sc into the next stitch. Repeat this sequence around the entire circle, joining with a slip stitch at the end. Each scallop uses six stitches from the foundation round, producing a series of soft, rounded arches. The seven double crochets form the raised fan, while the single crochet anchors each fan securely. For a fuller decorative effect, the center double crochet of each scallop can be replaced with a treble crochet. This optional variation adds a slightly taller point to the middle of each fan, creating an elegant floral appearance.
After completing the border, fasten off the yarn and weave in the ends carefully with a yarn needle. Lay the round crochet placemat on a flat surface and check that the scallops are evenly spaced. If needed, lightly dampen the cotton fabric and shape it by hand, allowing it to dry completely before attaching the pumpkins. Blocking is especially helpful for circular projects because it encourages the stitches to settle into a consistent arrangement. The finished base should be smooth and relatively flat, with the scalloped border forming a decorative frame around the central crochet motif. At this stage, the placemat can already function as a simple seasonal table accessory, but the three-dimensional pumpkin wreath will transform it into a distinctive autumn decoration.
3. How to Crochet the 3D Pumpkins, Green Stems, and Curly Vines
The most recognizable feature of the Crochet Placemat with Pumpkin Wreath Pattern is the ring of miniature pumpkins surrounding the central foundation. For a balanced arrangement similar to the inspiration image, create nine small pumpkins, alternating five pink pumpkins with four ivory pumpkins. Each finished pumpkin should measure approximately 5–6 cm (2–2.4 inches) wide, although the exact size will depend on the yarn and hook used. Begin by making a foundation chain of 17 using your chosen pumpkin color. Row 1: Starting in the second chain from the hook, work 1 sc into each chain across, producing 16 sc. Ch 1 and turn. Rows 2–28: Work 1 sc in the BLO of each stitch across, ch 1, and turn. On the final row, fasten off with a long tail for sewing. The resulting ribbed rectangle forms the body of the pumpkin.
To assemble the ribbed crochet pumpkin, fold the rectangle so that the first and last rows meet, with the ridges running parallel to the short edges. Sew the two edges together using a yarn needle, forming a small tube. Thread another length of matching yarn through the stitches around one open end, pull tightly to gather the opening, and secure with a knot. Turn the piece so that the seam is hidden inside. Add a small amount of polyester fiberfill, distributing it evenly without overstuffing. Gather the second opening using the same method, then pass the needle through the center of the pumpkin several times, gently pulling the top and bottom toward each other. This creates the slightly flattened, rounded shape typical of a pumpkin.
The raised ridges created by back-loop-only single crochet naturally form decorative pumpkin sections, but you can emphasize them with additional shaping. Thread a long yarn needle with matching yarn and pass it from the top center through the bottom of the pumpkin. Wrap the yarn around the outside, positioning it between two raised ridges, then return the needle through the center. Pull gently to create a shallow indentation. Repeat around the pumpkin at evenly spaced intervals. Avoid pulling too tightly, because excessive tension may distort the shape or expose the stuffing. Once the pumpkin has a balanced appearance, secure the yarn at the bottom and weave the remaining tail inside. Repeat this process for all nine pumpkins, keeping their dimensions as consistent as possible.
The crochet pumpkin stems are made using olive green yarn and a slightly smaller hook if desired. Begin with a magic ring and work 6 sc into the ring. Join with a slip stitch, then work one sc in each stitch for three additional rounds to form a short cylindrical stem. Fasten off with a long tail for attaching the stem to the pumpkin. Position the stem over the gathered top opening and sew it securely in place. For a more natural appearance, add two or three small green loops around the base of the stem. These can be formed by chaining 5–7 stitches and joining each chain back into the stem base with a slip stitch. The loops create a leafy crown that visually connects the pumpkin to the surrounding vines.
To create the curly crochet vines, use the green yarn and make a foundation chain of approximately 18–25 stitches. Starting in the second chain from the hook, work 3 sc into each chain across. The extra stitches force the chain to twist naturally into a spiral. For tighter curls, use 4 sc in selected chain stitches, especially near the tip. For longer vines, begin with a chain of 30 or more stitches. Make approximately 12–18 vines in different lengths so that the wreath looks organic rather than overly symmetrical. Leave a long tail on each vine for attaching it to the placemat. The spirals should be flexible enough to curl around the pumpkins without covering their textured surfaces.
Before attaching the embellishments, arrange the pink and ivory crochet pumpkins around the outer section of the placemat. Position the pumpkins just inside the scalloped border, leaving the central area open. Alternate the colors and place the green vines between neighboring pumpkins to create a continuous wreath effect. Begin by sewing each pumpkin to the foundation through several stitches along its underside, keeping the attachment points hidden. Attach the stems and vines with small, discreet stitches using matching yarn. Make sure the pumpkins remain securely positioned but are not pulled so tightly that the base begins to pucker. Once every decorative element is attached, gently adjust the spirals so that they curl naturally around the pumpkin arrangement.
4. Finishing Techniques, Decorating Ideas, and Care Instructions
Completing the Crochet Placemat with Pumpkin Wreath Pattern requires a few careful finishing steps that improve both durability and appearance. Begin by inspecting the underside of the placemat for loose yarn tails or visible knots. Weave each tail through several neighboring stitches using a yarn needle, changing direction at least once to help secure it. Trim excess yarn only after confirming that the ends are firmly anchored. Check the attachment points beneath every pumpkin, especially those near the outer edge where they may be handled frequently. If any pumpkin moves too freely, reinforce its attachment with a few additional stitches. A well-finished placemat should feel sturdy while retaining the soft flexibility that makes handmade crochet appealing.
Because the finished design includes three-dimensional crochet decorations, it works especially well as a decorative centerpiece or charger-style table accent. Place it beneath a lightweight decorative bowl, a small artificial floral arrangement, or a seasonal display that does not crush the pumpkins. The open center creates a convenient space for arranging autumn decorations while allowing the surrounding pumpkin wreath to remain visible. For everyday dining, remember that raised embellishments may interfere with the stability of plates and drinking glasses. The placemat is therefore best treated as a decorative table accessory rather than a completely flat dining mat. Avoid placing hot cookware directly on the polyester-filled pumpkins, as synthetic stuffing may be damaged by high temperatures.
The color combinations can be customized to create different versions of this fall crochet placemat pattern. Traditional autumn enthusiasts may prefer burnt orange pumpkins, dark green vines, and a warm beige foundation. A cottage-inspired design could feature pale yellow pumpkins with sage stems and a soft white background. For a romantic farmhouse appearance, keep the blush pink and ivory palette shown in the inspiration image. You can also create a monochromatic version using several shades of cream, oatmeal, and taupe. Choosing colors that coordinate with your existing table linens makes the finished project easier to incorporate into seasonal home decor.
This handmade crochet pumpkin placemat can also become a thoughtful gift for friends and family members who appreciate seasonal crafts. Consider making a matching set of smaller coasters using the same circular stitch pattern and scalloped edging. A coordinated table runner featuring miniature pumpkin appliqués would also complement the placemat beautifully. When preparing the project as a gift, include a small card describing the yarn materials and recommended care instructions. Handmade gifts often feel especially meaningful because they reflect the time, creativity, and attention invested in their construction. A carefully packaged crochet placemat can make a lovely housewarming present, Thanksgiving hostess gift, or seasonal surprise for someone who enjoys decorating.
Proper cleaning helps preserve the shape and texture of the crochet pumpkin wreath decoration. If you used washable cotton yarn and polyester fiberfill, gentle handwashing is generally the safest approach. Fill a basin with cool water and a small amount of mild detergent, then carefully submerge the placemat without twisting or aggressively rubbing the pumpkins. Rinse thoroughly and press the excess water out using a clean towel. Lay the project flat to dry, gently reshaping the circular foundation and adjusting the scalloped edges. Avoid hanging the wet placemat, because the weight of the water may stretch the stitches. Always follow the care instructions provided for the specific yarn and stuffing used in your project.
For long-term storage, keep the finished Crochet Placemat with Pumpkin Wreath Pattern in a clean, dry location away from direct sunlight. Fold it loosely or lay it flat inside a breathable fabric storage bag to protect the decorative pumpkins from being crushed. Avoid placing heavy objects on top of the project, as this may flatten the ribbed texture and distort the curly vines. Before displaying it again, gently reshape the pumpkins with your fingers and arrange the green spirals around the wreath. With proper care, the placemat can remain a treasured seasonal decoration for many years, bringing the charm of handmade crochet back to your table every autumn.
Frequently Asked Questions About the Crochet Placemat with Pumpkin Wreath Pattern
1. Is the Crochet Placemat with Pumpkin Wreath Pattern suitable for beginners?
Yes. This pattern is suitable for confident beginners who already understand basic crochet stitches such as chain, single crochet, and double crochet. The circular base requires attention to stitch counts and increases, while the pumpkins use simple back-loop-only single crochet rows. Beginners may find it helpful to complete one practice pumpkin before making the full set of nine decorations.
2. What is the best yarn for making a crochet pumpkin placemat?
Medium-weight cotton yarn is an excellent choice for the circular foundation because it provides good stitch definition and helps the placemat maintain its shape. Cotton-blend yarn can also be used for the pumpkins. Choose yarns of similar thickness to ensure that the decorative elements remain proportionate to the base.
3. How much yarn is needed for this crochet placemat?
The amount depends on the yarn thickness, finished diameter, and personal tension. As a general starting estimate, plan for approximately 150–220 grams of cream yarn for the base, 50–100 grams combined of pink and ivory yarn for the pumpkins, and 20–40 grams of green yarn for the stems and vines. Having a little extra yarn available is helpful when making decorative projects with multiple components.
4. Can I make the crochet placemat larger or smaller?
Absolutely. To make a larger placemat, continue adding double crochet increase rounds before working the scalloped border. For a smaller version, stop increasing earlier and adjust the number or size of the pumpkins accordingly. Always maintain evenly spaced increases to help keep the circular foundation flat.
5. How do I prevent the circular crochet base from curling?
Curling often occurs when the stitch tension is too tight or the circle does not have enough increases. Check your stitch count after every round and confirm that you are following the recommended increase sequence. A slightly larger crochet hook may help if the stitches are unusually tight. Gentle blocking can also improve the shape of the finished foundation.
6. How are the pumpkin decorations attached securely?
Use a yarn needle and matching yarn to sew each pumpkin through several stitches along its underside. Attach the pumpkins to the foundation without pulling the yarn excessively tight. Reinforce the attachment points if necessary, especially when the placemat will be handled regularly. The stems and vines should also be sewn securely rather than left loosely attached.
7. Can I use traditional orange pumpkins instead of pink and ivory?
Yes. The pattern works beautifully with traditional orange, burnt orange, mustard yellow, forest green, and cream yarn. Changing the pumpkin colors does not affect the construction process, so you can customize the design to match your preferred autumn decorating style.
8. How long does it take to complete this crochet project?
An experienced crocheter may complete the placemat in approximately 8–14 hours, depending on the complexity of the finishing work. Beginners may need additional time to count stitches, shape the pumpkins, and attach the decorative vines. Working on the project over several relaxed sessions can make the experience more enjoyable.
9. Can this crochet placemat be used under hot dishes?
It is not recommended for direct contact with hot cookware. Although cotton yarn can tolerate moderate warmth, the raised pumpkin decorations contain polyester fiberfill, which may be damaged by excessive heat. The design is better suited to decorative table arrangements, lightweight serving accessories, and seasonal displays.
10. What should I do if my crochet pumpkins look uneven?
Check that each ribbed rectangle contains the same number of stitches and rows. Use similar amounts of stuffing and gather the openings evenly. If one pumpkin appears too round, pass a yarn needle through its center and gently pull the top and bottom closer together. Small variations are normal in handmade crochet and can add natural character to the finished wreath.
11. Can I sell finished placemats made using this pattern?
You can generally sell handmade items created from your own materials, subject to any applicable pattern licensing terms and local business requirements. If you plan to sell finished placemats, pay particular attention to secure construction, accurate material descriptions, and appropriate care instructions. The decorative nature of the raised pumpkins should also be clearly communicated to customers.
12. How can I make the pumpkin wreath look fuller?
Add more curly green vines between the pumpkins, use slightly larger pumpkins, or incorporate small crocheted leaves. You can also position the pumpkins closer together to create a denser wreath. However, avoid overcrowding the arrangement, because the open center and visible scalloped border are important features of the original design.
Conclusion:
Bring Handmade Autumn Charm to Your Home
The Crochet Placemat with Pumpkin Wreath Pattern is a beautiful way to combine practical crochet techniques with imaginative seasonal decorating. Throughout this tutorial, you learned how to prepare the materials, understand essential US crochet abbreviations, construct a circular double crochet foundation, create a decorative scalloped border, and make textured three-dimensional pumpkins. You also discovered how to crochet green stems and spiral vines, arrange the decorations into a balanced wreath, and finish the project securely.
What makes this autumn crochet placemat especially appealing is the opportunity to personalize every detail. From the gentle pink and ivory pumpkins to the traditional orange and green combinations, the design can reflect your favorite seasonal colors and decorating preferences. The finished project celebrates the warmth of handmade crafts while providing an inviting decorative accent for fall gatherings, Thanksgiving tables, and cozy home interiors.
Whether you are making your first decorative crochet centerpiece or adding another handmade creation to your autumn collection, this pattern offers a rewarding combination of familiar stitches and creative finishing techniques. Take your time with each step, enjoy the process of shaping the pumpkins, and allow your own style to influence the final arrangement.
EASILY FIND THE FREE PDF FOR THIS PATTERN HERE!
We would love to hear your sincere opinion! 🍂🧶 What do you think of this Crochet Placemat with Pumpkin Wreath Pattern? Would you keep the beautiful pink and ivory pumpkins, or would you choose traditional autumn colors? Share your honest feedback, creative ideas, and suggestions for improving the pattern. Your experiences and recommendations can inspire other crochet enthusiasts to create their own beautiful handmade fall decorations! 💗🎃