
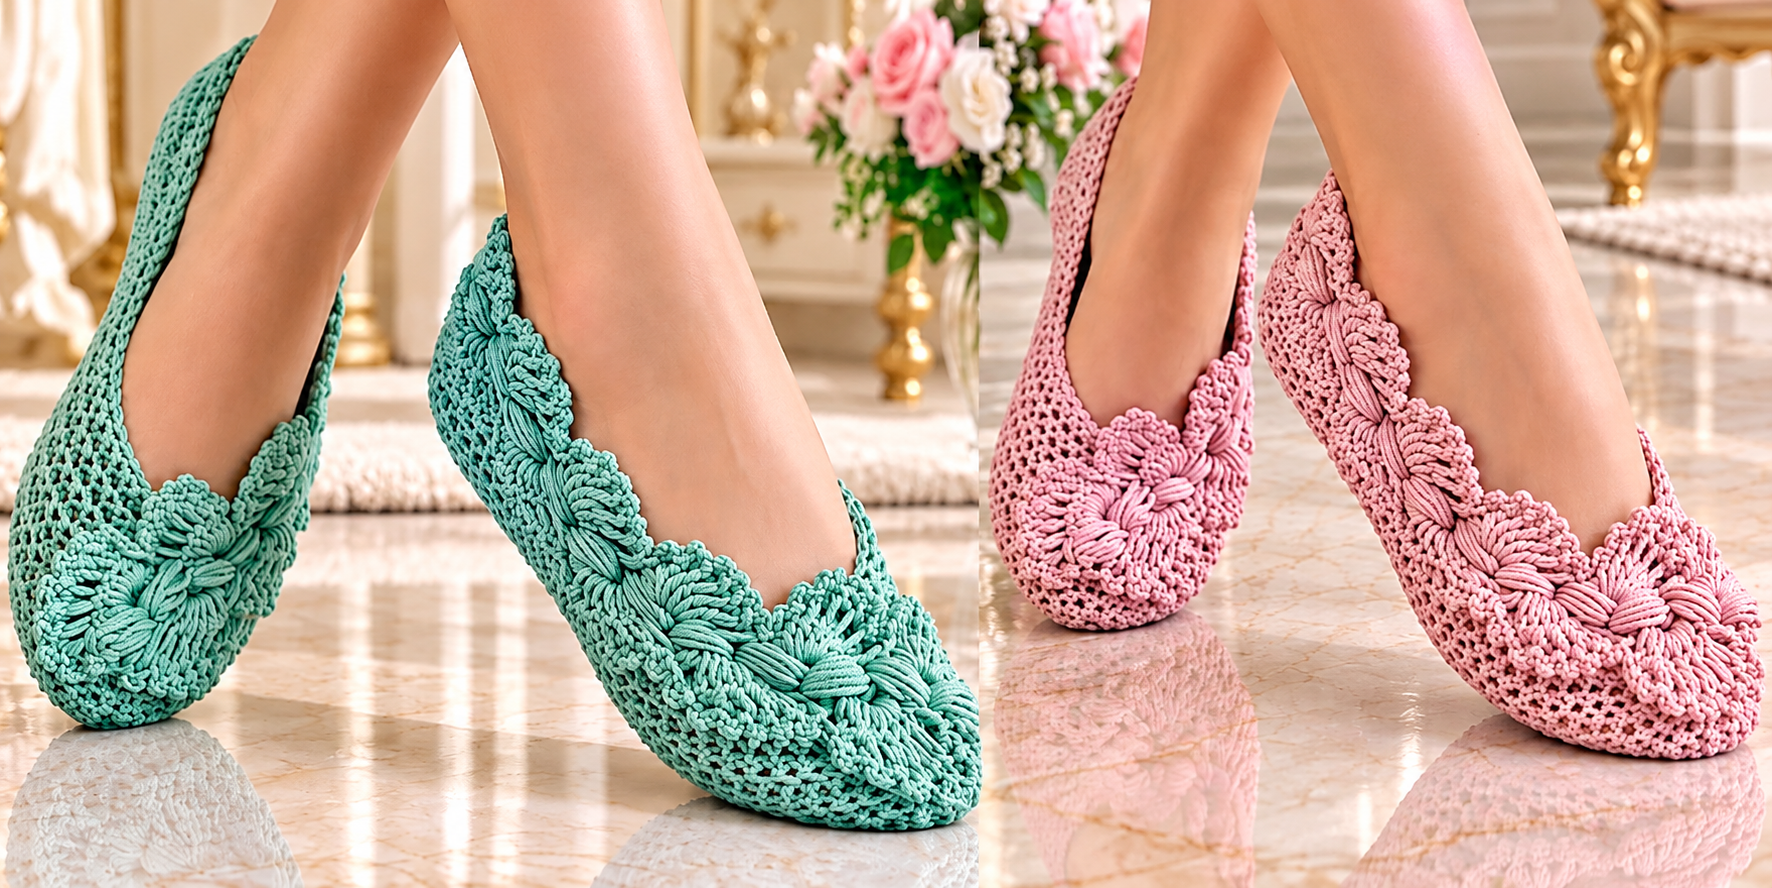
The Beautiful little shoes made from a crochet rectangle Pattern is a charming and creative way to transform a simple piece of crocheted fabric into comfortable, stylish, and beautifully textured handmade slippers. This delightful crochet project combines traditional stitching techniques with an easy construction method, making it an appealing choice for beginners and experienced crocheters alike. Instead of working with complicated shoe shapes or difficult patterns, you begin with a basic crochet rectangle and gradually transform it into a lovely pair of soft slippers. The finished shoes can feature delicate floral details, decorative braided stitches, and attractive scalloped edges, giving them a handmade elegance that looks wonderful in any color. Whether you prefer pastel pink, mint green, cream, or another favorite shade, this easy crochet slippers pattern offers plenty of opportunities for personalization. Best of all, creating something beautiful from such a simple foundation makes the entire process especially rewarding.
One of the most enjoyable aspects of the Beautiful little shoes made from a crochet rectangle Pattern is its versatility. These handmade slippers can become cozy indoor footwear, thoughtful homemade gifts, or decorative accessories for relaxing around the house. Their lightweight construction makes them comfortable to wear, while the crochet texture allows the fabric to adapt naturally to the shape of the foot. By choosing soft cotton yarn or a comfortable cotton-blend yarn, you can create breathable slippers suitable for everyday indoor use. The decorative details are another wonderful feature, especially when you incorporate crochet flower motifs, braided textures, and carefully finished borders. Although the finished design looks intricate, the underlying construction can be surprisingly approachable when each step is explained clearly. This tutorial focuses on an adaptable rectangular construction inspired by the pictured slippers, with practical measurements, stitch instructions, and assembly techniques.
Learning how to make crochet shoes from a rectangle is also an excellent opportunity to develop useful crochet skills that can be applied to many other handmade projects. Throughout this tutorial, you will practice foundational stitches, understand how to measure crochet fabric, learn how to shape flat pieces, and discover simple techniques for joining sections securely. You will also explore ways to create decorative crochet flowers that enhance the appearance of the slippers without requiring advanced construction methods. The instructions use United States crochet terminology, making the pattern straightforward for readers familiar with American crochet abbreviations. Measurements are provided in centimeters, along with guidance for adjusting the finished size to different feet. Whether you are making your first pair of handmade slippers or looking for a relaxing weekend project, this pattern provides an enjoyable balance of creativity, practicality, and traditional craftsmanship.
1. Materials, Measurements, and Basic Crochet Stitches for Rectangle Slippers
Before beginning the Beautiful little shoes made from a crochet rectangle Pattern, gather the materials needed to create a comfortable and durable pair of slippers. Choose approximately 150–200 grams of medium-weight cotton or cotton-blend yarn, depending on the desired size, stitch density, and decorative details. A 4.0 mm crochet hook is a practical starting point, although you may need to adjust the hook size to match your yarn and tension. You will also need scissors, a yarn needle, stitch markers, a measuring tape, and optional non-slip fabric or suitable grip material for the soles. For a design inspired by the photograph, consider using mint green or dusty pink yarn with a soft matte finish. These colors highlight the texture of the crochet stitches beautifully.
DISCOVER MORE FREE PATTERNS HERE!
Understanding the measurements is essential because the crochet rectangle slipper pattern depends on accurately shaping flat fabric around the foot. For an adult sample approximately corresponding to US women’s size 7–8, begin by aiming for a finished foot length of around 24–25 cm, adjusting according to actual foot measurements. In this tutorial, each slipper begins with a rectangle approximately 25 cm long and 20 cm wide, measured after lightly relaxing the fabric. The 25 cm direction runs from the toe toward the heel, while the 20 cm direction wraps around the foot. This is only a starting size, since yarn thickness, crochet tension, and individual foot shape can affect the fit. Measure the intended wearer’s foot before making both slippers.
The following US crochet abbreviations will be used throughout the instructions: ch (chain) creates the foundation stitches; sc (single crochet) produces firm, compact fabric; hdc (half double crochet) adds a little height while maintaining flexibility; dc (double crochet) creates taller stitches; sl st (slip stitch) joins sections or moves the working yarn; st (stitch) identifies an individual stitch; sp (space) indicates an opening; BLO (back loop only) creates ribbed texture; and FO (fasten off) means securing the final stitch. You will also encounter sc2tog, which means single crocheting two stitches together to decrease the stitch count. Understanding these abbreviations makes the instructions easier to follow and helps build confidence when working with other American crochet patterns.
To begin the foundation rectangle, make a small tension swatch using half double crochet stitches. For example, if your gauge is approximately 16 hdc stitches and 12 rows per 10 cm, chain 42 stitches to produce 40 working hdc stitches after the turning chains. Work the first hdc into the third chain from the hook, then continue across. This creates a foundation width of approximately 25 cm at the sample gauge. Chain 2, turn, and work one hdc into each stitch across, treating the turning chain as a turning aid rather than an additional stitch. Continue until the rectangle measures approximately 20 cm in the row direction, which may require around 24 rows. Always prioritize the actual measurements over a fixed row count.
For crocheters who prefer a textured finish, alternating rows of hdc in the back loop only can create subtle ridges that make the slippers look more decorative. Another attractive option is to work two rows of regular half double crochet followed by one row of back-loop stitches. This combination gives the fabric a flexible structure while introducing gentle visual interest. Avoid making the rectangle too loose, as overly open stitches can stretch significantly during wear. Similarly, excessively tight crochet may feel uncomfortable around the toes and sides of the foot. The ideal fabric should be firm enough to hold its shape but flexible enough to wrap comfortably around the foot.
Before moving to assembly, create a second rectangle using exactly the same yarn, hook size, stitch count, and finished measurements. Place both rectangles flat and compare their dimensions carefully. If one rectangle is noticeably larger, adjust it before continuing so the completed slippers fit consistently. Use stitch markers to identify the midpoint of each short edge and the center of the rectangle. These markings will help when shaping the toe and heel. At this stage, the pieces may look like ordinary rectangular swatches, but the following steps will transform them into the foundation of your handmade crochet ballet slippers.
2. Step-by-Step Instructions for Shaping Crochet Rectangle Shoes
The most exciting part of the Beautiful little shoes made from a crochet rectangle Pattern begins when the flat rectangles are transformed into recognizable footwear. Place the first rectangle horizontally with its 25 cm length running from left to right and its 20 cm width running from top to bottom. The left short edge will form the toe, and the right short edge will form the heel. The long edges will become the upper sides of the slipper. If your fabric has a textured front surface, place that side facing down while assembling so the decorative texture will appear on the outside after turning. Use stitch markers to identify the toe center, heel center, and the sections that will remain open for the foot.
Begin shaping the toe by threading a yarn needle with a strong length of matching yarn. Along the 20 cm toe edge, weave a running stitch through the outer loops of the crochet fabric, passing through each stitch or row-end space at regular intervals. Gently pull the yarn to gather the entire edge into a rounded toe shape. The gathering should create a smooth curve rather than a bulky knot. Secure the gathered edge with several small stitches, then weave the yarn through the inside to reinforce the closure. This gathered construction is a simple way to create the front of crochet slippers made from rectangles without complicated increases or decreases.
Next, form the top of the slipper by joining the two long edges together from the gathered toe toward the center. Using the yarn needle or slip stitches, sew approximately 7–9 cm along the top centerline, depending on how much coverage you want over the toes. This seam creates the upper vamp, which is the section covering the front of the foot. Leave the remaining long edges unjoined to form the opening where the foot will enter. Try the partially assembled slipper on carefully before securing the final seam length. If the opening feels too narrow, shorten the top seam; if the front feels too loose, extend it slightly. This adjustment helps produce a comfortable ballet-style silhouette.
Now shape the heel by bringing together the two corners of the opposite 20 cm short edge. Fold this edge in half so the midpoint becomes the bottom of the heel and the corners meet at the top. Sew the folded edge together from the midpoint toward the joined corners, creating a vertical heel seam. Use a mattress stitch or carefully spaced whip stitches to avoid a thick ridge against the foot. Check that the heel is symmetrical and that the slipper sits naturally when turned right side out. If the heel feels too tall or loose, adjust the seam and opening before fastening off. The rectangle’s remaining unsewn long edges now form the opening around the ankle and instep.
After completing the toe and heel seams, turn the slipper right side out and gently shape it with your hands. Insert your foot or a suitable shoe form to evaluate the overall fit. The gathered toe should provide enough room for the toes without pulling tightly across the front, and the heel should remain comfortably in place. If the slipper feels too wide, you may adjust the upper seam or carefully take in small sections along the heel. If it is too short, the original rectangle may need additional length, since stretching alone is not a reliable solution. Repeat the same construction process for the second slipper, checking that the seam placement and opening size match.
To improve the structure, work a finishing round of single crochet stitches around the entire foot opening. Attach the yarn near the heel, chain 1, and work evenly around the exposed edge, placing stitches at consistent intervals. For a smoother finish, work one sc into each existing stitch along stitch-based edges and distribute stitches evenly along row ends, adjusting as necessary to prevent puckering. Join the round with a slip stitch into the first sc. If you want a firmer opening, work a second round using sc in the back loop only. Finish by fastening off and weaving in the ends securely. At this point, your easy handmade crochet slippers have their basic shape and are ready for decorative details.
3. Creating Decorative Crochet Flowers, Braided Textures, and Elegant Edges
The decorative details are what make the Beautiful little shoes made from a crochet rectangle Pattern especially appealing. The pictured slippers feature prominent floral-like textures that add depth and sophistication to the upper surface. You can achieve a similar appearance by creating individual crochet flowers and attaching them across the toe and along the sides of the opening. Begin with a magic ring using the same yarn as the slipper or a complementary shade. Chain 1 and work 6 sc into the ring, then pull the ring closed. Join with a slip stitch to the first sc. This small center provides the foundation for a simple flower motif that can be repeated as needed.
To create the petals, work the following sequence into each of the six stitches around the center: (sl st, ch 2, 2 dc, ch 2, sl st) into the same stitch. Repeat this sequence for all six center stitches to produce a six-petal flower. Fasten off, leaving a long tail for sewing. Gently shape the petals with your fingers so they lie evenly. This beginner-friendly motif creates a decorative flower approximately 4–5 cm across, depending on yarn and tension. Make three flowers for the front of each slipper, or adjust the number according to the desired appearance. These flowers provide a practical interpretation of the raised floral texture visible in the reference design, rather than an exact reconstruction of its original stitchwork.
For a more dimensional effect, you can add puff stitches to the flower centers. A puff stitch is made by repeatedly drawing up loops into the same stitch before pulling the yarn through the accumulated loops. To make a simple puff, yarn over, insert the hook into the designated stitch, yarn over, and pull up a loop. Repeat this action three times in the same stitch, then yarn over and pull through all the loops on the hook. Chain 1 to secure the puff. This technique creates a raised, rounded texture that resembles the center of a soft fabric flower. Puff stitches can also be added along the slipper’s front edge for extra visual interest.
Another lovely decorative option is a crochet braided cord that follows the opening of the shoe. To make a simple cord, chain approximately 35–45 stitches, depending on the section you wish to decorate. Beginning in the second chain from the hook, work one slip stitch into each chain across. Fasten off, leaving long tails for attachment. Make two or three cords and loosely braid them together, keeping the tension even. Position the braid along the upper edge of the slipper or curve it around the flower motifs. Sew the braid into place using small, nearly invisible stitches. This decorative addition can give the finished shoes a richer handmade appearance.
To create a delicate scalloped crochet edging, attach the yarn at the heel and work around the slipper opening. Repeat the sequence (skip 1 st, 5 dc in the next st, skip 1 st, sl st in the next st) wherever the stitch count allows. This produces small shell-shaped scallops that soften the outline of the footwear. If the edging becomes wavy or crowded, space the shells farther apart or use a smaller hook. For a subtler look, replace the five-double-crochet shells with three-double-crochet shells. The goal is to create a neat decorative border that complements the floral details without making the opening uncomfortable or overly bulky.
Once the flowers, braided cords, and edging are complete, arrange the decorative pieces on the slippers before sewing them permanently. Position the largest flower near the center of the toe and place smaller motifs along the sides for balance. Use stitch markers to hold everything in place while checking the overall appearance. Sew each decoration securely through the upper crochet fabric, taking care not to create uncomfortable knots inside the slippers. Weave in every loose yarn end using a yarn needle and inspect the attachments carefully. When finished, both slippers should display coordinated crochet floral embellishments while retaining the softness and flexibility of the original rectangular construction.
4. Adjusting Sizes, Improving Comfort, and Caring for Handmade Crochet Slippers
One of the biggest advantages of the Beautiful little shoes made from a crochet rectangle Pattern is the ability to customize the finished footwear for different sizes. Instead of following only one fixed stitch count, you can adapt the foundation rectangle using actual foot measurements and a simple crochet gauge calculation. Measure the length of the foot from heel to longest toe, then use that measurement as the starting point for the rectangle’s long dimension. The rectangle’s width should be based on the circumference around the widest part of the forefoot, adjusted for the natural stretch of the crochet fabric. Make a small sample before beginning, especially when changing yarn thickness or hook size.
For a general starting guide, consider the following approximate rectangle measurements for crochet slippers. These dimensions are suggestions for a moderately stretchy fabric, not guaranteed finished shoe sizes.
| Approximate US women’s size | Rectangle length | Rectangle width |
|---|---|---|
| 5–6 | 23 cm | 18 cm |
| 7–8 | 25 cm | 20 cm |
| 9–10 | 27 cm | 22 cm |
| 11–12 | 29 cm | 24 cm |
The table is intended to help you plan the project, but individual foot width, yarn elasticity, and seam placement may require adjustments. For the most reliable fit, make one complete sample slipper before crocheting the second.
Choosing the right yarn can significantly influence the comfort and durability of your crochet rectangle shoes. Cotton yarn is breathable, shows stitch definition clearly, and generally holds decorative details well. Cotton blends can provide additional softness and flexibility, making them attractive for slippers intended for frequent indoor use. Acrylic yarn is another affordable option, although its warmth and stretch characteristics differ from cotton. Avoid very delicate fibers that wear down quickly against flooring. For a firmer slipper, consider using a slightly smaller hook to create tighter stitches in the sole area. Whatever material you choose, prioritize softness, durability, and comfort against the skin.
Because crochet slippers are typically worn indoors, slip resistance is an important consideration. Plain crocheted soles may slide on polished wood, tile, marble, and other smooth surfaces. To improve traction, attach appropriately designed non-slip sole patches or a compatible grippy sole material according to the manufacturer’s instructions. You can also sew a thin, flexible fabric sole to the bottom of each slipper, provided the fabric itself offers suitable traction. Test the finished footwear carefully on the intended flooring before regular use. Decorative crochet stitches alone do not provide reliable slip resistance, so this finishing detail should not be overlooked.
Proper cleaning will help your handmade crochet slippers maintain their appearance over time. Always consider the washing recommendations for the yarn used in the project. For cotton or cotton-blend slippers, gentle handwashing in cool or lukewarm water is often a suitable option, provided the yarn label permits it. Use a mild detergent, avoid excessive rubbing, and gently press out excess water without twisting the fabric. Reshape the slippers while damp and allow them to air-dry flat in a well-ventilated area. Avoid hanging wet slippers by the heel because the weight of the water may stretch the crochet stitches. If you have added non-slip materials, follow their specific care instructions as well.
Finally, remember that the beauty of the Beautiful little shoes made from a crochet rectangle Pattern comes from both the construction and the creative finishing choices. A simple pair in one solid color can look elegant and timeless, while contrasting flower motifs can create a playful and colorful result. You can experiment with different yarn textures, smaller floral decorations, subtle braided trim, or minimalist edging. Handmade slippers also make thoughtful gifts because you can personalize them according to the recipient’s favorite colors and preferred fit. With careful measurements, secure seams, and patient finishing, this project offers a wonderful way to turn basic crochet skills into a practical and attractive handmade accessory.
Frequently Asked Questions (FAQ)
1. Can beginners make beautiful little shoes from a crochet rectangle?
Yes. This pattern is suitable for confident beginners who already understand basic crochet stitches such as chain, single crochet, half double crochet, and slip stitch. The rectangular foundation is straightforward, and the shaping mainly involves gathering and sewing. Beginners can omit the decorative flowers until they feel comfortable with the construction.
2. How many crochet rectangles do I need for one pair of slippers?
You need two rectangles, one for each slipper. Both rectangles should have matching dimensions and stitch tension to ensure the finished shoes fit consistently. Each rectangle is gathered at the toe, seamed across part of the upper foot, and joined at the heel.
3. What is the best crochet stitch for making rectangle slippers?
Half double crochet (hdc) is an excellent choice because it produces a fabric that balances flexibility, comfort, and structure. Single crochet can create a firmer fabric, while double crochet produces a more open texture. Back-loop half double crochet is particularly useful for adding subtle ribbing.
4. Can I make these crochet slippers without sewing?
Some rectangle slipper designs use crochet slip stitches to join sections instead of a yarn needle. However, this particular construction requires joining the gathered toe, upper section, and heel. You can complete most of these joins with a crochet hook if you prefer not to hand-sew.
5. How do I make the slippers larger or smaller?
Adjust the foundation rectangle according to the intended wearer’s foot measurements and your crochet gauge. A larger rectangle generally creates a larger slipper, but the width and seam placement must also be considered. Make one sample slipper and test the fit before completing the pair.
6. Which yarn is best for comfortable crochet shoes?
Medium-weight cotton and cotton-blend yarns are practical options because they provide good stitch definition and comfortable fabric. Choose a yarn that feels soft against the skin and can withstand regular use. Always consider the intended season and the amount of warmth desired.
7. How long does it take to crochet a pair of rectangle slippers?
The time depends on your experience, stitch choice, and decorative details. A simple pair may take several hours, while a more elaborate design with floral embellishments and braided edging may require additional time. Beginners should work at a comfortable pace and focus on consistent stitches.
8. Can these slippers be worn outside?
Crocheted slippers with plain yarn soles are generally better suited for indoor use. Outdoor surfaces can quickly damage the yarn and may expose the feet to moisture or sharp objects. If you want outdoor footwear, you would need a properly constructed, durable, and secure outdoor-rated sole.
9. Why do my crochet slippers stretch after wearing them?
Crochet fabric naturally stretches under pressure, especially when the stitches are loose or the yarn has limited recovery. To reduce excessive stretching, use a suitable hook size, maintain even tension, and avoid making the slippers too large initially. A firmer edging around the opening can also help maintain the shape.
10. How can I make the floral decorations look more professional?
Use consistent yarn tension, make the petals as evenly as possible, and arrange the flowers before attaching them. Sew decorations securely with matching yarn and hide the ends inside the crochet fabric. Lightly shaping the motifs with your fingers can improve their appearance without flattening the raised texture.
11. Are crochet rectangle slippers suitable as handmade gifts?
Absolutely. These slippers can make meaningful handmade gifts for birthdays, holidays, or special occasions. Choose the recipient’s preferred colors, confirm their foot measurements, and include appropriate non-slip soles for safer indoor use. A carefully finished pair can feel both personal and practical.
12. Can I wash crochet slippers in a washing machine?
Machine washing depends on the yarn and any added sole materials. Even when the yarn is machine washable, handwashing is often gentler on decorative flowers, seams, and braided trims. Always follow the care recommendations for every material used in the slippers.
13. Can I replace the crochet flowers with another decoration?
Yes. You can decorate the slippers with simple bows, small leaves, textured circles, or contrasting crochet edging. Make sure any embellishments are securely attached and do not interfere with the fit or comfort of the footwear.
14. How can I keep both slippers the same size?
Use the same yarn, hook size, stitch count, row count, and seam measurements for both pieces. Measure each rectangle before assembly and compare the slippers during shaping. Consistent tension and careful finishing are especially important for a matching pair.
Conclusion: Enjoy Creating Your Own Beautiful Crochet Rectangle Slippers
The Beautiful little shoes made from a crochet rectangle Pattern demonstrates how a simple crochet foundation can become a beautiful and functional handmade accessory. By starting with two basic rectangles, shaping the toes and heels, joining the upper sections, and finishing the openings, you can create a lovely pair of comfortable indoor slippers without complicated construction techniques.
Throughout this tutorial, you learned how to select suitable yarn, understand US crochet stitches and abbreviations, measure the foundation rectangles, assemble the slippers, and personalize them with crochet flowers, braided details, and scalloped edging. You also discovered practical ways to adjust the size, improve comfort, add slip-resistant soles, and care for your finished project.
The most rewarding part of handmade crochet is the opportunity to transform simple stitches into something meaningful. Every pair of slippers can reflect your favorite colors, decorative preferences, and personal creativity. Whether you make them for yourself or as a thoughtful gift, these easy crochet rectangle slippers offer an enjoyable project that combines traditional craftsmanship with everyday comfort.
We would love to hear your sincere opinion! What did you think of this crochet slipper pattern? Would you choose mint green, soft pink, or another color for your handmade shoes? Share your experience, honest feedback, and suggestions for improving the tutorial. Your ideas can inspire new designs and help other crochet enthusiasts enjoy this beautiful handmade project.