
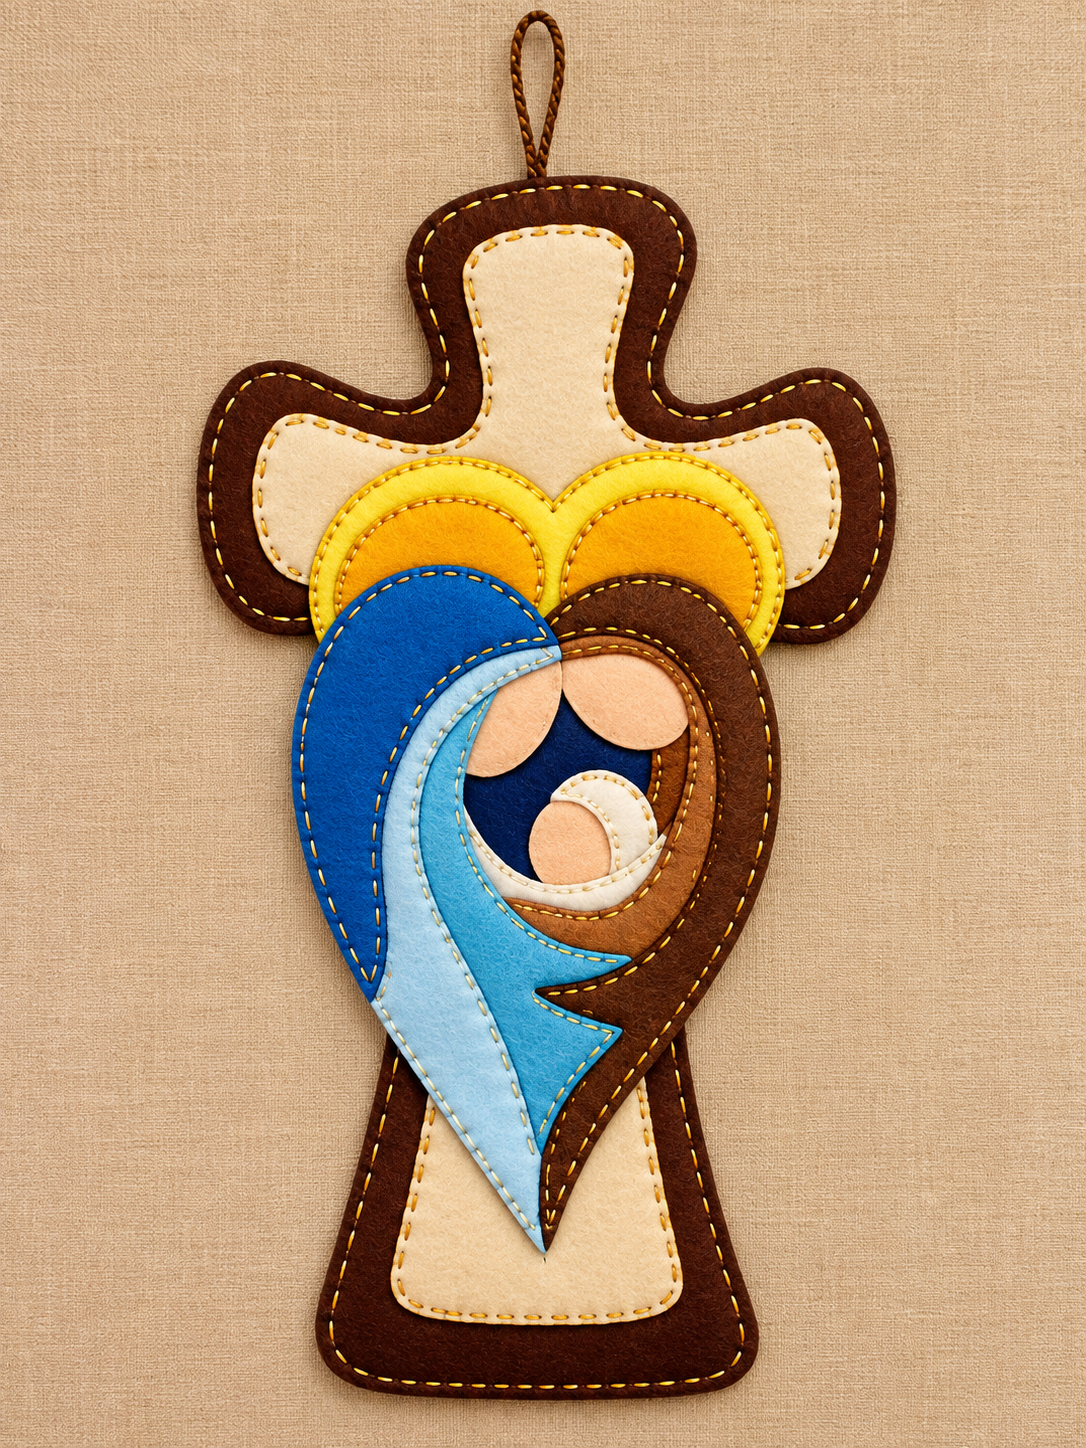
The Felt Cross with Holy Family Appliqué Pattern is a meaningful handmade project that combines traditional felt crafting with layered appliqué and decorative hand stitching. Inspired by the design shown in the reference image, the project features a large cross as its foundation, with a softly stylized representation of Mary, Joseph, and Baby Jesus positioned in the center. Warm brown, cream, gold, blue, and natural skin-tone shades create a welcoming palette that works beautifully for Christmas decorations, faith-inspired wall hangings, handmade gifts, and seasonal ornaments. The layered construction also gives the piece dimension without requiring complicated sewing techniques, making it approachable for crafters who are still developing their hand-sewing skills.
One of the most attractive qualities of this felt Holy Family appliqué is the way simple shapes work together to create an expressive finished piece. Instead of relying on tiny realistic details, the design uses curved felt sections, overlapping silhouettes, and visible stitches to define the figures. The brown cross provides a strong visual frame, while the cream inner cross creates contrast behind the Holy Family. Golden halo shapes draw attention toward the center, and the blue and brown garments help distinguish Mary and Joseph. Because every section is assembled separately before the final construction, the project can be adjusted in size, color, and finishing style without changing its basic method.
Creating your own Felt Cross with Holy Family Appliqué Pattern is also an excellent way to practice several useful felt-crafting techniques in one project. You will learn how to prepare templates, transfer pattern pieces, cut smooth curves, position overlapping appliqué shapes, use running stitches, conceal knots, and build a slightly padded ornament. Beginners can keep the construction simple with basic hand stitches, while experienced makers can add embroidery, decorative thread, additional layers, beads, or personalized details. The following tutorial explains the entire process from preparing the materials to attaching the hanging loop and completing the final edge.
Materials, Colors, and Pattern Preparation
Begin by choosing good-quality craft felt for the felt cross appliqué. A practical finished size for a decorative wall piece is approximately 30 cm tall by 18 cm wide, although the pattern can easily be enlarged or reduced. For a result similar to the reference project, select dark brown for the outer cross and Joseph’s garment, warm cream for the inner cross and lower garment, royal or medium blue for Mary’s outer veil, light blue for her inner veil, golden yellow and warm yellow-orange for the halos, dark navy for the central background, and peach or light tan for the faces and Baby Jesus.
DISCOVER MORE FREE PATTERNS HERE!
You will also need embroidery floss or strong decorative hand-sewing thread. Gold or mustard thread works especially well against brown and blue felt because it creates visible decorative outlines. Cream thread can be used around lighter sections for a softer finish. Prepare a hand-sewing needle, fabric scissors, paper scissors, straight pins or removable fabric clips, a fabric marking pencil, paper for the templates, and a small amount of polyester fiberfill if you want the cross to have a padded appearance.
The Felt Cross with Holy Family Appliqué Pattern can be divided into individual templates before cutting the fabric. These include the large outer cross, the smaller inner cross, two overlapping halo shapes, Mary’s large blue veil, her light-blue inner veil, Joseph’s brown outer garment, his face, Mary’s face, the dark central section behind the baby, the baby’s face, and the cream swaddling shape. Separating these pieces makes the cutting and assembly process much easier.
When creating the paper pattern, draw one half of the cross first and fold the paper along its vertical center. Cut through both layers so that the two sides remain symmetrical. For a 30 cm finished cross, the widest horizontal section can measure approximately 18 cm, while the lower stem can be around 9–11 cm wide. Keep the corners softly rounded rather than sharply squared to reproduce the gentle handmade character of the design.
Trace each paper template onto the appropriate felt using a removable fabric marker. Felt does not normally require a traditional seam allowance for appliqué because its edges do not unravel. However, if you plan to sew two outer cross layers together and add stuffing, cut the back cross approximately 2–3 mm larger or exactly the same size as the front, depending on the edge finish you prefer. Always cut slowly around curved areas to prevent jagged edges.
Before sewing anything permanently, place all the cut pieces on top of the outer cross. This dry assembly is extremely important because it allows you to check proportion and spacing. Position the cream cross first, followed by the halos, the two adult figures, their faces, and Baby Jesus. Take a quick reference photo or lightly mark key positions once you are satisfied with the arrangement. This will make the final Holy Family felt appliqué much easier to assemble accurately.
Building the Cross and Layering the Holy Family Appliqué
Start the permanent assembly with the cream inner cross. Center it on the dark brown outer cross while leaving a consistent brown border visible around the entire shape. Depending on the size of your project, a border of approximately 1.5–2 cm creates a balanced appearance. Secure the cream layer with a few pins or tiny removable clips, making sure it remains flat and symmetrical.
Sew around the cream shape using a small running stitch approximately 3–4 mm long. Running stitch is one of the easiest decorative sewing methods for felt: simply bring the needle up through the fabric, move forward a short distance, take it back down, and repeat. Try to maintain consistent spacing between the stitches. This regularity gives handmade felt projects their distinctive decorative finish.
Next, position the two golden halo pieces around the upper center of the cross. They should overlap slightly in the middle and remain partially visible behind the heads of Mary and Joseph. A brighter yellow outer halo paired with a deeper golden inner section creates additional depth. Stitch around their curved edges before placing the figures over them so that most of the stitching remains accessible.
Mary’s figure can now be assembled on the left side of the central composition. Begin with the larger blue veil and garment section, then layer the light-blue inner piece over it. The curves should sweep toward the center, visually surrounding Baby Jesus. Attach the larger piece first with decorative running stitches, then sew the lighter section separately. Using contrasting thread around both pieces emphasizes the layered felt appliqué technique.
Build Joseph on the opposite side using the same principle. Place the large brown outer garment first, followed by a slightly lighter brown inner layer if desired. His garment should curve inward toward the baby, creating a protective oval composition together with Mary’s veil. Position the peach-colored face near the top, slightly overlapping the brown felt. Secure each piece individually rather than trying to stitch several thick layers simultaneously.
Complete the central arrangement by positioning the dark navy felt section between Mary and Joseph. Add Baby Jesus using a small peach oval for the face and a cream curved shape for the swaddling cloth. The baby’s pieces should remain visually simple because the surrounding layers already provide plenty of detail. Sew around the cream swaddle with tiny stitches and secure the face carefully. At this stage, the central Holy Family appliqué design should clearly resemble the reference composition.
Hand Stitching, Assembly, and Finishing Details
Once all appliqué pieces are positioned, inspect the project carefully before assembling the back. Look for loose corners, uneven curves, or sections that could lift away from the base. Add several discreet stitches where necessary. Felt is forgiving, but neat preparation at this stage produces a much cleaner finished ornament and prevents individual pieces from shifting later.
Decorative stitching is an important feature of the Felt Cross with Holy Family Appliqué Pattern. Gold or mustard embroidery floss can be used around the brown cross, halos, garments, and selected blue sections. Cream or pale yellow thread can provide softer contrast around faces and light-colored felt. Rather than trying to make every stitch mathematically identical, concentrate on maintaining a comfortable rhythm and approximately consistent spacing.
For additional dimension, prepare a second dark brown cross for the back. Place the finished appliqué front over the backing piece with the wrong sides facing each other. Clip or pin the layers together around the perimeter. Sew them using running stitch or blanket stitch, leaving approximately 5 cm open along one side of the lower portion. This opening will allow you to insert the filling.
Add polyester fiberfill gradually if you want a softly padded felt cross ornament. Use very small amounts at a time and distribute the filling with your fingers. The objective is not to make the project extremely thick. A gentle layer of padding is enough to lift the appliqué slightly and give the finished cross more structure. Pay particular attention to the arms and upper section so that the filling reaches the outer curves evenly.
Create the hanging loop before completely closing the ornament. Cut approximately 18–22 cm of decorative cord, fold it in half, and insert the cut ends between the front and back layers at the center of the upper cross. Push approximately 2 cm of cord inside the felt and reinforce this area with several strong stitches. A secure loop is especially important if the piece will be displayed on a wall, door, hook, or seasonal decoration stand.
Finish stitching the remaining opening and gently reshape the cross with your fingers. Check the outer edges one final time and trim any tiny uneven felt fibers with sharp scissors. Avoid cutting too close to the stitches. The result should be a clean, softly padded cross with clearly defined layers, visible handmade stitching, and a centered Holy Family felt design.
Decorating, Personalizing, and Caring for the Finished Project
Although the original color combination creates a warm traditional appearance, this Felt Cross with Holy Family Appliqué Pattern is easy to personalize. For a softer Christmas palette, consider ivory, burgundy, forest green, muted gold, and dusty blue. A modern version could use beige, terracotta, cream, and denim blue. The important principle is maintaining enough contrast between adjacent layers so that every appliqué shape remains recognizable.
You can also experiment with embroidery. Small stars can be stitched into the background, while French knots can provide tiny decorative accents around the halos. Metallic embroidery floss may be used sparingly to highlight selected edges. When adding embellishments, keep the central Holy Family composition as the visual focus rather than covering every available area with decoration.
For a more rustic appearance, choose wool-blend felt and slightly thicker embroidery thread. Wool-blend felt generally produces attractive dimensional edges and a traditional handmade texture. Standard craft felt is also suitable and can be particularly practical for beginners who want an affordable material for practicing the pattern before creating a more elaborate version.
The project can also be resized for different purposes. A small 10–15 cm felt cross can become a Christmas tree ornament, while a version measuring 35–45 cm can work as a wall hanging or door decoration. When resizing, scale all pattern pieces by the same percentage. Changing only the outer cross while leaving the figures unchanged can disturb the visual proportions of the design.
To store the finished appliqué, keep it flat in a clean, dry location away from direct sunlight. Avoid folding the cross because prolonged pressure can create creases in the felt and distort the padded areas. If dust accumulates, gently remove it with a soft brush or lint roller. Spot cleaning is generally preferable to soaking a layered felt project, especially when several colors and embroidery threads are involved.
Most importantly, allow small handmade variations to remain visible. The appeal of the Felt Cross with Holy Family Appliqué Pattern comes partly from its hand-cut curves and decorative stitches. Perfectly mechanical edges are unnecessary. Careful construction, secure stitching, balanced colors, and thoughtful placement will have a much greater impact on the finished project than absolute uniformity.
FAQ About the Felt Cross with Holy Family Appliqué Pattern
What is the best felt for this project?
Both regular craft felt and wool-blend felt can work well. Craft felt is economical and easy for beginners to cut, while wool-blend felt usually offers a softer texture and more substantial appearance. Choose felt that is firm enough to hold its shape without becoming excessively bulky when several appliqué layers overlap.
Does felt need a seam allowance?
For surface appliqué pieces, usually no. Felt does not fray like woven fabric, so the visible shapes can normally be cut directly along the template outline. If you are making a stuffed outer cross, you may include a few extra millimeters around the backing if that makes alignment easier.
What stitch should I use for a felt Holy Family appliqué?
A basic running stitch is ideal for recreating the decorative appearance shown in this project. Blanket stitch is another excellent option, especially around the outside edge. Backstitch can be used for small embroidered details where a continuous line is desired.
How large should the finished felt cross be?
Approximately 30 cm tall by 18 cm wide is a practical size for a wall ornament, although there is no mandatory measurement. Smaller versions can become Christmas ornaments, and larger patterns can become prominent wall decorations. Keep all internal pattern pieces proportional whenever you resize the project.
Can I make this pattern without a sewing machine?
Yes. In fact, this design is especially well suited to hand sewing. The visible running stitches contribute to its handmade character, and felt is easy to manipulate without a machine. A sewing machine is optional rather than necessary.
Should I glue the felt pieces before stitching them?
You can use a very small amount of fabric-safe adhesive to temporarily hold difficult pieces, but it is not essential. Pins, clips, or temporary positioning stitches are often enough. Excess glue can make felt stiff and may become difficult to sew through, so use it sparingly.
Can beginners make the Felt Cross with Holy Family Appliqué Pattern?
Yes. The project looks detailed because it contains several overlapping pieces, but the basic construction relies on cutting, layering, and straightforward hand stitching. Beginners should work slowly, prepare paper templates carefully, and assemble the entire design temporarily before beginning permanent stitching.
How can I make the stitches look more even?
Lightly mark stitch intervals along difficult curves before sewing. Keep your stitch length around 3–4 mm and maintain a similar distance from the felt edge. Working slowly around tight curves is more effective than pulling the thread quickly.
Can the project be made without stuffing?
Absolutely. Leaving out the fiberfill produces a flatter felt appliqué wall hanging. You can still use two backing layers for additional stability or use only one sturdy felt base if you prefer a lightweight decoration.
What colors work best for a Holy Family felt decoration?
Traditional combinations include brown, cream, gold, blue, navy, and warm neutral skin tones. However, the pattern can be adapted to your decorating style. The most important consideration is contrast: neighboring pieces should be sufficiently different in value or color to remain visually distinct.
How can I create a professional-looking finished edge?
Use sharp scissors when cutting the outer cross, align the front and back carefully, and maintain consistent spacing while stitching. Do not overfill the ornament, because excessive stuffing can distort the edges. After sewing, gently shape the curves by hand and trim only obvious stray fibers.
Can I use fabric instead of felt?
Yes, but woven cotton fabric behaves differently because its raw edges can fray. If you substitute quilting cotton or another woven material, consider using fusible web, turned-edge appliqué, or another edge-finishing technique. Felt remains the easiest material for achieving the clean layered appearance featured in this particular design.
Conclusion
The Felt Cross with Holy Family Appliqué Pattern combines straightforward hand-sewing techniques with an expressive layered design. Starting with a dark felt cross, you learned how to create a contrasting inner layer, prepare golden halos, construct Mary and Joseph from overlapping curved shapes, position Baby Jesus in the center, and finish the entire composition with decorative stitching.
The project also demonstrates important felt-crafting fundamentals, including pattern preparation, accurate cutting, running stitch, layered appliqué, optional padding, edge finishing, and secure installation of a hanging loop. These methods can be reused for many other felt ornaments and seasonal decorations, making this project useful not only as a finished piece but also as a way to develop practical sewing skills.
Color selection offers plenty of room for creativity. You can follow the warm brown, cream, gold, and blue palette of the reference design or create an entirely different interpretation using colors that coordinate with your Christmas decorations or home décor. Small embroidery details and carefully chosen thread can make each handmade version distinctive.
EASILY FIND THE FREE PDF FOR THIS PATTERN HERE!
Above all, work patiently and enjoy the handmade nature of the process. Slight differences in curves and stitches can give every finished Holy Family felt appliqué its own personality. Once your project is complete, take a moment to look at the overall balance, adjust any small details, and display it where its layered craftsmanship can be appreciated. If you make your own Felt Cross with Holy Family Appliqué Pattern, leave your sincere opinion about the project and share any suggestions you have. Your ideas about different colors, stitches, sizes, and finishing details can inspire even more creative variations of this beautiful handmade felt design.