
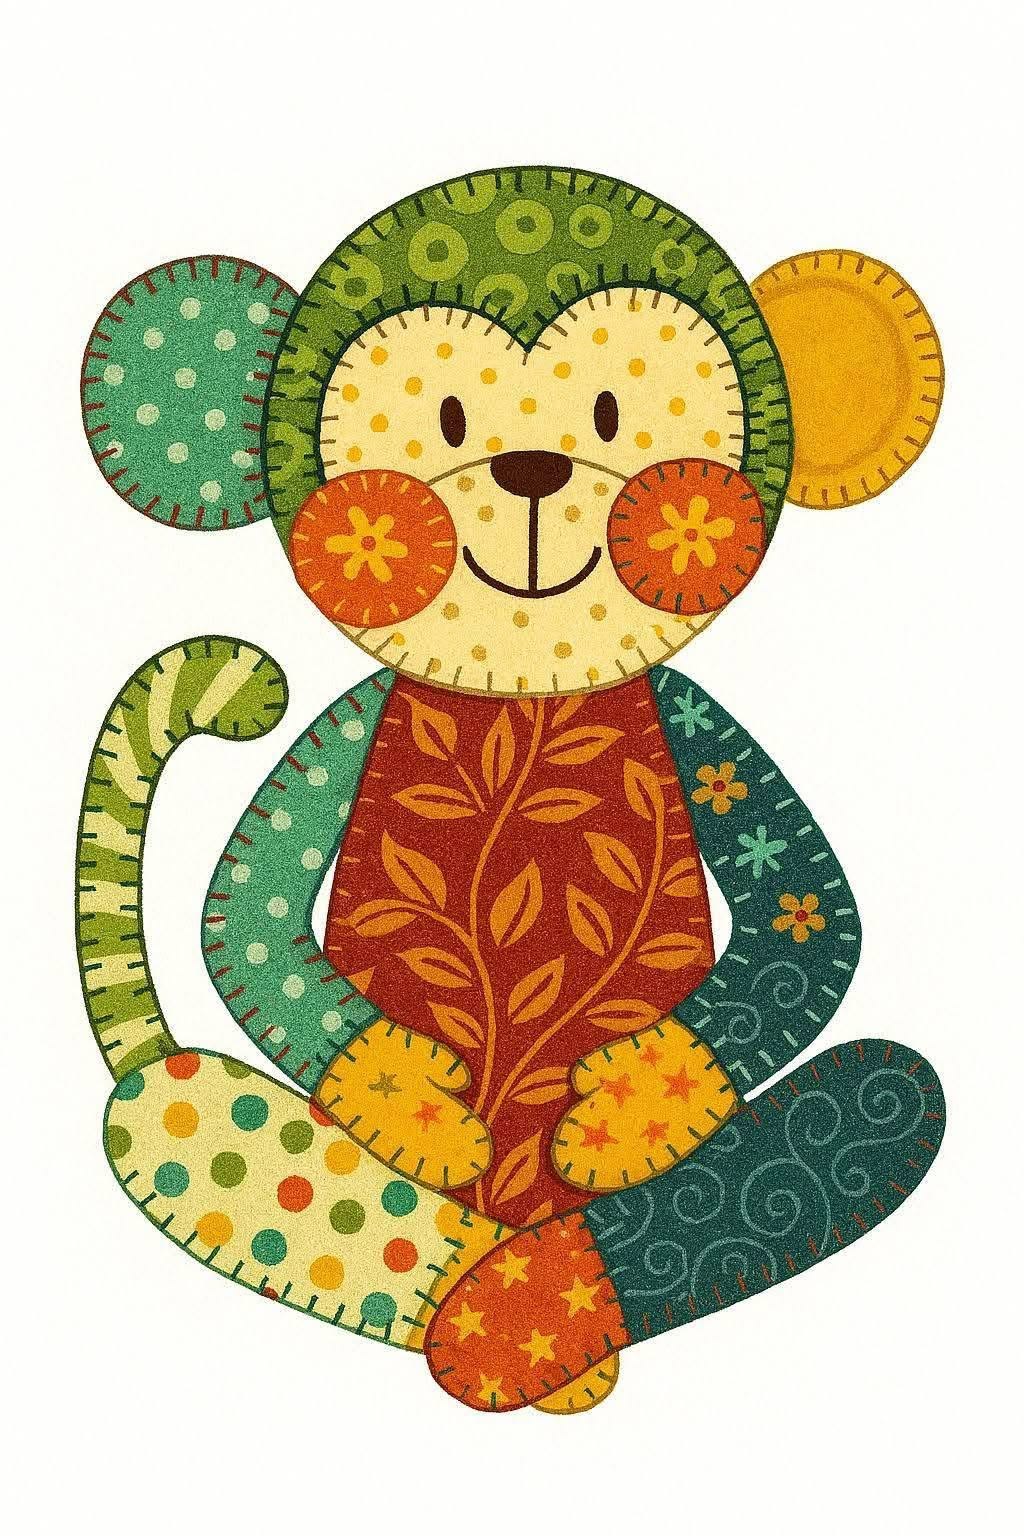
The Monkey Patchwork Appliqué Pattern is a cheerful sewing project that combines traditional appliqué techniques with the playful freedom of patchwork. Inspired by the colorful monkey shown in the reference image, this project uses contrasting fabric prints to create a character with a large rounded head, expressive face, oversized ears, curved arms, feet, and a distinctive curling tail. The design works especially well with fabric scraps because every section can feature a different print. Instead of trying to make every fabric match perfectly, the goal is to build a coordinated collection of colors that gives the finished monkey a handmade, whimsical personality.
One of the most enjoyable things about making a Monkey Patchwork Appliqué Pattern is that the construction can be adapted to different sewing experience levels. Beginners can use simple raw-edge or fusible appliqué, while more experienced makers can finish the edges with blanket stitching, satin stitching, or carefully turned appliqué. The visible stitching around the shapes is an important part of the appearance because it defines the individual pieces and gives the project a charming handcrafted finish. A combination of green, yellow, orange, rust, cream, and teal fabrics creates a look similar to the inspiration, although the same pattern can easily be personalized with scraps already available in your sewing room.
Before beginning, remember that successful appliqué depends more on careful preparation than complicated sewing. Taking time to create smooth templates, cut clean shapes, test the layout, and press each section properly will make the assembly much easier. This tutorial explains the entire process from planning the monkey and choosing fabrics to layering the pieces, stitching the appliqué, adding facial details, and finishing the background. The measurements can also be scaled depending on whether you want the patchwork monkey appliqué to become a quilt block, cushion front, wall hanging, tote bag panel, nursery decoration, or another fabric project.
Materials, Fabrics, and Templates for the Monkey Patchwork Appliqué Pattern
Begin by choosing a background large enough to comfortably hold the entire monkey. For a medium decorative panel, a piece measuring approximately 45 × 55 cm provides useful working space. Cut the background slightly larger than the intended finished size because appliqué stitching and pressing can sometimes cause minor distortion. A light neutral background is particularly effective for a colorful monkey because it allows every patterned fabric section to remain visually distinct.
DISCOVER MORE FREE PATTERNS HERE!
For the appliqué itself, gather several cotton fabric scraps in complementary colors. The reference design uses a wonderful mixture of greens, yellows, oranges, reds, cream, and dark teal. Try mixing dots, florals, leaves, stars, stripes, and swirls rather than selecting only one print style. Quilting-weight cotton is an excellent choice because it is easy to cut, press, fuse, and stitch. Very thick or highly stretchy fabrics can make small appliqué pieces more difficult to control.
You will also need fusible web, fabric scissors, paper scissors, an iron, pressing surface, marking pencil, sewing machine or hand-sewing needle, coordinating thread, and paper for creating templates. Embroidery floss is useful for facial details. If you plan to use blanket stitching by machine, test your stitch settings on a scrap containing the same fabric and fusible web before sewing the actual project.
Create separate templates for the monkey’s major components. These include the large outer head, two ears, inner face or muzzle section, two cheeks, body, two arms, two hands, two large lower legs or feet, two smaller overlapping feet, and the long curved tail. Small decorative details can be added separately. Keeping each component independent makes it much easier to reproduce the layered appearance of the Monkey Patchwork Appliqué Pattern.
For a monkey approximately 38–42 cm tall, a head around 19–21 cm wide works well. The body can be approximately 16–18 cm long, while the large lower foot shapes can measure around 15–18 cm at their longest points. These measurements are guidelines rather than strict rules. What matters most is keeping all pieces proportional to one another, especially the head, body, and exaggerated feet.
Before cutting expensive or favorite fabric, assemble the paper templates on a table. Place the head above the body, position the ears behind the head, curve the arms along both sides, and arrange the feet across the bottom. Add the tail on the left or right side. Adjust the shapes until the monkey has a balanced silhouette. This test layout is one of the easiest ways to prevent proportion problems later.
Cutting and Building the Monkey Appliqué Pieces
Once you are satisfied with the paper pattern, trace each shape onto the paper side of your fusible web. Follow the manufacturer’s instructions because fusible products can vary. When a piece has a directional design, such as the curved tail, remember that tracing onto fusible web may reverse the final shape. Labeling pieces such as “left arm,” “right arm,” “left ear,” and “right ear” can prevent confusion.
Rough-cut around each traced shape, leaving a small amount of fusible material outside the drawn line. Fuse these pieces onto the wrong side of your chosen fabrics. Allow everything to cool completely before cutting directly along the template outlines. Sharp fabric scissors are particularly useful around the curves of the face, cheeks, ears, hands, and tail.
Start assembling the head separately before positioning the entire monkey. Place the cream-colored face appliqué over the larger green head shape. The upper edge of the cream section can form two gentle arches around the eyes, creating the characteristic monkey expression. Add the two round orange cheeks so they overlap the lower sides of the face slightly. This layering produces dimension without requiring complicated construction.
Next, place the ears behind the head. Using two different fabrics for the ears reinforces the patchwork effect. For example, one ear could be green with dots while the other is golden yellow. The ears should extend beyond the head but overlap underneath its outer edge. Temporarily arranging everything before pressing allows you to correct spacing while the pieces can still be moved.
Build the body with the same approach. A rust or reddish-orange print works beautifully for the central torso, particularly when surrounded by contrasting green arms. The body should slip slightly underneath the lower edge of the head so there is no visible background gap. Position each arm beside the torso, allowing the lower ends to reach toward the smaller hand or foot shapes.
Finally, arrange the lower pieces. The inspiration image uses oversized horizontal shapes at the bottom, which create a seated pose and give the monkey a stable visual foundation. Place one patterned shape across each side, then overlap smaller orange or yellow pieces near the center. Add the curved patchwork tail behind the body and lower leg. When the entire composition looks balanced, photograph the layout before pressing. That quick reference can be extremely helpful if anything moves.
Fusing, Stitching, and Adding the Monkey’s Facial Details
Prepare your background fabric by pressing it thoroughly. Fold it gently in half vertically and horizontally, press temporary creases, and use those lines to locate the center. Position the complete monkey so there is sufficient background around all sides. Avoid placing appliqué too close to the unfinished edge, especially if the project will later become a quilt block or cushion.
Fuse the pieces in layers rather than pressing the entire composition at once. Begin with components that sit behind others, such as the tail, ears, and lower legs. Continue with the body and arms, then add the head, inner face, cheeks, hands, and overlapping feet. Follow the recommended heat and pressing time for your fusible appliqué product. Avoid sliding the iron because that can shift small shapes.
After the fused pieces have cooled, stitch around every appliqué edge. A blanket stitch closely resembles the decorative stitching visible in the reference design. Choose a medium stitch size that is noticeable without overwhelming the fabric prints. You can use one dark thread throughout for visual consistency or coordinate thread colors with individual fabrics for a softer appearance.
When stitching curved sections, sew slowly. Stop periodically with the needle down, lift the presser foot, rotate the fabric slightly, lower the foot, and continue. This technique is especially useful around ears, cheeks, hands, feet, and the curved tail. Smooth curves make the entire Monkey Patchwork Appliqué Pattern appear cleaner and more carefully constructed.
The face gives the monkey its personality. Create two narrow oval eyes using dark brown fabric appliqué, satin stitching, or embroidery. Position them symmetrically above the cheeks. Add a rounded dark brown nose in the center of the muzzle. A vertical embroidered line can extend downward from the nose, with two gentle curves forming the smiling mouth. Keep these details simple so the expression remains friendly and easy to reproduce.
Additional decorative details are optional. Small flowers can be appliquéd onto the cheeks, stars can decorate the feet, and contrasting stitches can emphasize different fabric sections. If your fabrics are already heavily patterned, however, use restraint. The strongest patchwork appliqué designs usually combine detailed prints with a few quieter areas so the viewer can easily recognize the main character.
Finishing and Using Your Monkey Patchwork Appliqué Pattern
Once all appliqué stitching is complete, inspect the back of the project and trim only unnecessary thread tails. Press the panel from the reverse side whenever possible, especially if fusible adhesive has been used. A pressing cloth can provide additional protection. The objective is to flatten the work without crushing decorative stitches or damaging the fabric surface.
If you are creating a quilt block, square the background only after all appliqué work is finished. Measure carefully from the center of the monkey toward each edge so the design remains properly positioned. Remember to preserve the seam allowance required for joining the block to surrounding patchwork. Never trim exactly against the appliqué unless the project specifically requires it.
For a cushion, add lightweight batting behind the appliqué panel and quilt around the monkey before assembling the cushion cover. Simple echo quilting approximately 0.5–1 cm away from the silhouette can make the monkey stand out. Straight-line quilting on the remaining background is another beginner-friendly option that adds texture without competing with the colorful fabrics.
The design can also become a charming fabric wall hanging. Add batting and backing, quilt the layers, and finish the outside with binding. A hanging sleeve can be sewn to the upper back edge. Because the monkey already contains many colors and patterns, a simple binding often works better than a highly detailed border.
Scrap selection provides endless opportunities to personalize the project. A pastel version could combine pale pink, mint, cream, and soft yellow. A woodland interpretation could use brown, olive, rust, and mustard fabrics. For a brighter children’s project, try turquoise, lime, orange, yellow, and red. The construction process remains identical even when the visual personality changes completely.
Most importantly, do not worry about making every element perfectly symmetrical. Part of the appeal of a Monkey Patchwork Appliqué Pattern comes from the irregular combination of fabrics, oversized shapes, visible stitching, and handmade details. Accurate cutting and secure stitching matter, but small variations can actually make the finished monkey feel warmer and more distinctive.
FAQ About the Monkey Patchwork Appliqué Pattern
What is a Monkey Patchwork Appliqué Pattern?
A Monkey Patchwork Appliqué Pattern is a sewing design in which separate monkey-shaped fabric components are cut and layered onto a background. The pieces are then secured with fusible web, hand stitching, machine stitching, or a combination of these techniques. Using different fabrics for individual body parts creates the patchwork appearance.
Is this appliqué project suitable for beginners?
Yes. The individual pieces are mostly composed of broad curves and uncomplicated shapes. Beginners may find fusible raw-edge appliqué particularly approachable because the adhesive holds the components securely while they are stitched. Practicing blanket stitching on scrap fabric first can make the final project easier.
What fabric is best for monkey appliqué?
Quilting cotton is one of the most practical choices. It has enough stability for accurate cutting while remaining easy to stitch. Cotton scraps also come in countless prints, making them ideal for creating the colorful mixed-pattern appearance shown in this design.
Do I need fusible web?
It is not absolutely required, but fusible web makes layered appliqué significantly easier to manage. It keeps individual pieces from shifting while stitching and is especially helpful around small components such as cheeks, eyes, hands, and decorative shapes.
What stitch should I use around the fabric pieces?
A blanket stitch is an excellent choice because it creates the visible handmade-style edging associated with many folk-inspired appliqué projects. Zigzag or satin stitching can also be used. Hand blanket stitching with embroidery floss creates an especially traditional appearance.
How can I enlarge or reduce the pattern?
Scale all templates by the same percentage. If you enlarge only the head but not the body, for example, the proportions will change. Keeping every template at a consistent scale preserves the character of the original design.
Can I make the monkey entirely from fabric scraps?
Absolutely. In fact, fabric scrap appliqué is particularly appropriate for this project. Small pieces left from previous quilting projects can be used for ears, cheeks, hands, feet, arms, and decorative accents. Larger scraps will generally be needed for the head and body.
Should the fabrics match each other exactly?
No. A controlled variety is more effective than perfect matching. Choose several dominant colors and repeat them in different areas. For example, green might appear in the head, arm, and tail, while orange could repeat in the cheeks, feet, and printed body fabric. Repeating colors helps visually connect fabrics with different patterns.
Can this pattern be hand sewn?
Yes. The entire project can be completed by hand. Fuse or baste the pieces into position and work blanket stitches around each edge. Facial features can then be embroidered with backstitch, satin stitch, or another familiar embroidery technique.
How do I stop the appliqué edges from fraying?
A closely worked blanket stitch or zigzag stitch helps control the edges. Fusible web also stabilizes the fabric. Some slight fraying may still occur with raw-edge appliqué, but this can become part of the handmade appearance. For completely enclosed edges, consider turned-edge appliqué.
What can I make with the finished monkey?
The completed design can be incorporated into a quilt, cushion cover, wall hanging, tote bag, fabric organizer, nursery decoration, or decorative sewing panel. Simply adjust the background dimensions and overall template scale to suit the final item.
How do I make the face look balanced?
Position the nose first because it establishes the center of the face. Then place the eyes at equal distances from that center line. Temporarily mark the mouth with an erasable fabric marker before embroidering it. Checking the face from a short distance can reveal alignment issues that are difficult to notice while working close to the fabric.
Can I change the colors from those shown in the reference design?
Certainly. The pattern structure is more important than the exact colors. You can create a coordinated neutral monkey, a pastel version, a rainbow interpretation, or even a seasonal version. Maintaining strong contrast between neighboring pieces will help the shapes remain recognizable.
How should the finished appliqué be washed?
If the project will be washable, prewashing fabrics before construction can help reduce uneven shrinkage. After completion, gentle washing and air drying are usually kinder to appliqué stitching than aggressive washing and high heat. Fabric and fusible-web manufacturer instructions should always take priority.
Why is my appliqué puckering?
Puckering can result from excessive thread tension, insufficient stabilization, overheating fusible web, or pulling the fabric while stitching. Allow the machine to feed the fabric naturally. For dense stitching, adding temporary stabilizer behind the background can provide additional support.
How can I make my Monkey Patchwork Appliqué Pattern look more professional?
Focus on clean template shapes, smooth cutting, careful layering, controlled pressing, consistent stitches, and neat facial embroidery. Also pay attention to contrast. Each major piece should remain distinguishable from the fabric directly beside it. These simple decisions often have a greater effect than adding complicated embellishments.
Conclusion
Creating a Monkey Patchwork Appliqué Pattern is a wonderful way to combine patchwork, appliqué, scrap fabrics, decorative stitching, and simple embroidery in one colorful sewing project. The process begins by preparing individual templates for the head, face, ears, cheeks, body, arms, hands, feet, and curved tail. From there, each shape is transferred to fabric, carefully cut, layered onto the background, fused into position, and finished with decorative edge stitching.
The most important lessons are to plan the fabric placement before fusing, work from the back layers toward the front, maintain good contrast between neighboring pieces, and take extra care when stitching curves. The eyes, nose, and smiling mouth should be added only after the main facial pieces are positioned correctly. These finishing details transform a collection of fabric shapes into a recognizable and expressive patchwork monkey.
EASILY FIND THE FREE PDF FOR THIS PATTERN HERE!
This project also demonstrates why scrap fabric sewing can be so creative. No two monkeys need to look identical. Changing the prints, colors, stitching, background, or decorative details allows the same basic pattern to produce many completely different results. Whether you turn your finished monkey into a quilt block, cushion, bag panel, or wall decoration, the techniques learned here can also be applied to many future appliqué projects. If you make your own Monkey Patchwork Appliqué Pattern, leave your sincere opinion about the project and share your suggestions. Which fabric colors or prints would you choose for your monkey, and what would you turn the finished appliqué into? Your ideas can inspire even more creative variations of this playful sewing pattern.