
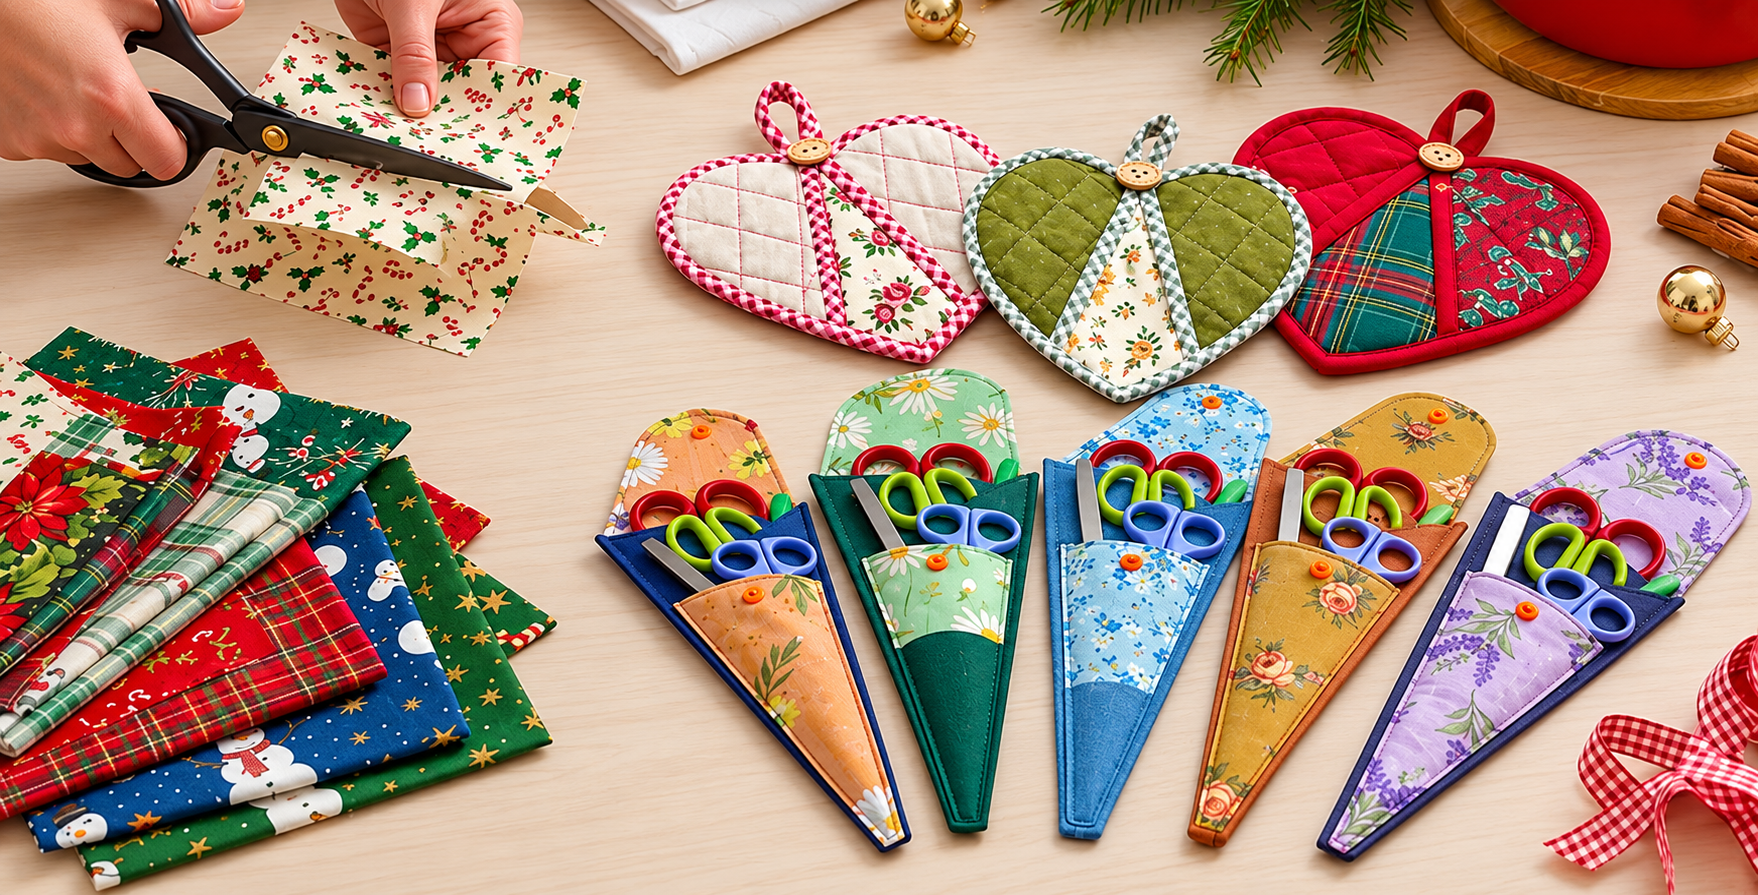
The Christmas themed organizers Pattern is a charming sewing project that combines practical storage with the warmth and color of holiday decorating. Inspired by the handmade organizers shown in the image, this project is especially useful for keeping small sewing tools, embroidery scissors, craft accessories, and notions together while adding a festive touch to a sewing room. The cone-shaped organizers can be made individually or as a coordinated collection, and each one can feature different Christmas fabrics, contrasting solids, floral prints, or traditional seasonal colors. Although the finished pieces look detailed and polished, the construction is approachable because the design relies mainly on basic cutting, layering, topstitching, and binding techniques. With careful preparation, even someone with limited sewing experience can create an attractive organizer that looks neat enough to give as a handmade Christmas gift.
One of the most enjoyable features of this Christmas themed organizers Pattern is the freedom it gives you when selecting fabric. Traditional combinations such as red, green, cream, navy blue, and gold immediately create a Christmas atmosphere, while softer floral fabrics can produce a more delicate interpretation of the same project. The organizer shown in the inspiration image uses a tapered pocket shape, with a taller backing section behind it to hold scissors securely. A contrasting lower section can be incorporated into the pocket to create additional visual interest. You can also coordinate the binding with the main fabric or deliberately choose a darker contrasting color to outline the organizer. Because relatively small fabric pieces are required, this is an excellent fabric scrap project for using remnants left over from quilts, table runners, stockings, and other seasonal sewing projects.
Another advantage of making a Christmas fabric organizer is that the project can easily be customized. The basic pattern can be enlarged for larger sewing tools or reduced for embroidery scissors and small accessories. Lightweight batting or fusible fleece between the fabric layers provides structure and creates the softly padded appearance visible in the finished organizers. Decorative quilting can be simple because the focus should remain on functionality. Straight lines, diagonal quilting, or stitching around printed motifs are all suitable choices. The most important goals are maintaining an even shape, securing all fabric layers, and creating a pocket that comfortably holds the intended tools without being excessively loose. Once you understand the basic construction method, making several organizers becomes quick and satisfying.
Materials, Measurements, and Fabric Preparation
Begin your Christmas themed organizers Pattern by gathering quilting cotton for the exterior and lining, a coordinating fabric for the front pocket, lightweight batting or fusible fleece, matching sewing thread, and optional bias binding. You will also need fabric scissors or a rotary cutter, quilting ruler, pins or sewing clips, an iron, marking tool, and sewing machine. Cotton quilting fabric is particularly suitable because it is easy to press, stable under the presser foot, and available in countless Christmas fabric prints.
DISCOVER MORE FREE PATTERNS HERE!
For a convenient medium-size organizer, start with a backing template approximately 25 cm long and 10 cm wide at its widest point. Create a gently rounded top and gradually taper the sides toward a narrower bottom. The exact dimensions do not have to be identical for every organizer, especially if you want to accommodate different scissors. Before cutting your favorite holiday fabric, make a paper template and place your scissors over it to confirm that the dimensions provide enough room.
The front pocket should be shorter than the backing so the handles of the scissors remain visible and easy to reach. A practical starting point is approximately 17 to 19 cm in length, following the same tapered lower shape as the backing. Remember that these dimensions are starting measurements rather than rigid requirements. If your scissors are particularly large, increase both pieces proportionally while preserving the tapered silhouette.
Cut one exterior backing piece, one lining piece, and one batting piece using the full-size template. For the front pocket, cut an exterior piece, a lining piece, and a matching batting piece. If you want the attractive two-fabric pocket design seen in the inspiration, divide the pocket template into upper and lower sections. Add seam allowance where the fabrics will be joined, sew them together, and press the seam carefully before assembling the pocket.
Batting plays an important role in this project because it prevents the finished organizer from appearing flat or flimsy. Low-loft cotton batting creates a traditional quilted finish, while lightweight fusible fleece produces a slightly firmer organizer. Avoid extremely thick batting because excessive bulk can make the narrow lower point difficult to sew and turn. Trim unnecessary batting from seam allowances whenever necessary to produce a cleaner finish.
Before assembling anything, press every fabric piece carefully. Accurate pressing is one of the simplest ways to improve handmade sewing projects. If the fabrics are wrinkled during cutting, the finished pieces may become distorted or uneven. Arrange all layers beside your machine and label them when making several organizers at once. This small organizational step makes batch sewing much easier and reduces the chance of accidentally attaching a lining or pocket in the wrong direction.
Sewing and Quilting the Main Organizer
Start constructing the Christmas themed organizers Pattern with the full backing section. Place the exterior fabric over the batting and position the lining behind it. Depending on your preferred method, you can quilt these layers before completing the edges. Pin or baste them carefully so they cannot shift while sewing. A few simple vertical or diagonal quilting lines are enough to secure the layers and add the appealing handcrafted texture associated with quilted sewing accessories.
Keep quilting relatively simple when working with detailed Christmas prints. Dense quilting can compete visually with small motifs such as holly leaves, snowflakes, flowers, stars, or Christmas characters. Straight-line quilting spaced roughly 2 to 3 cm apart provides enough stability for a small organizer. For solid fabrics, diagonal lines or a diamond quilting pattern can create extra texture without making construction significantly more difficult.
Next, prepare the front pocket in the same way. Layer the pocket exterior, batting, and lining and quilt them lightly. The upper opening deserves particular attention because this area will experience repeated use as scissors are inserted and removed. Finish the top edge with a narrow fabric binding or create a clean folded edge. Topstitch approximately 2 to 3 mm from the finished edge to reinforce it and give the pocket a professional appearance.
Position the completed pocket over the backing, carefully matching the tapered bottom and side edges. Baste around the sides and bottom while leaving the upper pocket opening completely free. Test the organizer with your intended scissors before permanently finishing the edges. The scissors should slide inside without excessive pressure, but the pocket should still hold them securely. Adjusting the pocket at this stage is much easier than changing it after the binding has been attached.
Once the pocket placement is correct, sew around the outside edge using a narrow seam allowance. This stitching primarily holds the layers together before the final edge treatment. If your project has become bulky, use a slightly longer stitch length and sew slowly around curved areas. Carefully guide the fabric rather than pulling it from behind the presser foot, as pulling can stretch the edge and distort the tapered organizer shape.
Finish the perimeter using coordinating binding for a decorative result. Narrow bias binding works particularly well because it follows curves more smoothly than straight-grain strips. Sew the binding to one side, fold it over the raw edge, and secure it on the opposite side with neat topstitching. At the pointed bottom, slow down and manipulate the binding carefully. A tidy perimeter immediately makes the organizer look more refined and helps protect its edges from everyday wear.
Adding Christmas Details and Creating a Coordinated Set
Color selection can transform this simple design into a distinctive Christmas sewing project. For a traditional collection, combine deep green, cranberry red, cream, navy, and touches of gold. Plaid fabrics work especially well alongside floral Christmas prints because they introduce geometric contrast. You do not need every organizer to match exactly. Instead, repeat one or two colors throughout the collection so the individual pieces feel related.
For example, make one organizer with a pale floral upper pocket and dark green lower section, another with blue Christmas fabric and denim-colored accents, and another with warm gold floral fabric and brown trim. This mix-and-match fabric approach is especially effective when using scraps. Repeating the same general construction while changing fabric combinations makes every organizer unique without requiring a different pattern.
You can also incorporate leftover fabrics from other Christmas projects. Small pieces from a quilt, tree skirt, table runner, or stocking can become decorative pocket panels. This makes the Christmas themed organizers Pattern an economical way to use valuable remnants instead of discarding them. Even very small pieces can be joined using patchwork techniques before the organizer pieces are cut to their final shape.
If you would like the organizer to hang, add a small fabric loop at the rounded upper end before finishing the perimeter. Cut a narrow strip, fold the raw edges inward, press, and topstitch it before folding the strip into a loop. Baste the loop securely between the layers. This optional detail allows the organizer to hang from a pegboard, hook, sewing station, or craft-room storage system when it is not being used.
Decorative buttons can also provide a sweet handmade accent, particularly near a hanging loop. However, decorative elements should never interfere with the scissors or create unnecessary bulk inside the pocket. Keep buttons, bows, appliqués, and other embellishments toward the upper exterior area. A small wooden button, embroidered star, or tiny fabric appliqué can reinforce the Christmas theme while preserving the organizer’s practical function.
When making several organizers, consider batch construction. Cut all backing pieces first, followed by all pocket pieces and batting. Then complete the quilting for every organizer before moving to pocket assembly and binding. Batch sewing reduces repeated setup and helps maintain consistent dimensions. It is particularly helpful when preparing handmade Christmas gifts because you can produce several coordinating pieces efficiently while still giving each one an individual fabric combination.
Finishing, Using, and Customizing the Pattern
After completing the binding, inspect every seam on your Christmas themed organizers Pattern. Look closely at the tapered point, pocket opening, and curved upper edge. Trim loose threads and reinforce any areas where stitching appears weak. Give the organizer a final gentle press, taking care not to flatten the batting completely. The finished project should feel structured while retaining a softly quilted texture.
Insert your scissors and check how they sit inside the pocket. Ideally, the blades should remain safely contained while the handles extend above the pocket opening. If you plan to give the organizer as a gift, consider pairing it with appropriately sized craft scissors. This turns a simple handmade fabric organizer into a useful sewing-themed Christmas present without requiring complicated packaging or additional construction.
The same basic pattern can organize more than scissors. A slightly wider version could hold a rotary cutter, marking pencils, seam gauge, crochet hooks, or small rulers. A shorter design can become a holder for embroidery tools. When adapting the dimensions, always place the intended item on the paper template before cutting fabric. This quick fitting test helps maintain the correct balance between accessibility and secure storage.
For a more pronounced patchwork look, construct the exterior from multiple fabric scraps before cutting the final shape. Sew small strips or rectangles together, press the seams, and then place the organizer template over the patchwork panel. This method produces an especially colorful scrap fabric organizer and ensures that even narrow leftover strips can become useful. Quilting across the completed patchwork also strengthens the seams.
Care instructions depend largely on your chosen materials. If everything is made from washable cotton fabric and batting, gentle cleaning is usually appropriate. However, decorative buttons, specialty interfacing, metallic fabric, or delicate embellishments may require additional care. For everyday maintenance, removing loose lint and threads and occasionally pressing the organizer may be enough to keep it looking fresh throughout the Christmas season and beyond.
Most importantly, treat the measurements as a flexible foundation. Handmade organizers are useful precisely because they can be adapted to the tools you already own. Keep the basic combination of a padded tapered backing, shorter front pocket, reinforced opening, and finished outer edge, then experiment with dimensions and fabrics. Once the first organizer is completed successfully, the same pattern can become the basis for an entire collection of personalized sewing accessories.
Frequently Asked Questions About the Christmas themed organizers Pattern
What is a Christmas themed organizers Pattern?
A Christmas themed organizers Pattern is a sewing template and construction method for making practical storage accessories using seasonal fabrics and decorative details. In this project, the organizer has a tapered quilted body and a front pocket designed primarily for scissors and small craft tools.
Is this pattern suitable for beginners?
Yes. A confident beginner who can sew straight seams, make gentle curves, quilt simple layers, and apply basic binding should be able to complete it. Beginners may want to make the first version slightly larger because wider pieces are generally easier to handle than very narrow tapered pieces.
What type of fabric works best?
Quilting cotton is one of the easiest choices. It is stable, easy to cut accurately, presses well, and comes in a huge variety of Christmas designs. Cotton-linen blends can also work, although very stretchy or slippery fabrics are less convenient for this particular pattern.
Do I need batting inside the organizer?
Batting is strongly recommended because it provides padding and structure. Without it, the organizer may feel too thin. Low-loft batting or lightweight fusible fleece is usually sufficient for a quilted scissors holder of this size.
Can I make the organizer without binding?
Yes. You could use a turned construction method instead, sewing the pieces right sides together and leaving an opening for turning. However, binding creates a distinctive outlined edge and works particularly well with the quilted appearance of this design.
How large should I make the organizer?
A backing around 25 cm long and approximately 10 cm wide is a useful starting point for medium craft scissors. The best size ultimately depends on the tool you want to store. Trace your paper pattern first and test it against the scissors before cutting fabric.
Can fabric scraps be used for this project?
Absolutely. This is an excellent Christmas fabric scrap project. Small remnants can be used for pocket panels, bindings, loops, appliqués, or patchwork exteriors. Using scraps also makes it easier to create several organizers with different designs while keeping the overall collection coordinated.
How can I make the organizer more festive?
Choose fabrics featuring holly, snowflakes, stars, Christmas florals, plaid, ornaments, or other seasonal motifs. Traditional red and green are not required; blue, cream, gold, burgundy, and soft botanical colors can also create a beautiful holiday appearance. Small buttons and hanging loops provide additional decorative possibilities.
Can these organizers be made as Christmas gifts?
Yes. Their combination of decorative quilting and practical storage makes them suitable handmade gifts for people who enjoy sewing, quilting, embroidery, crochet, or general crafting. You can personalize each organizer by selecting fabrics that match the recipient’s favorite colors.
How can I keep the pointed bottom neat?
Avoid excessively thick batting, trim bulky seam allowances, and sew slowly as you approach the narrow point. If using binding, manipulate it gradually rather than stretching it. Careful pressing and controlled stitching are more important than speed when finishing this area.
Can the same pattern be used after Christmas?
Certainly. The construction itself is not limited to Christmas. Replace the seasonal prints with floral, geometric, farmhouse, pastel, or solid fabrics and you have an organizer suitable for year-round use. The Christmas themed organizers Pattern simply uses festive fabric choices to give the basic design a holiday character.
Can I enlarge the pattern for other sewing supplies?
Yes. Enlarge the backing and pocket proportionally and test the intended tool against the paper template. A larger organizer can accommodate rulers, rotary cutters, marking tools, or several smaller accessories. Maintaining the same general proportions will preserve the attractive tapered appearance.
Conclusion: Creating Your Own Christmas Fabric Organizers
The Christmas themed organizers Pattern turns small pieces of fabric into attractive, functional accessories that can brighten a sewing space throughout the holiday season. Throughout this project, we covered how to select Christmas quilting cotton, prepare a tapered template, add batting, construct a shorter front pocket, quilt the layers, finish the opening, attach binding, and customize the organizer with contrasting fabrics and optional hanging loops.
The project also provides plenty of opportunities for creativity. You can use traditional Christmas colors, delicate florals, playful holiday prints, patchwork scraps, or coordinated solid fabrics. By changing the dimensions, the same construction method can accommodate different scissors and a variety of other craft tools. That flexibility makes the pattern useful for personal sewing rooms as well as handmade holiday gifts.
If you make this Christmas themed organizers Pattern, experiment with the fabrics you already have before purchasing anything new. A few carefully coordinated scraps can produce surprisingly beautiful results, and making several organizers is a wonderful opportunity to explore different color combinations. Most of all, enjoy the process of turning simple fabric, batting, and thread into something both decorative and genuinely useful. What is your sincere opinion of this Christmas themed organizers Pattern? Share which fabric combination you would choose, and leave your suggestions for changes or additional details you would like to add to the project. Your creative ideas can inspire new variations and make the pattern even more useful for other sewing and quilting enthusiasts.