
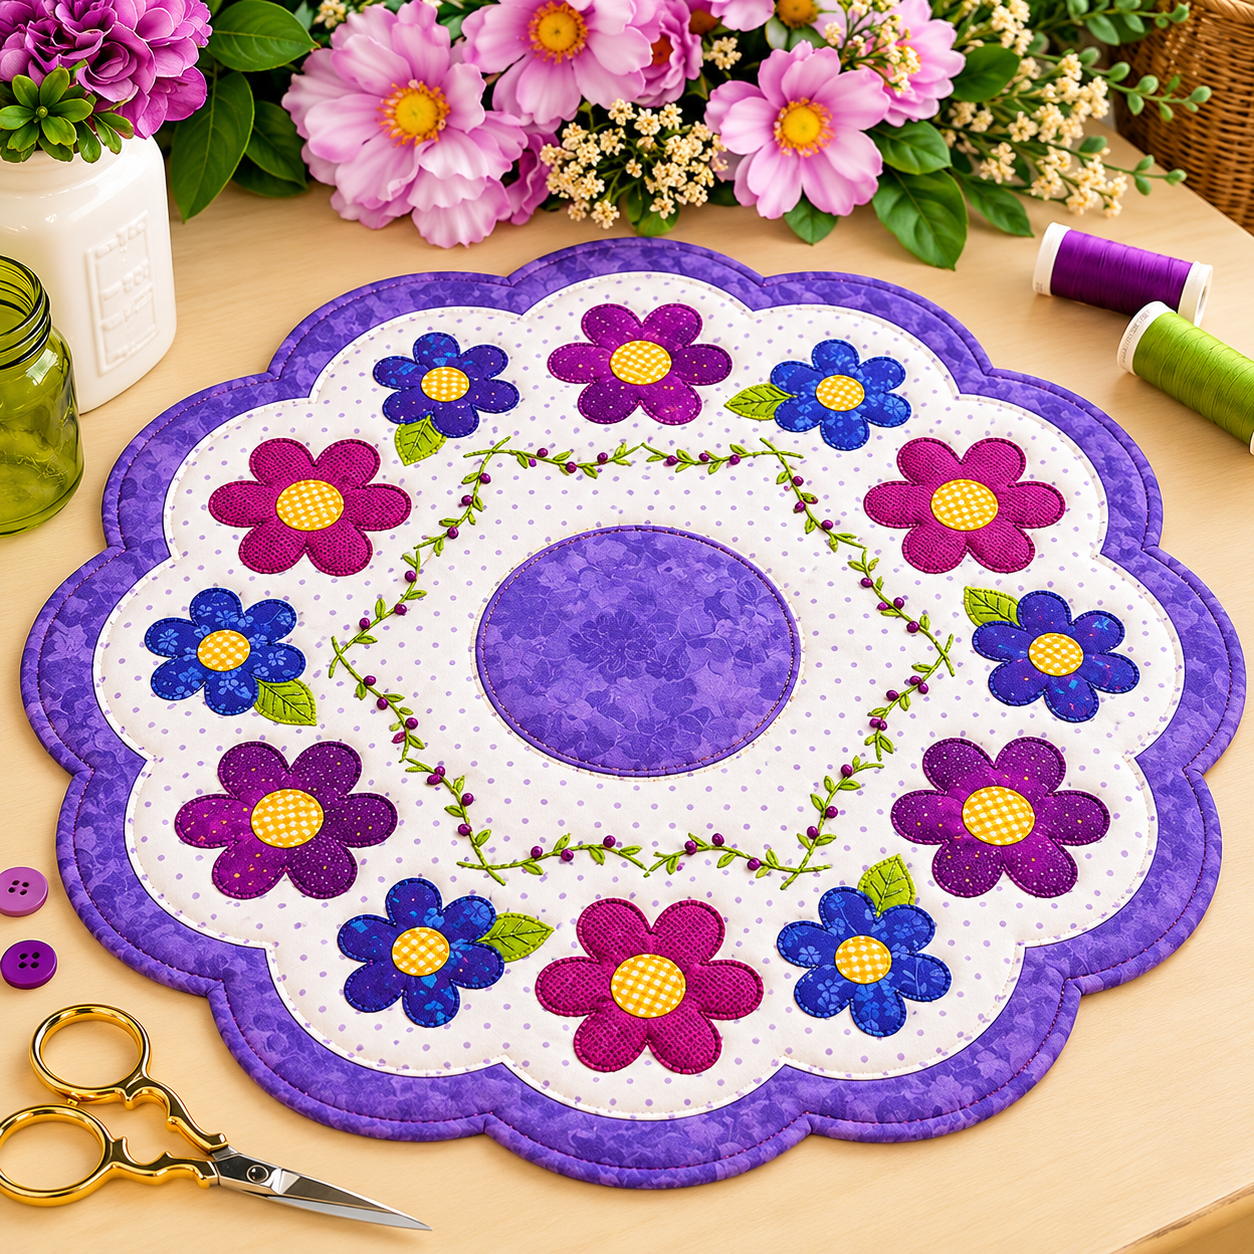
The Quilted Placemat with Floral Print and Scalloped Edge Pattern is a cheerful sewing project that combines traditional quilting, colorful fabric appliqué, decorative stitching, and a beautifully shaped scalloped border. Inspired by the floral design shown in the reference image, this placemat uses a light background surrounded by a rich purple frame, while bright flowers in blue, magenta, violet, yellow, and green create an eye-catching garden effect. The combination works especially well for spring and summer table décor, but the fabrics can easily be changed for any season. Because the design is built from relatively simple shapes, it can also be a satisfying project for someone who wants to practice appliqué without starting with a complicated quilt.
One of the most distinctive features of this Quilted Placemat with Floral Print and Scalloped Edge Pattern is its scalloped silhouette. Instead of finishing the project as a standard rectangle or circle, repeated rounded curves form a flower-like perimeter. Inside that border, a second scalloped section made from light printed fabric creates contrast with the purple outer frame. Individual fabric flowers are distributed around the placemat, while a circular purple centerpiece gives the composition a strong focal point. Decorative green stems with small purple accents complete the garden-inspired appearance and provide an opportunity to experiment with machine or hand embroidery.
This tutorial explains a practical way to recreate the overall appearance from beginning to end. Since the exact dimensions cannot be determined from a photograph alone, the measurements below are suggested project dimensions rather than measurements taken directly from the original piece. A finished diameter of approximately 46 to 50 cm (18 to 20 inches) creates a generously sized decorative placemat or table topper. You can enlarge or reduce the pattern according to your table. The important elements are maintaining an even scalloped perimeter, balancing the floral appliqué, keeping the quilt layers smooth, and using consistent stitching around every decorative shape.
Materials, Fabrics, and Pattern Preparation
Begin by gathering the materials for your Quilted Placemat with Floral Print and Scalloped Edge Pattern. You will need approximately 50 cm of purple cotton fabric for the border and center, 50 cm of light cotton fabric for the main background, several colorful fabric scraps for the flowers and leaves, backing fabric, and low-loft cotton or polyester batting. Choose quilting-weight cotton whenever possible because it is stable, easy to press, and well suited to appliqué.
DISCOVER MORE FREE PATTERNS HERE!
For the floral details, collect scraps in purple, magenta, blue, yellow, and green. The reference design uses different prints rather than relying entirely on solid fabrics, which gives the flowers more personality. Small-scale prints, dots, tonal florals, checks, and subtle textures work particularly well. Yellow fabric can be reserved for the flower centers, while fresh green fabrics create leaves and stems that stand out clearly against the pale background.
You will also need coordinating sewing thread, appliqué thread, fabric scissors, small sharp scissors, pins or clips, an iron, a sewing machine, removable fabric marker, quilting ruler, and a suitable appliqué stabilizer or fusible web. Fusible web is especially helpful for keeping the petals and leaves in position before stitching. For the embroidered vine, use embroidery thread or a heavier decorative sewing thread in green and purple.
To draft the scalloped pattern, begin with a large paper circle measuring approximately 48 cm in diameter. Divide the circumference into equal sections and draw repeated rounded scallops around the edge. A small bowl, cup, or circular template can help produce consistent curves. Fold the paper template into quarters before checking the scallops so that the finished design remains reasonably symmetrical.
Create a second scalloped template approximately 3 to 4 cm smaller around the entire perimeter. This becomes the light-colored interior section and allows the purple fabric beneath it to remain visible as a decorative outer frame. Keep the scallops of both templates aligned so the two layers look intentional rather than randomly offset. Mark the center of each template and quarter-fold lines to make alignment easier during assembly.
Finally, prepare simple templates for the fabric flowers, flower centers, and leaves. A flower approximately 7 to 9 cm wide works well for the larger motifs, while smaller flowers can measure around 6 to 7 cm. Use five rounded petals for the characteristic shape shown in the inspiration. Cut circular centers measuring roughly 2.5 to 3.5 cm and make several small pointed leaves. Before cutting all your fabric pieces, arrange paper versions around the placemat to test the spacing.
Creating the Scalloped Quilt Base and Center
Cut one complete scalloped shape from the purple top fabric. Cut matching shapes from the batting and backing fabric, leaving a little additional fabric around the backing and batting if you prefer to trim them after quilting. The purple top layer forms the outer frame visible around the pale center. Press all fabrics before cutting because wrinkles can distort curved edges and affect the final symmetry of the scalloped placemat.
Next, use the smaller template to cut the pale printed center. A white, cream, or very pale lavender fabric with tiny dots works beautifully because it provides visual separation from the colorful flowers. Center this piece carefully over the purple base. Check the distance between the two scalloped edges in several places before attaching it. The purple border should appear reasonably consistent all the way around.
Secure the pale scalloped panel with fusible web according to the manufacturer’s instructions, or baste it temporarily if you prefer traditional appliqué. Stitch close to its perimeter using a narrow zigzag, blanket stitch, satin stitch, or straight appliqué stitch. A contrasting purple thread can visually define the scallops, while a matching thread produces a quieter finish. Sew slowly around each curve to avoid creating sharp angles.
Create the circular centerpiece from purple fabric. A circle measuring approximately 15 to 17 cm in diameter is a useful starting point for a placemat around 48 cm wide. Position it precisely in the middle of the light background. Fuse or baste the circle into place and stitch around the circumference. Rotating the work gradually while sewing will create a smoother curve than making large movements.
Once the primary appliqué base has been assembled, layer the quilt top with batting and backing. Smooth each layer carefully from the center outward and secure them with basting spray, safety pins, or temporary hand-basting stitches. Avoid stretching the scalloped perimeter. Curved fabric sections can distort surprisingly easily, particularly when handled repeatedly during quilting.
Quilt the layers using a method appropriate to your experience. Simple echo quilting around the center circle, inner scallops, and floral motifs is effective without overwhelming the design. You can also quilt the pale background with widely spaced lines or gentle curves. The purpose is to stabilize all three layers while preserving the softness expected from a quilted placemat.
Making and Arranging the Floral Appliqué
The flowers are the main decorative feature of the Quilted Placemat with Floral Print and Scalloped Edge Pattern, so spend a little time planning their colors before attaching anything. Cut several five-petal flowers from blue, violet, purple, and magenta fabrics. Instead of making every flower identical, vary the sizes slightly. This creates the lively handmade character visible in the reference project.
Apply fusible web to the wrong side of each flower fabric before cutting the final shapes. Trace the templates onto the paper side, cut them out, remove the protective paper, and arrange the flowers around the pale section. Keep most flowers away from the center circle so that an open visual area remains between the centerpiece and the floral border. Rotate the flowers in different directions for a more natural arrangement.
Cut yellow circles for the flower centers. Yellow gingham, polka-dot, or textured cotton provides an especially attractive contrast against blue and purple petals. Place one circle in the center of every flower and fuse it after checking the alignment. Stitch around the flower first and then around its yellow center. This layered approach gives each motif a clean, finished appearance.
Use a short, narrow blanket stitch or zigzag around the petal edges. Purple or coordinating thread can emphasize the shapes, while matching thread creates subtler outlines. Pivot carefully where two petals meet. If your machine allows needle-down positioning, activate it before sewing the appliqués because it makes navigating the numerous curves much easier.
Add green leaves beside selected flowers rather than placing leaves beside every motif. This asymmetry keeps the arrangement from becoming too rigid. Fuse the leaves and stitch around their edges, then sew one or two lines through their centers to suggest veins. Different shades of green can be combined to make the arrangement more dimensional.
The inner vine provides the final major decorative detail. Lightly draw an irregular circular vine between the flowers and the purple centerpiece using a removable fabric marker. Stitch the stem with green thread, then add tiny leaves or short branches along it. Small purple knots, fabric circles, or embroidered accents can represent berries or buds. Keep this decoration relatively delicate so it complements rather than competes with the larger floral appliqué.
Finishing the Scalloped Edge and Perfecting the Placemat
After the quilting and appliqué are complete, trim the backing and batting carefully to match the scalloped top. Take your time around every inward and outward curve. Accuracy at this stage has a major influence on the finished appearance. Check that all three layers remain flat and that no fabric has shifted or folded underneath during quilting.
The scalloped perimeter can be finished with bias binding because bias-cut fabric bends much more easily around curves than straight-grain binding. Cut bias strips approximately 4 to 5 cm wide, join them diagonally, and press them into continuous binding. Purple fabric matching the border creates the cohesive appearance seen in the inspiration, although a contrasting binding can also be attractive.
Attach the binding slowly around the scallops. Curves require more frequent repositioning than straight quilt edges. Avoid pulling the binding tightly around outward curves because this can cause the placemat to cup. Around inward curves, allow enough flexibility for the binding to follow the shape naturally. Small clips are particularly convenient for holding binding along complicated curved edges.
When you reach the beginning of the binding, join the ends neatly and complete the seam. Fold the binding around to the back and secure it by hand for a traditional finish or machine stitch it for a faster, durable result. Press the edge gently with an iron, using steam only when appropriate for the fabrics and batting you selected.
Inspect the completed Quilted Placemat with Floral Print and Scalloped Edge Pattern from both sides. Trim loose threads and remove any temporary markings. Check each flower center, petal, and leaf for loose edges. If you discover an area that needs reinforcement, a few additional stitches are much easier to add before the placemat is washed or placed on the table.
The finished piece can be used individually as a decorative centerpiece or made as a coordinated set of placemats. Changing the flower colors is an easy way to adapt the same pattern to different decorating styles. Pastels can produce a soft spring version, reds and greens can create a seasonal variation, and blues with neutral backgrounds can produce a calmer look. The construction method remains essentially the same.
FAQ About the Quilted Placemat with Floral Print and Scalloped Edge Pattern
What is a Quilted Placemat with Floral Print and Scalloped Edge Pattern?
It is a layered fabric table accessory combining a quilted base, decorative floral appliqué, and a curved or scalloped outer edge. The quilt sandwich generally consists of a decorative top, batting, and backing fabric, while appliqué pieces provide the floral design.
Is this floral placemat suitable for beginners?
An adventurous beginner can make it, although the scalloped binding and multiple appliqué curves require patience. Someone new to sewing may want to practice blanket stitching and bias binding on scrap fabric before working on the finished project.
What fabric is best for a quilted floral placemat?
Quilting cotton is an excellent choice because it is easy to cut, press, stitch, and coordinate. Medium-weight cotton also handles fusible appliqué well and is available in the small-scale prints that work beautifully for flowers.
How large should the finished placemat be?
A diameter of approximately 46 to 50 cm works well for a decorative version inspired by the photograph. However, the pattern can be resized. When changing the overall diameter, resize the center circle, flowers, scallops, and border proportionally.
Do I need fusible web for the floral appliqué?
No, but it makes assembly considerably easier. Fusible web prevents the flower petals and leaves from shifting while you stitch around their edges. Traditional needle-turn appliqué, raw-edge appliqué, or temporary fabric adhesive can also be used depending on your preferred sewing method.
How do I make the scallops even?
Draft the pattern on folded paper and use a consistent circular template for each scallop. Mark the center and quarter points before cutting the fabric. Checking symmetry on paper is much easier than attempting to correct uneven scallops after the quilt has been assembled.
Why should bias binding be used around the edge?
Bias binding is cut diagonally across the grain, which gives the strip greater flexibility. That flexibility helps the binding travel smoothly around rounded scallops and curved sections where ordinary straight-grain binding may wrinkle or resist the shape.
Can I make the flowers from fabric scraps?
Yes. This project is particularly suitable for a fabric scrap project because the petals, centers, and leaves require relatively small pieces. Coordinating scraps also add variation and make each flower slightly different.
Can the decorative vine be embroidered by hand?
Absolutely. Hand embroidery can give the vine a charming handcrafted character. Stem stitch, backstitch, French knots, and small detached-chain stitches can be used for stems, berries, and tiny leaves. Machine decorative stitching is another practical option.
Should I wash the fabrics before sewing?
Prewashing is useful when you are concerned about shrinkage or color bleeding, especially when combining intense purple, blue, or magenta fabrics with a white background. Whatever preparation method you choose, try to treat all the main fabrics consistently.
Can this pattern be enlarged into a table topper?
Yes. The same floral quilt pattern can be enlarged for a centerpiece or small table topper. Increase the dimensions proportionally and consider adding additional quilting so the larger surface remains stable.
How can I keep the placemat flat after quilting?
Begin with properly pressed fabric, baste the layers thoroughly, and quilt outward from the center while avoiding excessive pulling. When attaching bias binding, do not stretch it around the outer curves. A final gentle pressing can also help the placemat settle evenly.
Conclusion
The Quilted Placemat with Floral Print and Scalloped Edge Pattern brings together several enjoyable sewing techniques in one colorful project. You begin by drafting the scalloped base, selecting coordinating quilting fabrics, and building the layered background. The purple frame and center establish the structure, while the pale interior provides a clean surface for the colorful floral arrangement.
From there, floral appliqué transforms the quilted base into a garden-inspired design. Five-petal flowers, cheerful yellow centers, green leaves, and an embroidered vine create the decorative character of the project. Careful placement is more important than making every motif perfectly identical; small variations can actually enhance the handmade appearance.
EASILY FIND THE FREE PDF FOR THIS PATTERN HERE!
Finally, quilting stabilizes the layers and bias binding provides a polished solution for the curved scalloped perimeter. By working patiently around the curves and checking the project frequently, you can create a finished placemat that is both decorative and practical. The same basic pattern can also be customized with different colors, prints, flower arrangements, and sizes. I hope this tutorial gives you a clear path for creating your own Quilted Placemat with Floral Print and Scalloped Edge Pattern from beginning to end. If you make your own version, leave your sincere opinion about the project and share any suggestions, color combinations, or creative changes you would like to try.