
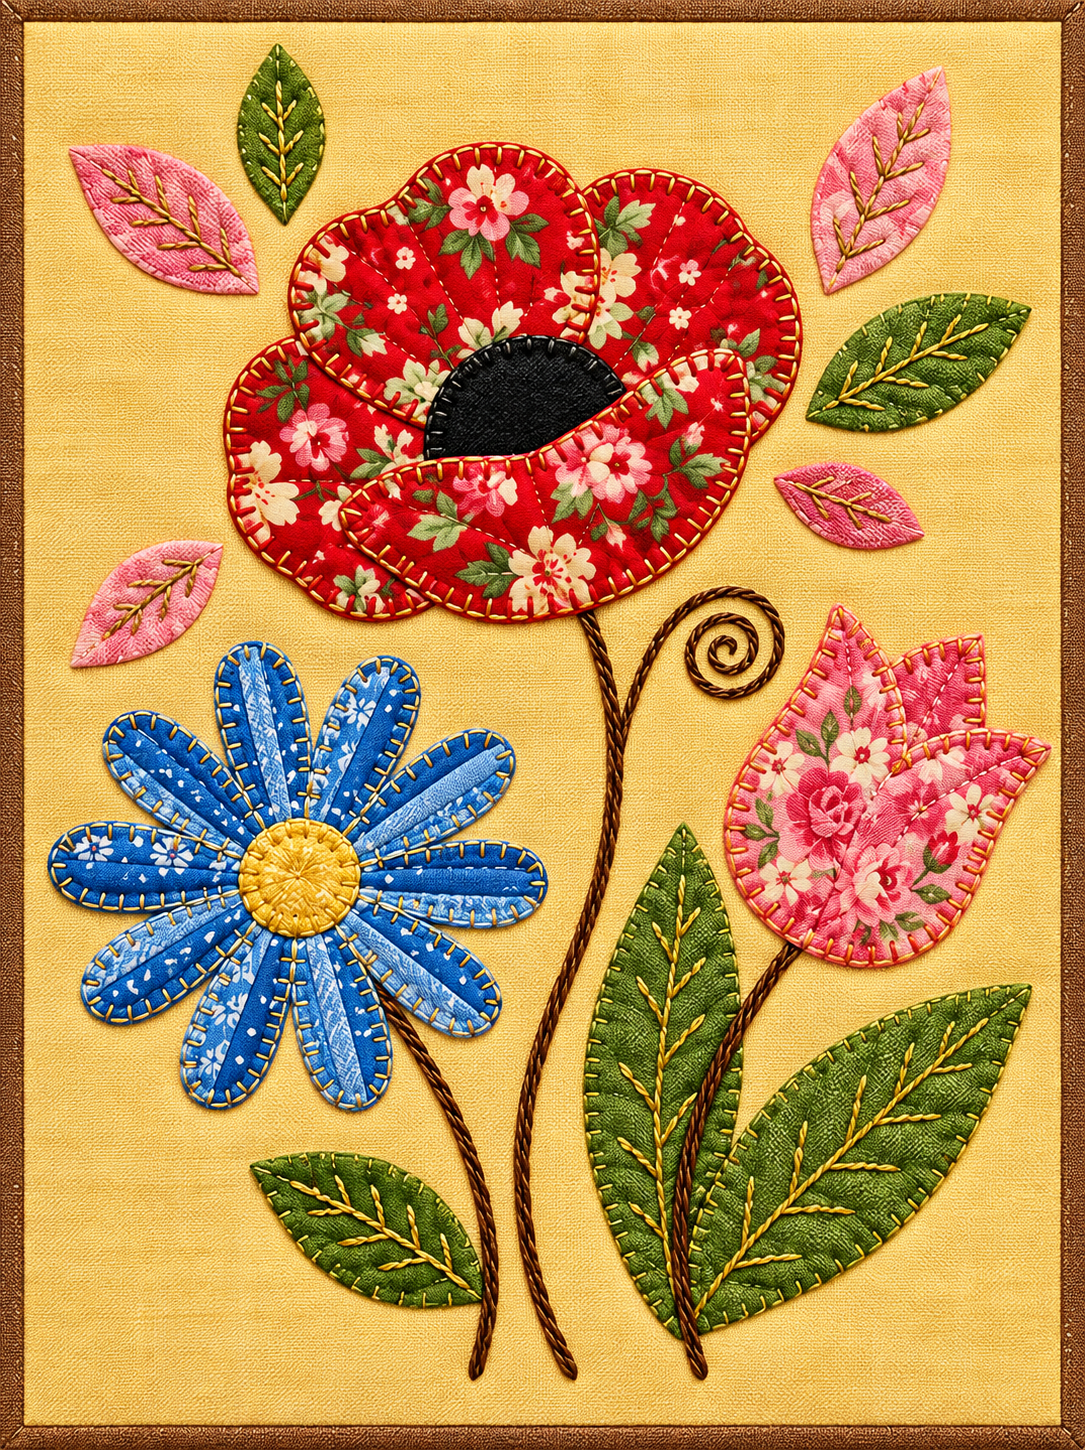
Quilt Block with Floral Appliqué Pattern is a cheerful sewing project that combines the charm of traditional quilting with the creative freedom of fabric appliqué. Inspired by the floral composition shown in the reference image, this design brings together a large red layered flower, a bright blue daisy-style bloom, a pink tulip, green leaves, curved stems, and several smaller decorative leaves. The warm background fabric helps every colorful shape stand out, while visible decorative stitches give the finished block a handmade personality. It is an attractive project for quilters who enjoy turning small pieces of fabric into detailed textile artwork.
One of the most appealing features of this floral appliqué quilt block is that the design does not depend on complicated piecing. Instead, individual fabric shapes are cut, arranged, layered, and stitched onto a solid foundation. This makes it possible to experiment with fabric scraps, floral prints, contrasting colors, and different stitching techniques without constructing dozens of traditional patchwork units. The project is also highly customizable. You can follow the color arrangement of the inspiration image or create an entirely different palette while keeping the same basic floral composition.
Throughout this tutorial, you will learn how to recreate the Quilt Block with Floral Appliqué Pattern from beginning to end, including selecting fabrics, preparing appliqué templates, positioning the flowers, forming dimensional-looking petals, creating stems and leaves, adding decorative stitching, and finishing the block neatly. Although the design contains many individual pieces, the construction becomes manageable when it is divided into stages. Careful preparation is especially important because the final appearance depends on balanced spacing, smooth curves, consistent stitches, and secure appliqué edges.
Materials, Fabric Selection, and Preparing the Floral Appliqué Pieces
Begin by choosing a sturdy cotton fabric for the background of your Quilt Block with Floral Appliqué Pattern. A warm cream, pale yellow, ivory, or light neutral shade works particularly well because it creates contrast with colorful flowers. Cut the background slightly larger than the desired finished block. The extra fabric allows you to square the piece accurately after all of the appliqué and decorative stitching has been completed.
DISCOVER MORE FREE PATTERNS HERE!
For the flowers, gather several coordinating quilting cotton fabrics. The reference design uses red floral fabric for the largest flower, multiple blue prints for the daisy, pink floral fabric for the tulip, and green fabrics for the leaves. Mixing prints within a single flower creates additional depth. Small-scale prints are particularly useful because their details remain visible even after the fabric has been cut into narrow petals.
You will also need basic sewing supplies such as sharp fabric scissors, small embroidery scissors, quilting pins or clips, coordinating thread, an appliqué needle, a marking tool, an iron, and your preferred appliqué stabilizer or fusible web if you use the fusible method. Decorative embroidery thread can be used for the visible blanket stitches and leaf veins. A sewing machine is optional because much of this project can also be completed by hand.
Next, prepare paper or cardstock templates for every major component. You will need templates for the large rounded petals, the central section of the red flower, the elongated blue petals, the circular daisy center, tulip petals, and several leaf sizes. Creating reusable templates makes the cutting process much more consistent. Remember that templates may require additional fabric around their edges if you intend to turn the raw edges underneath.
Trace each template onto the appropriate fabric and carefully cut out the shapes. For a raw-edge appliqué technique, the shapes can generally be cut directly to their final dimensions. If you prefer turned-edge appliqué, add a small seam allowance around each template. Clip gently around deep curves where necessary so that the seam allowance can turn smoothly without creating bulky folds.
Before attaching anything permanently, place every appliqué component on the background. Recreate the approximate composition of the reference project: position the large red flower toward the upper portion, the blue daisy toward the lower left, and the pink tulip toward the lower right. Arrange green leaves around the flowers while leaving enough negative space for the curved stems. Photographing this temporary arrangement can provide a useful reference once you begin sewing.
Building the Red Flower, Blue Daisy, and Pink Tulip
The large red flower is the visual focal point of the Quilt Block with Floral Appliqué Pattern, so it is a good place to begin. Cut approximately five broad, rounded petal shapes from red floral cotton. Slight variations between the petals can actually enhance the handmade appearance. Arrange them in an overlapping circular formation, allowing each petal to partially cover the next one.
Once you are satisfied with the arrangement, secure the red petals temporarily. Stitch around each petal using a visible blanket stitch, appliqué stitch, or another decorative edge finish. In the inspiration image, contrasting stitching emphasizes the individual shapes and becomes an important design feature rather than something that needs to disappear. Keeping the stitches reasonably even will give the flower a polished appearance.
Create the dark center after the outer petals have been secured. A black or very dark fabric provides dramatic contrast against the bright red floral print. Depending on your preferred construction method, this central section can overlap the inner edges of the petals. Stitch around its curved edge carefully, maintaining a smooth line. This strong central contrast helps visually separate the overlapping red petals.
For the blue daisy, cut a collection of long oval or slightly pointed petals. Using several blue fabric scraps instead of one identical fabric gives the flower the patchwork character seen in the reference image. Arrange the petals around a circular yellow center, alternating prints and shades so neighboring petals remain visually distinct. Check the spacing before stitching because evenly distributed petals produce a balanced flower.
Secure each blue petal individually and add decorative stitches around its perimeter. The visible edging can be made with yellow, cream, gold, or another contrasting thread. Once all petals are attached, place the yellow circle over their inner ends and sew around the circumference. Optional hand quilting or embroidery inside the center can add texture and help the circular piece remain flat.
Complete the main group of flowers with the pink tulip. Construct it from several overlapping pointed pieces rather than one flat silhouette. Begin with the rear petals and gradually layer the remaining pieces toward the front. This simple layered appliqué technique creates an impression of depth without requiring complicated three-dimensional construction. Outline each petal with decorative stitching so the individual layers remain clearly visible.
Creating Stems, Leaves, Decorative Stitching, and the Final Composition
With the main flowers established, add the stems. The reference design uses narrow brown curved lines that connect the flowers visually and provide movement through the composition. These can be created with narrow bias strips, fabric-covered cord, embroidery, decorative yarn, or another flexible textile element. Whatever method you choose, test the curve before sewing so the stems flow naturally rather than appearing stiff.
The largest green leaves should be positioned near the lower part of the tulip and along the stems. Cut elongated leaf shapes with gently pointed tips and arrange them at different angles. Using multiple shades or prints of green quilting fabric prevents the foliage from looking overly uniform. The leaves should support the composition without competing visually with the brightly colored flowers.
Stitch around every leaf using the same decorative technique used elsewhere in the project. Then add embroidered veins through the center and toward the sides. A simple stem stitch or backstitch can create the central vein, while smaller diagonal stitches form the secondary veins. Contrasting thread, such as warm yellow or gold, makes these details especially noticeable against dark green fabric.
Smaller floating leaves can be scattered around the upper and side areas of the quilt block. In the reference design, these pieces help fill empty areas while maintaining an airy composition. Some can be pink and others green. Avoid placing every decorative element at identical distances from the flowers; controlled variation creates a more natural arrangement and keeps the viewer’s eye moving around the entire block.
After all pieces are attached, inspect the floral appliqué pattern carefully. Look for loose threads, unsecured corners, uneven edges, or areas where additional stitching could improve definition. This is also the ideal stage for adding subtle quilting lines inside some petals. Gentle curved quilting can emphasize the shapes and give flat cotton pieces additional visual dimension.
Finally, press the completed block carefully according to the requirements of the fabrics and stabilizers you used. Press rather than aggressively sliding the iron across the appliqué. Square the background only after the decorative work is complete. A narrow contrasting fabric border can then be added if desired, echoing the framed appearance of the inspiration image and giving the Quilt Block with Floral Appliqué Pattern a defined finished edge.
Finishing the Quilt Block and Creative Ways to Customize the Pattern
Once the appliqué work is finished, decide how you want to use your Quilt Block with Floral Appliqué Pattern. It can remain a decorative textile panel, become the center of a larger quilt, or be incorporated into a cushion cover, wall hanging, table decoration, tote bag, or fabric organizer. Leaving additional background fabric around the motif gives you more flexibility when deciding on the final project.
If you want a quilted finish, prepare a traditional three-layer quilt sandwich consisting of the appliquéd quilt top, batting, and backing fabric. Smooth all three layers carefully and baste them together. Quilting can be minimal because the appliqué already contributes substantial texture. Simple echo quilting around the flowers and leaves is an effective way to emphasize their silhouettes.
Another option is to quilt the open background areas using gentle curves, small loops, or understated free-motion patterns. Avoid making the background quilting so visually strong that it competes with the flowers. The goal is to support the appliqué composition while providing enough stitching to secure the quilt layers and create an appealing textile texture.
Color customization offers almost unlimited possibilities. A farmhouse-inspired version might combine cream, burgundy, dusty blue, and muted green fabrics. A spring interpretation could use pastel pink, lavender, aqua, pale yellow, and sage. For a modern fabric appliqué pattern, consider a white background with saturated solid fabrics. The basic flower shapes can remain unchanged even when the entire color personality of the block is transformed.
Scraps left from previous sewing projects are especially suitable for this design. Because many petals and leaves require only small pieces, the project provides an excellent opportunity to coordinate remnants that might otherwise remain unused. Try grouping fabrics by color family before cutting. This allows you to create variation while maintaining visual harmony throughout the floral quilt block.
Most importantly, do not worry if every petal is not perfectly identical. Handmade appliqué naturally contains subtle variations, and those differences can contribute to the personality of the finished project. Concentrate instead on secure stitching, thoughtful fabric placement, balanced proportions, and clean finishing. With these fundamentals in place, your Quilt Block with Floral Appliqué Pattern can look carefully crafted while still retaining the warmth associated with handmade quilting.
Frequently Asked Questions About Quilt Block with Floral Appliqué Pattern
What is a Quilt Block with Floral Appliqué Pattern?
A Quilt Block with Floral Appliqué Pattern is a quilt design in which flower, leaf, and stem shapes are attached to a foundation fabric rather than being created entirely through traditional patchwork piecing. The appliqué pieces can be stitched by hand or machine and may use raw, turned, or fused edges.
Is this floral appliqué project suitable for beginners?
Yes, especially when the project is completed one element at a time. Beginners can start with fusible or raw-edge appliqué because these methods reduce the amount of edge preparation required. More experienced quilters may prefer traditional turned-edge techniques.
What fabric works best for floral appliqué?
Quality quilting cotton is an excellent choice because it is stable, easy to cut, widely available in coordinating prints, and generally straightforward to sew. Small floral prints, dots, tonal patterns, and solid colors can all work beautifully.
Can I make this quilt block using fabric scraps?
Absolutely. This design is particularly suitable for scrap quilting because petals and leaves can be cut from relatively small pieces. Using several related prints within one flower can create a rich patchwork effect.
Should I use fusible web for the appliqué?
Fusible web is optional. It can make positioning small shapes easier and help stabilize raw edges before stitching. However, traditional hand appliqué can be completed without it. Always follow the instructions supplied with the particular stabilizing product you choose.
Can the appliqué be sewn by hand?
Yes. Hand sewing can create an especially charming result. Blanket stitch, whipstitch, slip stitch, and decorative embroidery are all possible approaches. Hand stitching is also useful when you want the contrasting stitches themselves to become part of the design.
Can I make the floral pattern with a sewing machine?
Yes. A sewing machine can be used for straight stitch, zigzag stitch, satin stitch, or machine blanket stitch around the appliqué pieces. Practice on scrap fabric first to determine the stitch width and length that best complement your fabric shapes.
How do I keep appliqué petals from shifting while sewing?
Temporary fabric adhesive, fusible web, appliqué pins, or careful basting can help stabilize the pieces. It is also useful to arrange the complete flower first and secure the lower layers before attaching overlapping upper pieces.
How can I make the flowers appear more dimensional?
Use overlapping petals, multiple fabrics, visible quilting lines, and contrasting decorative stitches. Layering is particularly effective because the viewer can distinguish individual petals instead of seeing one flat flower silhouette.
What can I make with the finished quilt block?
The finished floral appliqué quilt block can become a wall hanging, cushion front, tote bag panel, table topper, quilt centerpiece, framed textile decoration, or part of a larger sampler quilt. You can resize the templates to adapt the design to different projects.
Do all the leaves need to use the same green fabric?
No. Combining several green prints often produces a more interesting result. You can use dark green for larger leaves and lighter or patterned green fabrics for smaller ones, while repeating similar thread colors to visually connect them.
How should I wash a finished appliqué quilt?
Washing requirements depend on the fabrics, threads, stabilizers, and embellishments used. Prewashing fabrics before construction can reduce unexpected shrinkage or color transfer. A gently constructed appliqué project should always be handled according to the most delicate material included in it.
Conclusion
Creating a Quilt Block with Floral Appliqué Pattern is a wonderful way to combine traditional quilting, appliqué, decorative stitching, and creative fabric selection in one colorful project. Starting with a simple background, you can gradually build the composition by preparing templates, cutting individual petals and leaves, arranging the large red flower, constructing the blue daisy and pink tulip, and finally adding stems and detailed foliage.
The most important lesson is to build the design gradually. Instead of viewing the project as one complicated floral panel, treat every flower, petal, stem, and leaf as a small individual sewing task. Careful placement followed by consistent appliqué stitching makes the complete composition much easier to manage and helps maintain a professional-looking finish.
EASILY FIND THE FREE PDF FOR THIS PATTERN HERE!
This pattern also leaves plenty of room for personal creativity. Change the colors, combine treasured fabric scraps, enlarge the flowers, simplify the foliage, experiment with decorative thread, or incorporate the completed block into a larger quilt. The same Quilt Block with Floral Appliqué Pattern can look completely different depending on your fabric choices and finishing techniques. I hope this detailed tutorial inspires you to create your own colorful floral appliqué project. If you make your own version, leave your sincere opinion about the pattern and share any suggestions you have for colors, fabrics, stitches, or future quilting projects. Your creative ideas can be just as valuable as the pattern itself.