
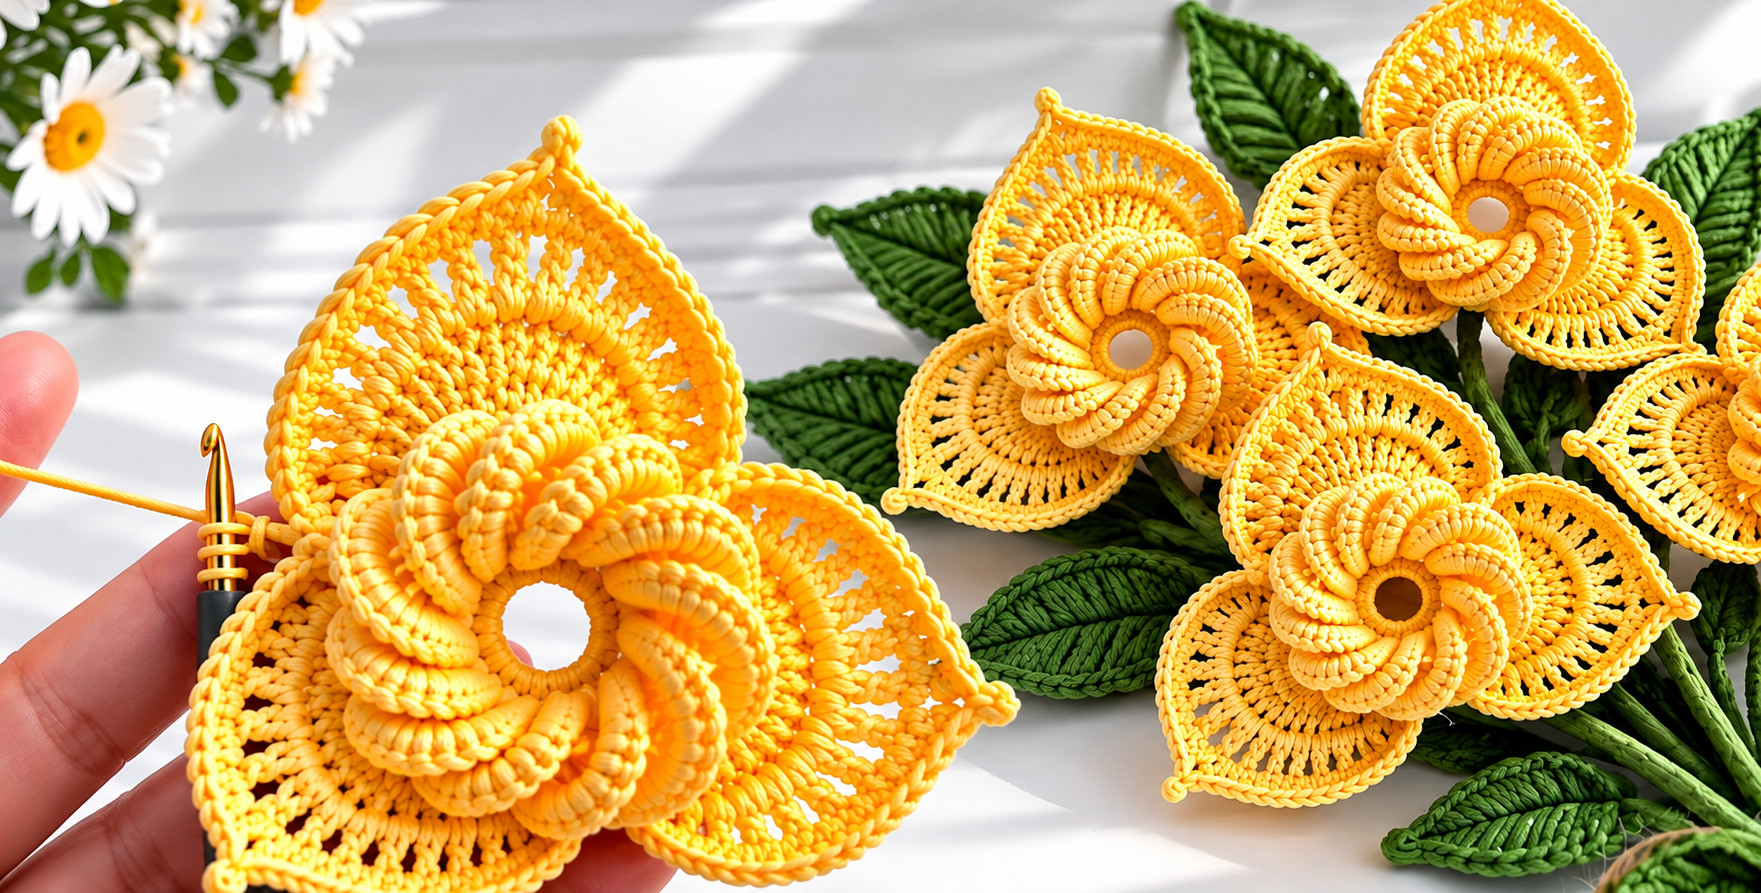
The Stunning 3D crochet flower Pattern is a beautiful way to transform simple yarn into a richly textured floral motif with impressive depth and movement. Unlike a flat crochet flower, this design uses raised stitches, layered petals, carefully placed increases, and shaped outer sections to create a flower that seems to lift away from the background. The finished piece can become a decorative appliqué, part of a bouquet, a centerpiece for a handmade accessory, or an accent for many other crochet projects. Although the finished flower looks elaborate, the construction becomes much easier when it is divided into logical rounds and the stitch placement is carefully counted.
One of the most attractive characteristics of this 3D crochet flower is the contrast between the compact center and the larger dimensional petals. The flower can be worked with cotton or another smooth yarn that provides enough stitch definition to highlight every curve. A medium-firm tension is especially helpful because the petals need enough structure to maintain their shape instead of collapsing. For a bright botanical appearance similar to the inspiration, yellow yarn works beautifully, but cream, coral, pink, red, lavender, or even multiple coordinated shades can completely change the personality of the same crochet flower pattern.
This tutorial uses standard U.S. crochet terminology and explains the construction through crochet keys and abbreviations so that the pattern is easier to follow. Because yarn thickness, hook size, and personal tension affect the final dimensions, think of the stitch counts and construction as a practical framework that can be adjusted while preserving the overall flower structure. Before beginning, it is useful to understand the main abbreviations: MR = magic ring, ch = chain, sl st = slip stitch, sc = single crochet, hdc = half double crochet, dc = double crochet, tr = treble crochet, BLO = back loop only, FLO = front loop only, st = stitch, sts = stitches, rep = repeat, inc = increase, and FO = fasten off.
Materials, Crochet Keys, and Preparation for the 3D Flower
For the Stunning 3D crochet flower Pattern, choose a smooth cotton or cotton-blend yarn that allows individual stitches to remain visible. Mercerized cotton is particularly attractive for decorative flowers because its smooth surface can emphasize the sculptural appearance of the petals. You will also need an appropriately sized crochet hook, yarn needle, scissors, and removable stitch markers. A hook around 2.5–3.5 mm can work well with many lightweight cotton yarns, but always match your hook to the yarn and the firmness you want.
DISCOVER MORE FREE PATTERNS HERE!
The central construction begins with an MR (magic ring). This technique creates an adjustable loop into which the first stitches are crocheted. After the stitches have been completed, the yarn tail is pulled to close the center. A magic ring is especially useful for floral crochet because it produces a neat beginning without leaving an unnecessarily large opening. If you prefer a visible central opening for the dimensional flower, however, you can leave a controlled opening instead of closing the ring completely.
Begin with MR, ch 1, and work 12 sc into the ring. Join with a sl st to the first sc. Keep the stitches even but avoid pulling them excessively tight. This first round establishes the foundation for everything that follows. Place a stitch marker at the beginning of the round if necessary. Accurate counting is particularly important in a layered crochet flower, because an incorrect foundation count can cause uneven petal placement later.
For the next foundation round, ch 1, then work 2 sc into each stitch around, giving you 24 stitches. Join with a sl st. If you want a slightly larger central base, another controlled increase round can be added by alternating 1 sc in the next st, 2 sc in the next st around. The goal is to produce a flat circular foundation rather than a bowl. If the circle begins curling upward too early, check your tension and increase placement.
The dimensional effect relies heavily on working through different loops. BLO (back loop only) means inserting the hook beneath only the back loop of the stitch, while FLO (front loop only) means using only the front loop. This leaves an unused loop that can later support another layer of petals. It is one of the most useful methods for producing 3D crochet motifs, since several decorative layers can grow from essentially the same circular foundation without needing to sew every layer separately.
Before continuing, check the center carefully. It should lie relatively flat, the stitches should be evenly distributed, and the round should not be twisted. Weave in the initial tail securely if it will become difficult to access later. Do not rush this stage. A clean foundation helps the raised petals sit symmetrically and makes the finished Stunning 3D crochet flower Pattern look much more polished.
Building the Raised Spiral Petals Step by Step
The signature feature of this project is its curled, dimensional petal structure. To prepare the first raised layer, work into the available loops around the central foundation. A practical petal sequence can begin with sl st in the next loop, ch 7, followed by stitches worked back along the chain. Starting in the second chain from the hook, work sc, hdc, dc, 2 tr, dc. Slip stitch into the next available foundation position to anchor the petal.
Repeat this petal sequence evenly around the center. The progression from short stitches to tall stitches and back toward shorter anchoring points gives each petal a naturally curved profile. For additional fullness, you can work multiple tall stitches into selected chains. The important principle behind the 3D flower pattern is gradual height variation. Abrupt changes in stitch height can make petals angular, while a controlled progression produces a softer botanical curve.
For a more dramatic spiral, gently rotate each completed petal in the same direction before beginning the next one. Crochet fabric naturally has enough flexibility to accommodate this shaping. Avoid pulling or stretching the petals aggressively. Instead, use your fingers to encourage each petal to overlap the previous one slightly. As the round develops, the repeated overlap creates the swirling appearance that makes this crochet flower visually distinctive.
The second petal layer can be built behind the first by returning to the unused loops. Join the yarn with a sl st and create slightly longer chains, such as ch 8 or ch 9. Work a sequence such as sc, hdc, dc, tr, tr, dc, hdc along each chain before anchoring it back to the foundation. These slightly longer petals should appear behind the smaller central petals, adding both diameter and depth.
Do not worry if the petals initially look too upright or tightly clustered. Three-dimensional crochet often changes significantly during final shaping. Once an entire round is complete, spread the petals gently with your fingers. Position each petal so that it partially covers the gap between two petals in the layer beneath or in front. This staggered placement gives the layered crochet flower a fuller appearance and prevents large empty spaces from becoming visible.
After completing the raised center, examine the flower from above and from the side. From above, the petals should create a reasonably balanced spiral. From the side, several distinct levels of crochet should be visible. If one section looks sparse, carefully reposition neighboring petals rather than immediately adding random stitches. Consistent spacing is usually more effective than excessive volume when creating a refined Stunning 3D crochet flower Pattern.
Crocheting the Large Outer Petals and Adding Natural Shape
The large outer petals provide the backdrop for the sculptural center. Begin by creating evenly spaced attachment points around the outer foundation. One useful method is to work ch 5, skip the appropriate number of foundation stitches, sl st into the next stitch, and repeat around. These chain spaces become arches onto which the larger petals are built. Make sure the arches are distributed as evenly as possible.
Into the first chain space, begin with shorter stitches and gradually increase the height. A useful sequence is sc, hdc, 2 dc, 4 tr, 2 dc, hdc, sc. Depending on your yarn thickness and desired petal width, you can add or subtract tall stitches. The principle is more important than an absolutely fixed number: the sides of the petal should rise gradually toward the center and then descend symmetrically.
To produce the pointed shape seen in many decorative floral motifs, place ch 2 or ch 3 at the highest point of the petal and use a sl st into the first chain to form a small picot. Continue down the opposite side using decreasing stitch heights. The picot creates a crisp tip while the surrounding treble and double crochet stitches create the broad body. This combination works particularly well for a stylized crochet flower with pointed petals.
Repeat the same sequence in every chain space. Count the stitches in each petal so that all outer sections remain similar in size. Small variations are normal in handmade crochet, but dramatically different stitch counts can make one side of the flower appear heavier. After completing each petal, smooth it outward and compare it with the previous one before continuing.
If you want a more defined border, finish the outer edge with a round of sc or sl st. At each pointed tip, work sc, ch 2, sc into the tip space. This reinforces the point without making it excessively bulky. A contrasting yarn can be used for the edging, although using the same color produces a seamless appearance that allows the dimensional center to remain the main focal point.
At this stage, the basic Stunning 3D crochet flower Pattern is complete. However, the final shaping is just as important as the crochet itself. Arrange the large petals so that they spread outward, then position the central spiral petals in overlapping layers. If your yarn label permits gentle blocking, lightly shape the outer petals while leaving the raised center unflattened. Never press the dimensional petals flat, because their volume is an essential part of the design.
Finishing, Shaping, Customizing, and Using the Crochet Flower
Fasten off with FO, leaving a sufficiently long tail if you intend to attach the flower to another project. Use a yarn needle to weave loose ends through several stitches on the reverse side. Change direction once or twice while weaving to help secure the yarn. Trim only after you are confident that the ends will not work loose. Good finishing is especially important for decorative motifs that may be handled frequently.
For a more pronounced 3D effect, shape the center petals individually. Insert a finger beneath each petal, lift it slightly, and curve it toward the same rotational direction as the neighboring petals. The center should look full without becoming compressed. The larger background petals can remain flatter because this contrast between the flat base and elevated center is what creates the strongest illusion of depth.
You can also add crochet leaves to transform individual flowers into a botanical arrangement. A simple leaf can begin with ch 14. Starting in the second chain, use progressively taller stitches toward the middle and shorter stitches near the opposite end. Crochet along both sides of the foundation chain to create an oval or pointed leaf. Working a final round in BLO or using surface slip stitches can imitate the appearance of leaf veins.
Color customization makes this pattern extremely versatile. A monochromatic flower emphasizes texture, while two-tone construction highlights individual layers. For example, the central spiral can be worked in golden yellow and the outer petals in pale yellow. A cream center with blush petals creates a softer effect. When changing colors, secure each yarn end carefully on the reverse side so that the front remains neat.
The completed flower can decorate cushions, fabric baskets, bags, wall hangings, handmade wreaths, table decorations, or other craft projects. When attaching it to fabric or another crochet piece, stitch around the foundation rather than sewing through every raised petal. This keeps the center free to retain its dimensional movement. For items intended for babies or young children, avoid loose detachable decorations and prioritize secure construction.
Once you understand the basic construction, the Stunning 3D crochet flower Pattern becomes easy to personalize. Increase the chain length for larger petals, reduce it for compact flowers, experiment with different yarn weights, or add additional foundation rounds. Keep notes about your hook size, yarn, stitch counts, and modifications. Recording these details makes it much easier to reproduce matching flowers for larger projects.
Frequently Asked Questions About the Stunning 3D Crochet Flower Pattern
What skill level is recommended for this pattern?
This 3D crochet flower pattern is best suited to confident beginners or intermediate crocheters. You should be comfortable with basic stitches such as sc, hdc, dc, tr, ch, and sl st. Familiarity with FLO and BLO is helpful, although these techniques are straightforward once you understand which loop should receive the hook.
What does 3D mean in crochet?
In crochet, 3D generally describes a motif that has noticeable height, layering, or sculptural volume rather than remaining completely flat. In this project, overlapping raised petals create the dimensional effect.
What yarn is best for a 3D crochet flower?
Smooth cotton yarn is an excellent choice because it provides strong stitch definition and enough structure for shaped petals. Cotton blends can also work well. Very fuzzy yarn may hide the detailed stitches, while extremely soft yarn may produce petals that need more shaping.
Can I make the flower larger?
Yes. You can use thicker yarn and a larger hook or modify the number and length of the petals. Adding another foundation round before creating the outer petals is another option. Remember that increasing the diameter may require additional attachment points to maintain balanced spacing.
Can I make a smaller flower using the same idea?
Absolutely. Choose thinner yarn and a smaller hook, shorten the petal chains, or remove one dimensional layer. Keep the relationship between the central foundation and outer petals proportional so the flower remains balanced.
Why are my crochet petals curling?
Some curling is desirable because it contributes to the 3D floral effect. Excessive curling, however, may indicate that your tension is too tight or that the petal does not contain enough stitches for its foundation space. Try loosening your tension slightly or adjusting the number of stitches.
Why is the flower becoming wavy around the outside?
Strong waviness usually indicates too many stitches or increases. Mild movement is normal for dimensional flowers, but severe ruffling can distort the overall shape. Reducing the number of tall stitches in each outer petal can help.
How do I make all the petals approximately the same size?
Count every stitch carefully and use the same sequence for each repeated petal. Stitch markers can identify the beginning of each repeat. Consistent yarn tension is equally important because identical stitch counts can still produce different sizes if your tension changes dramatically.
Do I need to block a 3D crochet flower?
Blocking is optional. If you choose to block, concentrate mainly on the outer petals and avoid flattening the raised central section. Always follow the care recommendations for the yarn you are using.
Can I attach the flower to a bag or cushion?
Yes. Secure the flower through its foundation and outer base stitches while leaving the dimensional center relatively free. This maintains the raised appearance while providing a stable attachment.
What is the difference between FLO and BLO?
FLO (front loop only) means crocheting through the front loop of a stitch, while BLO (back loop only) means crocheting through its back loop. Leaving one loop unused provides a convenient location for attaching additional layers, which is especially useful in layered crochet patterns.
Can the pattern be made without a magic ring?
Yes. You can make a short chain, join it into a ring with a slip stitch, and crochet the first round into that ring. A magic ring simply offers greater control over the size of the central opening.
How can I make the petals stand up more?
Use a slightly smaller hook, maintain firm but comfortable tension, and choose yarn with good structure. Adding additional layers behind the central petals can also increase volume. Most importantly, shape each petal after the crochet is complete rather than expecting the final form to appear immediately.
Can different colors be used for each layer?
Yes. Color changes are one of the easiest ways to emphasize the construction. You might use a dark center, medium-tone inner petals, and lighter outer petals, or reverse the arrangement for a different visual effect.
How long does a crochet flower take to make?
The time varies significantly according to experience, yarn weight, flower size, and the number of dimensional layers. The first flower usually takes longer because you are learning the construction. Repeated flowers generally become faster once the stitch sequence is familiar.
Is stitch counting really necessary?
Yes, especially for the foundation and repeated outer petals. Accurate stitch counts keep the attachment points evenly distributed and help produce a balanced flower. Marking the beginning of each round can prevent many common mistakes.
Conclusion
The Stunning 3D crochet flower Pattern combines familiar crochet stitches with clever layering to create a surprisingly sophisticated result. Starting with a stable circular foundation, you learned how MR, ch, sl st, sc, hdc, dc, tr, FLO, and BLO can work together to produce a flower with genuine depth rather than a simple flat motif.
The key to this project is building the design gradually. First comes the foundation, followed by the smaller raised petals, the secondary dimensional layer, and finally the broad outer petals. Careful stitch counting and consistent tension help maintain symmetry, while thoughtful shaping at the end gives the petals their characteristic spiral movement.
You can now adapt the same construction to create flowers in different sizes, colors, yarn weights, and styles. Once you understand how the separate layers interact, the pattern becomes a flexible starting point for appliqués, bouquets, accessories, home décor, and many other handmade projects. Most importantly, enjoy experimenting with your own version of the Stunning 3D crochet flower Pattern. Crochet becomes especially rewarding when a basic stitch sequence turns into something dimensional and expressive. Leave your sincere opinion about the pattern and share your suggestions for colors, petal variations, or other creative ways you would customize this beautiful 3D crochet flower.