
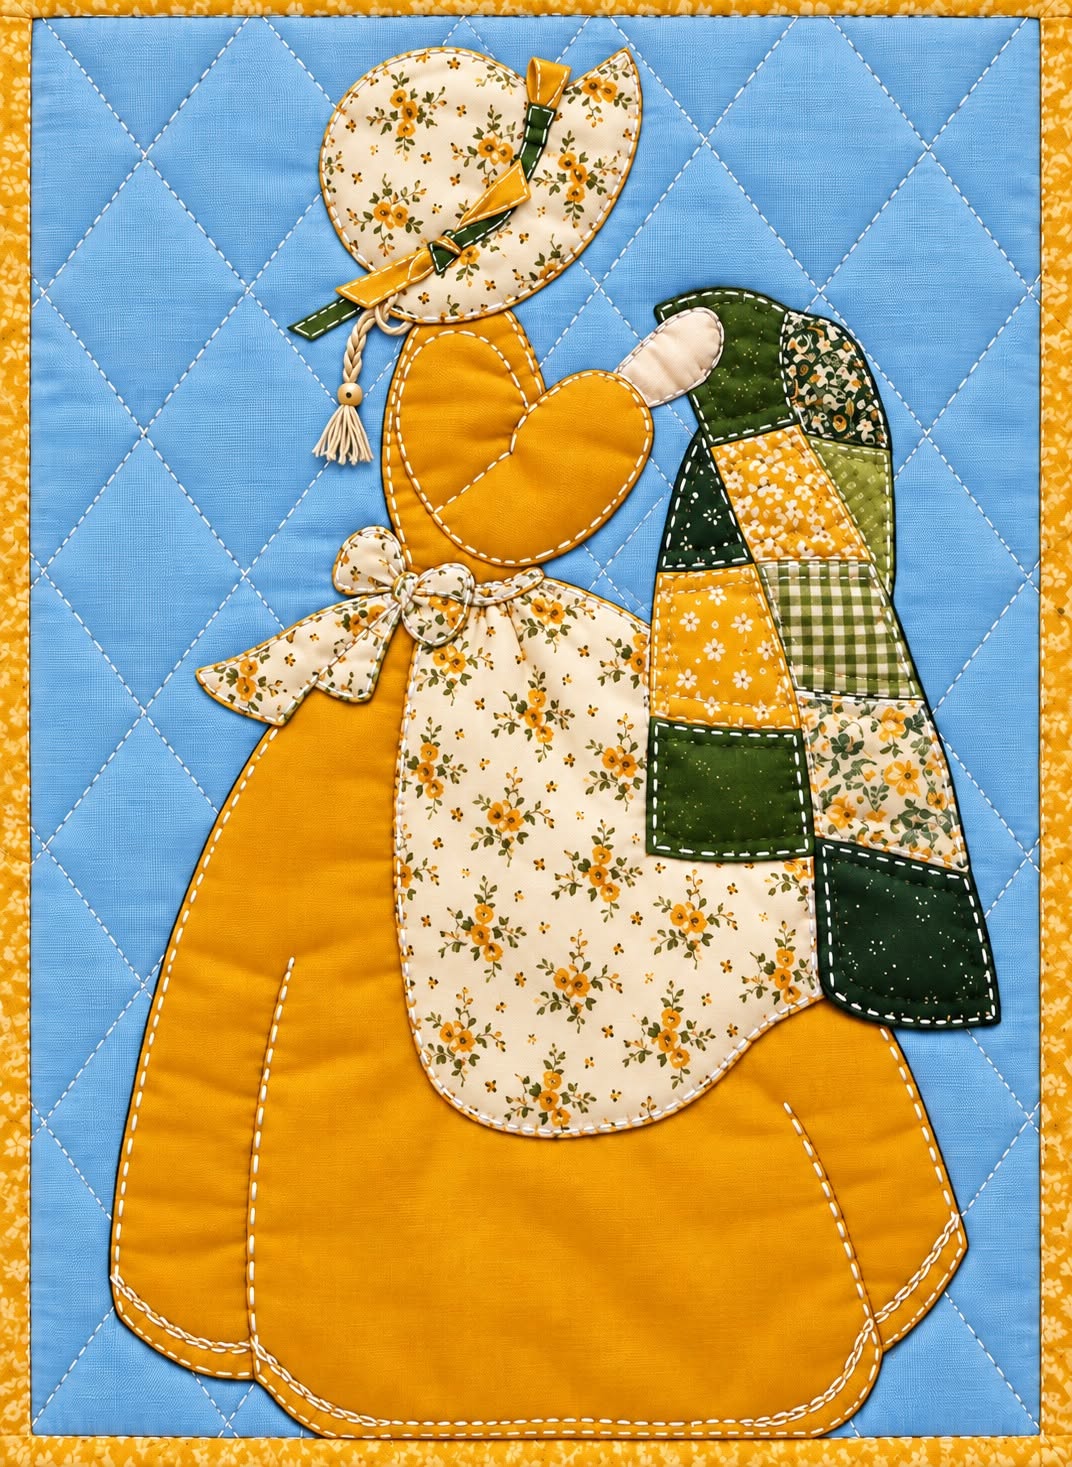
The “Sunbonnet Girl” Patchwork Panel Pattern is a charming sewing project that combines traditional appliqué, patchwork, quilting, and decorative hand-stitching in one nostalgic design. Inspired by the classic sunbonnet figure often seen in vintage quilts, this project features a girl wearing a wide-brimmed bonnet, a flowing dress, a floral apron, and a colorful patchwork accessory. The soft blue quilted background provides contrast for the warm golden fabrics, while small green and floral pieces bring depth and personality to the composition. Although the finished panel looks detailed, it can be created successfully by breaking the work into manageable sections and assembling the appliqué pieces in a logical order.
One of the most appealing aspects of this Sunbonnet Girl patchwork project is the opportunity to combine different sewing techniques without requiring a complicated full-size quilt. The background can be prepared as a small quilt sandwich, the main character can be constructed with fabric appliqué, and the smaller details can be enhanced with hand embroidery or machine stitching. The patchwork section is especially useful for using small fabric scraps that coordinate with the main color palette. Beginners can simplify some decorative elements, while experienced quilters can add more elaborate quilting, embroidery, dimensional bows, or carefully coordinated prints.
Before cutting fabric, it is important to study the shapes and visual layers of the design. The large golden dress forms the foundation of the character, while the floral apron overlaps the center of the dress. Above it are the bodice, arm, bonnet, ties, and decorative details. A separate patchwork element sits beside the figure and introduces a combination of green, mustard yellow, gingham, and floral fabrics. Understanding which pieces sit behind and which pieces overlap will make assembly much easier. The following tutorial explains how to recreate the “Sunbonnet Girl” Patchwork Panel Pattern from beginning to end while allowing enough flexibility to personalize the colors, prints, stitches, and finished dimensions.
Materials, Fabric Selection, and Preparing the Sunbonnet Girl Pattern
Begin by choosing fabrics that create a harmonious country-inspired palette. For a panel approximately 40 × 55 cm, prepare a blue cotton rectangle of approximately 45 × 60 cm so there is extra fabric for trimming. You will also need batting and backing fabric in approximately the same dimensions. For the appliqué, collect mustard or golden cotton, cream floral cotton, several green prints, yellow prints, green gingham, and small coordinating scraps. These measurements are flexible because the Sunbonnet Girl appliqué can easily be enlarged or reduced.
DISCOVER MORE FREE PATTERNS HERE!
Choose 100% quilting cotton whenever possible because it is stable, easy to cut, and works especially well for appliqué. The golden dress requires the largest piece, so prepare approximately 35 × 45 cm of golden fabric. A piece of cream floral fabric around 25 × 30 cm should be enough for the apron and bonnet. Small scraps measuring approximately 10 × 15 cm are usually sufficient for individual patchwork sections and decorative details.
You will also need basic quilting supplies, including fabric scissors or a rotary cutter, cutting mat, quilting ruler, pins or fabric clips, coordinating sewing thread, hand-sewing needles, and a sewing machine if you prefer machine construction. Fusible web is optional but extremely useful for keeping appliqué pieces stable before stitching. A removable fabric marker can help position each component accurately.
Create paper templates for the major shapes before cutting your decorative fabrics. The main templates should include the dress, bodice, bent arm, bonnet, apron, bow, bonnet ties, and the individual pieces forming the patchwork accessory. Trace the shapes from your planned design and remember that templates intended for turned-edge appliqué need approximately 0.6 to 0.7 cm of seam allowance around their edges. Fusible raw-edge appliqué can be cut closer to the finished outline.
Prepare the background before attaching the figure. Place the backing fabric wrong side up, position the batting over it, and place the blue background fabric right side up. Smooth all three layers carefully and baste them together. Quilt diagonal lines approximately 5 to 7 cm apart in one direction and then repeat in the opposite direction to produce the diamond pattern visible in the inspiration. Keeping the quilting relatively simple allows the appliqué figure to remain the visual focus.
After quilting, square the panel but do not attach the final binding yet. Position all paper templates temporarily over the surface to establish the composition. The bonnet should sit toward the upper portion of the panel, with the large dress extending downward. Leave enough open blue space around the character so that the finished design does not appear crowded. Photograph or sketch the arrangement before removing the templates; this simple reference can be extremely helpful during assembly.
Building the Dress, Bonnet, Arm, and Floral Apron
Start the Sunbonnet Girl appliqué with the largest shape: the golden dress. Transfer the dress template to the fabric and cut it carefully. If using turned-edge appliqué, clip gentle curves where necessary and press the seam allowance toward the wrong side. Position the dress on the quilted background and temporarily secure it with appliqué glue, pins, or small basting stitches.
Stitch around the dress using your preferred appliqué stitch. A small blanket stitch gives the panel a traditional handmade appearance, while an invisible appliqué stitch creates a cleaner edge. Machine users can choose a narrow blanket stitch or small zigzag. For a look similar to the photographed project, use contrasting golden or darker yellow thread so the stitching becomes part of the decorative design instead of disappearing completely.
Next, prepare the upper body and bent arm. The bodice can be made from the same golden fabric as the dress, helping the separate shapes read visually as one garment. The bent arm is one of the defining features of the design, so position it carefully. Place the lower section of the arm over the upper dress and allow the hand or sleeve area to extend toward the patchwork accessory. Stitch slowly around the curves to preserve the rounded silhouette.
The floral apron adds an important second layer to the dress. Cut a rounded apron shape from cream cotton printed with small yellow flowers or another delicate floral design. Place the top beneath the bow area and center the lower section over the dress. The apron should cover a significant portion of the golden fabric while still leaving enough gold visible around the sides and bottom. Secure the edges with blanket stitch or another decorative appliqué technique.
Now construct the bonnet. Cut the main bonnet from the same floral fabric used for the apron to visually connect the upper and lower portions of the design. A slightly curved oval or semicircular shape works well. Add a narrow brim or folded section if desired. Small fabric strips in mustard and green can be folded, pressed, and positioned across the bonnet to create the decorative ties shown in the inspiration.
Finish this stage with the bow at the waist and any dimensional embellishments. The bow can be constructed from several small floral pieces rather than a single flat silhouette. Folding the fabric slightly before stitching creates gentle dimension. For the bonnet ties, narrow folded fabric strips can be stitched securely at their attachment points while leaving selected sections free. Keep dimensional decorations practical if the finished panel will be washed frequently.
Creating the Green and Yellow Patchwork Detail and Decorative Stitching
The patchwork section beside the girl is an excellent place to showcase scrap quilting. Rather than using one fabric, combine small rectangles and irregular pieces in dark green, olive green, mustard yellow, cream floral, and green gingham. These fabrics should relate to colors already present in the dress and bonnet. Repeating the same floral print in different parts of the panel helps unify the entire composition.
To construct this section, first draw its finished outer silhouette on paper. Divide that shape into several manageable patchwork sections. Cut fabric pieces slightly larger than necessary and sew neighboring pieces together using approximately a 0.6 cm seam allowance. Press each seam carefully as you work. Once the patchwork unit is complete, place the full paper template over it and trim the outer perimeter to the correct shape.
Add the small pale section near the upper portion before attaching the patchwork unit to the panel. This detail can represent part of the figure’s hand, sleeve, or another layered element depending on your interpretation of the pattern. Since handmade appliqué designs often allow artistic flexibility, exact realism is less important than maintaining a clear and balanced silhouette.
Position the completed patchwork appliqué beside the girl’s body. Check the relationship between the arm and the patchwork piece before stitching permanently. Once satisfied, baste the piece and sew around its outer edge with a small blanket stitch. You can also add visible running stitches along some of the internal patchwork seams to emphasize the handmade appearance.
Decorative stitching is one of the features that gives this project character. Use running stitch, blanket stitch, or stem stitch around selected edges. A warm golden thread can connect the different fabrics visually. Keep stitch length reasonably consistent, approximately 0.3 to 0.5 cm, but do not worry about achieving machine-like perfection when sewing by hand. Slight variations can contribute to the handcrafted style.
For additional texture, quilt lightly inside some of the appliqué shapes after they are attached. A few lines inside the dress, apron, or patchwork accessory can prevent large pieces from lifting away from the background. Avoid excessive quilting over the floral prints because dense stitching can compete with their patterns. The goal is to create enough definition to distinguish each layer while keeping the design soft.
Before proceeding to the border, inspect the entire “Sunbonnet Girl” Patchwork Panel Pattern for loose threads, unsecured corners, or puckered areas. Press carefully from the back whenever possible, particularly if fusible web has been used. Avoid flattening dimensional bows and ties. This is also the ideal time to add optional embroidery, tiny decorative knots, or additional quilting if any area appears visually empty.
Finishing the Quilt Panel, Binding, and Personalizing the Pattern
Once all appliqué pieces are securely attached, square the panel again. Use a ruler and rotary cutter to straighten each edge while preserving an even amount of blue background around the Sunbonnet Girl. Accurate squaring makes the final binding much easier to attach and gives the finished wall panel a professional appearance.
Prepare the binding from golden floral cotton or another fabric that coordinates with the dress. For a conventional double-fold binding, cut strips approximately 6 to 6.5 cm wide and join them end to end with diagonal seams. Press the long strip in half lengthwise with wrong sides together. The warm yellow border shown in the inspiration creates a strong visual frame around the cooler blue background.
Sew the binding around the front of the panel using approximately a 0.6 cm seam allowance, carefully mitering each corner. Fold the binding over the raw edge toward the back and secure it with small hand stitches or machine stitching. Take extra care at the corners so they remain neat and approximately square. Press the finished border gently without crushing raised appliqué details.
If the panel will be displayed as quilted wall art, add a hanging sleeve to the back before finishing. Cut a fabric strip slightly shorter than the width of the panel, fold and hem its short ends, then create a tube and hand-stitch it near the upper back edge. A lightweight hanging rod can then slide through the sleeve without being visible from the front.
You can personalize the pattern in many ways while retaining its recognizable character. Try a pastel pink dress with a sage background, a blue dress with cream patchwork, or seasonal fabrics for spring and autumn versions. Scraps from previous quilting projects can turn the Sunbonnet Girl patchwork panel into a memory piece. You can also replace floral prints with polka dots, gingham, tiny geometric patterns, or reproduction fabrics.
The most important finishing step is a careful overall inspection. Make sure every appliqué edge is secure, remove temporary markings, trim stray threads, and check that dimensional pieces are firmly anchored. A final gentle press from the reverse side can improve the appearance. Once complete, the “Sunbonnet Girl” Patchwork Panel Pattern becomes a decorative example of how appliqué, quilting, patchwork, fabric selection, and traditional hand-stitching can work together in a single project.
FAQ About the “Sunbonnet Girl” Patchwork Panel Pattern
What is a Sunbonnet Girl patchwork pattern?
A Sunbonnet Girl patchwork pattern is a fabric design featuring a stylized girl whose face is generally hidden beneath a large bonnet. The figure is traditionally created through appliqué and may be combined with patchwork, embroidery, hand stitching, and quilting.
Is the “Sunbonnet Girl” Patchwork Panel Pattern suitable for beginners?
Yes. A beginner can make this project by simplifying some of the smaller details. The large dress and apron shapes are relatively approachable, while the smaller bonnet, bow, curved arm, and patchwork sections provide opportunities to develop more precise appliqué skills.
What fabric works best for this project?
Good-quality quilting cotton is an excellent choice because it presses cleanly, holds its shape, and is available in countless colors and prints. Cotton scraps are particularly useful for the small patchwork sections.
Do I need a sewing machine?
No. The project can be completed largely by hand using traditional appliqué and quilting techniques. However, a sewing machine can make background quilting, patchwork assembly, and binding faster.
Can fusible web be used for the appliqué?
Yes. Fusible appliqué is particularly convenient for beginners because it helps hold shapes in position before stitching. Follow the manufacturer’s directions for the fusible product you use and avoid overheating delicate fabrics.
What stitch is best around the appliqué pieces?
Blanket stitch is an excellent option for achieving the visible handcrafted outline associated with this style. Invisible appliqué stitch works well for a subtler appearance, while machine blanket stitch can provide a neat and consistent finish.
How large should the finished panel be?
There is no mandatory finished size. A panel around 40 × 55 cm provides enough room for the major details without becoming overly large. You can resize the templates proportionally to create a smaller block or a larger wall hanging.
Why quilt the background before adding the appliqué?
Quilting the background first creates the attractive diamond texture and stabilizes the three-layer quilt sandwich. The appliqué can then sit prominently above that texture. Some quilters prefer adding the appliqué before completing all quilting, and that approach can work as well.
Can fabric scraps be used?
Absolutely. Fabric scraps are particularly appropriate for the patchwork portion, bow, bonnet ties, and smaller decorative pieces. Coordinating scraps can add variety without making the composition look disconnected.
How can I make the panel look handmade?
Visible running stitches, blanket stitching, dimensional bows, folded fabric ties, and slightly raised appliqué pieces all contribute to a handmade appearance. Choosing small floral and gingham prints can further reinforce the traditional patchwork character.
Can I change the colors shown in the original design?
Yes. The golden yellow, green, cream, and blue combination is only one possibility. The pattern can be adapted to farmhouse colors, pastels, Christmas fabrics, autumn shades, or fabrics already available in your collection.
How do I prevent the appliqué from puckering?
Do not pull stitches too tightly, and make sure the background is smooth before attaching each piece. Light basting or fusible web can keep larger shapes stable. Pressing between construction stages also helps maintain a flat surface.
Should the appliqué pieces have seam allowances?
For turned-edge appliqué, add approximately 0.6 to 0.7 cm around the finished template shapes. Raw-edge fusible appliqué generally does not require the same turning allowance, although the exact preparation depends on the chosen technique.
Can this design become part of a larger quilt?
Yes. Instead of finishing it as an individual wall panel, the Sunbonnet Girl block can become a centerpiece for a larger quilt. Additional patchwork blocks, borders, or repeated Sunbonnet figures could be arranged around it.
How should the finished panel be cared for?
Because the project contains appliqué and potentially dimensional fabric details, gentle handling is preferable. If washing becomes necessary, consider the fabrics, batting, threads, fusible products, and embellishments used in your particular version before selecting a cleaning method.
Conclusion
The “Sunbonnet Girl” Patchwork Panel Pattern brings together several enjoyable textile techniques in a project that feels both traditional and creative. Starting with a quilted blue background, you can gradually build the composition using a golden dress, floral apron, distinctive bonnet, bent arm, dimensional bows, and a colorful green-and-yellow patchwork section.
Throughout the process, careful fabric selection and thoughtful layering are just as important as stitching. Preparing templates before cutting, arranging all the major shapes before sewing, and working from larger background pieces toward smaller foreground details can make the construction much easier. Techniques such as fabric appliqué, patchwork quilting, blanket stitching, running stitch, diamond quilting, and double-fold binding each contribute something different to the final appearance.
EASILY FIND THE FREE PDF FOR THIS PATTERN HERE!
The project is also highly adaptable. You can change the color palette, use favorite fabric scraps, simplify the decorative details, enlarge the pattern, or transform the finished design into a wall hanging, cushion panel, quilt centerpiece, or other fabric decoration. That flexibility is one reason traditional Sunbonnet Girl patterns continue to offer so many creative possibilities for quilters and sewing enthusiasts. Most importantly, enjoy the process rather than trying to make every handmade stitch identical. The small variations in fabric placement, stitching, prints, and embellishments are what give an appliqué project its individual personality. If you make your own “Sunbonnet Girl” Patchwork Panel Pattern, leave your sincere opinion about the project and share any suggestions, color combinations, or creative modifications you would like to try.