
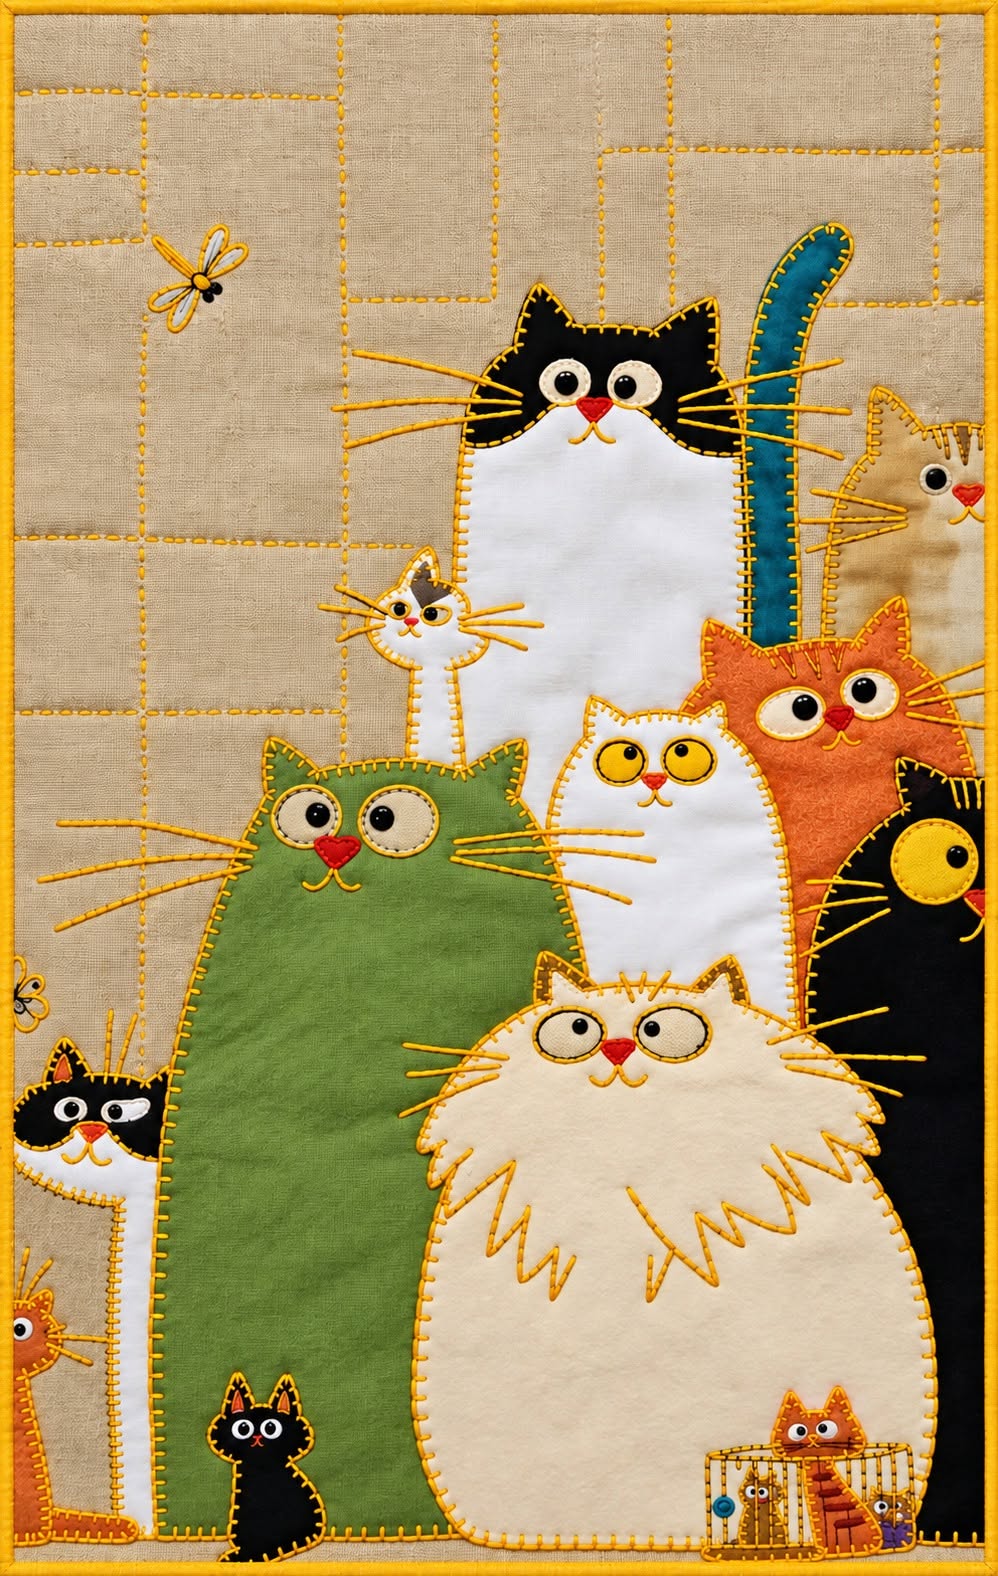
Padded Wall Panel with a Family of Cats Pattern is a charming sewing and appliqué project that turns simple pieces of fabric into a lively family of cats with completely different personalities. The design combines large and small feline silhouettes, expressive eyes, embroidered whiskers, contrasting colors, and a softly padded background. Because the composition is intentionally playful, the cats do not need to look perfectly symmetrical. In fact, slightly different ears, eyes, noses, and body shapes give this cat wall hanging much of its handmade character. The project is also an excellent way to use coordinated cotton scraps left from previous sewing projects while learning how appliqué, padding, embroidery, and quilting can work together in one decorative piece.
The most recognizable feature of the Padded Wall Panel with a Family of Cats Pattern is its layered composition. A large green cat and a fluffy cream cat dominate the foreground, while white, black, orange, tan, and black-and-white cats appear behind and around them. Smaller cats are tucked into the remaining spaces, and tiny decorative elements add even more personality. All of these pieces are arranged over a neutral linen-look background, allowing the stronger fabric colors to remain the visual focus. Although the finished panel looks detailed, construction becomes much easier when the design is divided into individual appliqué shapes and assembled from the background toward the foreground.
For this tutorial, the project can be made as a 30 × 45 cm (approximately 11.8 × 17.7 inches) padded wall panel, although the dimensions can be adjusted if you want a larger wall quilt. Beginners can use fusible appliqué to stabilize the pieces before stitching, while experienced makers may prefer turned-edge or traditional hand appliqué. Quilting-weight cotton is a practical choice for most of the cats, and a linen-look cotton or cotton-linen blend works beautifully for the background. You will also need lightweight batting, backing fabric, thread, embroidery floss, fusible web if desired, basic sewing tools, and plenty of patience for the delightful facial details that bring the cat family to life.
Materials and Pattern Preparation for the Padded Wall Panel with a Family of Cats Pattern
Start by selecting a neutral background fabric that resembles natural linen or softly textured cotton. For a finished panel of about 30 × 45 cm, cut the background approximately 32 × 47 cm, leaving extra material around the perimeter for quilting and final squaring. Cut batting and backing slightly larger than the background. This extra margin is useful because quilting can subtly change the dimensions of the layers, and trimming everything afterward produces a cleaner, straighter finish.
DISCOVER MORE FREE PATTERNS HERE!
Next, gather fabrics for the cat family. The photograph provides a wonderful color guide: green, cream, white, black, orange, tan, turquoise, gray, and small amounts of red or pink. You do not need large cuts of every fabric. Many of the smaller cats, eyes, noses, and decorative details can be made from scraps. Using fabrics with slightly different textures can make the individual cats easier to distinguish, but avoid extremely heavy fabrics if you plan to machine appliqué through several overlapping layers.
Create the cat appliqué templates before cutting the final fabrics. The larger cats can be drawn as simple elongated bodies with two pointed ears at the top. The fluffy cream cat requires a wider body and an irregular, shaggy outline around the cheeks and chest. Smaller cats can use simplified versions of the same basic shapes. Trace each template onto paper first so that you can test the entire arrangement without wasting fabric. Remember that the goal is to capture the character and composition of the project rather than create mathematically identical animals.
If you are using fusible web, trace each pattern onto its paper side. Depending on the fusible product and tracing method, remember that the final appliqué may be reversed. Rough-cut around the traced pieces, fuse them to the wrong side of their corresponding fabrics according to the manufacturer’s directions, allow everything to cool, and then cut precisely on the final outlines. Fusible web is particularly helpful for this design because many cats overlap and must remain accurately positioned during sewing.
The faces require their own small pattern components. Cut circles or slightly irregular ovals for the eyes using white, cream, or yellow fabric, followed by smaller black pupils. Tiny triangular or rounded pieces of red or pink fabric can become noses. Some facial features can also be embroidered instead of appliquéd. This combination of fabric shapes and embroidery keeps the design interesting without forcing you to cut extremely tiny fabric pieces that might be difficult to handle.
Before sewing anything, place all the prepared shapes over the background and experiment with the arrangement. Start with the tallest cats at the back, position the large green and cream cats prominently in front, and fill smaller spaces with the miniature cats. Leave enough background visible so that the composition does not become confusing. Photograph your final arrangement before removing the pieces. This simple reference image will be extremely useful when you begin attaching the Padded Wall Panel with a Family of Cats Pattern one layer at a time.
Step-by-Step Cat Appliqué Assembly and Sewing
Begin the actual assembly with whichever cats visually sit farthest behind the others. Position the tall black-and-white cat near the upper center, for example, followed by the surrounding tan, orange, white, and black figures. If using fusible appliqué, remove the protective paper and press each piece into place according to the fusible manufacturer’s instructions. Use a press-and-lift movement instead of sliding the iron, because sliding can distort or move narrow appliqué shapes.
Once the basic bodies are secure, stitch around their edges. A blanket stitch is especially appropriate for this project because its visible thread creates the handcrafted outline seen in traditional appliqué work. A narrow zigzag or straight stitch close to the raw edge is another possibility. If you want the stitching to become part of the artwork, select contrasting thread. For a more subtle appearance, choose thread colors that coordinate closely with each cat.
Work carefully around the pointed ears and curved sides. When machine stitching around a sharp corner, stop with the needle down, lift the presser foot, rotate the work slightly, and continue. Small pivots produce smoother curves than trying to force the fabric around the presser foot continuously. Keep your stitch length reasonably short around intricate areas. The objective is to secure the raw edges while maintaining the intentionally simple shapes that define this fabric cat appliqué pattern.
Continue adding cats from the background toward the foreground. The large green cat should occupy a significant portion of the lower-left area, while the fluffy cream cat fills much of the lower-right foreground. Their generous size provides visual balance against the collection of smaller figures above them. Allow some cats to disappear partially behind their neighbors. This overlap is essential because it creates the amusing impression of an entire cat family crowding together for a portrait.
Now add the smaller characters. A tiny black cat can sit near the lower portion of the green cat, while additional miniature figures can peek from the side or bottom of the composition. Small cats require less detail than large ones. A recognizable silhouette, contrasting eyes, and perhaps a few whiskers are often enough. Avoid adding so many tiny pieces that they become difficult to sew securely. Simplicity is one of the strengths of this whimsical cat quilt wall hanging.
After all major bodies have been attached, examine the overall composition before adding faces. Look for unwanted gaps, awkward overlaps, or cats that have become visually lost. Minor adjustments are easier before the final facial embroidery is completed. The panel should feel crowded and playful without becoming chaotic. When the large and small cats are distributed successfully, the viewer’s eye naturally travels through the entire Padded Wall Panel with a Family of Cats Pattern instead of stopping at a single figure.
Adding Faces, Embroidery, Padding, and Quilting Details
The eyes give these cats their wonderful personalities. Rather than making every pair perfectly identical, vary their sizes and positions slightly. Some cats can have large round white eyes, while others can feature yellow appliqué eyes with black pupils. Stitch around each eye carefully so that small pieces remain secure. For very tiny pupils, embroidery or fabric-safe stitching can be easier than cutting miniature circles. The irregular expressions are part of the whimsical aesthetic, so perfect symmetry is unnecessary.
Create noses from tiny red or pink fabric pieces or use dense embroidery stitches. Add mouths with a few short lines of black embroidery floss, then extend long straight stitches outward to form whiskers. Keep the whiskers relatively loose-looking but securely anchored. Additional short stitches can suggest fur, eyebrows, or ear details. The fluffy cream cat benefits especially from embroidered lines around its chest because these marks reinforce its shaggy appearance without requiring dozens of separate fabric pieces.
Small insects and other background motifs can be added after the cats are complete. A delicate dragonfly positioned in an open area of the neutral background creates visual interest without competing with the central figures. These embellishments can be made with tiny appliqué pieces, embroidery, or a combination of both. Keep them secondary to the cats. Decorative elements work best when they fill otherwise empty spaces and help connect the composition rather than becoming separate focal points.
Once the appliqué and embroidery are complete, prepare the quilt sandwich. Lay the backing fabric right side down on a clean, flat surface. Place the batting over it and position the completed appliqué top right side up. Smooth the three layers gently from the center toward the edges. The batting is what turns an ordinary appliqué picture into a padded wall panel, providing softness, depth, and subtle dimension behind the fabric characters.
Secure the layers with quilting pins, safety pins, temporary basting spray, or hand basting. Then quilt the background using straight horizontal lines, gentle free-motion curves, or another simple pattern. Quilting does not need to be dense. Its primary purpose is to connect the layers while creating enough texture to emphasize the appliqué. Quilting around the outlines of the cats can make their bodies appear slightly raised, which is particularly effective on the large green and cream figures.
Work gradually across the panel and regularly inspect the backing for puckers. A walking foot can make straight-line quilting easier because it helps feed the multiple layers evenly through the machine. If you prefer free-motion quilting, practice your chosen movement on a scrap sandwich first. Keep heavy quilting away from important facial details. The combination of a softly quilted background and less densely quilted cats helps preserve the dimensional quality of the Padded Wall Panel with a Family of Cats Pattern.
Finishing the Wall Panel, FAQ, and Practical Sewing Tips
After quilting, place the panel on a cutting mat and square it carefully. For the dimensions used in this tutorial, trim the quilt to approximately 30 × 45 cm (11.8 × 17.7 inches). Use a quilting ruler to confirm that the corners are square before cutting. Work slowly around areas where cats sit near the edges. Accurate trimming prepares the piece for a professional-looking outer finish and removes uneven batting or backing left from the quilting process.
You can finish the perimeter with quilt binding in a coordinating color. Beige creates a quiet border, while green, orange, turquoise, or black can connect the binding visually with one of the cats. Prepare binding strips, join them as needed, and attach them around the front perimeter. Fold the binding toward the back and secure it by hand for a traditional finish or machine stitch it if you prefer a faster method.
If the panel will be displayed on a wall, add a hanging sleeve to the back. A fabric sleeve allows a small rod or dowel to support the quilt without damaging the front. Keep the sleeve slightly shorter than the panel width so that the hanging hardware remains hidden. Another option for a lightweight piece is to sew small fabric loops into the upper edge. Whatever method you choose, make sure the weight is distributed evenly to prevent the panel from sagging.
Give the completed piece a final inspection. Secure loose threads, check every appliqué edge, and make sure tiny eyes and noses are firmly attached. Press cautiously from the back when necessary, following the recommendations for your fusible product and fabrics. Avoid flattening the batting with excessive heat or pressure. The slight loft created by the padding contributes significantly to the handmade appearance of the finished cat family wall art.
This project is also easy to personalize. You can change the cats’ colors to resemble favorite pets, replace plain fabrics with subtle prints, enlarge particular characters, or create a wider composition for a larger wall. The basic construction method remains the same: prepare the background, create the templates, cut the appliqués, arrange the layers, secure the cats, embroider the faces, assemble the quilt sandwich, quilt, trim, and finish the perimeter.
Most importantly, allow the project to retain some handmade personality. The Padded Wall Panel with a Family of Cats Pattern works because every character looks slightly different. One cat can have enormous eyes, another a tiny nose, and another unusually long whiskers. Consistent construction keeps the project neat, but small visual variations make the finished panel memorable and give the cat family its cheerful character.
FAQ About the Padded Wall Panel with a Family of Cats Pattern
Is the Padded Wall Panel with a Family of Cats Pattern suitable for beginners?
Yes. A beginner with basic sewing-machine experience can complete the project by using fusible appliqué and simple straight or blanket stitches. The easiest approach is to complete one cat at a time rather than attempting to manage all the small pieces simultaneously.
What is the best fabric for a cat appliqué wall panel?
Quilting cotton is an excellent option because it is stable, widely available, easy to cut, and comfortable to appliqué. A cotton-linen or linen-look fabric can provide the textured appearance of the background while still being manageable under a domestic sewing machine.
Do I need fusible web for this pattern?
No, but it can make construction significantly easier. Fusible web keeps the numerous cat pieces from moving while you sew around them. Traditional needle-turn appliqué can also be used if that is your preferred technique.
What type of batting should I use?
A thin cotton or lightweight polyester batting works well. Extremely thick batting may make detailed appliqué and quilting more difficult, while a low-loft batting gives the panel enough dimension without overwhelming the smaller fabric pieces.
Can I make the wall panel larger than 30 × 45 cm?
Absolutely. The suggested measurement is simply a practical size based on this tutorial. You can enlarge the background and scale the cat templates proportionally. Remember to increase the batting, backing, and binding requirements as well.
Should the appliqué be completed before quilting?
For this design, completing the primary appliqué and most facial details before assembling the quilt sandwich is the straightforward approach. Afterward, quilting secures the three main layers and adds texture around the finished cats.
What stitch should I use around the cats?
A blanket stitch creates a decorative handmade appearance and works especially well for this design. A narrow zigzag or straight stitch can also secure raw-edge appliqué. Test the stitch on scrap fabric before working on the finished panel.
How can I prevent the fabric from puckering?
Avoid stretching the background while positioning the appliqué. Press rather than slide the iron, stabilize the appliqué when necessary, baste the quilt sandwich thoroughly, and quilt gradually from one area to another. A walking foot can also help feed the layers evenly.
How do I make the cat faces expressive?
Experiment with eye size and pupil placement. Slightly offset pupils can dramatically change an expression. Combine appliquéd eyes and noses with embroidered whiskers and mouth lines. The faces do not have to be perfectly symmetrical to look appealing.
Can fabric scraps be used for this project?
Yes. This is an excellent fabric scrap project because many characters and facial details require only small pieces. Coordinating leftover quilting cottons can create a colorful family while reducing the need to cut into larger pieces of fabric.
Can I wash the finished wall panel?
That depends on the fabrics, fusible web, thread, batting, and embellishments used. If you expect to wash the project, choose washable materials from the beginning and follow their care instructions. Prewashing fabrics can also reduce the possibility of unexpected shrinkage or color transfer.
How can I hang the finished quilt without showing the hardware?
Sewing a hanging sleeve across the upper back is one of the neatest solutions. A dowel or lightweight rod can pass through the sleeve while remaining largely hidden when the panel is viewed from the front.
Conclusion
The Padded Wall Panel with a Family of Cats Pattern combines accessible sewing techniques with plenty of room for creativity. Starting with a neutral fabric background, you build the composition from individual cat appliqués, arrange the figures in overlapping layers, secure their edges with decorative stitching, and then give each character personality through oversized eyes, colorful noses, whiskers, and embroidery.
The final stages transform the appliqué into a true padded quilted wall panel. Batting and backing create softness, quilting secures the layers and introduces texture, careful trimming establishes the final shape, and binding provides a neat finish. A hanging sleeve can then prepare the project for display.
EASILY FIND THE FREE PDF FOR THIS PATTERN HERE!
Whether you follow the colors in the original inspiration or personalize every cat, the most important idea is to enjoy the handmade character of the design. Small differences between the animals are what make the family feel lively and unique. If you make your own Padded Wall Panel with a Family of Cats Pattern, leave your sincere opinion about the project and share your suggestions. Which cat would you customize first, and what colors would you choose for your own cat family?