
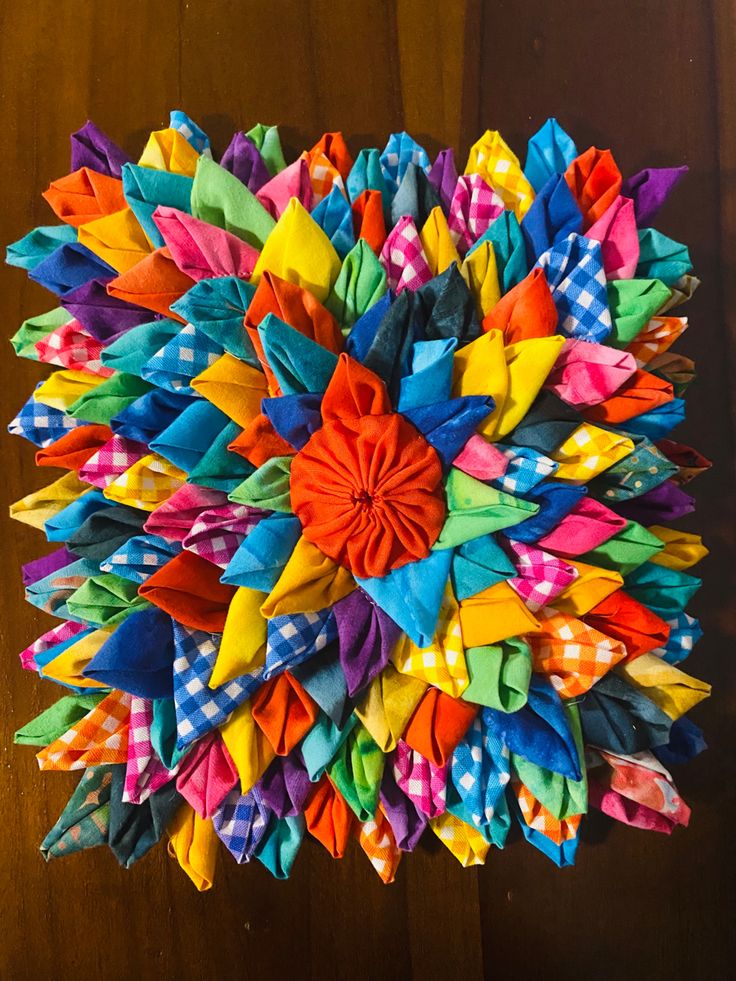
The Square with Folded Fabric Flower quilt Pattern is a colorful fabric project that combines traditional quilting skills with dimensional fabric folding to create a striking, textured design. Inspired by the project shown in the photo, this pattern is built from many individually folded fabric pieces arranged in layers around a decorative fabric flower. The finished square has an almost sculptural appearance, making it suitable for decorative cushions, wall hangings, table décor, or even a statement quilt block. Although the abundance of folded pieces makes the design look complicated, the construction becomes much easier when it is approached one layer at a time.
One of the most attractive characteristics of this folded fabric flower quilt pattern is the freedom it gives you when choosing fabrics. Bright solids can be combined with gingham, checks, small prints, scraps, and contrasting colors without requiring every piece to match perfectly. In fact, the variety is part of the charm. The photographed project uses vivid shades of orange, turquoise, yellow, blue, pink, green, purple, and darker accent fabrics. This creates depth while allowing the central orange flower to remain an obvious focal point. For quilters who keep leftover pieces from previous projects, this is also an excellent way to transform a collection of fabric scraps into something decorative and useful.
The construction of the Square with Folded Fabric Flower quilt Pattern relies primarily on folding, positioning, layering, and secure stitching. You do not need complicated patchwork blocks to reproduce the overall appearance. Instead, small fabric units are folded into pointed petal-like shapes and attached progressively to a sturdy square foundation. As additional rows are added, the points overlap and develop the dense texture visible in the photograph. The final fabric flower can be gathered or folded separately and sewn securely over the center. Because fabric thickness and folding methods vary, the measurements below should be considered practical starting dimensions rather than an exact reproduction of an unknown original pattern.
Materials, Fabric Choices, and Preparation for the Square
For a manageable decorative version of the Square with Folded Fabric Flower quilt Pattern, begin with a sturdy cotton foundation measuring approximately 45 x 45 cm. Cut a backing piece of the same size and, if you want additional stability, prepare a lightweight batting or interfacing piece approximately 44 x 44 cm. A slightly larger foundation can always be trimmed after the dimensional design has been completed. Quilting cotton is generally easier to fold than heavy upholstery fabric because multiple layers will accumulate quickly.
DISCOVER MORE FREE PATTERNS HERE!
The folded units can be created from squares approximately 9 x 9 cm or 10 x 10 cm. You may adjust this dimension according to the scale you want. Smaller squares produce finer details and require more pieces, while larger squares create a bolder project with fewer units. For a richly layered square similar in spirit to the photographed example, prepare a generous collection of fabric squares before sewing. Having extra pieces available is helpful because you can test different color combinations as the design develops.
Choose several quilting cotton fabrics instead of relying on only two or three colors. Solid cottons are especially useful because their strong colors emphasize the folded geometry, while gingham and small-scale prints provide visual breaks between the solids. Try turquoise, royal blue, orange, yellow, green, pink, purple, and dark teal, then introduce checked fabrics in a few coordinating shades. The goal is variety with enough repetition to make the composition feel intentional.
Before cutting, prewash and press the fabric if that is part of your normal quilting routine. Pressing is particularly important for this project because crisp fabric creates cleaner folds. Use a quilting ruler and rotary cutter for consistent squares, or carefully mark each piece before cutting with fabric scissors. Accurate dimensions make it easier to maintain even rows as you work outward from the center.
You will also need basic sewing and quilting supplies, including coordinating thread, pins or fabric clips, a hand-sewing needle if you plan to finish the center manually, scissors, an iron, and a sewing machine. A removable fabric marker can help you draw guidelines on the foundation. Because the project becomes thick, use a needle appropriate for multiple layers of cotton and sew slowly when crossing bulky sections.
Finally, prepare your workspace before beginning assembly. Sort the squares loosely by color rather than stacking everything randomly. You might create separate groups for warm colors, cool colors, checks, and darker accents. This makes color selection faster and allows you to distribute similar fabrics throughout the folded fabric quilt block instead of accidentally concentrating one color in a single area.
How to Make and Arrange the Folded Fabric Pieces
Start by experimenting with one fabric square. Place it right side down and fold it carefully to create a compact pointed unit. One simple approach is to fold the square in half and then bring the sides toward the center so that one end forms a visible point. Press each fold lightly with the iron. The objective is to create a dimensional piece with a pointed exposed end and a concealed raw edge that can be secured beneath neighboring pieces.
Make several practice units before preparing the entire batch. Place them beside one another and compare their dimensions. Consistency is more important than achieving a particular folding formula because the final design depends on repetition. Once you have a shape you like, use that first piece as a visual reference while folding the others. Press each folded fabric petal so it maintains its form without becoming completely flat.
Next, mark the horizontal center, vertical center, and diagonals of your 45 x 45 cm foundation square. These guidelines are extremely useful because a dense arrangement of fabric can easily drift out of alignment. Mark additional concentric squares or circles at regular intervals if desired. They do not need to appear in the finished project; they simply help maintain symmetry as you position the folded units.
Begin arranging pieces near the central area while leaving enough space for the final dimensional flower. Point the decorative ends toward the center so the shapes radiate outward like petals. Pin a small group temporarily and inspect the arrangement before stitching. Alternate colors rather than positioning several identical pieces together unless you deliberately want a color cluster.
Secure each row of folded pieces along the concealed base portion. Keep the stitching away from the decorative pointed ends so those sections remain dimensional. Add the following row so that it overlaps the attachment stitches from the previous one. This overlapping method is one of the most important techniques in the Square with Folded Fabric Flower quilt Pattern, because it hides construction lines and creates the lush layered appearance.
Continue working progressively toward the outside edges. Frequently rotate the project rather than always viewing it from the same direction. Check whether the density appears balanced on all four sides. Add darker fabrics between brighter colors to create depth, and distribute checked pieces throughout the composition. The result does not need to be perfectly symmetrical, but maintaining approximately equal visual weight around the center produces a more polished square.
Building the Layers and Creating the Central Fabric Flower
As you add additional rows, the dimensional quilt square will become increasingly thick. This is normal. Avoid placing every folded seam directly over another bulky seam whenever possible. Slightly offsetting the units can distribute thickness more evenly. Use clips instead of pins in areas where the layers become difficult to penetrate, and reduce your sewing speed when securing dense portions of the design.
The photographed inspiration has an abundant, almost floral surface because very little foundation fabric remains visible. To recreate that impression, position each new folded unit close enough to its neighbors that the underlying square disappears. The tips can overlap slightly, but avoid packing them so tightly that they become crushed. You want the folded points to retain enough volume to cast tiny shadows and emphasize the 3D quilt texture.
Color placement becomes especially important as you approach the outside rows. Repeat colors from the center in different areas so the entire project feels connected. For example, if you use orange near the center, introduce several orange pieces near the outer sections as well. Do the same with turquoise, blue, yellow, pink, and green. Repetition guides the viewer’s eye across the square without requiring a rigid color sequence.
To make the central flower, cut a strip or circular piece of contrasting cotton. An easy gathered version can begin with a strip approximately 8 to 10 cm wide and 45 to 55 cm long. Fold the strip lengthwise with the wrong sides together, press it, and sew a long gathering stitch near the raw edge. Pull the thread gradually until the fabric forms a compact rosette. Adjust the gathers before permanently securing the shape.
Another option is to create individual folded petals and join them in a circular arrangement. This method gives the center a more structured appearance. Whichever technique you choose, keep the flower proportionate to the surrounding folded points. The photographed design uses a strong orange center, demonstrating how a single saturated color can visually anchor a highly multicolored fabric flower quilt project.
Place the completed flower over the central attachment area and hand-stitch it firmly through the foundation. Use several secure stitches around the base rather than relying on a few stitches in the exact center. Tug gently on the flower afterward to check stability. The decorative center should conceal the innermost construction stitches while adding another layer of dimension to the finished Square with Folded Fabric Flower quilt Pattern.
Finishing, Quilting, Binding, and Creative Variations
Once all folded pieces are attached, place the project on a flat surface and inspect its overall shape. Measure from side to side and trim the foundation only if necessary. Do not accidentally cut into the folded units. Because the decorative surface is dimensional, conventional quilting across the front is generally unnecessary. Instead, concentrate on securing the foundation, backing, and exposed perimeter.
If you are turning the project into a wall hanging, add a backing and finish the perimeter with quilt binding. A binding approximately 6 to 7 cm wide before folding is a practical starting point, although the exact width depends on the thickness of your finished layers. Attach it carefully around all four sides. Hand-finishing the back of the binding can provide greater control when the front contains substantial bulk.
For a cushion, use the completed square as the decorative front panel. Add an envelope-style or zippered backing while keeping the dimensional flower away from seam allowances. Because the folded fabric surface is decorative and textured, this style of cushion is better suited to display than to heavy everyday use. Secure construction is particularly important if the finished piece will be handled frequently.
The same technique can also become a scrap fabric quilt project. Instead of buying coordinated yardage, save cotton remnants until you have enough colors to create a complete square. Scraps from previous quilts can make the finished piece especially interesting because every folded point may represent another sewing project. Keep fabric weights reasonably similar, however, so some pieces do not become dramatically bulkier than others.
You can also create seasonal variations without changing the construction method. Reds, greens, creams, and gold-inspired prints can produce a festive version, while pastels can create a softer spring design. Earth tones such as rust, mustard, olive, brown, and burgundy offer an autumn-inspired palette. A monochromatic version made from different shades of blue could emphasize texture instead of strong color contrast.
Before considering the project complete, check every folded section and reinforce any loose points. Remove visible marking lines, loose threads, and temporary pins. Give the backing and border a careful final press, avoiding heavy pressure directly on the dimensional front. Your completed Square with Folded Fabric Flower quilt Pattern should retain its rich layers, colorful pointed folds, and prominent central flower.
Frequently Asked Questions About the Square with Folded Fabric Flower quilt Pattern
What is a Square with Folded Fabric Flower quilt Pattern?
It is a dimensional fabric project made by arranging repeated folded fabric units on a square foundation. The folds resemble pointed petals or leaves, while a separate fabric flower forms the decorative center. Layering the pieces creates a textured effect that differs from traditional flat patchwork.
What fabric is best for folded fabric quilting?
Medium-light 100% quilting cotton is a practical choice. It presses well, holds folds effectively, and is available in countless solid colors and prints. Very thick fabrics can become difficult to sew because this pattern already contains many overlapping layers.
Can beginners make this quilt pattern?
Yes, particularly if they begin with a small sample. The basic skills involve accurate cutting, pressing, folding, positioning, and straight stitching. The greatest challenge is maintaining consistent folded pieces and keeping the arrangement balanced as more layers are added.
How large should the fabric squares be?
Squares around 9 x 9 cm to 10 x 10 cm provide a useful starting point for a medium-sized decorative project. There is no mandatory size, however. Larger pieces create larger folded elements, while smaller squares allow greater detail but significantly increase the number of units required.
How many fabric squares will I need?
The number varies according to the foundation size, folding method, spacing, and degree of overlap. A densely covered design can require many pieces, so cut a generous supply rather than calculating an exact number too early. You can always use leftover squares in another scrap project.
Do all the fabrics need to match?
No. The design is particularly attractive when solids, checks, gingham, and small prints are mixed. A useful approach is to repeat several main colors throughout the square while using contrasting fabrics as accents.
Should the folded fabric pieces be ironed?
Light pressing is recommended because it creates consistent folds and makes assembly easier. Avoid flattening the pieces excessively if you want a pronounced dimensional effect. The folds should remain crisp while still retaining some volume.
Can I wash the finished project?
Washability depends on the fabrics, construction, and intended use. If you expect the project to be washed, use washable quilting cotton, secure every unit carefully, and consider prewashing fabrics to reduce unexpected shrinkage or color transfer.
Can this technique be used for a full-size quilt?
It can, but dimensional folded fabric creates considerable weight and bulk. A practical alternative is to make several decorative blocks and combine them strategically with flatter quilted areas. This preserves the visual effect while making the finished quilt easier to handle.
How do I keep the square symmetrical?
Mark the center lines and diagonals on the foundation before attaching anything. Work outward gradually and compare opposite sides after every few pieces. Periodically viewing the project from a distance also makes uneven areas easier to notice.
Why are the measurements described as starting measurements rather than exact dimensions from the photograph?
A photograph can show construction details and proportions, but it cannot reliably reveal the original maker’s exact dimensions, seam allowances, or folding formula. The measurements in this tutorial are therefore designed as practical guidelines for creating a project inspired by the visible design rather than claiming to reproduce an unavailable original pattern exactly.
What can I make with the finished folded fabric square?
It can become a decorative cushion front, wall hanging, table decoration, framed textile piece, bag panel, or a feature block incorporated into a larger quilting project. The best application depends on how densely you construct the folded layers.
Conclusion
The Square with Folded Fabric Flower quilt Pattern demonstrates how simple pieces of cotton fabric can become a highly dimensional quilting project. By cutting consistent squares, pressing them into pointed units, arranging them around a marked foundation, overlapping successive rows, and finishing the center with a gathered fabric flower, you can build a design inspired by the colorful square shown in the reference photo.
The key techniques covered in this tutorial include fabric selection, accurate cutting, folded fabric petals, foundation marking, layered construction, color distribution, dimensional flower making, secure stitching, backing, and quilt binding. None of these steps needs to be rushed. Building the square gradually gives you time to correct spacing, experiment with colors, and maintain an even overall composition.
This project is also a creative way to use quilting cotton scraps. Instead of requiring perfectly matching fabric, the design benefits from variety. Bright solids can sit beside gingham and small prints, while repeated colors provide enough visual consistency to unite the entire piece. The central flower then becomes the final focal point that brings the many folded layers together.
EASILY FIND THE FREE PDF FOR THIS PATTERN HERE!
Most importantly, use the Square with Folded Fabric Flower quilt Pattern as a starting point for your own creativity. Change the dimensions, experiment with the number of layers, try a controlled color palette, or make several coordinating squares for a larger project. Once you understand how the folded units overlap, there are many ways to personalize the technique. If you make your own version, leave your sincere opinion about the pattern and share your suggestions. Which color combination would you choose for your folded fabric flower square, and what would you turn the finished block into?