
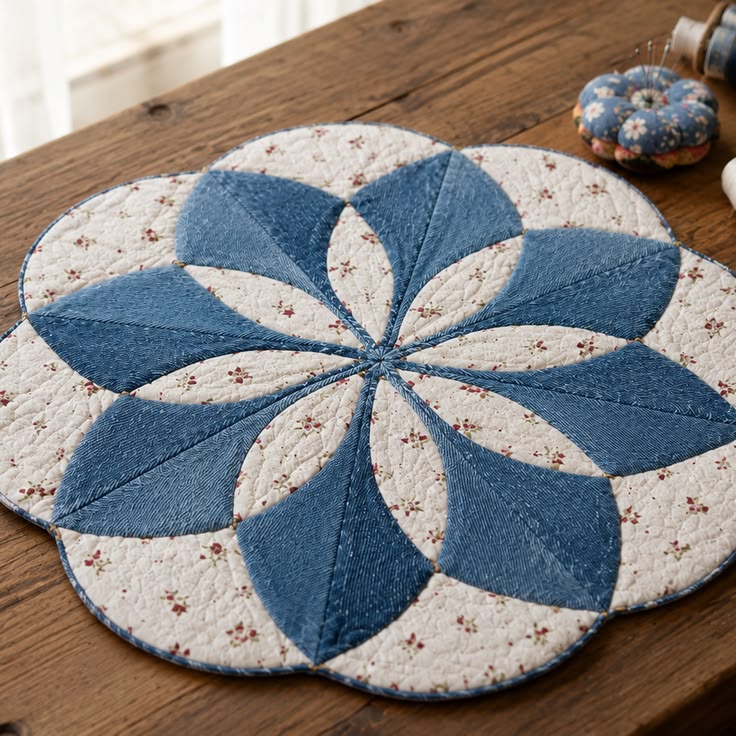
Flower-petal shaped placemat Pattern is a beautiful quilting project that combines the charm of a traditional floral motif with the practical function of a handmade table mat. Inspired by the project shown in the photo, this design uses repeated curved units arranged around a central point to create the appearance of overlapping flower petals. The combination of blue fabric, delicate floral cotton, visible quilting, and a softly scalloped outer edge gives the finished piece a cozy handmade character. Although the design looks intricate at first, it becomes much easier when the construction is divided into cutting, piecing, quilting, and finishing stages. Careful preparation is especially important because the repeated petals need to meet neatly near the center. Once you understand how each section is formed, the same method can be adapted to many different fabric combinations and table settings.
The main idea behind this Flower-petal shaped placemat Pattern is repetition and symmetry. Each section contributes to the circular flower effect, so accurate templates and consistent seam allowances help keep the finished placemat balanced. For a look similar to the reference project, choose one medium or dark fabric for the stronger petal shapes and a lighter printed fabric for contrast. A subtle floral print works particularly well because it adds detail without competing with the geometry of the design. Cotton batting placed between the top and backing gives the placemat a softly padded appearance and makes the quilting lines more visible. The finished project can work as a decorative centerpiece, an individual table mat, or a handmade accent for a kitchen or dining area.
One of the appealing features of this quilted flower placemat is the opportunity to personalize it without changing the basic construction. Blue and cream create a calm country-inspired appearance, but the same pattern can be made with red and white, green and beige, pastel fabrics, scraps, or seasonal prints. You can also experiment with denim-weight cotton for selected petals, provided that the other fabrics and your sewing machine can comfortably handle the additional thickness. Beginners should consider making a test petal before cutting the entire project, because curved seams require slightly different handling from straight patchwork seams. The goal is not to stretch the fabric while sewing around each curve. With patience, careful pressing, and accurate alignment, the flower-petal shaped placemat develops naturally as the repeated units come together.
Materials, Fabric Choices, and Preparing the Flower Petal Templates
Start by gathering the basic materials for your Flower-petal shaped placemat Pattern. You will need quilting cotton in two contrasting colors or prints, coordinating backing fabric, low-loft cotton or cotton-blend batting, matching sewing thread, quilting thread, pins or sewing clips, fabric scissors, a rotary cutter, a cutting mat, a quilting ruler, an iron, and a sewing machine. For a design resembling the photograph, a medium denim-blue print paired with an ivory fabric featuring tiny floral details is an attractive combination. Approximately 0.5 meter of each main fabric should provide comfortable working room for a medium-size project, although the exact requirement depends on your chosen diameter and template dimensions.
DISCOVER MORE FREE PATTERNS HERE!
Before cutting your best fabric, decide on the finished dimensions. A practical starting point is a placemat measuring approximately 40 to 45 cm across, including the scalloped outer petals. Because this is a flower-shaped design rather than a simple rectangle, the width should be measured from the outermost point of one petal to the opposite edge. If you prefer a centerpiece rather than an individual placemat, you can enlarge the templates proportionally. The important rule is to resize every related pattern piece by the same percentage so that all curved edges continue to match correctly.
The petal template is the foundation of this project. Create a symmetrical elongated leaf or petal approximately 17 to 20 cm long and about 7 to 9 cm wide at its broadest point as a useful starting size. Because the reference design uses overlapping curved shapes rather than isolated appliqué petals, you may need complementary curved background pieces that fit around each petal. Add approximately 0.7 cm seam allowance around pieces that will be machine-pieced. Mark the center points of the curves on the paper templates because these registration marks will make assembly considerably easier.
Prewash the fabrics if that is part of your normal quilting routine, especially when combining strongly colored fabric with a very light background. Press everything before tracing or cutting so the material lies flat and measurements remain consistent. Whenever possible, cut all repeated pieces with the same grain orientation. This small detail helps prevent some petals from stretching more than others. Accurate preparation is one of the most effective ways to achieve the crisp, symmetrical appearance associated with a professionally finished fabric flower placemat.
For the backing, cut a piece slightly larger than the anticipated finished flower. Do the same with the batting, leaving roughly 2 to 3 cm of extra material around all sides during the quilting stage. The excess provides room for minor movement while quilting and can be trimmed later. Low-loft batting is particularly suitable for a placemat because it creates texture without making the finished project unnecessarily bulky. Cotton batting also responds beautifully to quilting and develops a soft handcrafted appearance after use and laundering.
Finally, organize all the cut sections before going to the sewing machine. Arrange the blue petals and floral sections on a flat surface in their intended circular order. Numbering the sections with removable labels can prevent confusion during construction. Check that the flower looks balanced and that the curved edges correspond correctly before sewing anything permanently. This dry layout is a simple quilting technique, but it can save considerable time because mistakes are much easier to correct while the pieces are still loose.
Sewing the Curved Petals and Building the Circular Quilt Top
Begin the sewing stage by working with one curved unit at a time. Place two corresponding pieces with their right sides together, matching the center registration marks first and then aligning both ends. Pin or clip from the center outward rather than beginning at one end and forcing the remaining fabric into position. Curved pieces may initially appear as though they cannot fit together, but gentle manipulation allows the opposing curves to align. Avoid pulling aggressively, since stretching can distort the finished petal and make the circular arrangement difficult to assemble.
Use a consistent 0.7 cm seam allowance, or the allowance included in your personal template, and sew slowly around the curve. A shorter stitch length can provide better control in tighter areas. Stop occasionally with the needle lowered if you need to adjust the fabric. The objective is to guide the layers rather than stretch them. After stitching, inspect the seam for puckers and resew any troublesome area before moving on to the next unit.
Pressing is especially important in a curved patchwork pattern. First set the seam with the iron, then gently press the seam allowance toward the darker fabric when practical. Small clipping cuts can be made within the seam allowance of strongly concave curves, but never cut through the stitching line. Do not drag the iron back and forth because that can stretch the bias edges. Instead, lift and place the iron while gradually shaping the completed section.
Continue creating matching sections until you have enough units to form the complete flower. Lay them around the center repeatedly during construction to make sure the colors remain evenly distributed. In the photographed design, the darker blue areas create strong sweeping petals while the pale floral sections provide visual breathing room between them. This alternating contrast is what makes the Flower-petal shaped placemat Pattern appear dynamic even though it is based on repeated shapes. You can follow a similar arrangement or establish your own repeating color sequence.
Join neighboring sections gradually rather than attempting to sew the entire flower together at once. Building two halves and then joining those halves can make the center easier to manage. Match important seam intersections with pins and sew carefully toward the central point. Some bulk at the center is normal because several seams converge there. Trimming unnecessary seam allowance carefully and pressing seams in alternating directions can reduce this thickness.
Once all the sections have been connected, place the completed quilt top on a flat surface and inspect the overall flower shape. The center should appear reasonably balanced, and the scalloped perimeter should flow naturally from one petal to another. Small variations are completely normal in handmade quilting and generally become less noticeable after quilting. If one outer section appears significantly distorted, correct it before adding batting. This stage completes the decorative top of your quilted petal placemat and prepares it for the quilting process.
Creating the Quilt Sandwich, Quilting, and Finishing the Scalloped Edge
Prepare the quilt sandwich by placing the backing fabric wrong side upward on a clean, flat surface. Position the batting over it, followed by the completed flower top with its right side facing upward. Smooth each layer carefully from the center toward the outside. Temporary basting spray can be used according to its instructions, but traditional safety pins or hand-basting stitches are also effective. Secure the layers well because curved quilting lines can otherwise encourage the fabrics to shift.
For a look close to the reference image, use echo quilting around the curved petal seams. Echo quilting means sewing additional lines that follow the shape of an existing seam or motif at a consistent distance. Begin approximately 0.7 to 1 cm away from a petal seam and follow its curve slowly. Additional parallel lines can be added outward to fill larger areas. This technique reinforces the floral movement and makes each petal visually stand out from the background.
Another useful technique is stitching in the ditch, which means quilting very close to or directly along the seam between two fabrics. This method can stabilize the central flower before you add more decorative quilting. Start near the middle and work outward whenever possible. Avoid quilting all of one side before moving to the opposite side, since balanced quilting helps distribute tension more evenly. Check the backing occasionally to make sure no folds or puckers have formed underneath.
After the quilting is complete, trim the backing and batting to match the scalloped flower outline. Work slowly around every curve with sharp fabric scissors or a rotary cutter where appropriate. Smooth, accurate trimming makes the binding stage considerably easier. Do not try to convert the outer edge into a perfect circle, because the gently rounded lobes are an essential part of the flower-petal shaped design. The scalloped silhouette is what allows the entire placemat to resemble a large fabric blossom.
A bias binding is generally the easiest option for finishing a strongly curved perimeter. Bias strips are cut diagonally across the fabric grain, giving them enough flexibility to bend around rounded edges without creating excessive wrinkles. Join enough strips to travel around the entire perimeter, then press the binding according to your preferred binding method. Sew it slowly around the flower, easing it gently around each curve. Avoid stretching the binding excessively, as stretched binding can cause the edge to curl after sewing.
Finish the binding on the back by hand for a traditional appearance or machine-stitch it for a faster and durable finish. Give the completed placemat a gentle final press using a temperature appropriate for your fabrics and batting. The result should be a softly quilted flower with clearly defined curved petals, a balanced center, and an attractive scalloped perimeter. At this stage, your Flower-petal shaped placemat Pattern has gone from individual pieces of fabric to a complete decorative table accessory that showcases both piecing and quilting techniques.
Flower-petal shaped placemat Pattern FAQ
What is the best fabric for a Flower-petal shaped placemat Pattern? Quilting-weight cotton is one of the easiest choices because it cuts accurately, presses well, and is manageable around curved seams. Cotton also provides a large range of prints and solid colors. For the style shown in the photograph, try combining a deeper blue cotton with an ivory or cream small floral print. Beginners may find it easier to avoid very stretchy fabrics until they are comfortable sewing curves.
How large should a flower-shaped placemat be? A finished diameter of approximately 40 to 45 cm is a useful range for many table settings, although there is no single required measurement. Smaller versions can be used beneath mugs, bowls, or decorative objects, while larger versions can become table centerpieces. Always consider the dimensions of your table and dinnerware before choosing the final size. When resizing the project, enlarge or reduce all template components proportionally.
How do I sew curved quilt pieces without puckering? Mark the midpoint of both curves, place the fabrics right sides together, match those center marks, and then secure the remaining edges with several pins or clips. Sew slowly using a consistent seam allowance and reposition the fabric frequently instead of pulling it. Gentle pressing after each seam also helps the section lie flat. Practicing with scrap fabric before starting the actual placemat is an excellent way to become comfortable with curved piecing.
What batting should I use for a quilted placemat? A thin or low-loft cotton or cotton-blend batting is a practical option. It provides enough structure to emphasize the quilting while keeping the finished placemat relatively flat. Very thick batting can make the center bulky where multiple seams meet and may also make the binding more difficult to sew around the scalloped perimeter. Always check the care instructions for your chosen batting before washing the finished project.
Can this pattern be made with fabric scraps? Yes. A scrap quilt version can be especially attractive because every petal can feature a different fabric while the repeated shape keeps the design visually connected. You could create coordinated blue petals, rainbow petals, seasonal prints, or alternating light and dark scraps. For a harmonious result, consider repeating one background fabric throughout the design. This creates continuity even when the individual petal fabrics are different.
How should I care for a handmade quilted placemat? Care depends on the specific fabrics, batting, thread, and any decorative materials used. If all materials are washable cotton, gentle washing and drying according to their manufacturer instructions will usually help preserve the project. Avoid extremely high temperatures if you are uncertain about the batting or thread. Reshape the scalloped petals while the piece is slightly damp if necessary, then allow it to dry flat so the flower-shaped quilt maintains its attractive outline.
Conclusion
The Flower-petal shaped placemat Pattern is an engaging project for anyone who wants to combine curved piecing, quilting, fabric coordination, scalloped binding, and floral design in one practical handmade piece. The process begins with carefully prepared templates and accurately cut fabric, continues through controlled curved seams and symmetrical assembly, and finishes with batting, decorative quilting, trimming, and flexible bias binding.
The most important lesson is to work gradually. Accurate registration marks, consistent seam allowances, careful pressing, and frequent checks of the overall layout will make the construction much easier. Instead of trying to force curved pieces into position, allow the fabric to follow the shape naturally and use plenty of pins or clips to control each section.
The blue-and-cream combination inspired by the photographed project creates an elegant traditional appearance, but the design offers plenty of room for creativity. Floral cotton, solid fabrics, coordinated scraps, seasonal prints, and contrasting colors can completely transform the same basic pattern. Changing the scale also allows you to turn the concept into smaller mats or a larger decorative table centerpiece.
Quilting adds the final layer of character. Echoed curves emphasize the movement of the petals, while stitching near the pieced seams can stabilize the project and highlight its construction. Once the scalloped edge receives its binding, the flower silhouette becomes clearly defined and gives the finished piece its distinctive personality.
EASILY FIND THE FREE PDF FOR THIS PATTERN HERE!
Most importantly, this project demonstrates how repeated simple shapes can create a sophisticated visual effect. With careful cutting and patient sewing, the Flower-petal shaped placemat Pattern can become a beautiful addition to a handmade table setting while also providing valuable practice with curved quilt construction. If you make your own version, leave your sincere opinion about the pattern and share your suggestions. Which colors or fabric combinations would you choose for your flower-petal placemat? Your ideas can inspire new variations and creative ways to personalize this charming quilting project.