
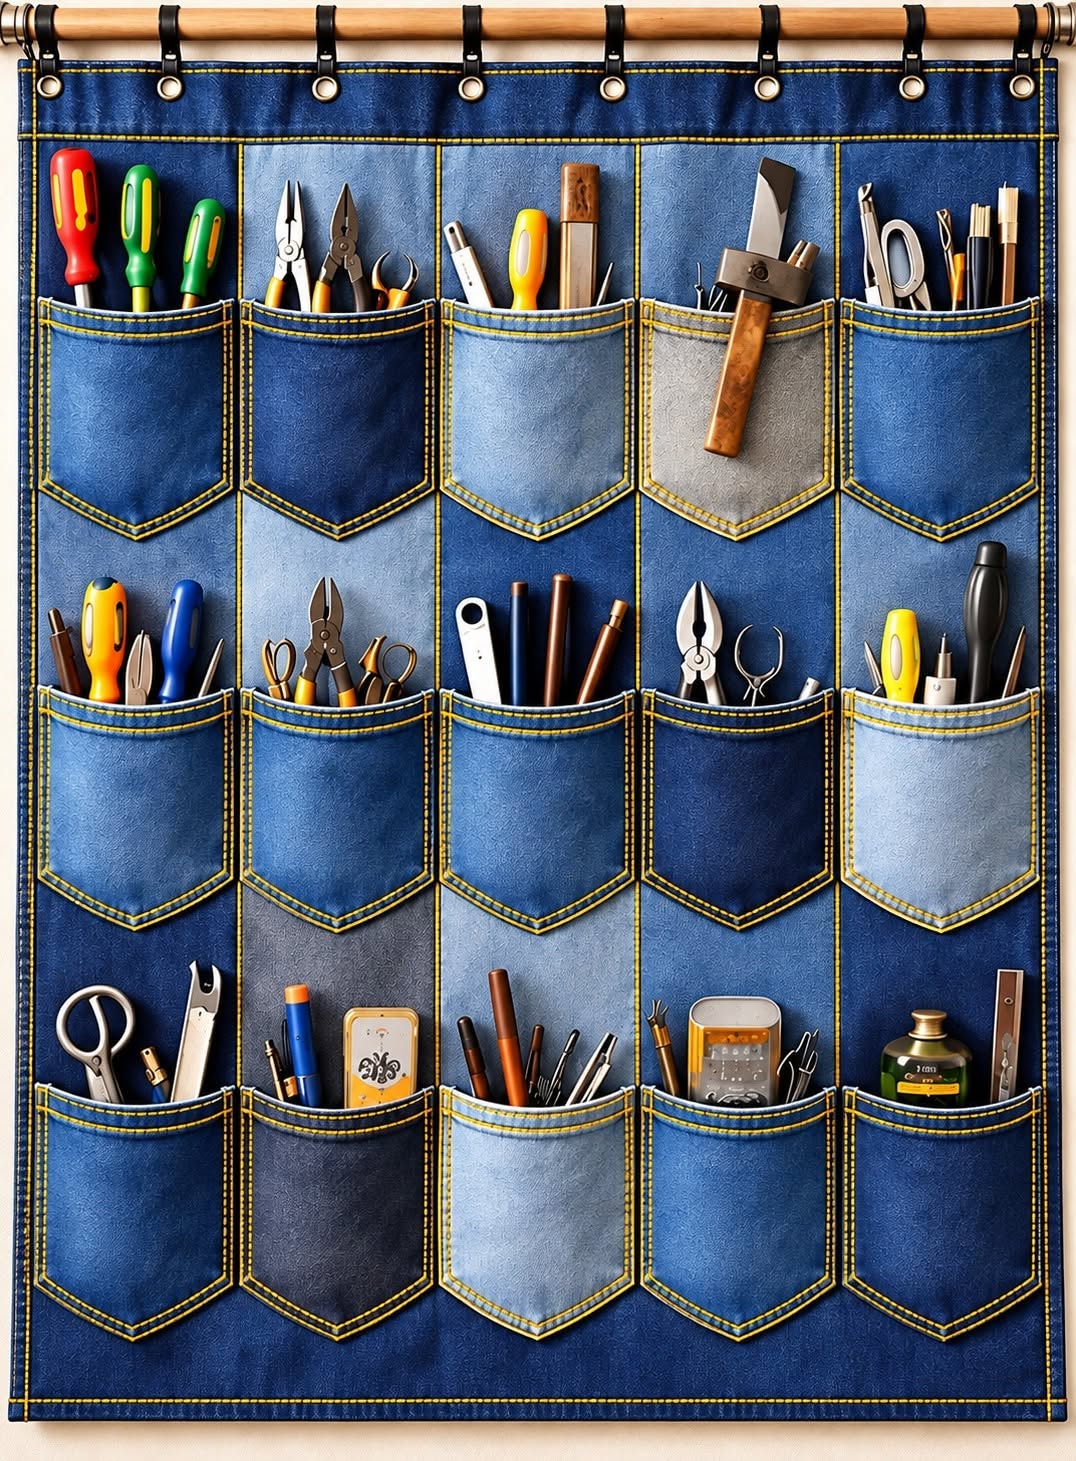
Denim wall organizer with pockets Pattern is a practical sewing project that turns durable denim into an attractive storage solution for a sewing room, craft space, workshop, home office, or utility area. Inspired by the organizer shown in the reference image, this project combines a large rectangular denim backing with multiple individual pockets arranged in neat rows. The finished organizer can hold scissors, rulers, marking tools, pliers, screwdrivers, brushes, measuring accessories, and many other lightweight supplies. One of the most appealing aspects of this denim pocket organizer is that every section can have a slightly different denim shade, creating the relaxed patchwork appearance associated with repurposed jeans while still keeping the overall design coordinated and functional.
Making your own Denim wall organizer with pockets Pattern is also an excellent opportunity to practice useful sewing techniques without requiring complicated garment construction. Most of the project relies on accurate measuring, straight stitching, hemming, topstitching, reinforcing pocket openings, and carefully arranging pieces before sewing. You can work with new denim yardage or repurpose clean jeans that are still in good condition. Using several shades—from dark indigo to faded blue and soft gray-blue—can recreate the dimensional look seen in the photo. The organizer can also be customized to fit the exact wall space available in your home, which means you are not limited to the suggested dimensions in this tutorial.
The organizer in the inspiration image features 15 denim pockets, arranged approximately as five pockets across and three rows down. A strong top section supports hanging loops that attach the organizer to a wooden rod. For a similar home sewing project, a finished size of approximately 70 cm wide by 80 cm high is a practical starting point, although the measurements can easily be changed. Each pocket can measure around 13 cm wide by 17 cm high after sewing, with additional fabric included for hems and seam allowances. Before beginning, remember that denim thickness varies considerably. Lightweight or medium-weight denim is generally easier to layer, while very heavy denim may require a denim needle, longer stitches, and careful handling where several seams overlap.
Materials, Measurements, and Preparing the Denim
Begin your Denim wall organizer with pockets Pattern by gathering the materials before cutting anything. You will need denim for the main backing and pockets, coordinating cotton fabric or another sturdy material for an optional backing layer, medium-weight fusible interfacing if additional stability is required, strong polyester sewing thread, a denim sewing-machine needle, fabric scissors or a rotary cutter, ruler, washable marking tool, clips or pins, iron, ironing surface, and a wooden dowel or curtain-style rod for hanging. Small fabric or webbing loops can be used across the top.
DISCOVER MORE FREE PATTERNS HERE!
For an organizer measuring approximately 70 × 80 cm, cut the front denim panel slightly larger than the desired finished dimensions so that the edges can be finished neatly. One convenient option is to cut the front at approximately 74 × 84 cm, giving you enough material to establish clean edges. If your denim is relatively soft, cut interfacing and a backing fabric to coordinate with the main panel. The objective is to create a backing that remains reasonably flat even when several pockets contain tools.
The pockets are the defining feature of this denim wall storage organizer. For 15 medium pockets, start with rectangles approximately 17 cm wide × 21 cm high. These dimensions include room for side finishing, the upper hem, and the bottom shape. You may adjust individual pocket dimensions depending on what you plan to store. For example, scissors and long marking pencils benefit from deeper pockets, while small clips and measuring accessories are easier to reach in shallower compartments.
To reproduce the characteristic jeans-pocket appearance, create a shallow point at the lower center of each rectangle. Measure upward approximately 3 to 4 cm from the original bottom corners and mark a center point along the lower edge. Draw diagonal lines to establish a subtle pentagonal pocket shape. Alternatively, trace an existing back pocket from a pair of jeans and enlarge it slightly if necessary. The important part is consistency: make one paper template and use that template for the remaining pockets.
Prepare the upper edge of every pocket before attaching it to the organizer. Fold approximately 1 cm toward the wrong side, press, then fold another 1.5 to 2 cm and press again. Stitch close to the folded edge. A second parallel line of topstitching can create the familiar appearance of jeans construction. Pressing each fold before stitching is especially helpful because denim can shift or become bulky when sewn without preparation.
Once all pocket pieces are prepared, arrange them on the main denim panel before attaching anything permanently. Mix light, medium, and dark denim shades across the organizer rather than grouping identical shades together. The visual variety gives the finished Denim wall organizer with pockets Pattern its patchwork character. Keep approximately 2 to 3 cm between neighboring pockets and enough vertical spacing so that your hand can comfortably enter each compartment.
Sewing and Attaching the 15 Denim Pockets
Place the first row of five pockets on the upper portion of the backing. Use a ruler to check that their upper edges follow the same horizontal guideline. Do not rely entirely on your eyes, because a difference of only a few millimeters can become more noticeable after all three rows have been attached. Mark the position of each pocket lightly with a removable fabric marker or chalk.
Fold the raw side and lower edges of each pocket approximately 1 cm toward the wrong side and press them carefully. At the lower angled corners, reduce unnecessary bulk without cutting too close to the future stitching line. Clips can be easier than conventional pins when working with multiple denim layers. Position the pocket on its marked outline and secure it along both sides and the shaped bottom while leaving the upper edge completely open.
Topstitch around the sides and bottom approximately 2 to 3 mm from the folded edge. For greater strength, add a second stitching line approximately 5 to 7 mm inside the first. This double line provides reinforcement and also creates an attractive jeans-inspired detail. Use a slightly longer stitch length—approximately 3 mm is a useful starting point for visible denim topstitching, although your ideal setting will depend on the machine, thread, and fabric weight.
Pay particular attention to the two upper corners of every denim pocket. These areas receive considerable stress whenever an item is inserted or removed. Sew a small reinforced rectangle, short bar tack, or several careful backstitches at each corner. Avoid making an excessively dense cluster of stitches because too many passes through heavy denim can weaken the fabric or cause needle problems. Strong, controlled reinforcement is more useful than simply sewing over the same area repeatedly.
Repeat this process until the first five pockets are attached, then prepare the second and third rows. Measure the vertical spacing before stitching each new row. A layout similar to the reference project places the pockets in a balanced grid, but small variations are completely acceptable in a handmade pocket wall organizer. What matters most is maintaining enough clearance above each pocket so that tools can be inserted and removed comfortably.
After attaching all 15 pockets, test the organizer before completing the outer edges. Insert representative lightweight items into several compartments and observe how the backing behaves. If it folds excessively, consider adding interfacing or a sturdy backing layer. This simple test is useful because an empty organizer can appear perfectly flat while behaving differently once the pockets are being used.
Constructing the Backing, Borders, and Hanging System
The backing is responsible for supporting the entire Denim wall organizer with pockets Pattern, so it deserves as much attention as the pockets. If you are using interfacing, follow the manufacturer’s instructions to fuse it evenly to the wrong side of the main denim panel. Avoid stretching the denim while pressing. Let the panel cool completely on a flat surface before continuing, which helps preserve its intended rectangular shape.
Place the backing fabric against the denim panel with the appropriate sides oriented according to your chosen finishing method. You can finish the perimeter with a turned construction, binding, or neatly folded denim edges. For a simple handmade organizer, folding and topstitching the perimeter can work particularly well. Keep the corners square and use a ruler to confirm that the finished panel has not become distorted during construction.
The upper portion should receive additional reinforcement because it carries the organizer’s hanging weight. Add a horizontal strip of denim or sturdy cotton approximately 8 to 10 cm deep across the back of the upper edge. Stitch it securely into the side and top seams. This reinforced area distributes tension from the hanging loops rather than allowing each loop to pull directly against a single layer of fabric.
Create approximately eight or nine hanging loops from denim strips, sturdy cotton webbing, or another strong material. For fabric loops, cut strips around 4 cm wide and 12 to 15 cm long, depending on the diameter of your wooden rod. Fold the raw long edges inward, fold the strip again lengthwise, and topstitch. Form each finished strip into a loop and position the loops evenly along the upper edge.
Secure the loops carefully using multiple lines of stitching across their bases. Their spacing should distribute the organizer’s weight across the full width of the panel. Before finalizing them, slide the intended wooden rod through the loops to confirm that it fits easily without excessive slack. The rod should be long enough to extend beyond both sides of the organizer and should be appropriately supported for the expected load.
Finish the outer perimeter with denim topstitching for a clean appearance. Press the organizer from the reverse whenever possible, particularly if you are working with faded or reclaimed denim. At this stage, trim loose threads and inspect all pocket corners, hanging loops, and perimeter seams. A carefully finished border gives the project a polished look while also helping the large panel maintain its shape.
Customizing, Organizing, and Caring for Your Finished Project
One advantage of the Denim wall organizer with pockets Pattern is its flexibility. Although the reference design uses 15 similarly sized pockets, there is no requirement for every compartment to be identical. You could replace two small pockets with one large compartment for rulers, create narrow vertical pockets for crochet hooks or pencils, or add a shallow pocket for sewing clips. Designing the pockets around the objects you actually use makes the organizer considerably more practical.
Repurposed jeans are especially suitable for creating a recycled denim organizer because they naturally provide several shades and textures. Before cutting old jeans, remove zippers, metal buttons, thick waistband sections, and damaged fabric. Wash and dry reclaimed denim before sewing so that it is clean and any significant shrinkage has already occurred. Areas around the lower legs often provide useful flat sections for cutting pocket pieces.
Decorative topstitching can make even a simple organizer look carefully designed. Traditional jeans-style thread offers a recognizable appearance, while coordinating thread creates a quieter finish. You can also incorporate small pieces of printed cotton, appliqué details, embroidered labels, or contrasting pocket linings. Keep decorative additions securely attached and avoid placing bulky ornaments where they could interfere with the practical opening of a pocket.
When deciding what to store, remember that a fabric wall organizer has practical weight limits. It works particularly well for ordinary sewing supplies, craft tools, brushes, lightweight hand tools, rulers, and similar accessories. Very heavy objects should have dedicated storage rather than relying on fabric pockets. The wall hardware and wooden rod must also be suitable for the total loaded weight, not merely for the organizer itself.
Cleaning depends on the materials used. If the entire organizer is constructed from washable denim and cotton without sensitive decorations, gentle washing may be possible. However, frequent machine washing can place unnecessary stress on a large structured piece. For routine maintenance, empty every pocket, shake away loose debris, use a lint roller or soft brush, and spot-clean small marks. Always allow the organizer to dry completely before putting tools back inside.
The finished Denim wall organizer with pockets Pattern combines organization with the familiar character of denim. Instead of hiding tools inside drawers, it places frequently used supplies where they are visible and accessible. The combination of sturdy fabric, repeated pocket shapes, contrasting blue shades, and traditional topstitching makes the organizer decorative enough for a craft room while remaining genuinely useful for everyday storage.
FAQ About the Denim Wall Organizer with Pockets Pattern
What is the best denim for a wall organizer?
Medium-weight denim is usually an excellent choice because it offers durability without becoming excessively bulky at overlapping seams. Lightweight denim can also work when combined with fusible interfacing or a sturdy backing. Extremely heavy denim may be more difficult for a domestic sewing machine to handle, particularly around reinforced corners.
Can I make this project from old jeans?
Yes. Repurposed jeans are ideal for a DIY denim wall organizer and naturally create the varied blue tones visible in the inspiration project. Choose sections that are clean, reasonably flat, and free from badly worn areas. Washing and pressing the jeans before cutting will make accurate pattern preparation much easier.
How many pockets should I make?
This tutorial uses 15 pockets arranged in three rows of five, reflecting the general composition of the reference image. However, the pattern is customizable. You can make fewer large pockets, more small compartments, or a combination of different sizes based on your storage requirements.
What size should each pocket be?
A useful starting cutting measurement is approximately 17 × 21 cm, which allows room for hems and folded edges. The final dimensions will be smaller after finishing. Before cutting all 15 pieces, make one sample pocket and place a few intended tools inside it. Adjust the template if necessary.
Do I need interfacing?
Not always. If your main denim and backing are naturally firm, the organizer may have enough structure without it. Medium-weight fusible interfacing is helpful when working with soft or lightweight denim because it reduces sagging and gives the finished panel more stability.
Which sewing-machine needle should I use?
A needle specifically intended for denim or jeans fabric is generally the appropriate choice. Select the needle size according to the weight and number of fabric layers being sewn. Replace the needle if it becomes damaged or dull during construction.
Can a beginner make this denim organizer?
Yes. The project primarily involves straight seams, folded hems, topstitching, measuring, and repeated pocket construction. A beginner should work slowly, press each piece carefully, and make one complete test pocket before preparing the entire set.
How do I prevent the pockets from pulling away from the backing?
Reinforce the upper corners, since these are the primary stress points. Secure stitching, appropriate thread, strong backing fabric, and reasonable pocket loads will all help. Avoid filling fabric pockets with objects that are excessively heavy for the construction.
Can the organizer be made larger or smaller?
Absolutely. The Denim wall organizer with pockets Pattern can be scaled to fit almost any practical wall space. Determine the finished backing dimensions first, decide how many pockets you need, and then calculate even spacing before cutting. Maintaining balanced margins will help the resized version look intentional.
How can I make the organizer look more professional?
Consistent topstitching makes a major difference. Press every fold, use a pocket template, measure spacing rather than estimating it visually, trim loose threads, reinforce stress points neatly, and maintain consistent seam allowances. Mixing several coordinated denim shades can also give the finished piece a sophisticated patchwork denim appearance.
Can I add labels to the pockets?
Yes. Fabric labels can be useful when the organizer will hold different categories of craft supplies. Sew labels onto the pocket pieces before attaching those pockets to the backing. This prevents the label stitching from passing unnecessarily through the main organizer panel.
What can I store in a denim pocket organizer?
It can hold scissors, fabric markers, measuring tools, pencils, brushes, crochet hooks, rulers, sewing accessories, lightweight workshop tools, and many other everyday supplies. Organize frequently used objects at a comfortable height and reserve lower pockets for items you need less often.
Conclusion
Creating a Denim wall organizer with pockets Pattern is a satisfying way to combine sewing, recycling, and practical home organization in one project. Starting with a strong denim backing, you can prepare approximately 15 individual pockets, arrange them in three balanced rows, reinforce each opening, add a stable backing, and finish the project with secure hanging loops and a wooden rod.
The key techniques covered in this tutorial include cutting denim, preparing pocket templates, pressing hems, denim topstitching, reinforcing stress points, arranging multiple pockets, stabilizing a large fabric panel, and constructing strong hanging loops. None of these techniques needs to be overly complicated, but careful measuring and consistent stitching will noticeably improve the final result.
You can follow the suggested 70 × 80 cm organizer and approximately 17 × 21 cm pocket cutting measurements, or customize everything to suit your available fabric and storage space. Using several denim shades is an easy way to reproduce the charming patchwork character of the inspiration while giving leftover jeans a useful new purpose.
Most importantly, treat the Denim wall organizer with pockets Pattern as a flexible foundation rather than a rigid design. Change the number and dimensions of the pockets, add labels, introduce decorative stitching, or adapt the hanging system to your space. A personalized organizer is often more useful because every compartment has been planned around the supplies you actually own.
EASILY FIND THE FREE PDF FOR THIS PATTERN HERE!
Once completed, the organizer provides an accessible place for frequently used tools while adding handmade denim texture to the room. It is a practical project for a sewing area, craft studio, workshop, or creative corner and offers plenty of opportunities to practice fundamental sewing skills. If you make your own Denim wall organizer with pockets Pattern, leave your sincere opinion about the project and share any suggestions or creative modifications you would make. Your ideas about different pocket arrangements, denim combinations, dimensions, and finishing details can inspire even more ways to customize this useful sewing project.