
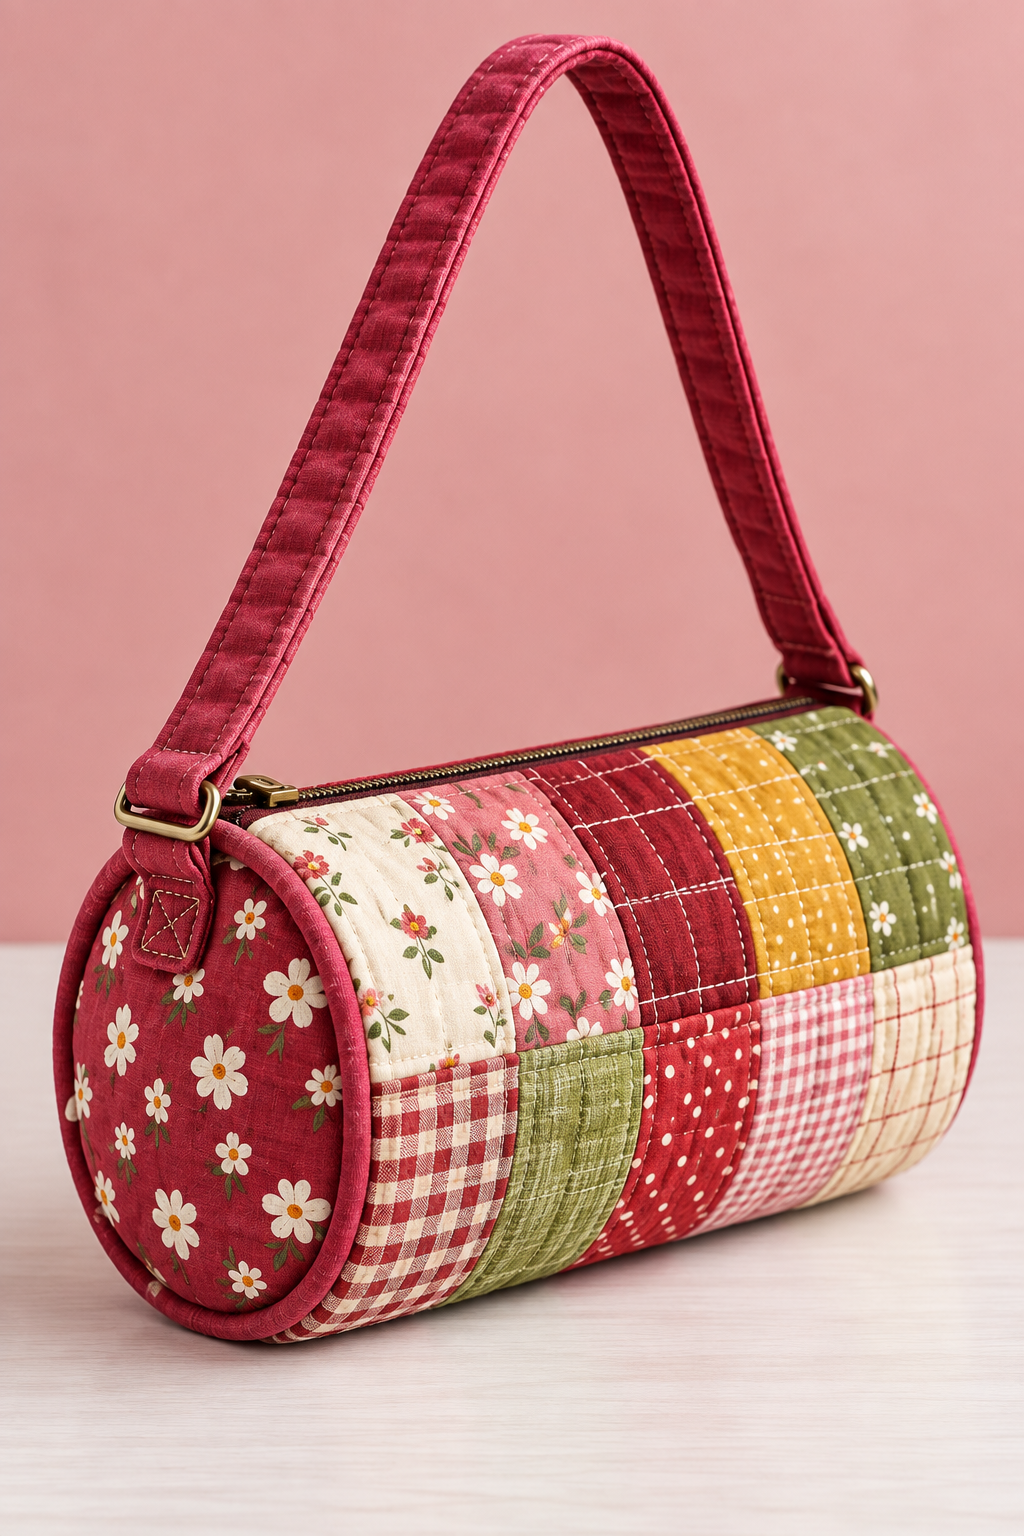
The Cylindrical Patchwork Bag Pattern is a charming sewing project that combines traditional patchwork with the practical shape of a compact barrel-style handbag. Inspired by the bag shown in the photo, this design uses several coordinated cotton fabrics arranged in vertical strips, creating a warm handmade appearance with plenty of visual texture. The rounded side panels give the bag its recognizable cylindrical silhouette, while the zipper closure keeps everyday belongings secure. A long fabric strap, piping around the circular ends, and small metal rings add structure and a polished finish. Although the finished piece looks detailed, the construction can be divided into manageable sewing stages that are suitable for an adventurous beginner or intermediate sewist. By working carefully through the cutting, quilting, shaping, zipper installation, and final assembly, you can create a patchwork cylindrical bag that is both decorative and functional.
One of the most enjoyable parts of making a Cylindrical Patchwork Bag Pattern is selecting the fabrics. The photographed design combines red, cream, pink, mustard, and olive-green fabrics with floral, gingham, dotted, and lightly textured prints. You do not need to duplicate these colors exactly; the same construction can work beautifully with farmhouse prints, modern geometric cottons, solids, scraps from previous quilting projects, or a coordinated fabric collection. The important idea is to create enough contrast for the individual patchwork sections to remain visible while still making the entire bag feel cohesive. Quilting cotton is particularly convenient because it is easy to cut, press, piece, and quilt. Adding batting and lining behind the patchwork exterior also gives the finished bag enough body to maintain its cylindrical form instead of collapsing when it is placed on a table.
Before beginning this Cylindrical Patchwork Bag Pattern, remember that the dimensions below can be adjusted to create a larger or smaller handbag. A practical starting point is a finished body approximately 28 cm wide, 17 cm high, and 14 cm deep, with two rounded end panels approximately 14 × 17 cm before final fitting. Because batting thickness, quilting density, seam allowance, and zipper installation can slightly change the finished dimensions, treat these measurements as a useful starting framework rather than an absolute template. A consistent 1 cm seam allowance makes assembly easier, and careful pressing after piecing helps prevent distortion. It is also wise to create the patchwork exterior slightly oversized, quilt it first, and trim it to its final dimensions afterward. This approach provides more accuracy and makes the final construction considerably easier.
Materials, Fabric Selection, and Preparation
For the exterior of the Cylindrical Patchwork Bag Pattern, gather several coordinating pieces of 100% cotton quilting fabric. Approximately six to ten different prints will provide enough variety for an attractive patchwork effect. Fat quarters, precut scraps, or leftover quilting cotton are excellent choices because the individual sections are relatively small. Try combining one dominant color with two or three supporting colors. In the inspiration piece, deep red works as the dominant tone, while cream, pink, mustard, and green provide contrast. Repeating one or two fabrics elsewhere in the bag helps visually connect the individual sections.
DISCOVER MORE FREE PATTERNS HERE!
You will also need cotton batting or thin bag batting, lining fabric, a zipper approximately 30 to 35 cm long, coordinating sewing thread, and fabric for the strap and piping. For a firmer bag, lightweight woven interfacing can be fused to the exterior pieces before quilting. Avoid extremely thick stabilizers around the curved seams because they can make the rounded ends difficult to sew. The goal is to provide enough support for the cylindrical shape while preserving the soft, quilted character visible in the original project.
Basic sewing supplies include a sewing machine, quilting needle, fabric scissors or rotary cutter, cutting mat, quilting ruler, clips or pins, iron, marking tool, and hand-sewing needle. Optional hardware includes two rectangular or D-shaped rings for attaching the strap. If you want a removable or adjustable shoulder strap, add swivel hooks and an adjustable slider. The photographed version uses hardware in a warm metallic finish, which complements the red patchwork particularly well.
To create the patchwork body, cut strips in different widths rather than making every section identical. For example, prepare strips approximately 5 to 8 cm wide and around 24 cm long. Sew enough strips together to create an exterior panel slightly larger than the required finished circumference of the bag. The alternating widths make the project appear more spontaneous and handmade. Remember that every seam consumes part of the strip width, so always prepare a panel larger than your calculated final measurement.
The rounded ends are an important feature of the Cylindrical Patchwork Bag Pattern. Draw an oval or softly rounded rectangle approximately 14 × 17 cm, adding a 1 cm seam allowance around the perimeter if your template represents the finished size. Cut two exterior pieces, two batting pieces, and two lining pieces. One end can feature a single floral fabric like the photographed bag, while the other can repeat the same material or introduce another coordinating print.
Before sewing the main bag, arrange all the fabric pieces on your work surface. Move them around until the colors appear balanced. Avoid concentrating every dark fabric on one side or placing several busy floral prints directly beside one another unless that is intentional. Photographing the arrangement before sewing can help you remember the sequence. This simple planning stage makes a noticeable difference in the finished patchwork bag pattern, especially when working with many colors and prints.
Cutting, Piecing, and Quilting the Cylindrical Body
Begin construction by joining the patchwork fabric strips right sides together using a consistent seam allowance. Sew one strip to the next until you have created a rectangular patchwork panel large enough for the bag body. Press each seam as you work rather than waiting until the entire panel is completed. Pressing seams to alternating sides can reduce bulk, although pressing them open is also suitable when several thick layers will eventually meet.
Once the patchwork panel is complete, place it over a piece of batting. If desired, add a thin backing fabric beneath the batting to create a traditional quilting sandwich. Baste the layers together using pins, clips where appropriate, or your preferred temporary basting method. Keep the panel smooth without stretching it. Because the Cylindrical Patchwork Bag Pattern depends on an even curved shape, distortion at this stage can make the final assembly more difficult.
Quilt the panel using straight-line quilting. The inspiration photo features visible stitching that follows the individual patchwork sections, so you can stitch approximately 1 to 2 cm apart or simply follow the seams and add additional parallel lines where necessary. A slightly longer machine stitch can make the quilting more noticeable. Quilting does more than decorate the bag: it connects the layers, strengthens the exterior, and provides the structure needed for the cylindrical body.
After quilting, place the panel on the cutting mat and square the edges. A useful approximate trimmed size is 44 to 46 cm around the curved direction by 28 cm across the bag’s length, but check this against your actual end-panel perimeter and zipper construction before trimming. The exact circumference must correspond to the perimeter of your rounded end template. Measuring rather than relying entirely on predetermined numbers is one of the best ways to achieve a professional fit.
Prepare the two rounded side panels in the same way. Layer each exterior fabric with batting and quilt using straight lines, a grid, or gentle curves. If you want to reproduce the visual character of the photographed Cylindrical Patchwork Bag Pattern, use a floral red fabric for at least one end panel and keep the quilting relatively simple. Trim both ends from the same template so they are identical in size and shape.
At this stage, inspect all the quilted pieces carefully. Trim loose threads and check that the patchwork seams are secure. Lay the body panel around the perimeter of one rounded end without sewing it yet. The pieces should meet naturally without excessive stretching or gathering. Making this test fit before installing the zipper gives you an opportunity to correct small dimensional differences while adjustments are still easy.
Installing the Zipper, Rounded Ends, Piping, and Strap
The zipper runs along the upper length of the cylindrical patchwork bag and should open wide enough to provide comfortable access to the interior. Position the zipper right sides together with one long upper edge of the quilted body. Add the corresponding lining edge and sew carefully using a zipper foot. Turn the layers away from the zipper teeth, press gently, and topstitch close to the seam for a clean, stable finish.
Repeat the process on the opposite side of the zipper. Before continuing, open and close the zipper several times to make sure no fabric catches in the teeth. The zipper should sit straight across the upper portion of the bag without rippling. Accurate zipper placement is especially important in a Cylindrical Patchwork Bag Pattern because the zipper becomes a visible structural line across the entire length of the project.
For a decorative finish similar to the photographed bag, make fabric-covered piping for the rounded ends. Cut bias strips approximately 3.5 to 4 cm wide, join them into sufficient lengths, and wrap them around piping cord. Sew close to the cord using a zipper or piping foot. Bias-cut fabric bends around curves much more easily than straight-grain strips, making it particularly useful around the oval end panels.
Baste the piping around each rounded exterior panel with the raw edges aligned. Clip the seam allowance carefully around tight curves without cutting through the stitching. Then attach each end panel to the main cylindrical body, right sides together. Use plenty of clips and distribute the fabric evenly around the perimeter. Sew slowly around the curve, stopping periodically to check that no folds have formed underneath.
Create the shoulder strap from a strip approximately 8 to 10 cm wide and 70 to 90 cm long, depending on your preferred carrying length. Interface the strip for extra strength, fold the long edges toward the center, fold the strip in half, and topstitch along both sides. Additional rows of quilting can reproduce the textured appearance of the strap in the photo. A finished strap around 3 to 4 cm wide provides a comfortable balance between strength and appearance.
Attach small reinforced fabric tabs to both ends of the bag and insert the metal rings before securing the tabs. Reinforcement is important because these points support the weight of the finished handbag. Sew a rectangle with an X-shaped reinforcement stitch through each tab where practical. Connect the main strap to the rings securely. Before using the bag, gently test each attachment point to ensure the seams and hardware remain stable under normal carrying weight.
Cylindrical Patchwork Bag Pattern FAQ
What is a Cylindrical Patchwork Bag Pattern? A Cylindrical Patchwork Bag Pattern is a sewing design used to create a rounded or barrel-shaped handbag from pieced fabrics. Unlike a conventional flat tote, it usually has a curved main body and two rounded end panels. Patchwork adds decorative interest, while batting, quilting, piping, lining, and a zipper help create the finished structure. The result combines techniques commonly found in both quilting and bag making.
What fabric works best for a cylindrical patchwork bag? Medium-weight quilting cotton is one of the easiest options because it is stable, widely available, and simple to piece accurately. Cotton canvas can also work, although it creates more bulk around curved seams. When using ordinary quilting cotton, batting or interfacing should usually be added to provide structure. Very stretchy fabrics are less suitable for a first attempt because maintaining accurate dimensions becomes more challenging.
How much fabric is needed for this project? The exact quantity depends on the finished dimensions and number of prints. For a small handbag approximately 28 × 17 × 14 cm, several fat quarters or a collection of quilting scraps should provide ample exterior fabric. You will also need enough lining fabric and batting to cover the body and two end panels. Buying or preparing slightly more material than the mathematical minimum gives you flexibility for directional prints, trimming, mistakes, and fabric matching.
Can beginners make this patchwork bag? A confident beginner can complete the project by working slowly and treating each technique as a separate stage. Basic straight sewing and patchwork piecing are relatively straightforward. The more challenging steps are zipper installation, piping, curved seams, and attaching the rounded ends. Basting before final stitching and sewing curved sections slowly will make these steps much easier. Practicing piping on scrap fabric can also help before working on the actual bag.
How can I make the cylindrical bag more structured? Use a combination of batting and interfacing rather than relying on the exterior fabric alone. Dense straight-line quilting also increases stability because it secures the layers together. If you prefer a very firm handbag, select a bag-making stabilizer appropriate for your sewing machine and fabric weight. However, excessive thickness can complicate the rounded seams, so additional firmness should be introduced gradually rather than using extremely heavy materials everywhere.
Can the Cylindrical Patchwork Bag Pattern be resized? Yes. The design can be transformed into a small cosmetic bag, handbag, craft organizer, or larger barrel bag. The essential rule is to resize the main body and rounded ends proportionally. If you enlarge an end panel, its perimeter increases, which means the corresponding body dimension must also increase. Make a paper template first, measure its perimeter carefully, and include the necessary seam allowances before cutting valuable fabric.
Conclusion
The Cylindrical Patchwork Bag Pattern brings together several satisfying sewing techniques in one distinctive handmade project. You begin by coordinating quilting cotton fabrics, cutting and joining patchwork strips, adding batting, and quilting the exterior. The rectangular quilted panel then becomes the curved body of the bag, while matching rounded panels establish its characteristic barrel shape. A carefully installed zipper provides practical access to the interior, and fabric-covered piping creates a defined transition between the body and ends.
Details such as the quilted shoulder strap, reinforced tabs, metal rings, lining, topstitching, and coordinated colors can transform a relatively simple construction into a polished handmade patchwork handbag. The approximate measurements in this tutorial provide a useful starting point, but the project can easily be customized by changing the dimensions, fabrics, quilting pattern, strap length, hardware, or number of patchwork sections.
EASILY FIND THE FREE PDF FOR THIS PATTERN HERE!
Most importantly, work accurately rather than quickly. Press the patchwork as you sew, quilt before making the final trim, check the circumference of the rounded panels, baste difficult curves, and test the zipper before completing the final seams. These small habits can significantly improve the shape and durability of your finished Cylindrical Patchwork Bag Pattern. Once you have completed your bag, experiment with different fabric combinations and make the design your own. Floral prints can produce a romantic country look, while solids and geometric fabrics can create a more contemporary version. If you try this Cylindrical Patchwork Bag Pattern, leave your sincere opinion about the project and share your suggestions for future sewing tutorials. Your ideas can inspire new variations, color combinations, and creative patchwork projects.