
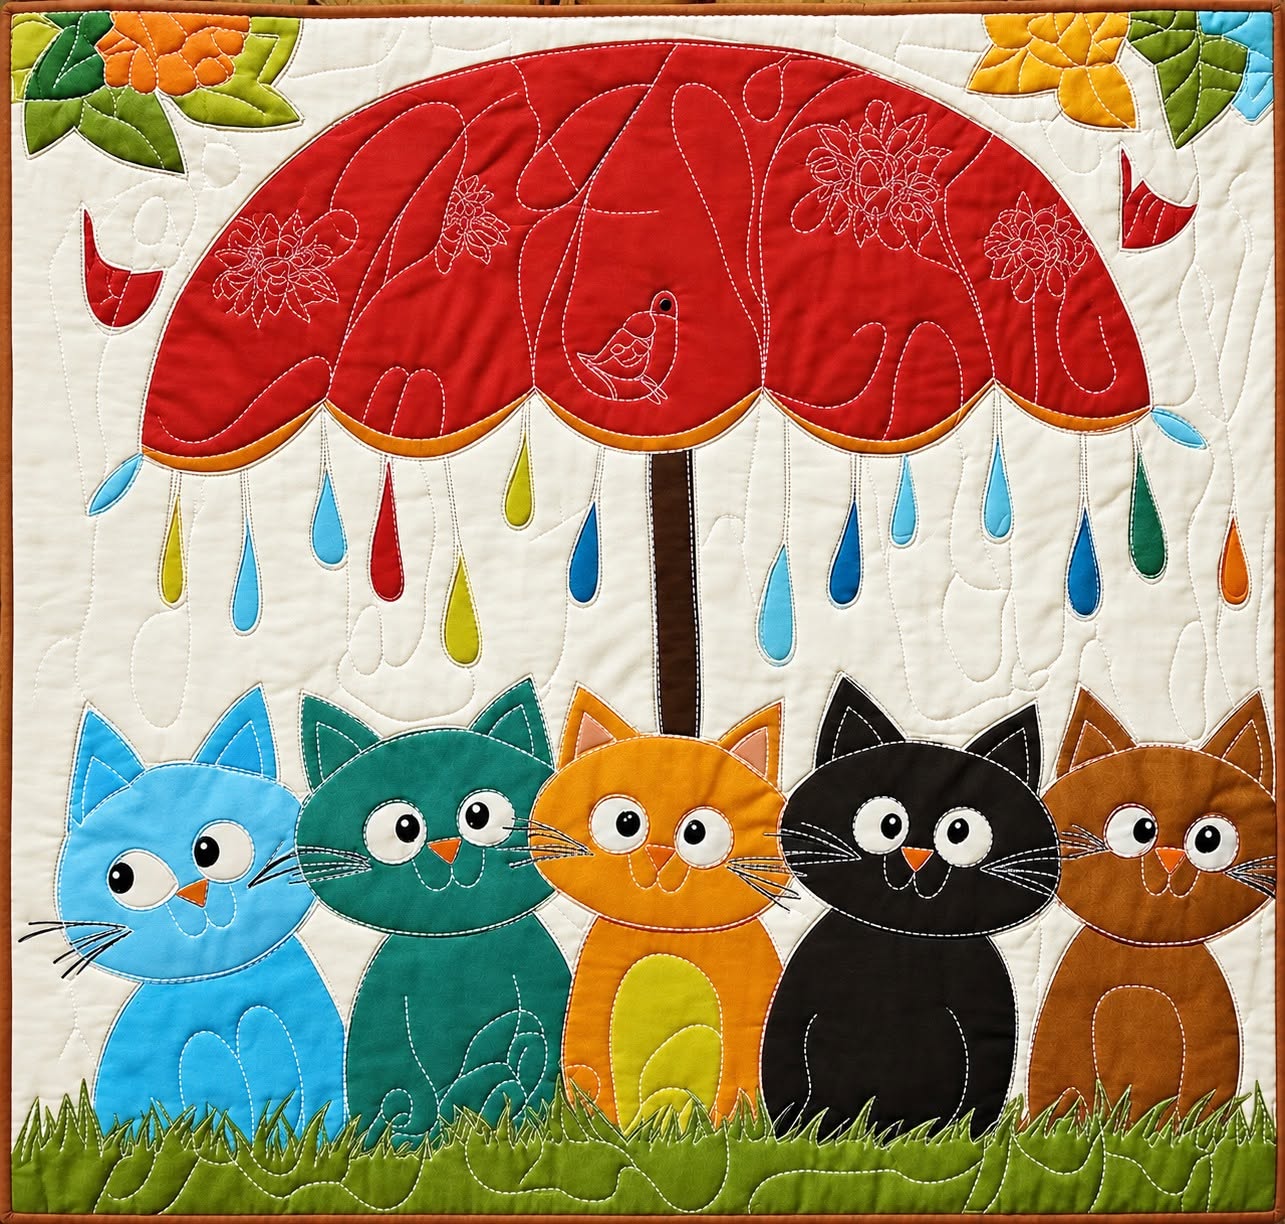
The “Cats on a Rainy Day” Quilt Pattern is a charming quilting project that combines playful appliqué, colorful fabric choices, gentle curves, and decorative quilting into one cheerful wall hanging. Inspired by a rainy scene filled with curious cats beneath a large red umbrella, this design is perfect for quilters who enjoy creating projects with personality. The composition brings together several recognizable quilting techniques, including fabric appliqué, layered construction, free-motion quilting, and decorative stitching. Although the finished piece looks detailed, it can be created gradually by dividing the project into simple sections and assembling each element one at a time.
One of the most appealing characteristics of the “Cats on a Rainy Day” Quilt Pattern is its storytelling quality. Instead of relying only on traditional geometric blocks, this quilt uses fabric shapes to create a complete scene. Five colorful cats sit together near the bottom of the design while a large umbrella protects them from falling raindrops. Grass, leaves, flowers, and small birds provide additional decorative details. Because every section can be customized, the project offers plenty of opportunities to use fabric scraps and experiment with color combinations while maintaining a cohesive finished appearance.
Creating this quilt is also a wonderful way to practice several important sewing skills. Beginners can simplify the shapes and use basic machine appliqué, while experienced quilters can add more advanced embroidery, detailed quilting, and dimensional embellishments. Choosing coordinated quilting cotton, preparing accurate appliqué templates, arranging the pieces carefully, and stitching each layer securely are the main foundations of the project. With patience and thoughtful preparation, the “Cats on a Rainy Day” Quilt Pattern can become a distinctive handmade decoration for a sewing room, nursery, living space, or seasonal display.
Materials and Fabric Preparation for the “Cats on a Rainy Day” Quilt Pattern
The first step is selecting fabrics that create strong contrast while keeping the playful atmosphere of the original composition. A warm cream or light beige cotton works beautifully as the background because it allows the brighter appliqué pieces to stand out. For a medium-sized wall quilt, prepare approximately 70 to 90 cm of background fabric, depending on your desired finished dimensions. Wash, dry, and press the fabric before cutting so that unexpected shrinkage does not affect the completed quilt.
DISCOVER MORE FREE PATTERNS HERE!
Choose several colorful cotton fabrics for the cats. The design can include shades such as light blue, turquoise, golden yellow, dark brown, and warm brown. Using slightly different tones for each cat helps every character remain visually distinct. Small scraps are usually sufficient for details such as ears, bellies, noses, and eyes. This makes the “Cats on a Rainy Day” Quilt Pattern particularly suitable for using leftover fabric scraps from previous quilting projects.
For the umbrella, select a strong contrasting fabric such as deep red, coral, burgundy, or another bold color. The umbrella is the largest visual element in the upper portion of the quilt, so its color strongly influences the overall appearance. A narrow strip of golden, mustard, or coordinating fabric can be used around the curved umbrella edge to create definition. Brown fabric works well for the umbrella handle and creates a clear vertical connection between the upper and lower sections.
Additional scraps will be needed for the raindrops, grass, leaves, flowers, birds, and other decorative details. Blue and turquoise fabrics create realistic rain, while yellow, red, green, and orange pieces make the scene more lively. These small shapes are excellent opportunities to introduce additional prints without overwhelming the composition. A mixture of solids, subtle textures, and small-scale prints can give the quilt a handmade storybook quality.
You will also need fusible web if you plan to use fused appliqué. This material helps temporarily secure the fabric shapes to the background before stitching. Other essential supplies include matching or contrasting thread, sharp fabric scissors, pins, an iron, a sewing machine, batting, backing fabric, and binding fabric. A removable fabric marker can be helpful for positioning the umbrella, cats, and decorative elements before they are permanently attached.
Before cutting any appliqué pieces, decide on your finished quilt size and create paper templates for the major shapes. The cats, umbrella, raindrops, leaves, and grass can all be enlarged or reduced to fit your preferred dimensions. Label the templates carefully so pieces do not become confused during assembly. Careful preparation at this stage makes construction of the “Cats on a Rainy Day” Quilt Pattern significantly easier.
Creating the Umbrella, Rain, and Background Details
Begin construction with the large umbrella because it establishes the main visual structure of the quilt. Trace the umbrella template onto the paper side of the fusible web, following the manufacturer’s instructions. Fuse the web to the wrong side of the red fabric and cut the umbrella carefully along the traced line. If your design includes several curved umbrella panels, lightly mark those divisions before positioning the appliqué.
Place the umbrella in the upper-middle section of the background fabric, leaving enough space for leaves and decorative elements around the corners. When you are satisfied with the placement, fuse the shape securely. Stitch around the perimeter using a blanket stitch, narrow zigzag stitch, or straight appliqué stitch. Decorative stitching around the curved bottom edge can emphasize the scalloped umbrella shape and give it a polished finish.
Next, create the umbrella handle from a narrow strip of brown fabric. Position it vertically beneath the center of the umbrella, making sure it extends downward behind the cats. The handle should appear to disappear naturally behind the foreground figures. Fuse and stitch it before attaching the cats so the overlapping layers remain clean and realistic.
The colorful raindrops are one of the most playful details in the “Cats on a Rainy Day” Quilt Pattern. Cut teardrop shapes in several sizes from blue, turquoise, yellow, red, and orange fabrics. Arrange them underneath the umbrella and in a few open spaces around the composition. Varying the height and spacing prevents the rain from looking too uniform. Attach each raindrop with fusible web and secure the edges with fine machine stitching.
Decorative leaves and flowers can be placed in the upper corners to frame the umbrella. Green leaves combined with orange or yellow flowers introduce warm colors that visually balance the cats below. Keep these shapes slightly smaller than the main characters so they remain supporting details rather than competing focal points. Small bird appliqués can also be added near the umbrella for an extra touch of personality.
Once the major background appliqués are attached, consider adding subtle quilting lines to suggest falling rain. Straight or slightly curved vertical stitches work especially well. These lines do not need to be perfectly parallel. Slight irregularity gives the design a more natural handmade appearance. Avoid quilting too densely at this stage because additional stitching will be added after the quilt sandwich is assembled.
Making and Appliquéing the Five Colorful Cats
The cats are the main characters of the “Cats on a Rainy Day” Quilt Pattern, so careful placement is important. Each cat can be constructed from several basic pieces: body, head, ears, belly, eyes, pupils, nose, and optional whiskers. Prepare separate templates for these elements and organize them by cat before cutting the fabric. This simple system helps prevent small pieces from being misplaced.
Start with the body shapes and position the five cats along the lower section of the quilt. Slightly overlap neighboring cats to create the impression that they are sitting closely together beneath the umbrella. The cats do not need to be identical in size. Small differences in height and shape can give each character more personality while creating a lively composition.
Fuse the bodies first and then add the heads. Attach the ears before adding facial details whenever possible. Contrasting inner-ear fabrics may be used, although keeping the ears in the same fabric as the body creates a cleaner appearance. Once the larger pieces are fused, stitch around them carefully using coordinating thread. A narrow satin stitch is useful for a polished edge, while a blanket stitch creates a charming handmade effect.
The eyes are especially important because they give each cat expression. Cut white or cream circles for the outer eyes and smaller dark circles for the pupils. Positioning the pupils in slightly different directions makes the cats appear curious and playful. Small fabric circles, embroidery, or carefully stitched appliqué pieces can be used for the noses. Keep these elements securely attached because small appliqué shapes can lift more easily than larger pieces.
Whiskers may be embroidered with dark thread after the facial appliqués are complete. Use long straight stitches extending outward from each cheek. Mouth lines can be added with simple embroidery or free-motion stitching. These small details require very little fabric but make a dramatic difference in the finished appearance of the “Cats on a Rainy Day” Quilt Pattern.
Finish the lower scene by adding grass around the cats. Cut irregular strips or individual blades from several shades of green fabric. Layering dark and light greens creates depth and hides the lower edges of the cat bodies. Some grass pieces can overlap the cats slightly, making the characters appear naturally seated within the scene rather than simply placed on top of the background.
Quilting, Assembly, Binding, and Finishing the Project
After all appliqué pieces are securely stitched, prepare the quilt sandwich. Place the backing fabric wrong side up on a clean flat surface, position the batting over it, and place the completed quilt top on top with the right side facing upward. Smooth each layer carefully to remove wrinkles. Secure the layers with safety pins, basting spray, or temporary hand basting.
Begin quilting around the primary appliqué shapes. Stitching close to the umbrella, cats, leaves, and raindrops helps define their outlines and prevents the layers from shifting. This technique is sometimes called outline quilting. It is particularly effective in appliqué quilts because it gives the shapes a slightly raised appearance against the background.
Next, quilt the open background areas. Free-motion loops, gentle swirls, cloud-like curves, or irregular meandering stitches work beautifully with this rainy-day theme. If you are new to free-motion quilting, simple vertical rain lines or loosely spaced curves can create an attractive effect without requiring complicated control. The goal is to secure the layers evenly while adding texture.
The cats can also receive additional quilting details. Curved lines may suggest paws, legs, bellies, or subtle fur texture. The umbrella can be divided into large curved sections with quilting lines that follow its natural shape. Decorative stitching within the umbrella adds visual interest without introducing additional fabric pieces.
Trim the completed quilt so all four edges are straight. Prepare binding strips from coordinating fabric and join them end to end. A finished binding width of approximately 0.7 to 1 cm works well for a small wall quilt. Sew the binding to the front, fold it around the raw edge, and secure it to the back by hand or machine. Take extra care at the corners to create neat miters.
Finally, inspect the entire “Cats on a Rainy Day” Quilt Pattern for loose threads or unsecured appliqué edges. Press the quilt lightly from the back if necessary, avoiding excessive heat over fusible materials. If the piece will be displayed as wall art, add a hanging sleeve to the back. A handmade label with the project name and completion date can provide a meaningful finishing touch.
Frequently Asked Questions About the “Cats on a Rainy Day” Quilt Pattern
Is the “Cats on a Rainy Day” Quilt Pattern suitable for beginners?
Yes. A confident beginner can make this project by using fusible appliqué and simple machine stitching. The most important strategy is to work one section at a time. Beginners may also simplify some of the smaller decorative pieces, such as leaves or embroidered facial details.
What type of fabric is best for this quilt?
High-quality quilting cotton is one of the best choices because it is stable, easy to cut, and available in many colors and prints. Cotton also works especially well with fusible appliqué and standard machine quilting.
Can I make the quilt larger or smaller?
Yes. The pattern can easily be resized by enlarging or reducing the appliqué templates. Make sure all major pieces are scaled proportionally so the umbrella, cats, and decorative elements maintain a balanced composition.
Do I have to use five cats?
No. The number of cats can be customized. You could create three larger cats, five similar characters, or even add additional cats if your quilt is wider. Changing their colors is another easy way to personalize the design.
What is the easiest appliqué method for this pattern?
Fusible appliqué is generally the easiest method for a project with many small shapes. The fusible material keeps each piece in position while the edges are stitched. This is especially helpful when working with small eyes, noses, raindrops, and leaves.
Should I use matching or contrasting thread?
Both approaches work. Matching thread creates subtle edges, while contrasting thread emphasizes the appliqué shapes. For a whimsical project such as the “Cats on a Rainy Day” Quilt Pattern, slightly contrasting stitching can enhance the illustrated appearance.
How can I prevent the small appliqué pieces from fraying?
Use a dense zigzag stitch, satin stitch, or blanket stitch around exposed edges. Fusible web also helps stabilize the pieces. Selecting tightly woven quilting cotton can further reduce fraying.
What batting works best for a wall quilt?
A thin cotton or cotton-blend batting is usually ideal. It provides enough structure and quilting definition without making the project unnecessarily bulky.
Can the facial details be embroidered instead of appliquéd?
Yes. Embroidery is an excellent option for whiskers, mouths, pupils, and other fine details. It can actually be easier than cutting extremely small pieces of fabric.
How should I quilt the background?
Simple meandering, loops, vertical rain lines, or gentle curves are all appropriate. The quilting should complement the appliqué rather than compete with it. Leaving slightly more open space around the cats can also help them remain the focal point.
Can I use fabric scraps for this project?
Absolutely. This design is ideal for a scrap quilt project because most appliqué pieces require only small amounts of fabric. Scraps can be used for cats, raindrops, leaves, flowers, grass, eyes, and other decorative details.
How can I make each cat look different?
Change the fabric colors, eye direction, belly shape, ear position, or facial stitching. Even very small differences can give each cat a distinct expression and personality.
Can this design be used for something other than a wall hanging?
Yes. The same appliqué concept could be adapted for a cushion cover, children’s quilt, decorative panel, tote bag, or larger bed quilt. Always adjust the scale and construction method according to the intended use.
Conclusion
The “Cats on a Rainy Day” Quilt Pattern combines storytelling, colorful appliqué, and practical quilting techniques in a project that can be adapted to many skill levels. Beginning with a neutral background, you learned how to build the scene by adding the large umbrella, handle, colorful raindrops, decorative leaves, flowers, playful cats, and layered grass. Each section can be completed separately, making what appears to be a complex design much easier to organize.
The project also provides an excellent opportunity to practice essential skills such as fusible appliqué, template preparation, fabric placement, decorative stitching, outline quilting, free-motion quilting, quilt sandwich assembly, and binding. Because many of the elements require only small pieces of fabric, the design is also a practical way to transform leftover scraps into a cohesive and expressive handmade quilt.
EASILY FIND THE PDF FOR THIS PATTERN HERE!
Most importantly, the “Cats on a Rainy Day” Quilt Pattern leaves plenty of room for creativity. You can change the cats’ colors, adjust their expressions, create different raindrop combinations, modify the umbrella, or add your own flowers and background details. These personal choices are what turn a quilting pattern into a truly individual piece of textile art. If you create your own version, leave your sincere opinion about the project and share your suggestions. Which cat color combination would you choose, and what details would you add to make your rainy-day quilt unique? Your ideas can inspire new variations and creative possibilities for this cheerful quilting design.