
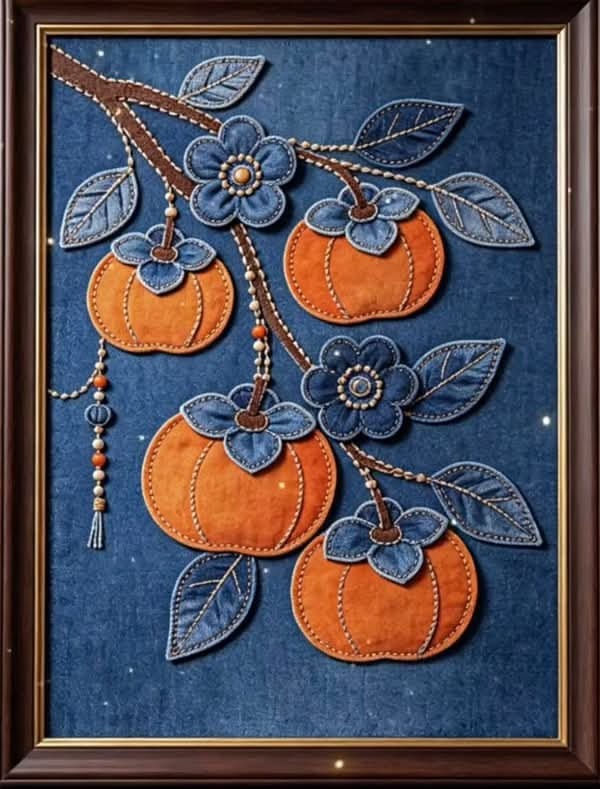
Tutorial on Applying Appliqués to Denim and Khaki Panels Pattern is a creative sewing project that combines the rustic personality of denim with dimensional appliqué techniques to produce a decorative textile panel full of warmth and handcrafted character. Inspired by the pictured composition, this project features pumpkin-shaped appliqués, layered flowers, leaves, branches, decorative stitching, and small embellishments arranged over a deep denim-style background. The contrast between rich orange pumpkins and different shades of blue makes the design especially striking while keeping the overall appearance coordinated and elegant. Although the finished panel may look complex at first, the construction can be divided into manageable stages, making it an enjoyable project for anyone familiar with basic sewing, appliqué, and fabric layering techniques.
One of the most appealing aspects of the Tutorial on Applying Appliqués to Denim and Khaki Panels Pattern is the opportunity to work with texture. Denim provides a sturdy foundation, while khaki, cotton, canvas, lightweight denim, and fabric scraps can be layered to create raised details. Decorative topstitching around each appliqué adds definition and helps visually separate the individual components. The pumpkin sections can be emphasized with curved lines of stitching, while leaves can receive vein-like details and flowers can be constructed from several overlapping fabric pieces. These techniques transform relatively simple fabric shapes into a detailed textile artwork suitable for framing, wall decoration, seasonal décor, or even as inspiration for a larger quilted project.
Before beginning the Tutorial on Applying Appliqués to Denim and Khaki Panels Pattern, it is helpful to study the composition and decide how large you want the finished panel to be. A practical size for a decorative wall panel is approximately 40 × 50 cm, although the pattern can easily be enlarged or reduced. Gather a piece of denim slightly larger than the intended finished size, orange or rust-colored fabric for the pumpkins, several shades of blue denim for flowers and leaves, brown or khaki fabric for branches and stems, coordinating sewing thread, fusible web if desired, fabric scissors, pins or clips, an iron, marking tools, and a sewing machine. Small beads, cords, buttons, or embroidery thread are optional additions that can reproduce the dimensional handcrafted character visible in the inspiration image.
Preparing the Denim Panel and Creating the Appliqué Pattern
Begin by preparing the denim panel that will become the foundation of the entire design. Cut your denim to approximately 44 × 54 cm if you want a finished panel around 40 × 50 cm. The extra fabric provides working space and allows the edges to be trimmed neatly after all appliqués have been attached. Press the denim carefully from the reverse side to remove wrinkles without flattening its natural texture. If the denim is particularly lightweight or stretchy, add a medium-weight fusible interfacing to the back. This reinforcement helps prevent distortion when multiple appliqué pieces and decorative stitches are added.
DISCOVER MORE FREE PATTERNS HERE!
Next, create the individual templates for your appliqué pattern. The design can be divided into pumpkins, pumpkin caps, stems, flower petals, flower centers, leaves, and branches. For a balanced arrangement similar to the inspiration, prepare four pumpkin templates in different sizes. The largest pumpkin can measure approximately 16 × 14 cm, the second around 13 × 11 cm, and the smaller pumpkins approximately 10–12 cm wide. Rather than making every pumpkin identical, vary the proportions slightly. Small differences make the composition appear more organic and handcrafted.
Each pumpkin should be divided visually into curved sections. You do not necessarily need to cut every section from separate pieces of fabric. An easier method is to cut one complete pumpkin silhouette from orange fabric and create the divisions afterward with decorative stitching. Trace the pumpkin shape onto paper first, cut the template, and transfer it to the wrong side of the chosen fabric. If you are using fusible web for raw-edge appliqué, trace the shape onto the paper side of the fusible material before attaching it to the fabric.
The leaves can be prepared in several sizes, generally between 6 and 12 cm long. Use different shades of blue denim to introduce subtle variation throughout the design. A simple pointed oval makes an effective leaf template. After cutting each leaf, draw a central vein and several diagonal side veins with a removable fabric marker. These lines will later guide the decorative stitching and give the leaves their recognizable dimensional appearance.
For the flowers, create several rounded petal templates. A five-petal flower approximately 8–10 cm across works well for the larger blossoms, while smaller petals can be layered on top to create additional depth. Use contrasting shades of blue denim appliqué so that one layer does not disappear against another. Small circles, buttons, beads, or tightly stitched fabric pieces can form the centers. Keeping the flower construction slightly irregular contributes to the handmade charm of the finished panel.
Finally, arrange all paper templates directly on the denim before cutting too many fabric pieces. Position the pumpkins first because they are the dominant elements, then add branches, flowers, and leaves around them. Photograph or sketch the arrangement before removing the templates. This simple planning stage is important because a successful fabric appliqué panel depends as much on spacing and balance as it does on accurate sewing.
Cutting, Positioning, and Applying the Pumpkin Appliqués
Once the composition has been planned, cut the pumpkin pieces from orange, rust, terracotta, or warm khaki-toned fabrics. Medium-weight cotton, linen-look fabric, canvas, and soft upholstery remnants can all work well. If your goal is to emphasize the contrast between denim and khaki panels, consider using muted earthy fabrics alongside brighter orange sections. Press each piece before application so that its edges remain smooth and easy to stitch.
If using fusible web, attach it according to the manufacturer’s general heat requirements while protecting the fabric with a pressing cloth when necessary. Cut each pumpkin precisely along its traced outline, remove the backing paper, and position it on the denim. Do not permanently fuse every element immediately. First place all major pumpkins on the panel and check the overall spacing. Leave enough room between them for flowers, branches, and leaves.
When you are satisfied with the arrangement, secure the pumpkin appliqués. With raw-edge appliqué, stitch approximately 2–3 mm inside the fabric edge using a straight stitch, narrow zigzag stitch, blanket stitch, or another decorative sewing-machine stitch. A slightly contrasting thread can make the stitching a visible design feature. For a rustic project, perfectly invisible stitching is not necessary; clearly defined stitches can enhance the handmade appearance.
Create the characteristic pumpkin segments by marking several curved vertical lines. Start near the stem area and curve the lines gently toward the lower center. Sew along these markings with a slightly longer stitch length or use two parallel rows for stronger visual definition. The goal is to suggest the rounded sections of a real pumpkin without adding unnecessary bulk. Decorative thread in beige, cream, tan, or gold can create an attractive contrast against orange fabric.
Cut the pumpkin caps and stems separately. The cap can be made from blue denim to coordinate with the flowers and leaves, while the stem can use brown or khaki fabric. Layer the cap slightly over the upper edge of the pumpkin before stitching it into place. Add a small stem above the cap and topstitch around its perimeter. These overlapping pieces are important because they create the dimensional layered effect that makes appliqué artwork visually interesting.
Repeat this process for all pumpkins, varying their orientation slightly. One pumpkin might hang almost vertically, another may lean toward the side, and the largest can become the central visual anchor. Avoid positioning everything in perfectly straight rows. A gentle diagonal movement across the panel creates a more natural composition and helps guide the viewer’s eye from one decorative element to another.
Building Denim Flowers, Leaves, Branches, and Decorative Stitching
The branches provide the structural framework connecting the different elements of the Tutorial on Applying Appliqués to Denim and Khaki Panels Pattern. Cut narrow curved strips from brown, tan, or khaki fabric. Because narrow curved pieces can be difficult to handle, fusible web is particularly useful here. Another option is to use fabric cord or bias strips. Arrange the branches so that they travel naturally between the pumpkins, flowers, and leaves without making the design feel crowded.
Attach the branches before adding most of the leaves and flowers because those elements should visually overlap the branches. Stitch along both sides of each branch using a coordinating or contrasting thread. For additional texture, add a decorative line of embroidery or machine stitching beside the branch. This detail creates the appearance of hand-finished textile artwork even when most of the construction is completed by machine.
Now assemble the denim flowers. Place the largest petal layer on the panel first and secure it around the edges. Add a smaller contrasting layer over it, rotating the second layer slightly so the lower petals remain visible. Finish the center with a fabric circle, decorative button, small beads, or several rounds of embroidery stitches. If the finished panel will be framed behind glass, avoid very bulky embellishments; if it will be displayed without glass, dimensional centers can be more pronounced.
Prepare the leaves by stitching around their outside edges and then sewing the marked vein lines. A pale beige, gray, or golden thread creates attractive contrast against dark blue denim. If you prefer a subtler appearance, select thread only one or two shades lighter than the leaf fabric. Mixing light, medium, and dark denim leaves is an excellent way to add visual depth without introducing additional colors.
Decorative stitching is one of the defining features of this appliqué sewing pattern. Use topstitching deliberately rather than treating it only as a construction method. Outline pumpkin edges, emphasize flower petals, create leaf veins, and add small lines along branches. If your machine includes decorative stitches, test them on scrap denim before using them on the final project. Adjust thread tension and stitch length until the fabric remains flat and the stitching looks consistent.
Small embellishments can complete the composition. A hanging strand made from beads, fabric-covered knots, embroidered circles, or small wooden-style beads can provide additional movement. These details are optional and should not overwhelm the main appliqués. Think of them as finishing accents. The pumpkins and flowers should remain the strongest focal points, with smaller decorative components supporting the overall denim appliqué design.
Finishing, Framing, and Caring for Your Appliqué Panel
After every appliqué has been attached, inspect the entire panel carefully. Look for loose thread ends, areas where the appliqué edges may need additional stitching, and sections that appear uneven. Trim threads from the reverse side and secure any stitches that could unravel. If fusible materials were used, confirm that all edges remain firmly attached after the extensive sewing process.
Press the completed panel gently from the reverse side. Place it face down on a thick towel so dimensional flowers, beads, and textured stitching are not crushed. Use moderate heat appropriate for the fabrics involved. Denim can usually tolerate relatively high heat, but synthetic embellishments and fusible adhesives may require lower temperatures. A pressing cloth provides additional protection.
Square the panel using a quilting ruler or measuring tape. If you originally cut the background to 44 × 54 cm, you can now trim it to approximately 40 × 50 cm or whatever dimensions best suit your composition. Check that important leaves and branches remain comfortably inside the finished edges. Leaving some negative space around the design prevents the composition from looking crowded once it is framed.
For a framed finish similar to the inspiration, mount the finished appliqué panel over a firm backing board covered with batting or another thin layer of fabric. The batting can provide subtle softness behind the denim. Stretch the panel evenly without pulling it so tightly that the appliqués become distorted. Secure the excess fabric at the back of the mounting board before inserting it into a suitable decorative frame.
The project can also be finished as a traditional textile wall hanging instead of using a rigid frame. Add batting and backing fabric, quilt lightly around the appliqués, and finish the outer edges with binding. A hanging sleeve can be sewn across the upper back edge. This approach turns the design into a small art quilt and makes it easier to display without glass.
To care for your finished Tutorial on Applying Appliqués to Denim and Khaki Panels Pattern, occasional gentle dusting is usually sufficient for a decorative wall piece. If the project contains beads, buttons, raw-edge appliqués, or dimensional embroidery, avoid frequent machine washing. For washable versions, prewash all fabrics before construction and choose secure stitching instead of delicate glued embellishments. Proper preparation will help your textile artwork maintain its shape and appearance over time.
Frequently Asked Questions About Denim and Khaki Appliqué Panels
What is the best denim for an appliqué wall panel?
Medium-weight denim is usually the easiest choice because it provides enough stability to support multiple appliqués without becoming excessively heavy. Very thick jeans denim can be difficult to stitch through when several layers overlap, while extremely lightweight denim may require interfacing. Recycled denim can also work beautifully as long as it is clean, stable, and relatively flat.
Do I need fusible web for this project?
No. Fusible web is convenient because it keeps individual shapes stable while they are stitched, but traditional pinned or basted appliqué methods can also be used. Beginners often find fusible appliqué easier because pumpkins, leaves, and petals are less likely to shift underneath the presser foot.
What is the difference between appliqué and patchwork?
Appliqué involves placing fabric shapes on top of a background fabric and stitching them in place. Patchwork generally involves joining separate fabric pieces edge to edge to create a larger surface. This project primarily uses appliqué because the pumpkins, flowers, leaves, and branches are layered over a denim background.
Can old jeans be used for the flowers and leaves?
Yes. Repurposed jeans are excellent for creating denim appliqués, particularly when several washes and shades are available. Dark, medium, and faded denim can produce natural contrast between neighboring petals and leaves. Avoid extremely worn sections that are too thin to hold decorative stitching securely.
How can I prevent denim from fraying around the appliqué edges?
You can use a narrow zigzag, satin stitch, blanket stitch, or closely spaced straight stitching around the edges. Fusible web also helps stabilize raw edges. A small amount of controlled fraying can actually complement rustic textile art, but the stitching should still prevent excessive unraveling.
What needle should I use when sewing denim appliqués?
A denim or jeans needle is generally suitable for a denim background, especially when several layers overlap. Needle size should correspond to the combined fabric thickness. Always test the selected needle, thread, and stitch combination on scraps before sewing the final panel.
Can this pattern be made without a sewing machine?
Yes. Hand appliqué and decorative embroidery can produce a beautiful result, although the project will require considerably more time. Blanket stitch, running stitch, backstitch, and simple embroidery techniques can be used to attach and decorate the fabric pieces.
How do I make the pumpkins look dimensional?
Use curved decorative stitching to divide each pumpkin into sections. Slightly different thread shades, carefully placed seams, and optional thin batting underneath the pumpkin appliqué can create additional depth. Layering the blue cap and brown stem over the pumpkin also strengthens the three-dimensional effect.
Can I change the colors of the original design?
Absolutely. The orange-and-blue combination creates a strong autumn-inspired contrast, but the same appliqué pattern can be adapted to many palettes. Neutral khaki pumpkins, burgundy flowers, green leaves, or lighter denim backgrounds can completely transform the project while preserving its basic construction.
Is this project suitable for beginners?
A confident beginner can complete it by working slowly and testing stitches beforehand. Start with simple pumpkin and leaf shapes before constructing the layered flowers. The advantage of this design is that slight variations and irregularities often enhance its handmade appearance rather than detract from it.
How large should the finished wall panel be?
Approximately 40 × 50 cm is a practical starting point, but there is no mandatory finished measurement. You can enlarge the templates for a substantial wall hanging or reduce them for a smaller framed decoration. Keep the proportions of the pumpkins, flowers, leaves, and empty background space balanced when resizing.
Can batting be placed underneath individual appliqués?
Yes. A thin piece of batting placed beneath selected pumpkins or flowers can create a subtle trapunto-style dimensional effect. Trim the batting slightly smaller than the fabric appliqué so it remains hidden. Avoid excessive thickness around areas where several appliqués overlap.
Conclusion
The Tutorial on Applying Appliqués to Denim and Khaki Panels Pattern demonstrates how familiar fabrics can be transformed into detailed textile artwork through careful layering, decorative stitching, and thoughtful composition. Beginning with a sturdy denim background, you learned how to plan the arrangement, create pumpkin templates, prepare leaves and flowers, construct branches, apply fabric shapes, and use visible stitching to enhance the contours and textures of each element.
The project also shows why denim appliqué, khaki fabric, raw-edge appliqué, decorative stitching, and layered fabric techniques work so well together. The sturdy background supports dimensional components, while contrasting fabric colors allow even simple shapes to become visually expressive. By varying denim shades and using warm orange or earthy fabrics for the pumpkins, you can create depth without needing an overly complicated selection of materials.
EASILY FIND THE PDF FOR THIS PATTERN HERE!
Most importantly, this pattern is flexible. Measurements, colors, embellishments, and even the number of pumpkins can be adjusted to suit the fabrics you already have. Whether the completed piece becomes framed textile art, an appliqué wall hanging, or the starting point for a larger quilt, the same fundamental techniques can be reused in many future sewing projects. If you create your own version of the Tutorial on Applying Appliqués to Denim and Khaki Panels Pattern, leave your sincere opinion about the project and share your suggestions. Which colors would you choose for the pumpkins and denim flowers? Your ideas and personal variations can inspire new ways to transform this pattern into a truly unique piece of fabric art.