
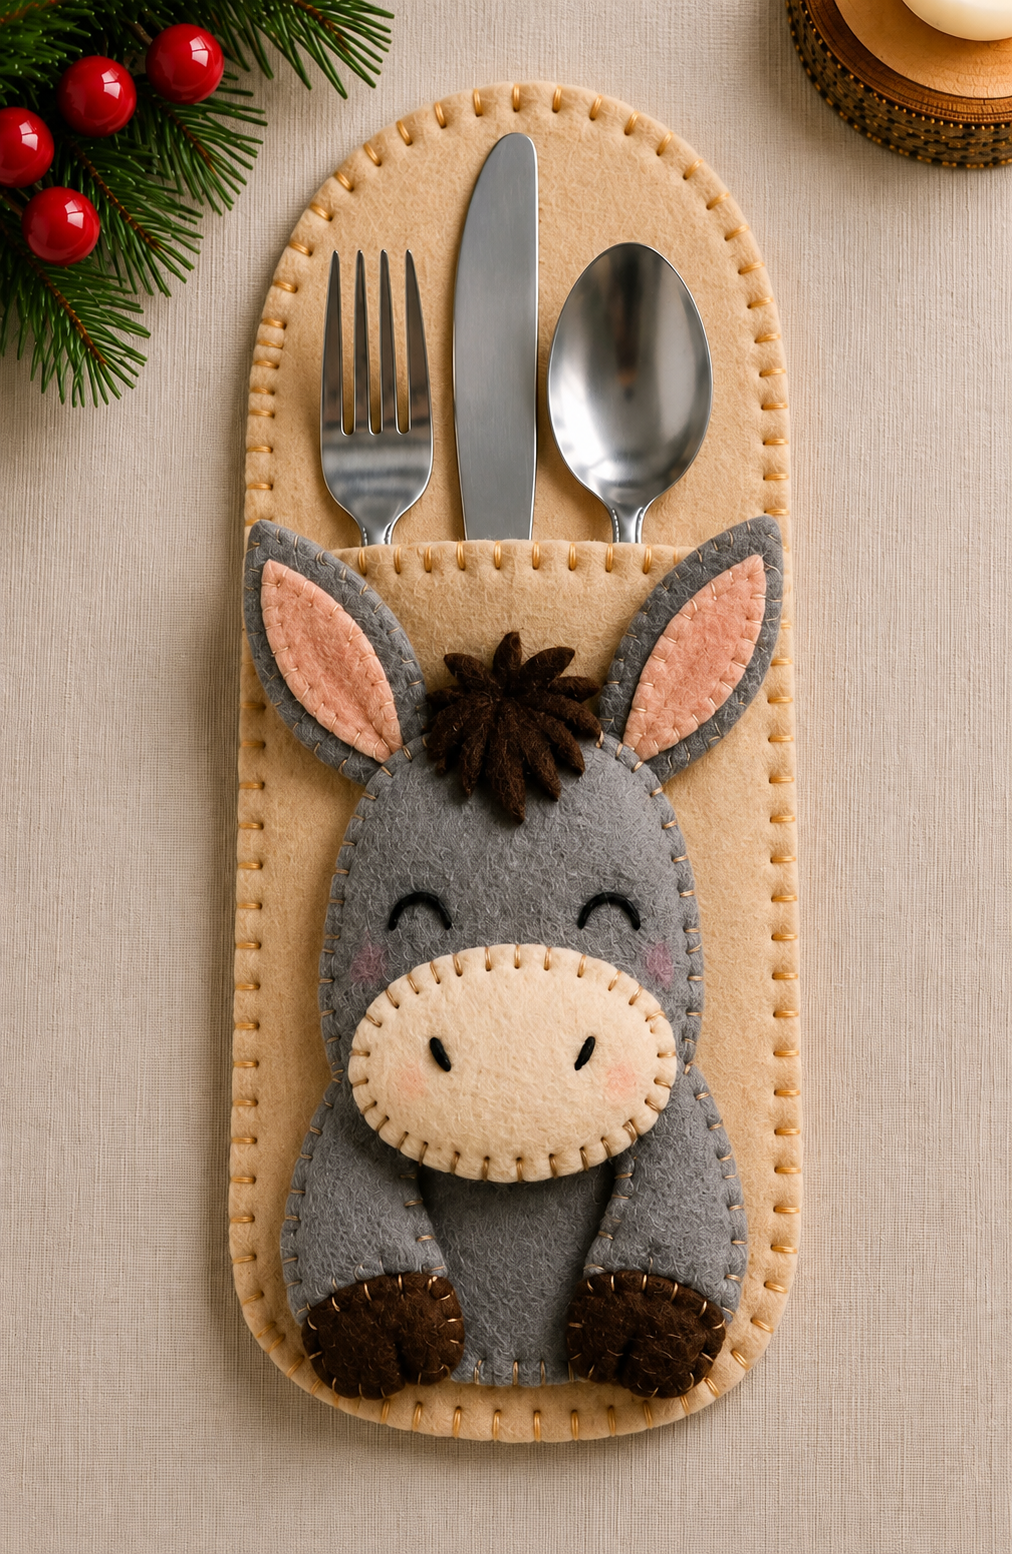
The Donkey Design felt cutlery holder Pattern is a charming handmade project that combines decorative sewing, felt appliqué, and practical table organization in one creative piece. Inspired by the photographed design, this project features a soft gray donkey with long ears, a light muzzle, dark brown hooves, a textured mane, and a warm beige background that also functions as a cutlery pocket. The finished holder can accommodate a fork, knife, and spoon while adding a cozy handcrafted detail to a holiday dinner, family gathering, farmhouse-style table, or children’s celebration. Because the construction relies mainly on simple shapes and visible hand stitching, it is also a welcoming project for people who are still building their confidence with felt crafts.
One of the best characteristics of the Donkey Design felt cutlery holder Pattern is that it does not require complicated sewing equipment or advanced tailoring experience. Most of the components can be cut from felt, positioned in layers, and secured with basic hand stitches. The decorative blanket stitches visible around the edges give the project a polished handmade appearance while also helping reinforce the felt pieces. Neutral shades such as beige, gray, cream, soft pink, and dark brown create the warm rustic appearance shown in the inspiration image, but the same pattern can easily be customized to coordinate with different table decorations. This flexibility makes the project suitable for seasonal crafting as well as everyday handmade décor.
This tutorial explains the complete process of creating the Donkey Design felt cutlery holder Pattern, from planning the dimensions and choosing materials to assembling the pocket and adding the donkey appliqué. Throughout the project, accuracy matters more than speed. Felt is forgiving, but carefully aligned layers will create a cleaner finished piece and make the utensils sit securely inside the holder. The main techniques used include felt appliqué, blanket stitch, running stitch, layered felt construction, and simple hand embroidery. By learning what each technique does and when to use it, you can reproduce the visual style of the photographed holder while developing skills that can be reused in many other handmade felt projects.
Materials, Measurements, and Preparing the Felt Pieces
Begin by gathering medium-weight craft felt in beige, medium gray, cream, blush pink, dark brown, and black. You will also need embroidery floss or strong sewing thread in coordinating shades, sharp fabric scissors, sewing pins or clips, a removable fabric marker, a hand-sewing needle, and paper for creating templates. The Donkey Design felt cutlery holder Pattern works especially well with wool-blend felt because it holds its shape nicely, but good-quality synthetic felt can also produce attractive results.
DISCOVER MORE FREE PATTERNS HERE!
For the main holder, cut two matching rounded rectangles approximately 13 cm wide by 28 cm long. Round the upper corners into a soft arch similar to the photographed piece. The lower corners should also be rounded slightly so the entire holder has a smooth silhouette. These two layers form the front and back structure and provide enough stability to support standard table utensils without making the finished project excessively thick.
Next, prepare the utensil pocket. Cut a beige felt rectangle approximately 13 cm wide by 9 cm high, adjusting the upper edge so it matches the width of the main holder. This pocket should sit approximately halfway down the project, leaving enough room for the handles of the fork, knife, and spoon to slide inside. The pocket is an important part of the felt cutlery holder because it must be decorative while remaining strong enough for repeated use.
Create the donkey body template from paper before cutting the gray felt. A finished body around 9 to 10 cm wide and 12 to 13 cm high works well for these proportions. Draw a rounded head connected visually to a wider lower body, then create separate templates for the ears, muzzle, front legs, hooves, and mane. Using separate pieces makes the appliqué more dimensional and allows the donkey to resemble the layered construction seen in the photo.
The ears should be long and slightly pointed, measuring approximately 3 cm wide by 7 cm long. Cut two outer ears from gray felt and two smaller inner ear pieces from blush pink felt. For the muzzle, cut a soft oval approximately 7.5 cm wide by 5 cm high from cream or pale beige felt. Two dark brown pieces can be used for the hooves, while several narrow irregular strips or looped pieces of brown felt can create the textured mane.
Before sewing anything permanently, arrange all pieces on the main beige base. This process is known as dry placement, and it is one of the easiest ways to prevent alignment problems. Check that the donkey remains centered, the ears do not interfere with the utensil pocket opening, and enough space remains around every edge for stitching. Photographing or sketching the arrangement before sewing can also help you remember the ideal position while assembling the individual layers.
Sewing the Main Cutlery Holder and Creating the Pocket
Place the two large beige felt base pieces directly on top of each other. Make sure their edges match accurately, then secure them temporarily with clips or pins. Sew around the outer perimeter using a blanket stitch, leaving approximately 0.5 cm between stitches. Blanket stitching creates the small decorative loops seen around the border of the photographed Donkey Design felt cutlery holder Pattern while simultaneously joining and strengthening the layers.
A blanket stitch is created by bringing the needle through the felt near the edge and catching the working thread underneath the needle before tightening the stitch. This produces a small loop that sits neatly along the outside edge. Keep your spacing as consistent as possible. Slight imperfections are completely natural in handmade work, but repeating approximately the same stitch length throughout the project creates a professional visual rhythm.
Once the base has been joined, position the rectangular pocket on the front side. Align the lower and side edges with the main holder while leaving the upper edge completely open. Pin the pocket securely because this area will experience more movement than the decorative appliqué. Sew down both sides and along the bottom using the same blanket stitch technique. Do not stitch across the top because that opening is where the utensils will be inserted.
Test the pocket before continuing. Insert a fork, knife, and spoon and check whether they sit comfortably without stretching the felt. The utensils should remain upright while still sliding in and out easily. If the pocket feels too tight, remove the side stitches and reposition the fabric slightly. Making this correction now is easier than attempting to change it after the donkey decoration has been attached.
To reinforce the upper corners of the pocket, add two or three small backstitches on each side. A backstitch is stronger than a decorative running stitch because every new stitch overlaps slightly with the previous one. These hidden reinforcement stitches can help prevent the upper corners from pulling loose after repeated use, particularly when heavier stainless-steel cutlery is inserted.
At this stage, you should have a complete functional felt holder with a large beige base, visible decorative edge stitching, and a secure utensil pocket. The remaining steps focus on transforming this simple structure into the distinctive Donkey Design felt cutlery holder Pattern. Keeping the decorative work separate from the structural assembly also makes the project easier to control and reduces the risk of accidentally stitching through the pocket opening.
Creating and Appliquéing the Donkey Design
Start the donkey appliqué by positioning the gray body on the lower half of the utensil pocket. Leave approximately 1.5 to 2 cm between the bottom of the donkey and the outer edge of the holder. The character should appear centered and balanced. Pin or lightly tack the body in position, then attach it using small blanket stitches in thread that coordinates with the gray felt.
Felt appliqué is the method of layering smaller decorative fabric shapes onto a larger background. Unlike traditional turned-edge cotton appliqué, felt does not fray, so its raw edges can remain visible. This makes the technique especially convenient for projects with playful shapes such as animals. On the Donkey Design felt cutlery holder Pattern, the exposed gray, pink, cream, and brown layers create depth without requiring complex seam allowances.
Attach the gray outer ears behind or slightly underneath the top edge of the donkey’s head. Add the smaller pink inner-ear pieces on top and secure them with delicate running stitches or blanket stitches. A running stitch is one of the simplest embroidery stitches, created by passing the needle repeatedly up and down through the felt. Keeping these stitches small will make the ear details appear neat and intentionally handcrafted.
Place the cream-colored oval muzzle over the lower section of the donkey’s face. Secure it around the edge using a contrasting or matching thread. Add two tiny black stitches for the nostrils. For the eyes, use black embroidery thread to create short curved lines resembling relaxed closed eyes. These minimalist facial details are important because they create the gentle, cheerful personality visible in the photographed donkey without making the design overly complicated.
Add the dark brown hooves to the bottom of the body and stitch around their edges. To create the mane, cut several uneven dark brown felt strips and layer them between the ears and forehead. They can be folded, twisted slightly, or overlapped before stitching the center firmly in place. The irregular texture makes the mane appear fuller and gives the felt donkey appliqué a playful three-dimensional quality.
Complete the face with optional blush details on the cheeks. Small circles of pale pink felt can be stitched in place, or a tiny amount of fabric-safe coloring can be added carefully. Step back and inspect the proportions before finishing. The ears should appear symmetrical, the muzzle centered, and the hooves balanced. Small adjustments at this stage can greatly improve the overall appearance of your Donkey Design felt cutlery holder Pattern.
Finishing Details, Care, and Creative Customization
After all appliqué pieces have been attached, inspect the back of the holder and trim any loose threads. Tie embroidery knots securely and hide the thread ends between felt layers whenever possible. Avoid leaving large knots exposed because they may catch on table surfaces. Gently reshape the holder with your hands so the rounded edges and utensil pocket return to their intended form.
For a clean finished appearance, lightly press the felt between your hands instead of using very high heat from an iron. Some synthetic felts can melt or change texture when exposed directly to heat. If pressing becomes necessary, place a cotton cloth between the felt and the iron and use a low setting. The goal is simply to flatten uneven areas rather than compress the natural texture of the material.
The completed Donkey Design felt cutlery holder Pattern can be used for family dinners, rustic celebrations, farmhouse table settings, holiday meals, and handmade gift sets. Because each holder is relatively small, making several matching pieces is manageable. Once your templates are prepared, you can cut multiple sets of felt at the same time and assemble them in batches for a coordinated table arrangement.
Color customization provides another creative option. For a traditional rustic appearance, keep the beige, gray, cream, brown, and blush palette shown in the inspiration image. For children’s parties, consider softer pastel shades. A Christmas version could incorporate green or red background details while keeping the donkey neutral. The Donkey Design felt cutlery holder Pattern remains recognizable even when the surrounding colors are changed.
You can also personalize each holder by embroidering a guest’s name, initials, or a small decorative symbol near the upper edge. Keep additional decorations flat so they do not interfere with the utensils. Small stars, hearts, leaves, or simple flowers can complement the donkey without overpowering the central design. This approach turns a practical felt cutlery holder into a handmade place setting that guests can take home afterward.
When cleaning the finished holder, gentle hand cleaning is usually preferable to machine washing because repeated agitation may distort the appliqué or create fuzzy felt edges. Spot-clean minor marks using a slightly damp cloth and allow the project to air-dry completely while lying flat. Proper care will help maintain the shape, stitching, and layered details so your handmade donkey holders can be reused for many special meals.
Frequently Asked Questions About the Donkey Design Felt Cutlery Holder Pattern
What type of felt is best for this project?
Medium-weight craft felt or wool-blend felt is a practical choice. Wool-blend felt generally has a dense texture and polished appearance, while synthetic craft felt can be more accessible for beginners. The most important factor is choosing felt that is firm enough to support the utensils without becoming floppy.
Can beginners make the Donkey Design felt cutlery holder Pattern?
Yes. This project is well suited to beginners because the shapes are simple and felt does not require finished raw edges. Learning basic blanket stitch, running stitch, and simple embroidery techniques is enough to complete most of the design successfully.
What size should the finished cutlery holder be?
A holder approximately 13 cm wide and 28 cm long works comfortably for many standard forks, knives, and spoons. However, dimensions can be adjusted according to the size of your own cutlery. Testing the utensils before completing the decoration is highly recommended.
Do I need a sewing machine?
No. The entire Donkey Design felt cutlery holder Pattern can be assembled by hand. In fact, visible hand stitching contributes significantly to the rustic character of this project. A sewing machine may speed up structural seams, but it is not required.
What is the easiest stitch for joining felt?
The blanket stitch is one of the best options because it both secures and decorates the felt edges. Beginners can also use a basic running stitch if they find blanket stitching difficult at first, although the finished visual effect will be different.
How can I keep the donkey pieces from moving while sewing?
Use sewing clips, pins, or very small temporary tacking stitches. Position the pieces carefully before attaching them permanently. Avoid using excessive adhesive because it may stiffen the felt and make hand stitching more difficult.
Can I make several holders from the same pattern?
Absolutely. Creating reusable paper templates makes it easy to reproduce the same shapes repeatedly. For a full table setting, trace and cut all matching pieces in batches before beginning the sewing stage. This can save time and help maintain consistent proportions.
Can the colors be changed?
Yes. The neutral palette is only one interpretation. Gray can be replaced by brown, cream, or another natural tone, while the background can be adapted to different celebrations. Maintaining strong contrast between the donkey and background helps preserve the visual clarity of the appliqué.
How can I make the holder more durable?
Use two layers for the main base, strong embroidery thread, closely spaced stitches, and reinforced stitching near the pocket corners. Choosing dense felt rather than very thin craft felt will also improve durability.
Can this pattern be used for other animals?
Yes. Once you understand the basic construction of the holder, the donkey appliqué can be replaced with a rabbit, sheep, cow, horse, reindeer, or another simplified felt character. The base and pocket construction can remain almost identical.
Conclusion
The Donkey Design felt cutlery holder Pattern is a creative way to combine practical table décor with the warmth of handmade sewing. Throughout this tutorial, you learned how to prepare a double-layer felt base, construct a functional utensil pocket, apply decorative blanket stitching, create a layered donkey using felt appliqué, embroider simple facial details, add dimensional ears and a textured mane, and reinforce the project so it can be used repeatedly.
The most important part of achieving an attractive result is careful preparation. Accurate templates, balanced placement, consistent stitching, and properly sized pockets make a noticeable difference in the finished project. At the same time, handmade pieces do not need to look mechanically perfect. Small variations in stitching and appliqué placement give every Donkey Design felt cutlery holder Pattern its own personality and make the finished item feel genuinely handcrafted.
EASILY FIND THE PDF FOR THIS PATTERN HERE!
Once you have completed your first holder, you can reuse the same construction method to create an entire table set or experiment with different colors, animals, embroidered names, and seasonal details. The skills practiced here—including blanket stitch, running stitch, felt appliqué, hand embroidery, and layered felt construction—can also be applied to ornaments, gift decorations, table accessories, children’s crafts, and many other creative sewing projects. If you try this Donkey Design felt cutlery holder Pattern, leave your sincere opinion about the project and share your suggestions. It is always interesting to discover which colors, details, or creative adaptations other makers would add to give this friendly little donkey an even more personal handmade style.