
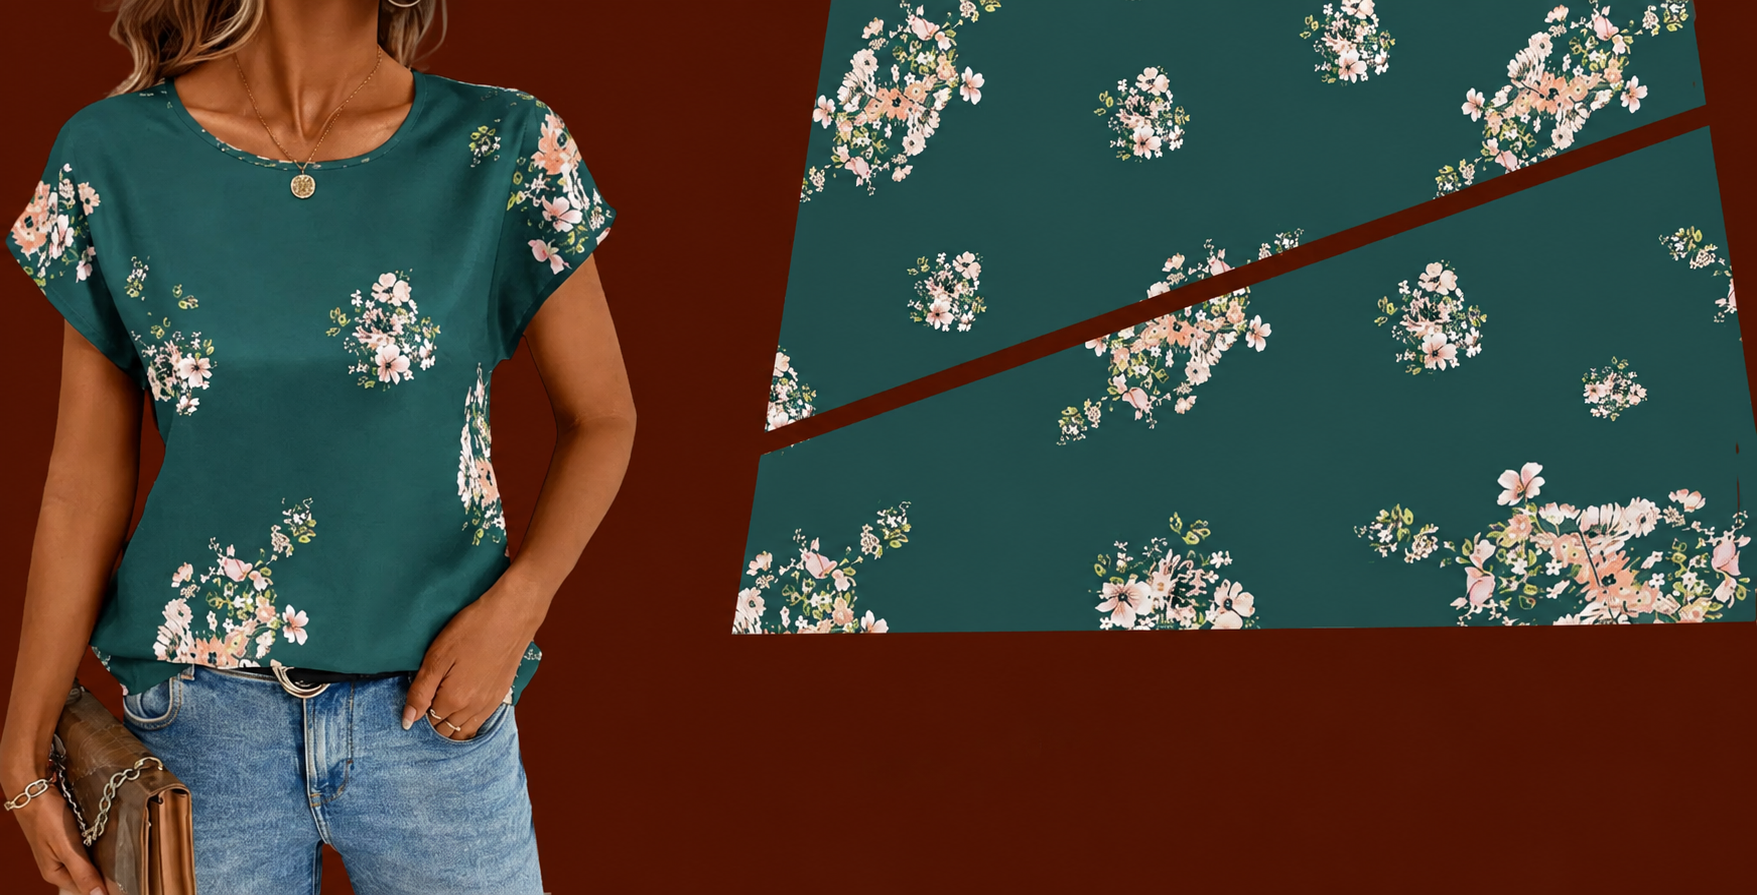
Blouse pattern featuring the latest trends Pattern is a versatile sewing project designed for anyone who wants to create a comfortable, feminine, and modern blouse inspired by relaxed contemporary fashion. The design shown in the reference image combines a loose silhouette, short sleeves, a softly rounded neckline, and an attractive floral fabric that gives the garment a fresh everyday appearance. One of the greatest advantages of this style is that it can be adapted to different body shapes without requiring extremely complicated tailoring techniques. Because the construction uses relatively simple pattern pieces, it is also a practical project for sewists who are developing their garment-making skills. Choosing the right fabric and carefully adjusting the measurements are the most important steps for achieving the relaxed drape visible in the finished blouse. Throughout this tutorial, you will learn how to plan, cut, sew, finish, and customize your own Blouse pattern featuring the latest trends Pattern from beginning to end.
The visual appeal of this blouse comes largely from the balance between a simple garment structure and an expressive floral print. Rather than using complicated seams or heavy decorative details, the project allows the fabric itself to become the main design feature. A deep teal or green background combined with delicate pink, cream, and soft green floral motifs creates a modern yet timeless look, although many other fabric combinations can work beautifully. The blouse has a casual fit through the torso, making it comfortable enough for everyday wear while still looking polished when paired with jeans, trousers, or a skirt. The short sleeves appear integrated naturally into the body of the blouse, which helps create a relaxed shoulder line. When working with this blouse sewing pattern, paying attention to fabric placement can make the floral motifs look balanced across the front and back.
Creating clothing at home also gives you control over details that ready-made garments rarely provide. You can increase or decrease the blouse length, modify the neckline, add a little extra ease around the bust, or create a slightly more fitted waist depending on your preference. The project is especially useful for learning fundamental garment sewing techniques, including taking measurements, creating seam allowances, cutting printed fabric accurately, sewing curved seams, finishing raw edges, and pressing each section during construction. Beginners should work slowly and test the pattern using inexpensive fabric before cutting a favorite floral material. More experienced sewists can personalize the blouse with decorative topstitching, contrasting neckline binding, side vents, or a curved hem. With careful preparation, the Blouse pattern featuring the latest trends Pattern becomes a reusable foundation that can inspire several different handmade tops.
Understanding the Blouse Pattern and Choosing the Right Materials
The first step is understanding the overall shape of the blouse pattern. The reference design features a relaxed body with enough ease to move comfortably without creating excessive volume. The front and back pieces can be drafted using a favorite loose-fitting blouse as a reference or created directly from body measurements. Measure the bust, waist, hip area where the blouse ends, shoulder width, desired blouse length, and arm opening. Add wearing ease so the finished blouse does not feel tight. For a relaxed design, approximately 8 to 12 cm of total bust ease can provide a comfortable starting point, although personal preference should always guide the final adjustment.
DISCOVER MORE FREE PATTERNS HERE!
Fabric selection has a major influence on the finished garment. Lightweight cotton, cotton lawn, rayon blends, viscose, lightweight crepe, and soft woven fabrics are excellent possibilities for this type of modern blouse pattern. A fabric with gentle drape will fall naturally around the body instead of creating a stiff or boxy appearance. If you are a beginner, a stable lightweight cotton may be easier to control while cutting and sewing. Softer fabrics can create beautiful movement but may require additional pinning and slower stitching. Before starting, wash and dry the fabric according to the care method you plan to use for the finished garment.
The floral print shown in the project is another important design element. Medium-scale floral clusters spaced across a solid-colored background create visual interest without making the blouse appear overly busy. When cutting a floral blouse sewing pattern, examine the direction of the motifs before placing your pattern pieces. Make sure flowers are facing the same general direction on the front, back, and sleeves whenever the print has an obvious orientation. You can also position an attractive floral cluster near the shoulder or lower front area while avoiding awkward placement directly at seam intersections.
In addition to fabric, prepare matching all-purpose sewing thread, lightweight fusible interfacing if needed, fabric scissors or a rotary cutter, pins or sewing clips, a measuring tape, tailor’s chalk, a ruler, an iron, and a sewing machine. A universal needle suitable for lightweight woven fabric will work for many materials. If you choose a delicate fabric, selecting the correct needle size can help prevent pulled threads or visible holes. Keeping tools organized before beginning makes the DIY blouse sewing project much easier to complete.
Seam allowance is another detail that should be established before cutting. A seam allowance of approximately 1 to 1.5 cm is practical for most blouse construction seams. The hem may need approximately 2 to 3 cm depending on your preferred finishing method. Around the neckline, the seam allowance can be smaller if you plan to use bias binding. Mark all important reference points, including the center front, center back, shoulder positions, side seams, and sleeve alignment points before removing the paper pattern.
Finally, consider creating a test version, sometimes called a muslin or toile, before cutting expensive fabric. This simple trial garment helps identify whether the neckline is comfortable, the blouse is long enough, and the bust and hip areas have sufficient ease. Minor adjustments are much easier to make during this stage. Once you are satisfied with the proportions, transfer the changes back to the paper pattern. This preparation transforms the Blouse pattern featuring the latest trends Pattern into a personalized sewing template that can be reused with different fabrics and prints.
Drafting and Cutting the Blouse Pattern Step by Step
Begin drafting the front section by drawing a vertical center-front line on pattern paper. Mark the desired blouse length from the highest shoulder point down toward the hem. Next, establish the bust line and half of the required garment width according to your measurements and preferred ease. Shape the shoulder with a gentle slope and create a comfortable curved neckline. The neckline in the reference blouse is moderately wide and rounded, giving the garment an open but still practical everyday style. Check the curve carefully because even small neckline changes can noticeably affect the appearance of a women’s blouse pattern.
The back pattern can be developed from the front while making a few important adjustments. The back neckline should normally sit higher than the front neckline, creating a shallow curve around the back of the neck. Maintain consistent shoulder lengths so the front and back pieces align properly during sewing. The back body can remain relatively straight because the blouse is designed with a relaxed fit. If additional shaping is desired, very subtle side seam curves can be introduced around the waist. Always compare the front and back side seam lengths before cutting fabric.
For the sleeves, the project can use either separate short sleeves or a simplified extended-shoulder construction depending on your sewing experience. The reference style appears relaxed around the upper arm, so avoid drafting a sleeve that is excessively tight. Measure around the fullest part of the upper arm and add sufficient ease for movement. The sleeve length can finish near the upper arm or slightly lower depending on personal preference. A comfortable short sleeve blouse pattern should allow the wearer to lift and move the arms without pulling dramatically across the chest.
Once the paper pattern is complete, fold the prewashed and pressed fabric according to the cutting layout. Position the center front and center back along the fold when the design uses pieces without a center seam. Pin or weight the pattern securely and check the print direction before cutting. Floral fabrics deserve extra attention because prominent motifs can look noticeably uneven if the pieces are placed randomly. Carefully cut around the pattern without lifting or stretching the fabric unnecessarily.
Transfer every useful construction mark onto the wrong side of the fabric. These marks may include shoulder points, sleeve centers, side seam references, front and back identification marks, and hem lines. Avoid using permanent markers because they may show through lightweight material. Tailor’s chalk or washable fabric markers are usually more appropriate. Accurate markings make the later stages of blouse construction faster and help prevent accidentally attaching components in the wrong direction.
Before moving to the sewing machine, arrange the cut pieces on a flat surface in their approximate garment positions. This simple check allows you to verify that the floral print looks balanced and that no piece has accidentally been cut upside down. Compare corresponding seams once more to confirm they match. If everything aligns correctly, your cutting stage is complete. Taking a few extra minutes here can prevent difficult corrections later and contributes greatly to the professional appearance of the finished Blouse pattern featuring the latest trends Pattern.
Sewing, Finishing, and Customizing the Modern Blouse
Start construction by placing the front and back blouse sections with their right sides together. Align the shoulder seams, pin them securely, and stitch using the previously selected seam allowance. Finish the raw edges with an overlocker, zigzag stitch, or another suitable seam-finishing technique to reduce fraying. Press the shoulder seams carefully after sewing. Pressing is an essential part of professional garment sewing because it helps seams sit flat and creates a cleaner overall shape.
The next stage is attaching the short sleeves if your pattern uses separate sleeve pieces. Match the center of each sleeve cap to the shoulder seam and align the remaining edges around the armhole. Pin carefully without stretching the fabric. Sew slowly around the armhole curve, checking regularly that no unwanted folds are trapped beneath the seam. After stitching, finish the seam allowances and press them toward the sleeve whenever appropriate for the fabric. This technique helps produce a smooth transition between the blouse body and sleeves.
Now sew the side seams. With the blouse still turned inside out, align the front and back sections from the sleeve hem to the bottom edge. Pin both sides and sew continuously when the construction allows it. Before finishing the raw edges, temporarily try on the blouse if possible. Check the bust, waist, hips, and sleeve opening for comfort. If the garment feels excessively loose, small amounts can be removed evenly from both side seams. If it feels tight, adjustments are easier when enough seam allowance was included during cutting.
The neckline deserves careful attention because it is one of the most visible areas of the blouse. A neat finish can be created with bias binding, a narrow facing, or a shaped neckline facing reinforced with lightweight interfacing. For bias binding, stitch the binding evenly around the neckline, trim bulky seam allowance if needed, fold the binding toward the inside, and secure it carefully. Press the finished neckline so it lies flat against the body. Avoid stretching the neckline while sewing because this can create unwanted waves.
Finish the sleeve edges with a narrow double-fold hem or a small facing depending on the fabric. Press the raw edge toward the inside, fold it again, and stitch evenly around each sleeve. Use the same principle for the lower blouse hem, although a slightly deeper hem often produces a more attractive finish. When working around gentle curves, press gradually rather than forcing the fabric into position. Consistent stitching gives the handmade blouse a polished appearance and helps it withstand repeated wear and washing.
Customization is where this sewing project becomes especially enjoyable. You could create the blouse in solid linen for a minimalist look, soft floral cotton for a romantic style, or lightweight rayon for extra movement. The neckline could be made slightly wider, the blouse length could be increased, or small side vents could be added at the hem. Decorative topstitching can emphasize the neckline and sleeves without making the design too complicated. By keeping the basic Blouse pattern featuring the latest trends Pattern, you can create several garments that look completely different simply by changing fabric, print scale, length, and finishing details.
Frequently Asked Questions About the Blouse Pattern
Is this blouse pattern suitable for beginners? Yes. The relaxed construction makes this style a practical choice for someone learning beginner garment sewing, particularly when made from stable cotton fabric. Beginners should focus on careful measuring, accurate cutting, and pressing after each major seam. Creating a practice version before using expensive fabric can also make the process more comfortable. The neckline may require patience, but bias binding is a useful technique that becomes easier with practice. Taking time rather than rushing is more important than advanced sewing experience.
What fabric works best for this blouse? Lightweight woven fabrics generally provide excellent results. Cotton lawn is comfortable and manageable, while rayon or viscose can create softer movement and a flowing silhouette. Lightweight linen blends are another option for a casual appearance. Avoid extremely heavy fabrics because they may change the intended drape of the modern blouse design. If you are uncertain, hold the fabric vertically before buying or cutting it and observe how naturally it falls.
How much fabric is required? Fabric consumption depends on garment size, fabric width, blouse length, sleeve style, and print direction. Many short-sleeved blouses can be created with approximately 1.5 to 2 meters of standard-width fabric, but larger sizes, narrow fabric, directional prints, or pattern matching may require additional material. Creating your paper pattern first is the safest way to estimate the amount. Lay the pattern pieces within an area matching the fabric width and measure the required length. Always purchase a little extra when working with large floral motifs that need careful placement.
Can I adjust the pattern for different sizes? Absolutely. The blouse pattern featuring the latest trends Pattern can be adapted by adjusting the bust, waist, hip, shoulder, and length measurements. When grading between sizes, distribute increases or decreases gradually rather than changing only one area. Keep seam lines smooth after every adjustment. If the bust measurement falls into one size and the hip into another, blend carefully between those points. A test garment remains the best way to evaluate significant sizing modifications before cutting your final fabric.
How can I make the blouse look more professional? Accurate cutting and pressing are two of the most important factors. Use consistent seam allowances, finish raw edges neatly, and avoid pulling the fabric while stitching curved sections. Match visible floral motifs where practical and keep topstitching evenly spaced. Trim loose threads and press the blouse thoroughly after construction. These relatively simple habits can dramatically improve a DIY blouse pattern and create a finish that looks refined rather than homemade in an unfinished way.
Can the same pattern be used to create different styles? Yes, and that is one of the biggest advantages of developing a reliable basic pattern. You can use a solid fabric for a classic blouse, delicate botanical prints for a feminine version, geometric designs for a modern interpretation, or subtle textures for an elegant garment. Sleeves can be shortened or lengthened, the neckline can be modified, and the hem can be straight or gently curved. Once you have perfected the fit, your Blouse pattern featuring the latest trends Pattern can become a valuable foundation for many future sewing projects.
Conclusion
Creating a Blouse pattern featuring the latest trends Pattern is a rewarding way to combine practical sewing techniques with personal style. Beginning with accurate measurements, you learned how to plan a relaxed blouse silhouette, select suitable lightweight fabric, draft the front and back sections, prepare comfortable sleeves, and position floral motifs before cutting. Careful construction techniques such as shoulder assembly, sleeve insertion, side seam sewing, neckline binding, hemming, seam finishing, and pressing help transform simple pieces of fabric into a wearable garment.
The most important lesson is that a beautiful handmade blouse does not necessarily require complicated construction. Thoughtful fabric selection, balanced proportions, clean seams, accurate measurements, and careful finishing can create an attractive result that feels both current and timeless. Once the basic pattern fits properly, it can also be customized repeatedly with different fabrics, colors, floral prints, sleeve lengths, necklines, and decorative details. If you make this blouse, leave your sincere opinion about the project and share your suggestions for future sewing tutorials. Your ideas and experiences can inspire new variations and help other sewing enthusiasts discover creative ways to personalize this versatile pattern.