
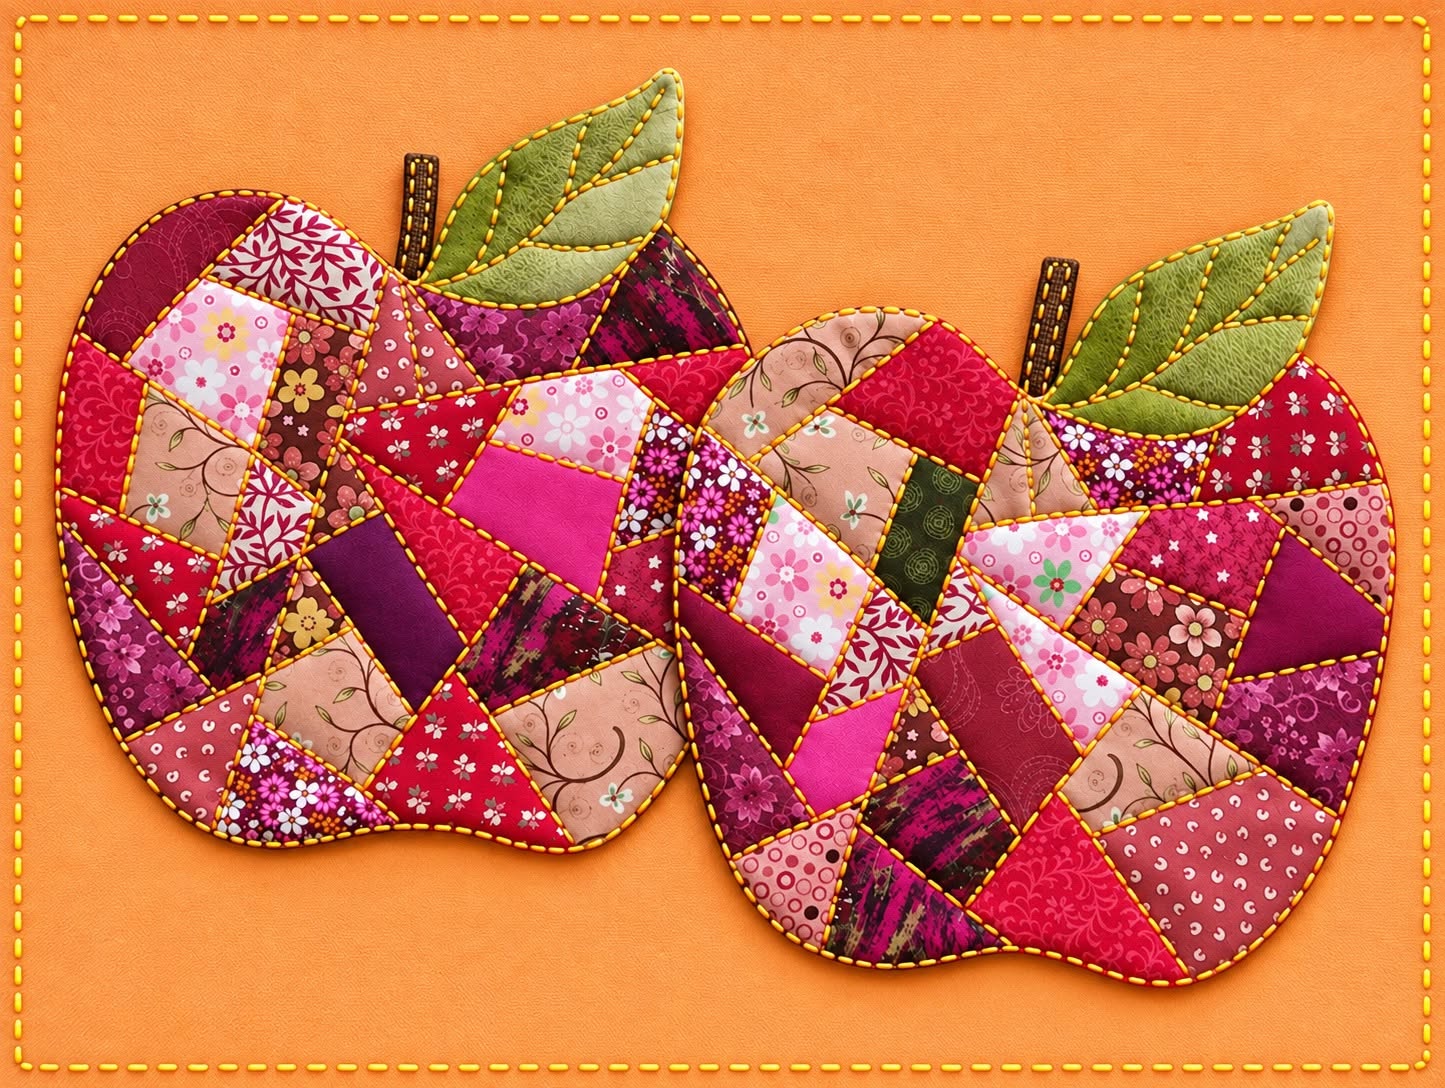
The Quilted Patchwork Apple Tutorial Pattern is a charming sewing project that transforms small fabric scraps into a decorative apple-shaped quilted piece full of color, texture, and handmade personality. Inspired by the patchwork apples shown in the reference image, this project is especially appealing because no two finished apples need to look exactly alike. Floral cottons, tiny prints, solids, and leftover quilting fabrics can all be combined to create a rich mosaic surface. The softly rounded apple silhouette, dimensional green leaf, brown stem, and visible quilting give the finished piece a warm handcrafted appearance. It can be used as seasonal décor, a mug rug, a small trivet, a wall accent, or even part of a larger autumn-themed sewing collection. Best of all, the design is approachable enough for confident beginners while still being enjoyable for experienced quilters who love creative scrap projects.
Working with a Quilted Patchwork Apple Tutorial Pattern is also an excellent way to practice several essential quilting techniques in a small format. Instead of purchasing large amounts of coordinated fabric, you can use scraps already available in your sewing room and experiment freely with different combinations. The irregular patchwork arrangement creates visual movement, while the quilting stitches help stabilize the layers and emphasize the apple shape. Because the pieces do not have to match perfectly, the project encourages creativity rather than precision at every stage. You can choose deep burgundy and pink fabrics like those in the photographed example, or completely change the mood with green, yellow, orange, blue, or traditional red apple colors. Understanding how fabric selection, piecing, batting, shaping, quilting, and finishing work together will help you apply these same skills to many future quilting projects.
Another advantage of this Quilted Patchwork Apple Tutorial Pattern is its flexibility in both size and purpose. A finished apple measuring approximately 20 to 25 cm wide works beautifully as a decorative mat, while a smaller version can become an ornament or appliqué embellishment. Larger apples could even be joined into a table runner or decorative wall hanging. The important idea behind this pattern is not simply copying one arrangement of fabric pieces, but learning the method that creates the patchwork texture and recognizable apple silhouette. By building the fabric surface first, adding support layers, and then cutting or shaping the final form, you gain more control over the finished design. The following tutorial explains each stage carefully so that you can recreate the look of the photo while still making the project uniquely your own.
Materials, Fabric Selection, and Preparing the Apple Template
Begin your Quilted Patchwork Apple Tutorial Pattern by collecting cotton fabric scraps in several coordinating shades. For a look similar to the reference project, combine burgundy, raspberry, dusty pink, red, plum, cream, and small floral prints. Scraps approximately 5 to 10 cm wide are convenient, although smaller pieces can also be used. Mixing solids with floral, geometric, and tone-on-tone fabrics helps create depth without making the design appear overly uniform.
DISCOVER MORE FREE PATTERNS HERE!
You will also need a piece of thin cotton batting or lightweight quilt batting slightly larger than the planned apple, plus backing fabric of the same size. For an apple approximately 23 cm wide and 21 cm high, prepare batting and backing measuring about 28 x 28 cm. This extra space makes construction easier because the final apple can be trimmed after the quilting is finished. Basic supplies include matching thread, scissors, a rotary cutter if available, quilting ruler, pins or clips, sewing machine, iron, and fabric marking pencil.
To create the apple shape, draw a simple rounded apple template on paper. Make two broad rounded lobes at the top, narrow the center slightly near the stem area, and form a gently curved bottom with a shallow indentation in the middle. A useful beginner-friendly template size is approximately 23 cm wide by 21 cm high. The exact measurements are flexible because handmade patchwork apples often look more attractive when their shapes are slightly organic rather than mathematically perfect.
For the leaf, draw an elongated oval or pointed leaf shape approximately 9 cm long and 5 cm wide. Fold the paper leaf in half lengthwise while drawing it if you want a symmetrical result. You can make the leaf from green cotton fabric layered with a small amount of batting for extra dimension. A medium olive green or sage fabric works especially well with warm red and pink patchwork fabrics.
The stem can be made from a narrow rectangle of brown fabric measuring approximately 3 cm wide by 8 cm long before folding. Fold the long edges toward the center, press them, and fold the strip in half again to create a finished stem approximately 0.7 to 1 cm wide. Alternatively, use a narrow piece of brown bias tape or a small folded fabric tube. The slightly textured brown stems visible in the reference image add a natural contrast against the colorful apple body.
Before sewing, arrange all fabric scraps on your work surface and study the balance of color. Avoid placing all dark pieces in one area or all light fabrics together. Distribute floral and solid fabrics throughout the design so the eye moves naturally across the apple. This planning stage is important because successful patchwork quilting depends not only on accurate sewing but also on thoughtful contrast, scale, and color distribution.
Building the Scrappy Patchwork Surface Step by Step
The easiest way to recreate the irregular appearance of the Quilted Patchwork Apple Tutorial Pattern is to build a larger patchwork panel first and cut the apple shape afterward. Start with two small fabric scraps and place them right sides together along one edge. Sew with an approximately 0.6 cm seam allowance, open the pieces, and press the seam to one side. Continue adding scraps around this first unit, changing the direction of the seams as you work.
You do not need perfectly square pieces for this style. Rectangles, trapezoids, angled strips, and irregular shapes can all be combined to form the lively mosaic effect seen in the finished apples. If a fabric edge is uneven, trim it straight before attaching the next scrap. This method resembles improvisational patchwork because the composition grows naturally rather than following a strict block grid. Keep checking that the overall panel remains reasonably flat.
Continue adding fabric until the patchwork section measures at least 27 x 27 cm. This gives enough room for the apple template plus trimming allowance. Whenever several pieces have been joined, press the panel carefully from the back and then lightly from the front. Good pressing is essential because bulky or twisted seams can make the quilted surface difficult to shape later.
Try to alternate fabric values as you sew. Place a darker plum beside a lighter floral, or a bright red beside dusty pink or cream. This prevents individual pieces from disappearing visually into neighboring fabrics. The Quilted Patchwork Apple Tutorial Pattern works especially well when the scraps appear coordinated but not identical, producing the spontaneous handmade character associated with traditional scrap quilting.
If you prefer a more controlled design, you can make small patchwork blocks first and then join the blocks into one panel. For example, sew together groups of four or five scraps measuring approximately 8 to 12 cm each, press the groups, and then combine them. This can be easier for beginners because you work with manageable sections. However, keep the final arrangement irregular rather than creating obvious rows if you want the organic appearance seen in the reference project.
Once the panel is complete, place it on the ironing board and press thoroughly without stretching it. Lay the paper apple template on top and move it around until you find the most attractive section of patchwork. Check where important colors and prints will appear near the center, top curves, and lower corners. Do not cut immediately if the composition feels unbalanced; simply reposition the template until the distribution looks pleasing.
Quilting, Shaping, Stem, Leaf, and Final Assembly
Place the backing fabric wrong side up on a clean surface, position the batting over it, and place the completed patchwork panel right side up on top. Smooth all three layers carefully so there are no wrinkles. Pin or baste the layers together from the center outward. This layered structure is what turns an ordinary patchwork panel into a true quilted patchwork project with softness, stability, and dimension.
Quilt across the patchwork using straight lines, gentle curves, or stitching close to selected seam lines. In the reference style, visible stitching follows different areas of the patchwork and helps define individual fabrics. A stitch length of approximately 2.5 to 3 mm works well for machine quilting. You do not need dense quilting; evenly distributed lines are enough to secure the layers while preserving a soft padded appearance.
After quilting, place the apple template over the layered panel and trace around it with a removable fabric marker. Carefully cut through all layers along the traced outline. At this stage, you should clearly see the apple silhouette developing. Check the curves and trim any uneven areas with small scissors. Smooth, flowing curves generally look better than sharp corners because they reinforce the soft fruit shape.
Prepare the leaf by placing two green fabric pieces right sides together with a thin layer of batting underneath. Sew around the leaf using approximately a 0.6 cm seam allowance, leaving a small opening for turning. Trim the seam allowance, clip carefully around tighter curves, and turn the leaf right side out. Press gently and topstitch around the edge. Add several curved or diagonal lines of quilting to imitate natural leaf veins.
Fold and press the brown stem as described earlier. Position the stem at the upper indentation of the apple so approximately 3 to 4 cm remains visible above the body. Place the leaf beside the stem at a slight angle. Baste both pieces securely. The leaf should appear to grow naturally from the stem area rather than sitting perfectly upright, which gives the finished Quilted Patchwork Apple Tutorial Pattern a more relaxed and realistic handmade character.
Finish the raw edge of the apple using narrow binding, a turned-edge method, or close satin stitching depending on your preferred technique. For a clean quilted finish, narrow bias binding works particularly well around curves because it bends more easily than straight-grain strips. Sew slowly around the rounded edges and clip or ease the binding where necessary. Once the edge is finished, give the apple a final gentle press, taking care not to flatten the dimensional quilting or padded leaf.
Creative Variations, Uses, and Tips for a Professional Finish
One of the most enjoyable features of the Quilted Patchwork Apple Tutorial Pattern is the ability to change the color palette completely. Traditional reds create a classic autumn apple, while greens produce a fresh orchard-inspired design. Golden yellow and orange scraps can create a warm harvest theme. You can even use blue, turquoise, lavender, or neutral fabrics for a modern decorative interpretation that coordinates with your home.
Consider making several apples in different sizes and arranging them together as a seasonal table display. A set of two or three overlapping patchwork apples resembles the composition in the reference image and highlights differences in fabric placement. Each apple can share the same general palette while using a different combination of scraps. This creates unity without making the pieces look mass-produced.
The project also works beautifully as a practical quilted mug rug or small table mat. If you intend to place warm dishes on the apple, choose batting designed for the intended use and avoid decorative materials that are unsuitable for heat exposure. For purely decorative pieces, standard cotton or polyester quilt batting is usually sufficient. Always select materials according to how the finished item will actually be used.
For more texture, add hand quilting after the machine construction is complete. Small running stitches in contrasting or coordinating thread can emphasize individual patchwork pieces. You might also stitch additional veins on the leaf or add a subtle outline around selected floral motifs. Decorative stitching should complement the patchwork rather than overwhelm it, so leave enough unstitched space for the fabrics themselves to remain visible.
A professional-looking Quilted Patchwork Apple Tutorial Pattern depends heavily on pressing and careful finishing. Press every major seam during construction instead of waiting until the entire panel is complete. Trim loose threads frequently, maintain consistent seam allowances where possible, and use a fresh sewing machine needle appropriate for quilting cotton. When sewing around curves, slow down and stop with the needle lowered whenever you need to reposition the project.
Finally, remember that scrap quilting does not require every section to be perfectly symmetrical. Slight differences between two apples often make a handmade set more interesting. The goal is to create a balanced patchwork surface, secure quilting, a recognizable silhouette, and neat finishing. Once you understand the basic method, this same construction approach can be adapted into pears, pumpkins, hearts, leaves, flowers, and many other small quilted shapes.
Frequently Asked Questions About the Quilted Patchwork Apple Tutorial Pattern
What does Quilted Patchwork Apple Tutorial Pattern mean?
The term Quilted Patchwork Apple Tutorial Pattern describes a sewing project that combines three main ideas. “Patchwork” refers to joining smaller pieces of fabric to create a larger decorative surface. “Quilted” means that the decorative top is layered with batting and backing and then stitched together. “Apple pattern” refers to the final fruit-shaped template used to create the recognizable silhouette.
Is this project suitable for beginners?
Yes. A beginner who understands basic straight stitching can successfully complete this project. The irregular scrap arrangement is forgiving because the pieces do not need to form perfectly matched blocks. The most challenging part is usually finishing the curved outer edge, so beginners should sew slowly and practice on a scrap if using bias binding for the first time.
What size should I make the patchwork apple?
A convenient decorative size is approximately 20 to 25 cm wide. The tutorial uses an example around 23 cm wide by 21 cm high, but you can enlarge or reduce the template according to your intended purpose. Always prepare the patchwork panel, backing, and batting several centimeters larger than the final template.
Can I use very small fabric scraps?
Absolutely. This design is ideal for using leftovers from previous quilting and sewing projects. Even pieces only a few centimeters wide can become useful sections of the patchwork. If your scraps are extremely small, join several together first to make larger units before attaching them to the main panel.
What fabric is best for a Quilted Patchwork Apple Tutorial Pattern?
Quilting cotton is usually the easiest option because it is stable, easy to press, widely available, and comes in countless prints. Try to use fabrics with a similar weight so the patchwork surface remains even. Mixing drastically different fabric weights may create uneven seams or distortion during quilting.
Should I cut the apple shape before or after making the patchwork?
For this style, it is generally easier to build and quilt a rectangular or square patchwork panel first and then cut the apple shape. This allows you to reposition the template and choose the most attractive portion of the patchwork. It also avoids struggling to sew tiny scraps directly onto a curved apple-shaped foundation.
How can I stop the apple from becoming distorted during quilting?
Baste the layers carefully and quilt from the center toward the outer areas whenever possible. Avoid pulling the fabric while stitching, and use an appropriate quilting foot if available. Press the patchwork panel before layering it, but do not excessively stretch or steam the finished quilted piece.
Can I make the leaf without batting?
Yes. The batting is optional, but a thin layer gives the leaf more structure and makes the quilted vein lines more visible. If you prefer a flatter leaf, simply sew two layers of green cotton together, turn them right side out, press, and topstitch.
How can I make several apples look coordinated without making them identical?
Choose one consistent color family and repeat a few fabrics throughout the set. For example, use burgundy, pink, red, and cream in every apple but arrange the individual scraps differently. Keep the stem and leaf fabrics similar across the collection. This creates visual consistency while allowing each piece to remain unique.
Can I sew this project by hand?
Yes. The patchwork seams, quilting, leaf construction, and edge finishing can all be completed by hand. Hand sewing will take longer, but it can create a beautiful traditional appearance. Use small, consistent stitches and strong cotton or polyester thread suitable for the fabric.
What other projects can be created from this pattern?
The finished apples can become decorative mats, wall ornaments, seasonal table accents, appliqué pieces, hanging decorations, or components of a larger quilted display. You can also reduce the pattern for small ornaments or enlarge it to create placemats and wall décor.
How do I achieve the dimensional look shown in the finished project?
The dimensional effect comes from several elements working together: batting inside the apple, visible quilting stitches, layered patchwork seams, a padded leaf, and the contrast between the raised quilted surface and the background. Avoid pressing the finished piece too aggressively, because excessive pressure can flatten the batting.
Conclusion
The Quilted Patchwork Apple Tutorial Pattern is a creative way to transform ordinary fabric scraps into a colorful and useful handmade project. Throughout this tutorial, you learned how to select coordinating fabrics, prepare an apple template, construct an improvisational patchwork panel, press the seams, create the quilt sandwich, add quilting stitches, cut the apple shape, prepare a dimensional leaf and stem, and finish the curved outer edge neatly.
The greatest strength of this project is its versatility. You can follow the rich red, pink, burgundy, and floral palette inspired by the reference image, or create a completely different version that reflects your own fabric collection and decorating style. Because each small scrap contributes something unique to the finished surface, even fabrics left over from previous projects can become part of an attractive new design.
Once you have completed one Quilted Patchwork Apple Tutorial Pattern, consider making a second or third apple in different sizes. Displaying several together creates an especially charming arrangement and gives you the opportunity to experiment with new color combinations and quilting details. The same techniques can later be adapted to many other decorative quilted shapes, making this small project valuable practice for future patchwork work.
EASILY FIND THE PDF FOR THIS PATTERN HERE!
Most importantly, enjoy the creative process instead of worrying about making every patch perfectly identical. Handmade quilting has its own personality, and small variations are often what make a project memorable. If you try this tutorial, leave your sincere opinion about the project and share your suggestions. Your ideas about color combinations, finishing techniques, or creative ways to use these patchwork apples can inspire even more possibilities for future quilting projects.