
Beetle Print Fabric Panel Pattern is a charming textile art project that combines appliqué, patchwork-inspired fabric choices, dimensional sewing, and careful hand or machine stitching to create a decorative beetle on a textured fabric background.
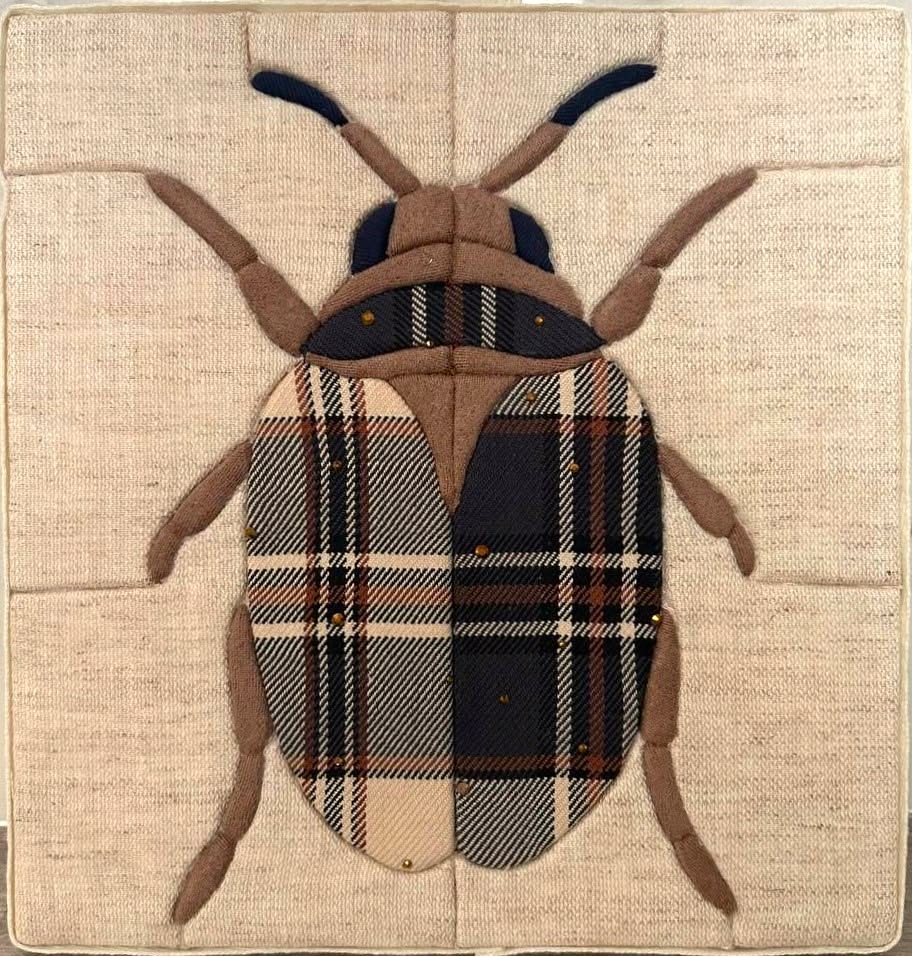
The design shown in the reference image is especially attractive because it uses warm neutral colors, plaid fabric, and dark accents to turn a simple insect silhouette into an elegant piece of fabric wall art.
Instead of relying on complicated quilting techniques, the project can be built from individual fabric shapes that are positioned symmetrically and stitched onto a sturdy background panel.
This makes the pattern approachable for intermediate beginners while still offering enough detail to interest experienced makers who enjoy fabric appliqué, textile pictures, and handmade home décor.
The beetle itself becomes the visual center of the panel, while its segmented body, antennae, legs, head, and wings give the finished piece a dimensional, carefully crafted appearance.
Throughout this tutorial, you will learn how to plan, cut, assemble, stitch, and finish your own Beetle Print Fabric Panel Pattern using practical techniques that can be adapted to the fabrics you already have at home.
One of the most appealing features of this beetle fabric pattern is the contrast between the quiet background and the patterned insect body.
In the photographed project, a cream or oatmeal-colored base allows the brown, black, tan, and plaid sections of the beetle to stand out without making the composition feel too busy.
The wings are divided into different fabric areas, creating the impression of natural beetle markings while also adding the visual richness associated with patchwork sewing.
Slight padding beneath some pieces can give the insect a soft raised appearance, which is particularly effective when the panel is displayed as textile artwork.
Small decorative stitches or tiny embroidered dots can also be added after construction to create subtle highlights that make the design feel handmade and unique.
Because every fabric combination changes the personality of the finished project, the pattern provides plenty of room for creativity while maintaining the recognizable structure shown in the original inspiration.
Creating a polished Beetle Print Fabric Panel Pattern begins with careful preparation rather than complicated equipment.
You need a stable fabric foundation, several coordinating fabric scraps, lightweight interfacing or batting, thread, scissors, pins or clips, and basic sewing tools.
The project is also an excellent way to use leftover pieces from previous quilting projects because the beetle’s individual components require relatively small amounts of fabric.
Choosing fabrics with different values is important: light, medium, and dark tones help separate the beetle’s head, wings, legs, and body even when the colors belong to the same neutral palette.
Accuracy matters most when creating the symmetrical wing shapes, because the two sides should balance visually around the central body seam.
By working slowly through the following stages, you can reproduce the character of the photographed design while creating a finished fabric beetle panel that reflects your own sewing style.
Materials and Planning the Beetle Print Fabric Panel Pattern
Start by selecting the fabric for the background panel. A medium-weight cotton, linen-look fabric, canvas, or quilting cotton reinforced with interfacing works well for this textile appliqué project. The reference design uses a warm cream background that has enough texture to look handmade while remaining visually quiet. For a similar effect, avoid highly patterned background fabrics because they can compete with the beetle.
DISCOVER MORE FREE PATTERNS HERE!
Next, gather fabric scraps for the insect. You will need approximately three to five coordinating fabrics, including a dark fabric for the upper wing or head details, a medium brown for the body and legs, and a patterned fabric for the decorative wings. Plaid, tartan, checked, striped, or subtle geometric materials are excellent choices for creating a patchwork beetle similar to the photograph.
Prepare a paper template before cutting the final fabric. Sketch the beetle as a symmetrical shape with a rounded body, two large lower wings, smaller upper sections, a narrow central body, six legs, and two antennae. Folding the paper vertically before drawing one side is an easy way to create a balanced beetle appliqué template. After cutting the folded paper and opening it, both sides will match.
For a panel approximately 30 to 35 cm wide, make the beetle body roughly 20 to 24 cm tall. The main lower wings can each measure approximately 7 to 9 cm wide at their broadest area, while the central body should remain narrower. These measurements do not need to be exact because the project is decorative, but keeping the proportions consistent will make the Beetle Print Fabric Panel Pattern look harmonious.
Lightweight fusible interfacing is useful when working with fabrics that fray easily. Apply it to the back of the plaid and brown pieces before cutting the final shapes. Interfacing stabilizes the edges, makes detailed pieces easier to handle, and reduces distortion while stitching curved sections. If you prefer a dimensional appearance, add a thin layer of batting underneath the larger body pieces.
Before sewing anything permanently, position every paper or fabric component on the background. Begin with the central body and wings, then arrange the head, legs, and antennae. Step away from the table and look at the entire composition from a distance. This simple check helps you identify uneven spacing before the fabric panel pattern is stitched in place.
Cutting, Preparing, and Building the Beetle Shapes
Begin construction with the central body. Cut a long, gently tapered brown shape that runs from beneath the beetle’s head to the bottom of the wings. The upper portion should be slightly wider than the lower center section. This central piece provides an important visual anchor and helps you align the left and right sides of the beetle quilt appliqué.
Cut the two major wing covers as mirrored pieces. To guarantee symmetry, place the fabric right sides together, position one paper template on top, and cut both layers simultaneously. Rounded outer edges and a relatively straight inner edge create the distinctive beetle silhouette. When using plaid fabric, consider the direction of the lines because intentional pattern placement can make the finished Beetle Print Fabric Panel Pattern look much more professional.
The upper wing areas can be created from darker fabric pieces positioned horizontally beneath the head. In the reference image, these dark sections help separate the insect’s upper body from its large patterned wings. You can use charcoal, black, deep navy, or dark brown fabric. Small strips of contrasting material may also be added to imitate the striped markings visible in the design.
Create the head from a rounded or slightly angular brown piece. Above it, add a smaller section that visually connects the head to the antennae. If desired, place a tiny amount of batting behind these sections before attaching them. This produces gentle relief without making the panel excessively thick and gives the dimensional fabric art a soft sculptural quality.
For the legs, prepare six narrow tapered strips of brown fabric. Each leg can be made from one long piece or from two small segments joined at an angle. The segmented approach resembles the bent legs visible in the reference project and creates a more recognizable beetle shape. Turn the raw edges inward where possible, or secure them using narrow appliqué stitching.
Finally, make two long antennae positioned above the head. Each antenna can consist of a brown lower section with a darker tip, echoing the color combination in the photographed panel. Curve them gently outward rather than positioning them completely straight. At this stage, arrange all pieces again to ensure the insect fabric design remains centered and balanced before stitching begins.
Step-by-Step Assembly and Sewing Technique
Begin the sewing stage by stabilizing your background. If you want the panel to have the slightly padded appearance shown in the image, layer the background fabric over thin batting and a backing fabric. Baste or pin the layers together. This foundation gives the project enough structure to support the multiple pieces used in the Beetle Print Fabric Panel Pattern.
Attach the legs and antennae before the main body because their inner ends should disappear underneath the larger shapes. Position three legs on each side, maintaining similar angles while allowing small variations for a natural appearance. Secure them with pins, temporary fabric adhesive, or basting stitches. Sew close to the edges using a straight stitch, narrow zigzag, or hand appliqué stitch.
Next, place the central body over the inner ends of the legs. Stitch around its edges carefully, keeping the fabric flat. Add the lower wing covers on either side, aligning their straight inner edges near the vertical centerline. Check the symmetry repeatedly because these pieces create most of the visual weight in the beetle fabric panel.
Add the darker upper wing pieces and then position the head components. Slight overlapping between pieces is desirable because it hides raw edges and creates depth. Stitch each layer before adding the next whenever possible. A coordinating brown thread produces subtle seams, while contrasting thread can emphasize the segmented structure if you prefer a more graphic look.
To imitate the patchwork feeling of the photographed project, add decorative seams across selected body sections. These can be simple straight stitches that follow existing plaid lines or deliberately divide a plain fabric area into smaller segments. Tiny embroidered knots or short stitches may also be scattered across the wings as decorative accents. Keep these details restrained so they complement rather than overwhelm the fabric beetle artwork.
After every component has been secured, inspect the entire insect for loose edges, puckering, or uneven seams. Gently press the panel from the back using the temperature appropriate for your fabric. Avoid crushing padded areas. If necessary, reshape curved sections with your fingers while the fabric remains slightly warm.
Finish the panel by trimming the background to an even square or rectangle. The border seen in the inspiration image can be recreated using a narrow binding or folded fabric strip around the outer edges. A neutral beige, cream, or brown binding creates a cohesive finish. Once complete, the Beetle Print Fabric Panel Pattern can be displayed as wall art, framed textile work, a cushion front, or part of a larger quilt.
FAQ About the Beetle Print Fabric Panel Pattern
What fabric is best for a Beetle Print Fabric Panel Pattern? Quilting cotton is one of the easiest options because it is stable, easy to cut, and available in many prints. Linen blends and lightweight upholstery fabrics can also create beautiful texture. For the beetle wings, plaid or checked cotton works especially well because the lines add visual detail without requiring complicated piecing.
Do I need a sewing machine to make this fabric beetle? No. Although a sewing machine makes the assembly faster, the entire beetle appliqué pattern can be completed by hand. Small slip stitches, blanket stitches, or decorative embroidery stitches can secure each piece. Hand sewing can even enhance the handmade character of the finished panel.
How can I prevent the appliqué pieces from fraying? Applying lightweight fusible interfacing to the back of the fabric before cutting can significantly reduce fraying. You may also turn narrow seam allowances underneath, use a close zigzag stitch, or choose a raw-edge appliqué method with a suitable fusible product. The best method depends on the finish you want for your fabric panel project.
Can I use different colors instead of brown and plaid? Absolutely. The neutral palette creates the classic appearance shown in the reference design, but the structure of the Beetle Print Fabric Panel Pattern works with many color combinations. Jewel tones can create a dramatic beetle, bright fabrics can make it playful, and blue or green batiks can suggest the iridescent colors found on real beetles.
How do I make both beetle wings symmetrical? Create one paper template and fold it along the centerline, or cut both fabric pieces at the same time with the fabrics placed right sides together. Mark the central vertical line of your background before positioning the wings. Measuring the distance from each wing to this centerline also helps maintain accurate symmetry.
Can this pattern be adapted for other sewing projects? Yes. The same beetle fabric appliqué can be scaled down for tote bags, table runners, fabric book covers, decorative pockets, or quilt blocks. It can also be enlarged for a statement wall hanging or cushion cover. Maintaining the proportions between the wings, body, legs, and antennae is more important than keeping one specific size.
Conclusion
The Beetle Print Fabric Panel Pattern demonstrates how a small collection of fabric scraps can become an expressive piece of textile art. By combining a neutral background, patterned wings, dimensional body pieces, carefully shaped legs, and distinctive antennae, you can recreate the appealing handcrafted style seen in the reference image while still making the design uniquely your own.
The most important part of the process is good preparation. Creating a balanced beetle appliqué template, choosing fabrics with enough contrast, cutting mirrored wing pieces, and arranging everything before sewing will make the assembly stage considerably easier. Adding lightweight interfacing or batting can further improve stability and give the beetle the soft dimensional appearance that makes this type of project so interesting.
You have also learned how to build the design in a practical order: prepare the background, position the legs and antennae, attach the central body, add the patterned wings, construct the upper body and head, and finish everything with decorative stitching and a clean outer border. These same techniques can be applied to many other fabric appliqué patterns and textile art projects. One of the best aspects of the Beetle Print Fabric Panel Pattern is its flexibility. You can stay close to the brown, cream, black, and plaid palette of the inspiration piece, or experiment with colorful scraps to produce an entirely different personality. Small changes in texture, print scale, embroidery, and stitching can transform the same basic template into something completely original.
EASILY FIND THE PDF FOR THIS PATTERN HERE!
Whether you turn the completed panel into wall décor, a cushion front, a quilt block, or another handmade item, the project offers an enjoyable opportunity to practice patchwork sewing, fabric appliqué, accurate placement, curved stitching, and creative fabric selection. The result is both decorative and practical, especially for anyone looking for an attractive way to use treasured fabric remnants. If you make your own Beetle Print Fabric Panel Pattern, leave your sincere opinion about the project and share any suggestions you may have. It would be wonderful to know which fabrics, colors, stitching techniques, or creative variations you would choose for your own beetle design.