
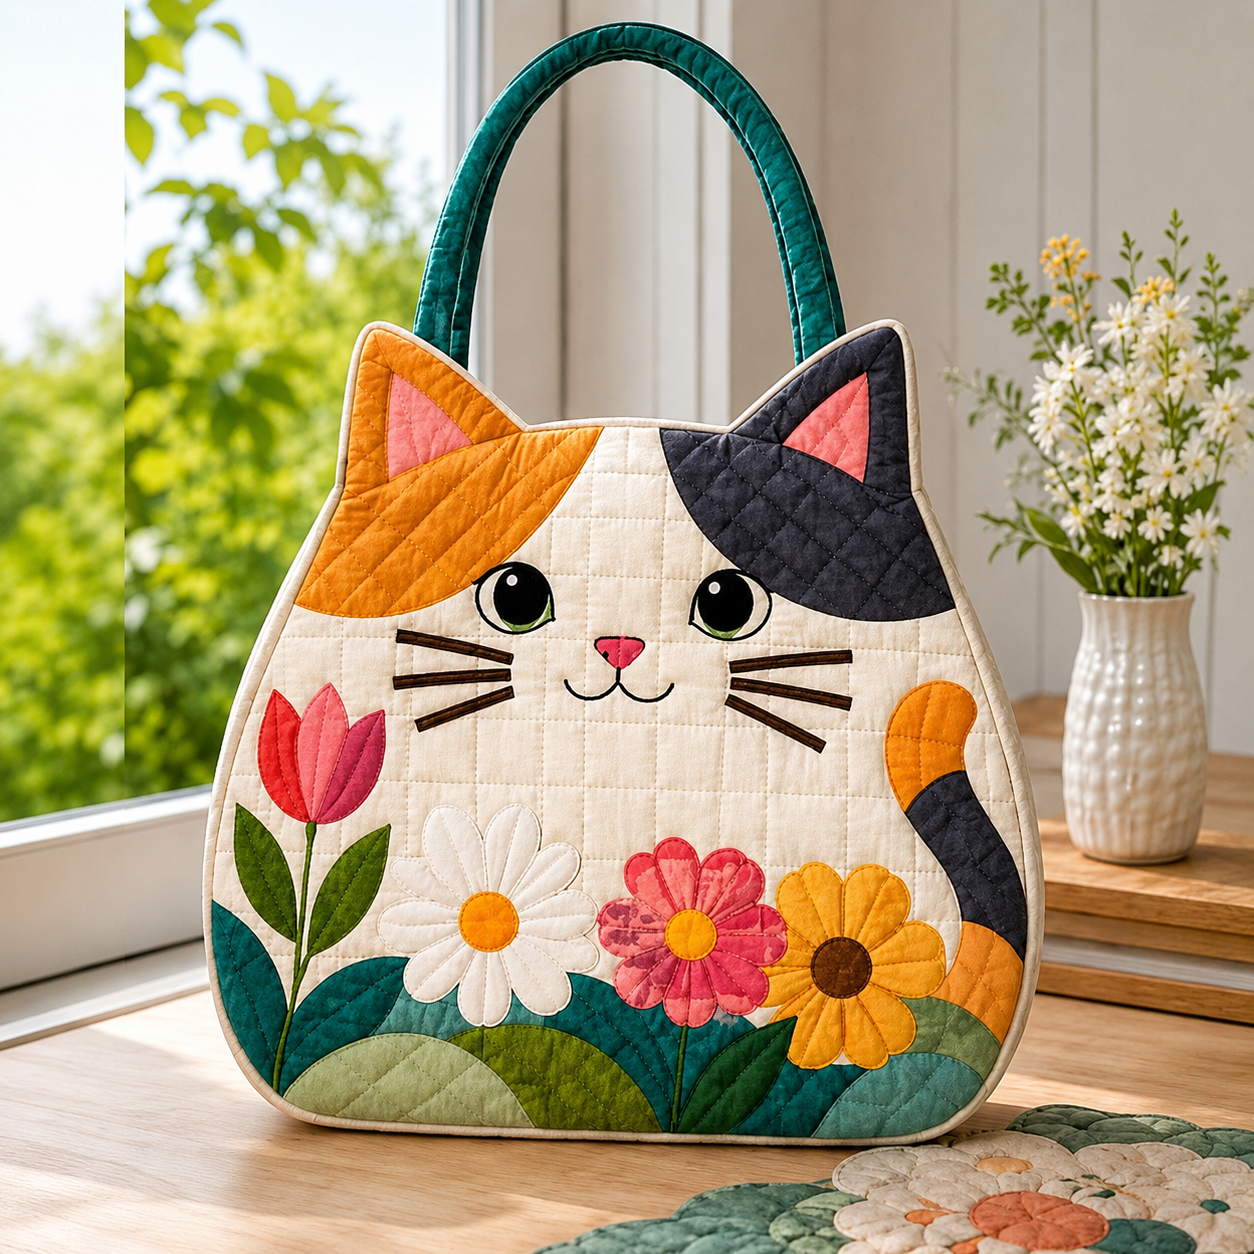
The Quilted Bag with Cat and Flower Print Fabric Pattern is a charming sewing project that combines practical bag construction, decorative appliqué, quilting, and playful patchwork in one handmade accessory. Inspired by the cat-shaped quilted bag shown in the photo, this design features a softly rounded body, pointed cat ears, a colorful patchwork face, dimensional whiskers, a curved tail, and a cheerful garden of appliqué flowers along the lower section. The combination of cream, orange, charcoal, coral, teal, green, and yellow fabrics creates a warm handmade appearance that works beautifully with quilting cotton. Although the finished piece looks elaborate, the construction becomes much easier when it is divided into individual stages. Each decorative component can be prepared before the main bag is assembled, allowing even an intermediate beginner to work slowly and accurately. This guide explains how to reproduce the overall style of the Quilted Bag with Cat and Flower Print Fabric Pattern, while still leaving room to personalize the colors, fabrics, flowers, and facial details.
One of the most appealing features of this project is that it combines several traditional sewing techniques without requiring highly specialized equipment. You will work with quilting cotton, lightweight batting, lining fabric, appliqué pieces, bias binding, basic machine quilting, and straightforward bag assembly. The cat face is constructed from fabric sections rather than printed directly onto the bag, making the design especially suitable for using coordinated scraps from previous quilting projects. The flowers and leaves can also be made from small remnants, which makes this an excellent scrap fabric project. For a medium-sized bag similar in proportion to the photograph, a finished body measuring approximately 38 cm wide by 35 cm high, excluding the handles, provides a useful starting point. These measurements can be adjusted as long as the front, back, lining, and batting pieces remain consistent. Careful cutting and pressing are more important than rushing through the sewing because the smooth curved silhouette depends on accurate layers.
The term Quilted Bag with Cat and Flower Print Fabric Pattern describes more than simply a decorative tote. “Quilted bag” refers to a bag whose outer fabric is layered with batting and stitched together, producing both strength and texture. “Cat” describes the recognizable silhouette created by the pointed ears, facial appliqué, whiskers, nose, eyes, and curved tail. “Flower print fabric pattern” in this project refers to the decorative floral arrangement built from colorful fabric pieces across the front, rather than requiring only commercially printed floral material. Together, these techniques create a project that is decorative enough to display but functional enough to use for crafts, books, light shopping, or everyday accessories. Because handmade quilting depends heavily on personal fabric choices, your finished version does not need to match every color in the photograph. What matters most is maintaining balanced proportions, clear appliqué shapes, durable seams, and enough quilting to stabilize the bag.
Materials, Measurements, and Pattern Preparation
Begin by choosing fabrics for the main structure of your Quilted Bag with Cat and Flower Print Fabric Pattern. For a bag approximately 38 cm wide and 35 cm high, prepare about 50 cm of cream quilting cotton for the main cat face and back, approximately 50 cm of lining fabric, and a piece of low-loft cotton or polyester batting large enough for both exterior panels. Small pieces of orange, charcoal, coral, pink, teal, green, yellow, white, and brown fabric can be used for the decorative areas. You will also need coordinating sewing thread, appliqué thread if desired, pins or clips, fabric scissors, a rotary cutter, ruler, removable fabric marker, iron, and sewing machine.
DISCOVER MORE FREE PATTERNS HERE!
Create the main paper pattern before cutting your fabric. Draw a body roughly 38 cm wide at its broadest point and 35 cm high, with gently rounded lower corners and slightly tapered sides. At the upper edge, extend two triangular ears approximately 8 to 10 cm high. Make the curves symmetrical by folding your paper template vertically and cutting both sides together. Add a 1 cm seam allowance around the entire shape if it has not already been included in your template. This same template will be used for the front exterior, back exterior, batting, and lining.
For the front cat face, divide the upper area into three visual sections similar to the inspiration image. Keep the central and lower face primarily cream, add an orange patch over one upper side, and place a charcoal or dark gray patch over the opposite side and ear. These color sections can be assembled with patchwork piecing or attached as raw-edge or turned-edge appliqué. If piecing the sections, remember to add seam allowance to every joining edge. Press each seam carefully to prevent bulk before attaching the decorative facial details.
Prepare separate templates for the flowers, leaves, tail, eyes, nose, inner ears, and any curved landscape-style pieces along the bottom of the bag. The flowers can range from approximately 7 to 11 cm in diameter, while leaves may measure around 3 to 7 cm long. The curved tail can be roughly 5 cm wide and 20 to 24 cm long, depending on the proportions of your bag. Each paper pattern should be labeled so that pieces are not confused during construction. If using fusible web for appliqué, remember to trace shapes in reverse when required by the product instructions.
The handles are an important structural feature of the Quilted Bag with Cat and Flower Print Fabric Pattern. Cut two handle strips approximately 9 cm wide by 55 cm long from teal or another contrasting fabric. Cut matching strips of thin batting or interfacing approximately 3 to 3.5 cm wide by 55 cm long. After folding the fabric around the stabilizer, the finished handle should be approximately 3 cm wide. You can shorten or lengthen the handles depending on whether you want the bag carried by hand, over the forearm, or over the shoulder.
Before sewing, arrange every appliqué piece on the main front panel. Position the eyes slightly above the center, with the nose and mouth below them. Place the floral design across the lower third, leaving enough space around the side edges for the final seam allowance. The tail should curve upward along one side without interfering with the edge stitching. Photographing or sketching the arrangement before removing the pieces can help preserve your preferred layout. This planning stage is essential because balanced placement gives the finished cat quilted bag its expressive appearance.
Creating the Cat Face, Flowers, and Decorative Appliqué
Start with the cat ears and color patches. Place the orange and charcoal sections onto the cream exterior panel, following the pattern placement lines you prepared earlier. Fuse or pin them securely before sewing. A narrow zigzag, blanket stitch, or small straight stitch close to the raw edge can be used for machine appliqué. If you want a cleaner traditional finish, turn approximately 3 to 4 mm of fabric underneath the appliqué edge and stitch it down. Add smaller coral or pink triangles inside each ear to emphasize the cat shape.
The eyes are among the most important details because they create the personality of the bag. Cut two white or cream eye bases approximately 5 to 6 cm high, followed by smaller black pupils. Tiny white highlights can be appliquéd or embroidered onto the pupils to create a bright expression. Position the eyes symmetrically but avoid making them mechanically identical; a subtle handmade variation can look charming. Secure all layers with close edge stitching, ensuring there are no loose fabric corners that could lift during use.
For the nose, cut a small rounded triangle from coral or bright pink fabric approximately 2.5 to 3 cm wide. Stitch it securely at the center of the face. Embroider or machine-stitch a short vertical line beneath the nose, followed by two gentle curves forming the mouth. The whiskers can be made from narrow strips of dark fabric, satin stitching, decorative cord, or dense machine stitching. Three whiskers on each side provide a recognizable cat expression without making the design visually crowded.
Next, prepare the fabric flower appliqués. A tulip can be constructed from three or four overlapping pointed petals, while daisies and rounded flowers work well with individual oval petals placed around circular centers. Cut a white flower, pink flower, and yellow or orange flower to echo the colorful garden shown in the reference image. Arrange each blossom before stitching so that petals overlap naturally. Sew around every petal with a narrow zigzag or appliqué stitch, keeping the stitch width consistent throughout the project.
Create several leaves in different shades of green and teal to add depth to the floral section. Long pointed leaves are ideal beside the tulip, while broader leaves work beneath the larger flowers. You can add stems using narrow fabric strips, bias tape, embroidery, or reinforced straight stitching. Layer curved pieces of teal, sage green, olive, and pale green fabric along the bottom edge to suggest rolling foliage or stylized garden shapes. These overlapping curves are an attractive way to use fabric scraps while visually connecting all the flowers.
Complete the appliqué stage by adding the cat’s curved tail. Use two or three colored sections to make the tail more interesting; for example, an orange tip, dark charcoal middle, and orange lower portion. Position it so that it rises from the lower side of the design while remaining clearly distinguishable from the flowers. Stitch around the complete outline carefully. Once all appliqué pieces are secure, press the panel gently from the wrong side using an appropriate iron temperature so that the decorative surface remains smooth and ready for quilting.
Quilting the Bag and Sewing the Main Construction
Layer the finished front exterior over batting, then add a backing or temporary quilting layer if your preferred quilting method requires one. Smooth the fabric from the center outward and secure it with quilting pins or temporary basting. Repeat this process for the back panel. The quilting layer gives the bag its soft structured appearance and also reinforces the many appliqué elements on the surface. Avoid overly thick batting because the ears and curved edges will become more difficult to sew accurately.
Quilt the cream background using a simple grid approximately 2.5 to 3 cm apart, similar to the subtle square quilting visible in the inspiration image. You may mark the lines using a removable fabric pen and ruler before sewing. Decorative areas can be quilted differently; diagonal lines, gentle curves, or outline quilting around flowers can add visual dimension. Keep quilting density reasonably consistent so that one part of the panel does not shrink more than another. After quilting, place your original pattern over the panel again and trim it back to the correct shape.
Prepare the bag handles by pressing each long strip lengthwise to locate the center. Fold the raw edges inward toward that center crease, place interfacing or thin batting inside, and fold the strip in half again. Topstitch along both long edges approximately 2 to 3 mm from the fold. Additional rows of straight stitching through the center can provide more structure. Make both handles identical in length and width because uneven handles can cause the finished quilted tote bag to hang incorrectly.
Position one handle on the front panel and the other on the back panel. Each handle end can be placed approximately 8 to 10 cm apart from the center line, depending on the width of the bag. Make sure the handles are not twisted. Baste the ends to the top edge within the seam allowance, using several reinforced stitches. Because handles receive repeated pulling during normal use, this is one area where extra reinforcement is worthwhile.
Place the front and back exterior panels right sides together, carefully matching the ears, side curves, and bottom edges. Clip or pin around the perimeter. Sew with approximately a 1 cm seam allowance, leaving the upper opening between appropriate points if your pattern uses a separate binding or facing. Clip the seam allowance along concave and convex curves without cutting through the stitching. The points of the ears require especially careful trimming so they can turn cleanly without excessive bulk.
Construct the lining from the same body pattern. Place the lining panels right sides together and sew around the sides and bottom, leaving an opening approximately 10 to 12 cm long for turning if using a bagging-out construction method. Insert the exterior and lining according to your chosen finishing method, matching side seams carefully. Sew the upper edges, turn the bag through the lining opening, and press the shape gently. Close the turning opening with an invisible hand stitch or narrow machine stitch.
Finishing Details, Binding, Pressing, and Professional Results
Once the main bag has been turned, inspect the ears and curved corners before final topstitching. Use a blunt turning tool to gently shape the pointed ears, but avoid pushing aggressively because this can damage the seam. Roll the upper seam between your fingers so that the lining remains slightly inside and is not visible from the front. Press using steam only if your fabric and batting tolerate it. Proper pressing is one of the simplest ways to make the Quilted Bag with Cat and Flower Print Fabric Pattern look polished and professionally constructed.
If you prefer the bound appearance shown around the outside of many quilted projects, finish selected edges with bias binding instead of using only turned seams. Cut bias strips approximately 4 to 5 cm wide, join them diagonally, and press them into double-fold binding. Beige, cream, or another neutral color works especially well because it frames the colorful appliqué without competing with it. Sew the binding to the front first, wrap it around the edge, and finish it on the back by hand or machine.
Add topstitching around the upper opening approximately 3 to 5 mm from the edge. This prevents the lining from rolling outward and reinforces the attachment points of the handles. When approaching each handle, sew slowly because the additional layers may be noticeably thicker. A longer stitch length of approximately 3 mm often works well for visible topstitching. Test the stitch on a fabric scrap containing the same number of layers before sewing the actual bag.
Check every appliqué edge and trim loose threads. If any flower petal or leaf corner appears insecure, stitch it again before using the bag. Examine the whiskers, eyes, tail, and nose because these detailed areas naturally attract attention. You can also add subtle free-motion quilting around the appliqué motifs if you want additional texture. However, avoid excessive stitching across the facial features because too many lines can make the design appear busy.
The inside can be customized with pockets. Cut a rectangle approximately 20 cm wide by 18 cm high, fold it right sides together, sew around it while leaving a turning gap, turn, press, and topstitch it to one lining panel before final assembly. Divide the pocket vertically if you want compartments for a phone, keys, sewing notions, or small accessories. A magnetic snap can also be installed before the lining is assembled, provided it is reinforced with interfacing. These optional details make the cat fabric bag more useful without changing its decorative exterior.
Finally, give the completed project a careful press and allow it to cool flat. Shape the handles evenly and check that the bag stands or hangs symmetrically. The finished dimensions may vary slightly because quilting can reduce the original panel size. That is normal in handmade quilting. What matters is that both exterior layers have been trimmed to matching dimensions before assembly. Your finished Quilted Bag with Cat and Flower Print Fabric Pattern should now combine a playful cat portrait, colorful flower appliqué, comfortable fabric handles, decorative quilting, and a practical lined interior.
FAQ About the Quilted Bag with Cat and Flower Print Fabric Pattern
What fabric is best for a Quilted Bag with Cat and Flower Print Fabric Pattern?
Medium-weight 100% cotton quilting fabric is one of the easiest choices because it cuts accurately, presses well, and is widely available in coordinated colors. Canvas can also be used for added strength, although bulky fabrics may make detailed appliqué more difficult.
How much fabric do I need for this quilted cat bag?
For a medium bag approximately 38 cm wide by 35 cm high, around 50 cm of main exterior fabric and 50 cm of lining should generally provide enough material, depending on fabric width and cutting layout. You will also need smaller scraps for the cat patches, flowers, leaves, ears, eyes, nose, and tail.
Can beginners make this cat quilted bag?
A confident beginner can complete the project by dividing it into stages. The most important skills are accurate cutting, basic straight stitching, curved seams, appliqué, pressing, and simple quilting. Practicing the appliqué stitch on scrap fabric before sewing the decorative pieces is especially helpful.
What type of batting should I use?
A low-loft cotton or polyester batting provides enough structure while keeping the bag flexible and easy to sew. Very thick batting can make seams, binding, and ear points bulky. Fusible fleece is another option when additional stability is desired.
Do I need fusible web for the flower appliqué?
No, but fusible web makes positioning small appliqué pieces easier. It temporarily stabilizes flowers, leaves, eyes, and other shapes while they are stitched. Traditional needle-turn appliqué or carefully pinned raw-edge appliqué can also be used.
Which stitch works best around the flowers?
A narrow zigzag stitch, satin stitch, or blanket-style appliqué stitch works well. Straight stitching approximately 2 mm inside the raw edge can create a more casual quilted appearance, although some controlled fraying may occur after washing.
How can I make the eyes and whiskers look neat?
Use a removable marking pen to establish the eye placement before sewing. For whiskers, mark straight or slightly angled guidelines and sew slowly. Narrow bias strips, embroidery stitches, or dense machine stitching can all create attractive whiskers.
Can I enlarge or reduce the pattern?
Yes. The entire body pattern can be scaled proportionally. If you change the size, remember to scale the ears, flowers, facial features, and tail so the design remains balanced. Seam allowances should normally remain around 1 cm rather than being enlarged proportionally.
Should I quilt before or after adding the appliqué?
For this style, attaching most appliqué pieces before completing the main quilting usually works well. You can then quilt the background and add outline quilting around decorative motifs. Another option is to quilt the background first and appliqué afterward for a more dimensional effect.
How do I prevent the bag from becoming uneven after quilting?
Cut your exterior and batting slightly larger than the final pattern whenever possible. Complete the quilting first, then place the paper pattern back on the quilted panel and trim it accurately. This compensates for small amounts of shrinkage caused by quilting.
Can this quilted bag be washed?
If all fabrics, batting, threads, and stabilizers are washable, gentle washing may be possible. Prewashing fabrics can reduce unexpected shrinkage or color bleeding. Because handmade appliqué contains many small stitched edges, gentle cleaning and air drying can help preserve the design.
Can I change the flowers or cat colors?
Absolutely. Personalization is one of the greatest advantages of this pattern. The orange and charcoal cat patches could become blue, brown, red, or multicolored, while the flower garden can be coordinated with fabrics already available in your sewing room. Maintaining contrast between the cat face, eyes, flowers, and background will help the design remain easy to see.
What can the finished bag be used for?
The bag can serve as an everyday tote, lightweight craft bag, quilting-project carrier, book bag, gift bag, or decorative storage piece. If you plan to carry heavier objects, reinforce the handles and consider adding a stronger interfacing layer.
Conclusion
The Quilted Bag with Cat and Flower Print Fabric Pattern brings together several enjoyable sewing techniques in one creative project. Beginning with the main cat-shaped template, you learned how to select quilting cotton, prepare batting and lining, build the colorful facial patches, create expressive eyes and whiskers, arrange flower appliqués, construct a curved tail, quilt the background, make reinforced handles, assemble the exterior and lining, and finish the edges neatly.
The key to achieving a result similar to the photographed project is working in stages. Preparing each appliqué component individually makes the design much less complicated than it initially appears. Accurate templates, consistent seam allowances, careful pressing, and secure appliqué stitching contribute more to the final quality than working quickly.
This project is also wonderfully flexible. You can change the color palette, replace the flowers with different botanical shapes, adjust the size, add interior pockets, alter the handle length, or create an entirely different cat personality while preserving the construction principles explained throughout this tutorial. Every variation can turn the same basic Quilted Bag with Cat and Flower Print Fabric Pattern into a unique handmade piece.
EASILY FIND THE PDF FOR THIS PATTERN HERE!
Whether you create the bag for yourself, as a handmade gift, or simply as a new quilting challenge, combining patchwork, appliqué, quilting, and bag making offers many opportunities to develop useful sewing skills. Most importantly, enjoy choosing the fabrics and adding the small details that give your cat its own character. If you make your own version, leave your sincere opinion about the project and share any suggestions, color combinations, or creative changes you would like to try. Your ideas can inspire even more variations of this cheerful quilted cat bag.