
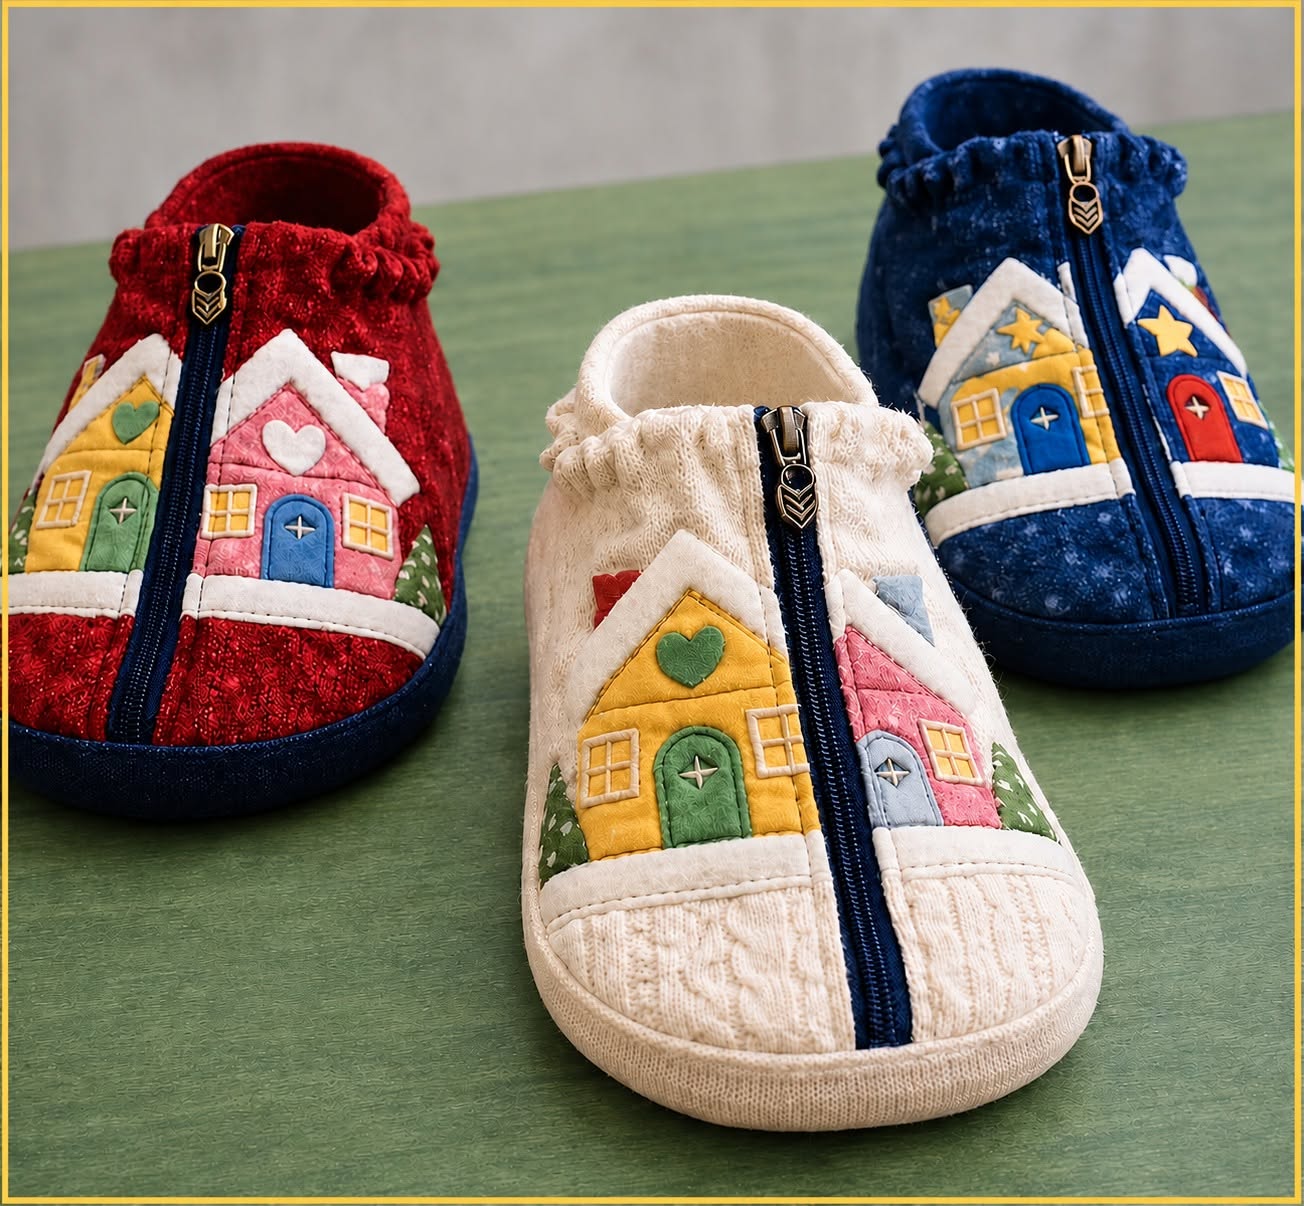
Zippered House Slippers Fabric Pattern is a charming sewing project that combines comfort, practical construction, and playful fabric appliqué in one handmade design. Inspired by cozy indoor slippers decorated with colorful little houses, this project is an excellent opportunity to work with fabric layering, appliqué, zipper installation, soft lining, and basic quilting techniques. The finished slippers can be customized with different colors, textures, house shapes, doors, windows, hearts, stars, trees, and other small decorative elements. Because every detail can be changed, no two pairs need to look exactly alike. The goal is to create something comfortable and attractive while learning techniques that can also be applied to bags, pouches, organizers, and many other fabric projects.
Looking closely at the design, one of its most interesting characteristics is the combination of soft textured fabric with structured decorative panels. The Zippered House Slippers Fabric Pattern can be made using cotton, quilted cotton, fleece, sweater knit, denim, corduroy, or other fabrics suitable for indoor footwear. A soft outer fabric creates the cozy appearance, while batting or foam provides structure and cushioning. The miniature houses are constructed from small fabric scraps, making this project especially useful for anyone who keeps leftover pieces from quilting and sewing projects. Instead of discarding those scraps, you can transform them into roofs, doors, windows, hearts, trees, and colorful walls.
Another important feature is the central zipper. Besides becoming a strong visual element, the zipper makes the slipper easier to open and can help create a comfortable entrance for the foot. The surrounding fabric should therefore be stabilized carefully so that the zipper remains straight and operates smoothly. Beginners should not worry if their first slipper takes extra time. Working slowly is particularly helpful when constructing small appliqué pieces and curved footwear sections. Make one slipper completely before rushing into the second one, taking notes about seam allowances, zipper position, and any fitting adjustments. Once the first slipper fits comfortably, those measurements can be transferred to its matching partner.
Materials, Measurements, and Preparing the Slipper Pattern
Begin the Zippered House Slippers Fabric Pattern by gathering your materials. You will need fabric for the exterior, soft fabric for the lining, lightweight batting or flexible foam, fabric scraps for the houses, fusible web if desired, matching sewing thread, a zipper for each slipper, and material suitable for the sole. You may also want embroidery thread for decorative details. A walking foot, zipper foot, fabric clips, pins, sharp scissors, and a washable fabric marker can make construction easier.
DISCOVER MORE FREE PATTERNS HERE!
The most reliable way to determine the basic slipper dimensions is to trace the foot that will wear the finished project. Place the foot on paper and trace around it without pressing the pencil inward. Add approximately 1 to 1.5 cm around the tracing for comfort and seam allowance. Indoor slippers should have enough space to feel comfortable without becoming excessively loose. Remember that batting and lining reduce some of the internal space, so consider their thickness when preparing the pattern.
Create a sole template from this tracing and clearly mark the heel, toe, center line, and left or right foot. Next, draft the upper section. A practical method is to use a comfortable existing slipper as a dimensional reference, measuring the distance across the widest part of the foot and the length from the toe toward the opening. Add sufficient seam allowance around every edge. The upper needs enough volume to accommodate the foot after the zipper is closed.
For the exterior shown in this style of project, textured fabrics can produce an especially warm appearance. A knitted fabric, velour, fleece, or textured cotton can work beautifully. If the exterior stretches significantly, stabilize it before adding the house appliqué. A lightweight interfacing applied to the wrong side helps prevent distortion while sewing small decorative pieces. This stabilization becomes particularly useful around the zipper opening.
Cut the lining and batting using the same primary templates, but check your chosen construction method before trimming the final seam allowances. Layer the exterior fabric over the batting and secure the layers temporarily. You can add a few subtle quilting lines to keep everything together. Avoid making the upper excessively stiff because a fabric house slipper should remain flexible enough to follow the natural movement of the foot.
Before cutting every component for both slippers, create a test version from inexpensive fabric if possible. This is one of the most useful steps when working with a homemade slipper sewing pattern because feet and preferred fits vary considerably. Test the length, toe room, heel height, and width. Adjust the paper pattern first, and only then cut your selected fabrics. A few minutes spent checking the pattern can prevent much more difficult corrections later.
Creating the Colorful House Appliqué Design
The miniature neighborhood is the decorative centerpiece of the Zippered House Slippers Fabric Pattern. Begin by sketching simple houses on paper. Keep the shapes uncomplicated: rectangles or slightly irregular quadrilaterals for the walls, triangles or angled pieces for the roofs, and small rectangles for doors and windows. Since these elements are intentionally whimsical, perfect architectural symmetry is unnecessary. Slight differences between the houses can actually enhance the handmade appearance.
Select several contrasting fabric scraps for the buildings. Yellow, pink, blue, green, cream, and red can create a cheerful neighborhood, but you can adapt the palette to your own style. For a more sophisticated version, try muted earth tones or coordinated neutrals. The important principle of fabric appliqué is contrast. Doors should remain visible against walls, roofs should be distinguishable from the main buildings, and windows should not disappear into surrounding prints.
If you use fusible web, trace each appliqué shape onto its paper backing and follow the manufacturer’s instructions for bonding it to the fabric. Cut out the pieces carefully and arrange them on the slipper upper before permanently attaching anything. This preview stage is important. Keep major decorative details away from the zipper seam allowance and outer construction seams so that they will not become hidden when the slipper is assembled.
Build each house from the largest shapes toward the smallest. Attach the walls first and then add the roof, door, and windows. Decorative hearts, stars, chimneys, snow-covered roof effects, bushes, and miniature trees can be added afterward. These tiny details are what transform a basic appliqué slipper pattern into a distinctive handmade project. However, avoid excessive thickness because multiple layers of fabric can make the upper difficult to sew.
Secure the appliqué edges using a narrow zigzag, blanket stitch, or small straight stitch close to the raw edge. A short stitch length generally provides greater control around miniature shapes. Turn the fabric gradually rather than pulling it through the machine. When approaching corners, stop with the needle down, raise the presser foot, rotate the work, lower the foot, and continue stitching. This technique helps produce cleaner windows, roofs, and doors.
Small embroidered accents can add another layer of personality. A simple cross on a door, tiny window divisions, roof details, or outlines around a heart can all be sewn with ordinary thread or embroidery floss. The purpose is not to make every detail perfectly identical. Handmade quilted slippers often become more appealing when subtle variations reveal that each decorative element was individually constructed.
Once the houses are complete, inspect the reverse side of the upper. Trim loose threads and check that nothing interferes with the zipper area. Press the appliqué carefully using a temperature appropriate for your fabrics. If the exterior is fleece, velvet, or another heat-sensitive material, use a pressing cloth and avoid flattening its texture. At this point, your miniature neighborhood should be securely attached and ready for assembly.
Installing the Zipper and Assembling the Fabric Slippers
The zipper is a defining component of the Zippered House Slippers Fabric Pattern, so careful positioning is worthwhile. Mark the center of the slipper upper and prepare the opening according to your drafted pattern. The zipper should run straight along the center front and open far enough to provide comfortable access. Choose a zipper length appropriate for your slipper size rather than forcing an oversized zipper into a small opening.
Use a zipper foot to stitch close to the zipper teeth while maintaining a consistent distance. Baste first if the exterior fabric tends to shift. Sew one side, check alignment, and then attach the opposite side. Close the zipper before final topstitching to verify that the two halves of the slipper meet evenly. If one side sits higher than the other, correcting it now is easier than correcting it after the sole has been attached.
The lining should cover the interior construction neatly without catching in the zipper teeth. Depending on your preferred method, the lining edges can be folded inward and hand stitched near the zipper tape or machine sewn during zipper installation. Keep the lining smooth because bulky folds inside the slipper can feel uncomfortable against the foot. Comfort is just as important as the appearance of the exterior.
Now shape the upper around the sole. Match the center front of the upper to the toe marking on the sole and match the back points at the heel. Distribute the remaining fabric evenly around the perimeter. Clips are often easier than pins when working through several layers of quilted fabric, batting, lining, and sole material. Baste around the edge before completing the permanent seam if you want greater control.
Sew slowly around the perimeter using the seam allowance established during pattern preparation. Curves require patience. Instead of attempting to force the entire slipper through the machine quickly, sew a short distance, reposition the fabric, and continue. After stitching, inspect the seam carefully. Clip or notch curved seam allowances where necessary without cutting into the stitching. This helps the finished edge turn and sit smoothly.
For the bottom, choose a durable material appropriate for indoor use. Multiple layers of heavy cotton, denim, or another sturdy fabric can provide structure, while batting can add cushioning. If you use a specialized non-slip sole fabric, follow its handling instructions carefully. The final sole should remain flexible and comfortable. Once attached, add binding or finish the perimeter according to your construction method for a clean, durable edge.
Finishing, Fitting, Customizing, and Caring for the Slippers
Turn the completed slipper into its final position and gently shape the toe and heel. Do not pull aggressively on the zipper or appliqué while turning. Use your fingers to smooth the curved seams and distribute the batting evenly. Close the zipper and inspect the overall shape. The houses should appear balanced on both sides of the center opening, and the zipper should remain straight without pulling the upper fabric.
Try on the slipper before finishing its matching partner. Check the toe space, width, heel fit, and opening. A handmade fabric slipper pattern can be adjusted more precisely than many standardized patterns, which is one of its greatest advantages. If the upper feels slightly loose, note where excess volume appears. If it feels tight, identify whether the problem comes from width, length, seam allowance, or excessive batting thickness.
Once you are satisfied with the fit, use your corrected templates to create the second slipper. Remember to mirror the sole pattern. This detail sounds simple but is easy to overlook when cutting multiple fabric layers. Organize the components into left and right sets before sewing. You can make the decorative houses identical on both feet or create two different miniature neighborhoods using coordinating fabrics.
Customization is where the Zippered House Slippers Fabric Pattern becomes especially creative. A winter version could include snowy roofs and stars. A spring version might feature flowers, green trees, and pastel houses. For a minimalist design, replace the colorful village with monochromatic appliqué. You could also personalize the project with initials, geometric shapes, hearts, simple animals, or other original motifs while keeping the same basic slipper construction.
For durability, reinforce areas that receive frequent movement, particularly the zipper ends, heel, and connection between the upper and sole. Remove all visible basting threads and check for loose appliqué edges. Open and close the zipper several times to confirm smooth movement. If the lining approaches the zipper teeth too closely, secure it farther away with small hand stitches so that it cannot become trapped during use.
Care depends on the fabrics selected. Whenever possible, prewash washable cotton fabrics before cutting so unexpected shrinkage does not alter the finished size. For completed slippers with delicate appliqué, gentle washing is preferable to aggressive cycles. Reshape them while damp and allow them to dry thoroughly. Proper fabric selection and careful construction can help your handmade zippered house slippers remain attractive through regular indoor use.
FAQ About the Zippered House Slippers Fabric Pattern
Is the Zippered House Slippers Fabric Pattern suitable for beginners?
Yes, although it is most comfortable for a beginner who already understands basic straight stitching and simple seam construction. The zipper and curved sole are the most demanding parts. Making a test slipper from inexpensive fabric can make the final project much easier.
What fabric is best for handmade house slippers?
Cotton, quilted cotton, fleece, velour, sweater knit, denim, and similar fabrics can all be considered depending on the desired finish. The outer layer should provide the appearance you want, while the lining should feel comfortable against the foot. Stabilize stretchy exterior fabrics when necessary.
Do I need batting inside the slippers?
Batting is not absolutely required, but it helps create the soft, padded appearance associated with quilted house slippers. Lightweight batting usually provides enough cushioning without making the project unnecessarily bulky. Flexible foam can also be considered when additional structure is desired.
How much seam allowance should I add?
Approximately 1 to 1.5 cm is a practical starting range for many handmade slipper projects. However, the exact allowance depends on your construction method and fabric thickness. Whatever measurement you choose, use it consistently throughout the project.
How do I make the slipper pattern fit my foot?
Trace your foot, add comfort and seam allowance, and create a test version. Pay special attention to the widest part of the foot, toe length, instep height, and heel. Modify the paper pattern before cutting your final fabrics.
Can I make the houses without fusible web?
Yes. Fusible web is convenient because it holds tiny shapes in position, but traditional appliqué methods also work. You can baste the pieces temporarily, use fabric-safe temporary adhesive where appropriate, or carefully pin them before stitching.
What stitch should I use around the appliqué houses?
A narrow zigzag, blanket stitch, or straight stitch close to the edge can work well. The best option depends on whether you want a polished enclosed edge or a slightly more rustic raw-edge appliqué appearance.
Why does my zipper look wavy after sewing?
A wavy zipper can occur when stretchy fabric is pulled during stitching or when the zipper tape and fabric feed unevenly. Stabilizing the zipper area, basting before sewing, and allowing the machine to feed the layers naturally can help reduce distortion.
Can leftover quilting fabric be used for the houses?
Absolutely. This is an excellent fabric scrap project because the windows, doors, roofs, hearts, and walls require only small pieces. Coordinating scraps from previous quilts can produce an especially interesting patchwork effect.
How can I make the slippers warmer?
Choose a warm lining such as fleece and add an appropriate lightweight insulating layer. Be careful not to add so much thickness that the finished slipper becomes tight. If you increase the internal padding significantly, adjust the pattern dimensions accordingly.
Should both slippers have identical appliqué?
No. Matching colors can make the pair feel coordinated even when the individual houses are different. Creating two slightly different scenes can emphasize the handcrafted character of the project.
How can I make the sole more durable?
Use a sturdy bottom fabric and reinforce it appropriately for indoor wear. The exact material should remain flexible enough for comfort. Pay particular attention to strong stitching around the perimeter because this seam receives repeated movement during use.
Conclusion
The Zippered House Slippers Fabric Pattern brings together several rewarding sewing techniques in a project that is practical, decorative, and highly customizable. Starting with a carefully drafted foot pattern, you learned how to prepare the exterior, lining, cushioning layer, and sole while accounting for seam allowances and the thickness of the finished slipper.
The colorful houses demonstrate how even very small scraps can become meaningful design elements. Through fabric appliqué, simple pieces of cotton can become walls, roofs, windows, doors, hearts, trees, and other miniature details. Careful placement before stitching helps keep these decorations balanced around the central zipper and away from important construction seams. You also learned why careful zipper installation matters in this design. Stabilizing the fabric, aligning both sides, using a zipper foot, and checking the closure before final assembly can create a cleaner result. After the zipper is installed, slow stitching around the curved sole helps maintain the intended shape and reduces unwanted puckering.
EASILY FIND THE PDF FOR THIS PATTERN HERE!
Most importantly, this project can be adapted rather than treated as a rigid formula. Change the fabrics, colors, appliqué motifs, lining, quilting details, or decorative stitching to create your own interpretation of the Zippered House Slippers Fabric Pattern. A successful handmade project should combine useful techniques with enough creative freedom to make the finished piece feel personal. If you make these zippered fabric house slippers, leave your sincere opinion about the project. Which part of the tutorial was most useful, and which detail would you change in your own version? Suggestions for new colors, appliqué themes, construction ideas, and future sewing projects are always welcome.