
Patchwork Happy Face Flower Ornament Fabric Pattern is a cheerful sewing project that combines traditional patchwork techniques, decorative fabric choices, soft padding, and a simple smiling face to create a charming handmade ornament. Inspired by the flower-shaped decorations shown in the reference image, this project is ideal for anyone who enjoys fabric crafts, patchwork sewing, seasonal decorations, and handmade gifts. The design features rounded fabric petals arranged around a padded circular center, with each petal offering an opportunity to combine different prints, colors, and textures. Christmas fabrics work beautifully for a holiday version, but the same pattern can easily be adapted for spring, birthdays, nurseries, kitchens, craft rooms, or everyday home décor.
One of the most appealing features of the Patchwork Happy Face Flower Ornament Fabric Pattern is its flexibility. Instead of requiring perfectly matching fabrics, the project actually becomes more interesting when several coordinated prints are combined. In the photographed inspiration, red, green, cream, plaid, floral, and snowflake fabrics create a warm Christmas patchwork appearance. The yellow center provides contrast and immediately attracts attention to the friendly embroidered face. Because each petal can be sewn separately before the flower is assembled, this project is also an excellent way to use smaller fabric pieces left over from previous quilting projects. Beginners can practice curves, layering, turning fabric, stuffing, hand stitching, and simple embroidery without committing to a large quilt.
The term Patchwork Happy Face Flower Ornament Fabric Pattern describes both the visual style and the construction method of this handmade decoration. Patchwork refers to combining different pieces of fabric into one coordinated design. Happy Face describes the simple smiling expression placed in the middle of the flower. Flower Ornament identifies the final decorative shape, while Fabric Pattern refers to the templates and construction plan used to cut and sew the project. Together, these elements produce a soft ornament that feels playful, handcrafted, and welcoming. The following tutorial explains the complete process, from selecting materials and preparing templates to assembling the petals, creating the smiling center, adding the hanging loop, and finishing the ornament neatly.
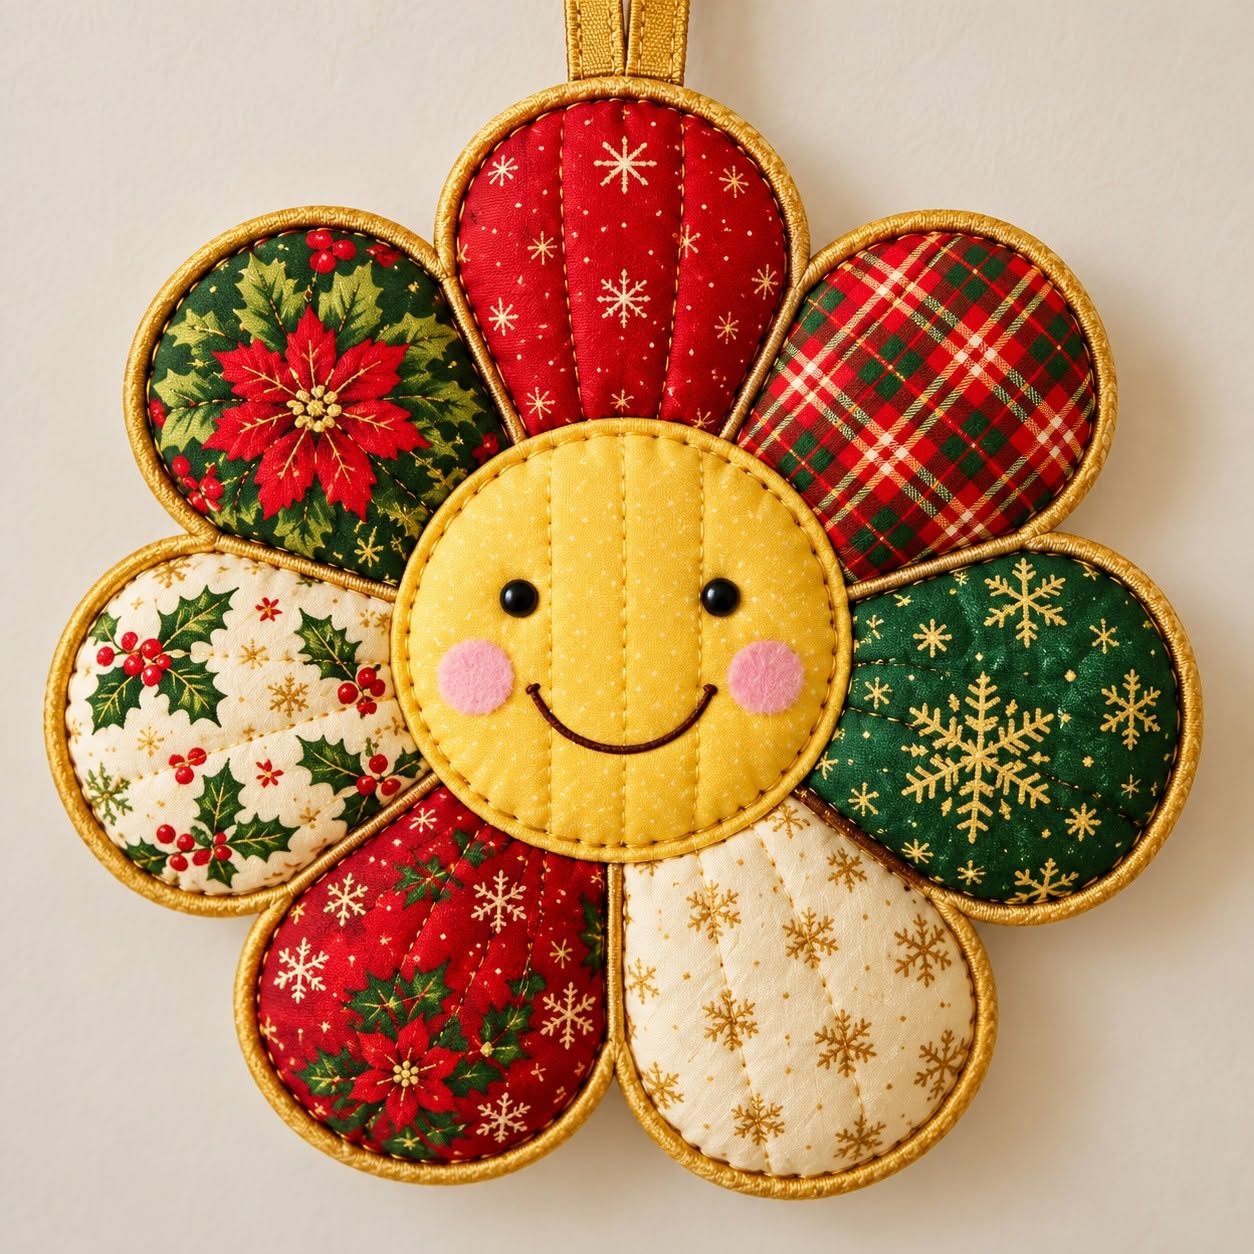
Materials and Fabric Preparation for the Patchwork Flower
Start by gathering several cotton fabrics for the petals. Quilting cotton is especially suitable because it is easy to cut, press, stitch, and turn. For a flower similar to the reference image, choose seven coordinating prints. Christmas versions can combine red fabric, green fabric, cream backgrounds, holly prints, stars, snowflakes, and plaid patterns. Keeping a consistent color palette helps different prints look intentional rather than random.
DISCOVER MORE FREE PATTERNS HERE!
You will also need a contrasting fabric for the circular face. Yellow or warm golden cotton creates the cheerful appearance seen in the inspiration, although pink, blue, cream, or another solid color could be used for a different theme. Select a fabric that does not contain a busy print because the eyes, smile, and cheeks should remain clearly visible after the ornament is finished.
Prepare lightweight batting, fusible fleece, or a small amount of polyester fiberfill to give the ornament dimension. Batting produces a flatter quilted look, while fiberfill creates puffier petals. Either method works for the Patchwork Happy Face Flower Ornament Fabric Pattern. If you want the petals to look softly rounded like small cushions, use a modest amount of fiberfill and distribute it evenly.
Additional supplies include coordinating sewing thread, a hand-sewing needle, embroidery floss, fabric scissors or a rotary cutter, pins or sewing clips, a fabric marking pen, an iron, and a sewing machine. Black embroidery floss works well for the eyes and mouth, while soft pink thread or fabric paint can create the rosy cheeks. Always choose washable or permanent textile-safe materials if the ornament may need gentle cleaning.
Create one petal template and one circular center template from paper or lightweight cardboard. A practical finished petal can measure approximately 9 to 11 cm long and 5 to 7 cm wide, depending on the desired ornament size. The center circle can measure around 8 to 10 cm in diameter. Add approximately 0.7 to 1 cm seam allowance around pieces that will be sewn and turned.
Before cutting the final fabric, press every piece with an iron. Smooth fabric gives more accurate shapes and makes curved sewing easier. Trace the template onto the wrong side of the fabric, paying attention to directional prints. If your fabric includes trees, stars, flowers, or characters, orient those motifs so they will appear upright when the petals surround the center of the completed fabric flower ornament.
Cutting, Sewing, and Shaping the Patchwork Petals
For a seven-petal flower, cut fourteen petal pieces because each petal requires a front and back. The fronts can all use different prints, while the backs may be made from one coordinating fabric if you prefer to conserve decorative material. Carefully match each pair with right sides facing together. Pin around the curved edges so the layers remain aligned during sewing.
Stitch around each petal using the seam allowance included in your template. Leave a small opening along one side or near the lower section of every petal. This opening will allow you to turn the fabric right side out and insert the padding. Sew slowly around curves and reduce your stitch length slightly if necessary for better control. Consistent stitching helps the finished petals remain symmetrical.
After sewing, carefully trim excess seam allowance from bulky areas without cutting the stitching. Small clips can be made around curved edges so the seam spreads naturally when turned. Do not cut directly through the seam line. Turn every petal right side out using a blunt turning tool, chopstick, or similar smooth object to gently shape the curves.
Press each turned petal lightly. If using fiberfill, avoid flattening the finished piece too aggressively after stuffing. Insert small portions of stuffing gradually, starting near the rounded end and working toward the opening. The goal is a softly padded shape rather than a rigid, overfilled petal. Uneven stuffing can distort the flower and make final assembly more difficult.
Close the turning opening with a small ladder stitch or slip stitch by hand. For a more decorative appearance, topstitch around each petal approximately 3 to 5 mm from the edge. This additional seam can create the outlined appearance visible in many handcrafted patchwork ornaments. Contrasting thread can emphasize the shape, while matching thread produces a subtler finish.
Repeat the process until all seven petals are complete. Arrange them temporarily in a circle before sewing anything together. Alternate colors and prints to achieve good visual balance. Avoid placing several similar fabrics directly beside each other when possible. This simple arrangement step is important because the individual prints create much of the personality of the Patchwork Happy Face Flower Ornament Fabric Pattern.
Making the Happy Face Center and Assembling the Flower
Cut two circular fabric pieces for the center, using the prepared template. If you want a softly padded face, add a circle of thin batting slightly smaller than the fabric pieces. Place the fabric right sides together and sew around the circumference, leaving an opening for turning. Clip the curved seam allowance before turning the circle right side out.
Insert a light layer of fiberfill or batting into the circular center. Keep the surface relatively smooth because embroidery is easier when the face is not overstuffed. Close the opening neatly with hand stitching. At this stage, check the center against your petal arrangement to confirm that it covers the inner ends of the petals without hiding too much of their decorative prints.
Use a removable fabric marker to lightly position two small eyes and a curved smile. Keeping the features simple usually gives this ornament its most charming expression. Embroider the eyes using small satin stitches or French knots, and create the mouth with backstitch or stem stitch. Two small pink circles can be embroidered, appliquéd, or carefully added with textile paint to create rosy cheeks.
Arrange the seven petals in an evenly spaced circle. Their narrow ends should meet or slightly overlap in the center. Pin or clip them temporarily and check the overall flower from a short distance. Adjust the spacing until the shape looks balanced. Sew the inner petal ends together by hand or machine so that they remain securely positioned beneath the face.
Center the finished smiling circle over the joined petals. Hand stitch around the outside edge using small hidden stitches, catching both the center and the petals. Alternatively, decorative topstitching can be used around the circular face if you prefer the stitching to become part of the design. Work gradually and check frequently to ensure that the face remains centered.
Once assembled, the happy face flower ornament should feel soft but structured. Gently reshape each petal with your fingers if necessary. The center should appear slightly raised, while the petals radiate outward evenly. This construction method also makes the pattern easy to customize: five, six, eight, or even more petals can be used as long as their width and center circle are adjusted accordingly.
Adding the Hanging Loop, Finishing Details, and Creative Variations
To transform the flower into a hanging ornament, cut a strip of fabric or ribbon approximately 15 to 22 cm long. Fold a fabric strip lengthwise, sew it into a narrow tube or folded strap, and press it neatly. Form the strip into a loop and attach both ends securely to the back of one upper petal. Reinforce this area because it will support the ornament’s weight.
The loop can also become part of the decorative theme. Red ribbon complements Christmas prints, green fabric produces a traditional seasonal look, and gold ribbon adds a festive accent. For a year-round Patchwork Happy Face Flower Ornament Fabric Pattern, select a loop color that matches one of the petal fabrics. Keep the loop proportional to the flower rather than making it excessively long.
Inspect all seams after assembly. Remove loose threads, reshape the petals, and check that every hand-stitched opening is closed securely. A gentle final press can improve the appearance, but protect embroidered features and avoid crushing thick batting. If the flower contains polyester filling, use moderate heat and avoid holding the iron in one place for too long.
The original Christmas-inspired palette can be changed easily. A spring version could feature pastel florals, gingham, and small botanical prints. A farmhouse version might combine cream, beige, muted green, and plaid. Children’s decorations can use brighter colors, stars, animals, or playful prints. This adaptability makes the fabric pattern useful well beyond one holiday or decorating season.
You can also turn the flower into more than a hanging ornament. Without the loop, it can become a decorative appliqué for a tote bag, cushion, wall hanging, or quilt block. A smaller version could become a gift tag or soft decoration, while an enlarged version could be adapted into a whimsical cushion. The construction principle remains essentially the same: padded petals surrounding a securely attached circular center.
For a coordinated display like the reference image, make several flowers in different sizes while keeping the same general fabric collection. Change the position of the prints on each flower so every ornament feels individual. A group of three works especially well because the repeated shapes create visual unity while variations in scale, fabric placement, and hanging-loop colors prevent the arrangement from becoming repetitive.
Frequently Asked Questions About the Patchwork Happy Face Flower Ornament Fabric Pattern
What is the best fabric for a Patchwork Happy Face Flower Ornament Fabric Pattern?
Quilting cotton is one of the easiest options because it is stable, widely available, easy to press, and suitable for both hand and machine sewing. Medium-weight cotton can also work well. Very stretchy fabrics are more difficult for beginners because the curved petals may lose their shape during construction.
How many petals should a patchwork flower ornament have?
Seven petals create a balanced appearance similar to the photographed design, but there is no strict rule. You can create flowers with five, six, seven, eight, or more petals. When changing the number of petals, test the arrangement with paper templates first to make sure they fit comfortably around the circular center.
Do I need a sewing machine to make this project?
No. A sewing machine speeds up construction, especially when preparing multiple ornaments, but the entire project can be sewn by hand. Use small, consistent backstitches for strong seams and a ladder stitch for closing turning openings. The compact size of the ornament makes hand sewing completely practical.
What type of filling should I use?
Polyester fiberfill provides the soft, rounded appearance commonly associated with stuffed fabric ornaments. Thin quilt batting creates a flatter result. Fusible fleece is another option when you want structure without much puffiness. Use only enough filling to give shape without stretching the seams.
How can I make all of the petals the same size?
Use a single sturdy template for every petal and trace it carefully onto the wrong side of the fabric. Maintain the same seam allowance when sewing each piece. Pressing, clipping curves consistently, and using approximately the same amount of filling in every petal will also improve uniformity.
Can fabric scraps be used for this project?
Yes. This is an excellent scrap fabric project because individual petals require relatively small pieces. Combining leftover prints can create an authentic patchwork style while making useful use of materials from previous sewing and quilting projects.
How do I make the smiling face look even?
Mark the features lightly before embroidering. Position the eyes at the same height and similar distance from the center. Draw the smile first with a removable marking tool, then stitch directly over that line. Keeping the expression simple often produces the most attractive result.
Can the ornament be washed?
That depends on the fabrics, filling, embroidery, and decorative materials used. If everything is washable, gentle hand cleaning is generally more suitable than aggressive machine washing because it helps preserve the shape. Always test decorative paints or specialty materials before using them on a washable project.
How can I make a Christmas version of this flower ornament?
Choose fabrics with traditional holiday colors such as red, green, cream, and gold. Plaid, holly, poinsettias, snowflakes, stars, and small Christmas motifs work particularly well. A red or green hanging loop and golden-yellow center can complete the festive appearance.
Can beginners make this fabric pattern?
Yes. The project involves several useful beginner techniques without requiring complicated quilt construction. It teaches template tracing, curved sewing, turning, stuffing, simple hand finishing, basic embroidery, and fabric arrangement. Beginners may find it helpful to make one practice petal before cutting the entire set.
What size should I make the ornament?
There is no mandatory finished measurement. Medium ornaments are convenient because the petals are large enough to sew comfortably but small enough to hang easily. A flower approximately 20 to 27 cm across can create an attractive wall or door decoration, while smaller templates produce tree ornaments or gift decorations.
Can I personalize the center instead of using a happy face?
Certainly. The circular center could feature an embroidered initial, small appliqué, heart, star, button arrangement, simple flower, or short decorative word. However, the smiling face is what gives the Patchwork Happy Face Flower Ornament Fabric Pattern its distinctive friendly personality.
Conclusion
The Patchwork Happy Face Flower Ornament Fabric Pattern transforms simple pieces of cotton fabric into a colorful handmade decoration full of personality. Throughout this tutorial, you learned how to choose coordinated patchwork fabrics, prepare templates, cut and sew curved petals, add lightweight padding, construct the circular center, embroider a friendly expression, arrange the petals evenly, attach the center securely, and finish the project with a practical hanging loop.
The greatest advantage of this project is the freedom to personalize it. Christmas fabrics can reproduce the warm seasonal feeling shown in the inspiration, while floral prints, pastels, farmhouse colors, children’s patterns, or fabric scraps can completely transform the same basic design. By changing the scale, number of petals, colors, embroidery, and finishing details, one fabric flower pattern can produce many different handmade decorations.
EASILY FIND THE PDF FOR THIS PATTERN HERE!
Whether you create one ornament or an entire coordinated collection, take time to enjoy the fabric combinations and handcrafted details that make each flower unique. If you try this Patchwork Happy Face Flower Ornament Fabric Pattern, leave your sincere opinion about the project and share your suggestions for colors, prints, finishes, or creative variations you would like to see in another version. Your ideas can inspire new ways to adapt this cheerful patchwork design. A useful next step is to create a printable petal and happy-face center template with seam allowance and measurements in centimeters, making the sewing process even easier from start to finish.