
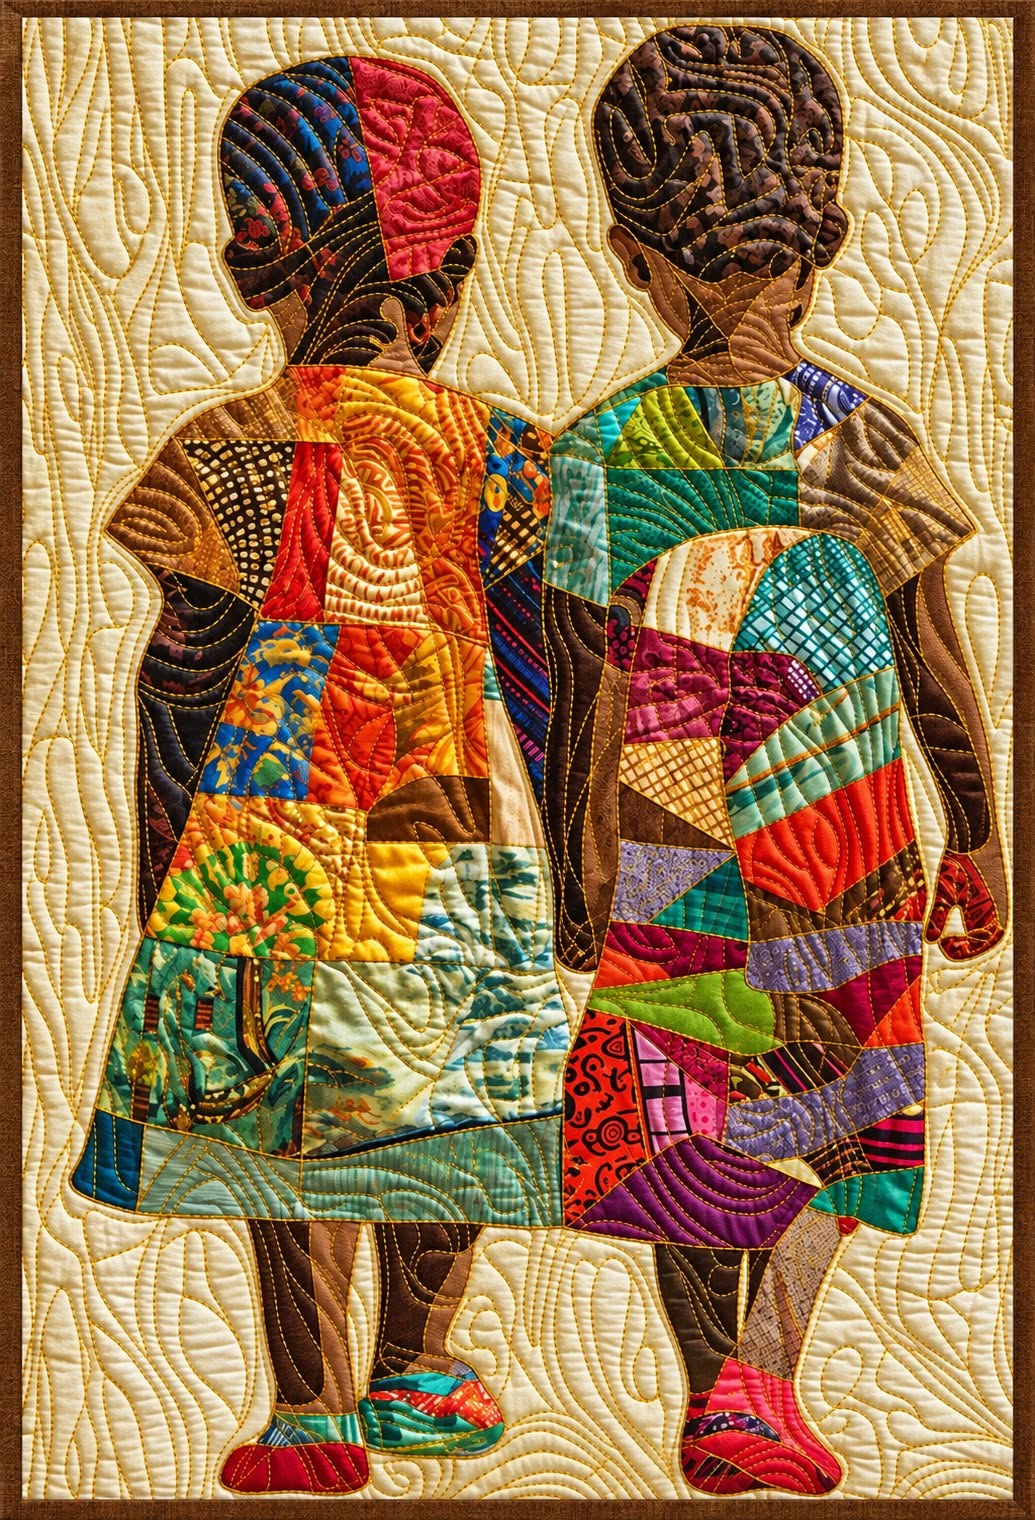
Children’s Patchwork Quilt Pattern is a charming fabric-art project that combines quilting, appliqué, scrap sewing, and free-motion texture to create a decorative scene filled with color and personality. Inspired by the quilt shown in the reference image, this design features two child silhouettes viewed from behind, each dressed in clothing assembled from many contrasting fabric pieces. The neutral quilted background allows the colorful figures to become the main visual focus while still contributing beautiful texture. One of the greatest advantages of this project is that it can be adapted to fabrics you already have in your sewing room, making it an excellent scrap fabric quilt idea. Small floral prints, geometric cottons, batiks, solids, and vintage-inspired fabrics can all work together. Rather than trying to make every fabric match perfectly, the goal is to build a lively composition where differences in color and pattern create visual richness.
The term Children’s Patchwork Quilt Pattern refers to a quilt design in which child-shaped figures are constructed using patchwork and appliqué techniques before being attached to a quilted background. In this type of project, a pattern acts as the template that determines the proportions and placement of the head, body, clothing, arms, legs, and accessories. Patchwork describes the process of joining several smaller fabric sections to create a larger decorative area, while appliqué involves placing fabric shapes on top of a foundation fabric and stitching them securely in position. Combining these methods makes it possible to create clothing that looks pieced together from many treasured scraps. The finished result can become a wall hanging, nursery decoration, family-inspired textile artwork, or an expressive handmade quilt panel. Because the shapes are relatively large, the project is also an interesting way to practice controlled quilting without needing to assemble a traditional block-based bed quilt.
Before starting your Children’s Patchwork Quilt Pattern, study the overall composition and think about the finished size you want. A practical wall panel could measure approximately 45 x 65 cm, although the proportions can easily be enlarged or reduced. The child figures should occupy most of the central area while leaving enough negative space around them for decorative quilting. Prepare your fabrics before cutting by pressing them carefully so there are no folds that might distort the pattern pieces. It is also helpful to arrange your scraps by color families, print scale, and value before designing the clothing. Medium and dark fabrics can define the skin, hair, shoes, and outlines, while bright scraps make the garments more noticeable. Planning these details first will make the later sewing stages much easier and help the completed quilt feel balanced rather than random.
Preparing the Fabrics, Templates, and Quilt Background
Begin by choosing the foundation fabric for the Children’s Patchwork Quilt Pattern. A light cream, ivory, beige, or softly textured cotton works especially well because it provides contrast against colorful patchwork clothing. For a panel around 45 x 65 cm, cut the background fabric approximately 50 x 70 cm so you have extra material around the edges for squaring and finishing later.
DISCOVER MORE FREE PATTERNS HERE!
Next, prepare the quilt sandwich using the background fabric, batting, and backing fabric. Cut the batting and backing slightly larger than the quilt top. Smooth the backing with the wrong side facing upward, place the batting on top, and position the background fabric right side up. Secure the layers with quilting safety pins, temporary basting spray, or long hand-basting stitches.
The colorful clothing is the heart of this patchwork appliqué quilt, so collect a wide variety of cotton scraps. Small pieces measuring from approximately 5 x 5 cm to 12 x 15 cm are generally large enough for most areas. Florals, stripes, abstract prints, batiks, plaids, and solids can be mixed freely, although repeating two or three colors in different areas helps unify the composition.
Create paper templates for the children’s silhouettes before cutting your final fabric pieces. Draw the head, neck, torso, arms, hands, legs, shoes, and garment shapes separately. When using raw-edge appliqué, the templates can usually be drawn at finished size. If you prefer turned-edge appliqué, add approximately 0.6 to 1 cm of seam allowance around pieces that need to be folded underneath.
Pay special attention to scale when creating the children appliqué pattern. The heads should be proportional to the bodies, while the shoulders, arms, and legs need to look natural when the figures are placed side by side. Lay every paper template on the background before cutting fabric and adjust the shapes until the composition looks comfortable and balanced.
Finally, decide how the two characters will interact visually. In the reference-inspired arrangement, the children stand close together and face away from the viewer, creating a peaceful storytelling quality. Positioning one figure slightly higher or differently from the other can prevent the design from looking too rigid while maintaining a strong connection between both silhouettes.
Creating the Patchwork Clothing and Appliqué Figures
Start the clothing by sewing small scraps together into larger patchwork sections. You do not need to follow a traditional quilt-block formula. Join two scraps with a 0.6 cm seam allowance, press the seam, add another piece, and continue until you have created a fabric section large enough to cover the garment template.
Using irregular pieces is particularly effective for a Children’s Patchwork Quilt Pattern because the clothing gains a playful, handmade character. Triangles, rectangles, narrow strips, and curved fabric sections may all be combined. Trim excessive seam allowance where necessary to keep bulky intersections from making the appliqué difficult to stitch.
Once the patchwork panels are complete, place the clothing templates over them and experiment with orientation. Rotate the template to see which arrangement displays your favorite fabric sections. When satisfied, trace the shape and cut carefully. If using fusible web for appliqué, follow the product instructions and fuse the stabilizing layer to the wrong side before cutting the final shape.
Create the skin areas separately using fabrics with suitable warm, brown, tan, or deep neutral tones according to the artistic style you want. Cut the heads, necks, arms, hands, and legs from these fabrics. Small printed or subtly mottled fabrics can add textile interest without requiring complicated shading techniques.
Hair can be created from darker printed cottons, batiks, or solids. Instead of relying only on the fabric print, add stitched lines later to suggest braids, curls, twists, or other hair textures. This is an excellent place to use free-motion quilting, because curved and overlapping stitches can transform a simple appliqué shape into a richly detailed surface.
Arrange every figure component on the quilt background before permanently attaching anything. Begin with pieces that visually sit behind other elements, such as legs or portions of the arms. Add the garments, then the necks, heads, hair, hands, and shoes. Photographing or sketching the arrangement before moving the pieces can help you remember the exact placement while sewing.
Sewing, Quilting, and Adding Dimensional Texture
For raw-edge appliqué, attach the shapes using a small zigzag stitch, blanket stitch, straight stitch, or free-motion stitching close to the edges. A thread color that blends with the fabric will create a subtle finish, while darker contrasting thread produces an illustrated outline. Test your stitch first on a scrap made from the same fabric and batting layers.
When sewing your Children’s Patchwork Quilt Pattern, work slowly around fingers, shoulders, shoes, and other small curves. Stop with the needle down whenever you need to pivot the fabric. This gives you greater control and helps create smoother outlines. A shorter stitch length can also make curved sections easier to navigate.
After securing the appliqué edges, begin adding interior quilting lines to the garments. Follow fabric shapes, seams, printed motifs, or imaginary folds in the clothing. Quilting each patch differently can create a wonderful handcrafted texture. Spirals, wavy lines, echoes, loops, and simple contour stitching are all suitable choices.
Use free-motion quilting to create details in the hair and clothing if you feel comfortable lowering the feed dogs on your sewing machine. Move the quilt smoothly with both hands while maintaining a consistent machine speed. Beginners should practice the movement on a small quilt sandwich before working on the finished project.
The open background around the children can be filled with closely spaced quilting lines. Organic wavy quilting works particularly well because it creates movement without competing with the figures. Lines may follow one another irregularly, almost like topographic contours, giving the neutral background a sophisticated textured appearance.
Do not feel that every section needs identical quilting density. The patchwork quilt design becomes more visually interesting when some areas contain tighter stitching while others remain slightly softer. However, avoid leaving very large unquilted areas when using cotton batting, and always consider the quilting distance recommended for the particular batting you selected.
Finishing the Children’s Patchwork Quilt Pattern Beautifully
When all appliqué and quilting are complete, lay the panel on a large cutting surface and square the edges. Measure from several points rather than relying on a single corner. Trim carefully until the top, bottom, and sides are straight while preserving an attractive amount of background around the child figures.
Prepare binding strips approximately 6 to 6.5 cm wide for a traditional double-fold binding. Join the strips diagonally, trim the seam allowances, and press the long strip in half lengthwise. Binding can match the background for a subtle result or repeat one of the stronger garment colors for additional contrast.
Sew the binding to the front of the quilt using approximately a 0.6 cm seam allowance, folding neat miters at the corners. Wrap the binding around the raw edges toward the back. Finish it by hand with an invisible stitch for a traditional appearance or machine stitch it if you prefer a faster and more durable construction.
After binding, inspect the complete Children’s Patchwork Quilt Pattern for loose threads or appliqué edges that need extra reinforcement. Trim thread tails carefully and check areas where several fabrics overlap. Press lightly if necessary, but avoid crushing heavily quilted texture with excessive heat or pressure.
If the finished piece will be used as a quilted wall hanging, add a hanging sleeve to the back. Cut a fabric strip long enough to fit near the upper edge, fold and finish its ends, then create a tube approximately 8 to 10 cm deep. Hand stitch the sleeve to the backing without allowing the stitches to appear through the quilt front.
The final project should celebrate the individuality of handmade quilting rather than mechanical perfection. Slight differences in patch sizes, quilting curves, and decorative stitching add character. Your finished Children’s Patchwork Quilt Pattern can become especially meaningful when it includes leftover fabrics from previous sewing projects, turning small remnants into an entirely new piece of textile art.
FAQ – Frequently Asked Questions About Children’s Patchwork Quilt Pattern
What is a Children’s Patchwork Quilt Pattern?
A Children’s Patchwork Quilt Pattern is a quilting design that uses child-shaped templates together with pieced scraps, appliqué, and quilting techniques. Instead of creating the entire image from traditional rectangular quilt blocks, the maker builds recognizable figures and clothing from individual fabric shapes before stitching them to a foundation.
Is this project suitable for beginners?
An adventurous beginner can make this project, although having basic experience with straight stitching and simple appliqué will be helpful. Beginners may want to start with larger garment pieces and fewer tiny scraps. Raw-edge appliqué is often easier than turned-edge appliqué because the fabric shapes do not require seam allowances to be folded underneath.
What type of fabric works best?
Quilting-weight cotton is an excellent choice because it is stable, easy to cut, and widely available in many prints. Batiks can also create beautiful patchwork sections because their dense patterns provide interesting color variations. Lightweight scraps from previous quilting projects are especially useful for the clothing.
How many different fabrics do I need?
There is no fixed number. Approximately 15 to 30 different scraps can create plenty of variety, although you can use fewer fabrics if you prefer a coordinated palette. The goal is not simply to use many colors but to distribute them thoughtfully so that the garments remain visually balanced.
Can I use leftover fabric scraps?
Yes. A scrap fabric quilt project like this is one of the best opportunities to reuse smaller pieces. Scraps that may be too small for larger quilt blocks can become pockets, shoes, garment sections, or decorative details. Sorting scraps before beginning will make the design process faster.
Do I need fusible web for the appliqué?
No, but fusible web can make positioning much easier. It temporarily or permanently stabilizes fabric pieces on the background before edge stitching. Traditional needle-turn appliqué, glue-basted appliqué, and raw-edge stitching without fusible web are also possible depending on your preferred method.
Should the background be quilted before or after applying the figures?
Both approaches are possible, but assembling the appliqué before completing most of the decorative quilting gives you greater freedom to quilt around and through the figures. You can baste the quilt sandwich, attach the appliqué pieces, and then use quilting stitches to add detail and secure the complete composition.
What batting should I use?
A medium or low-loft cotton or cotton-blend batting works well for a wall quilt because it provides enough dimension to show the quilting texture without making the panel excessively thick. The ideal choice depends on whether you want a flat decorative piece or a more pronounced sculptural effect.
How can I make the children’s clothing look more dimensional?
Use several values of fabric, including light, medium, and dark patches. Then quilt curved or directional lines across the garments to suggest folds and movement. Following patchwork seams with additional stitching can also make individual sections stand out while reinforcing the construction.
What is free-motion quilting?
Free-motion quilting is a machine-quilting technique in which the quilter controls the movement and direction of the fabric instead of relying entirely on the machine’s feed dogs. It allows the creation of spirals, waves, curls, outlines, and many other decorative textures. In this project, it is particularly useful for hair, clothing, and background details.
Can I make this design without free-motion quilting?
Absolutely. A walking foot can be used for gently curved lines, straight lines, echo quilting, or geometric patterns. You can also use decorative machine stitches. The most important consideration is keeping the quilt layers securely joined while choosing stitching that complements the appliqué design.
Can the pattern be enlarged?
Yes. Because the composition is based on individual silhouettes, the templates can be enlarged proportionally. When making a larger quilt, remember that very large garment sections may benefit from additional patchwork pieces and quilting so the increased scale still contains enough detail.
Can I personalize the figures?
Yes, and personalization is one of the most enjoyable parts of this type of appliqué quilt pattern. You can change hairstyles, garment shapes, footwear, fabric colors, posture, or accessories. These adaptations allow the composition to reflect your preferred artistic vision while maintaining the same fundamental construction technique.
How should I arrange the patchwork colors?
Begin with one or two dominant color families and distribute them across both figures. Add complementary or contrasting scraps in smaller amounts. Avoid placing every dark or bright patch in the same area. Repeating selected colors elsewhere in the design creates rhythm and helps the eye travel naturally through the composition.
How do I prevent the appliqué from puckering?
Make sure the quilt layers are well basted, avoid pulling the fabric while sewing, and maintain even machine tension. Stabilizing the appliqué pieces before stitching can also help. When quilting densely, work gradually across the project rather than completing one extremely dense section while the rest remains unquilted.
Can this project be made as a wall hanging instead of a bed quilt?
Yes. In fact, the detailed silhouette design is especially effective as a quilted wall hanging because it can be displayed like textile artwork. A medium-sized panel lets you experiment with detailed appliqué and quilting without requiring the time or material needed for a full-size bed quilt.
Conclusion
Creating a Children’s Patchwork Quilt Pattern is a rewarding way to combine scrap quilting, appliqué, creative fabric selection, and decorative stitching in one expressive project. Starting with a neutral quilt background gives the colorful figures room to stand out, while patchwork garments transform even small leftover fabrics into important parts of the finished artwork.
The process begins with planning the silhouettes and preparing the quilt sandwich. From there, scraps are sewn into larger sections, garment templates are cut, and individual appliqué pieces are arranged carefully on the background. Building the design gradually helps maintain correct proportions and makes it easier to adjust colors before permanent stitching begins. Appliqué stitching secures the figures, while free-motion quilting, echo quilting, and decorative stitching bring the children, garments, hair, and background to life. The contrast between colorful patchwork and a densely textured neutral foundation is one of the features that makes this style of quilt so visually appealing.
Finishing the edges with binding and adding a hanging sleeve transforms the project into a polished piece of handmade textile art. More importantly, there is plenty of room for creativity. Different scraps, hairstyles, clothing shapes, quilting patterns, and color combinations can make every version completely unique. A well-planned Children’s Patchwork Quilt Pattern does not require perfectly matching fabrics or complicated equipment. Thoughtful composition, secure appliqué, careful stitching, and creative use of fabric are far more important. Even scraps left from earlier projects can become some of the most beautiful details in the finished quilt.
EASILY FIND THE PDF FOR THIS PATTERN HERE!
If you make your own version of this project, leave your sincere opinion about the tutorial and share your suggestions for future quilt patterns. Your ideas about color combinations, appliqué techniques, quilting textures, and variations of the design can inspire new creative approaches to this beautiful patchwork project. A useful next step is to create a printable template with seam allowances and English labels for the two child silhouettes, clothing pieces, arms, legs, hair, and shoes based on the reference design.