
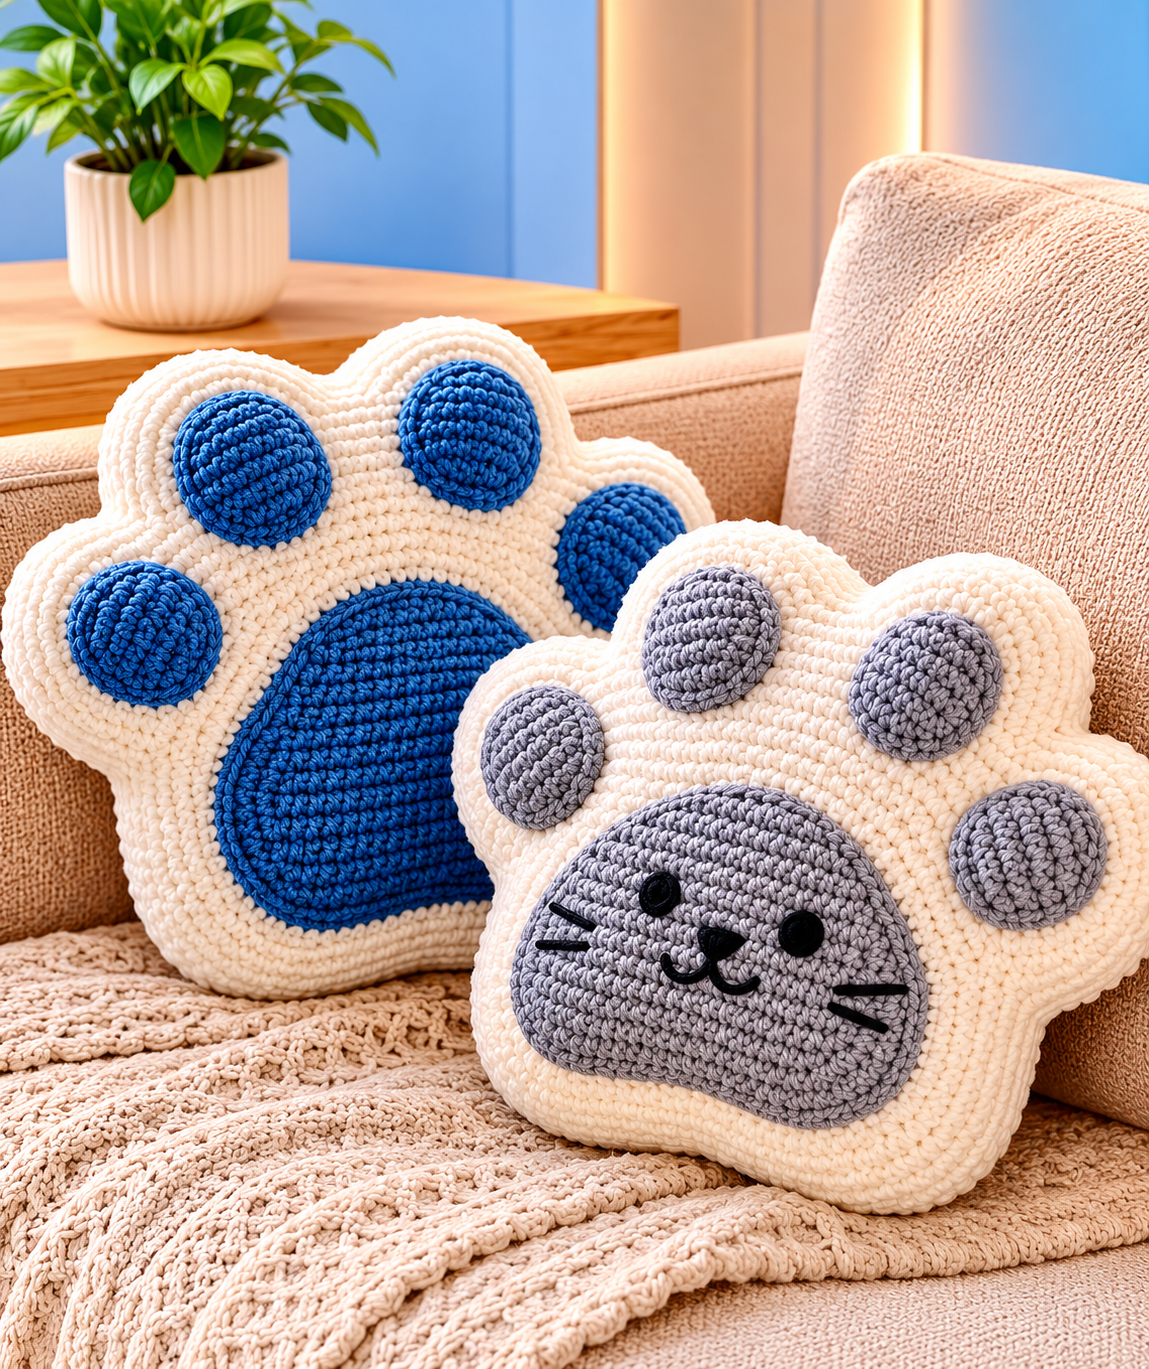
The Crochet Cat Paw Cushion Pattern is a charming handmade project that combines the comfort of a soft decorative pillow with the playful shape of a cat paw. Inspired by cozy pet-themed décor, this crochet cushion can become an attractive addition to a sofa, reading chair, bedroom, nursery, craft room, or handmade gift collection. The design is based on a large rounded paw with four raised toe pads and one oversized central pad, creating the dimensional appearance that makes the finished piece especially appealing. One of the advantages of this pattern is that the colors can easily be changed, allowing you to make a classic cream and gray cat paw, a cream and blue version, a black-and-pink paw, or virtually any combination that matches your home décor. Throughout this tutorial, you will learn how to crochet the main cushion body, create the individual paw pads, assemble the pieces, add optional facial embroidery, and finish the cushion neatly. The project uses familiar crochet stitches and straightforward shaping techniques, so it is accessible to confident beginners while still being enjoyable for experienced crocheters.
Before starting the Crochet Cat Paw Cushion Pattern, it is helpful to understand how the construction works. Rather than trying to create every detail in one complicated piece, the cushion is made from separate components that are assembled at the end. You will crochet two paw-shaped panels for the front and back, four smaller rounded pieces for the toe pads, and one larger oval pad for the center of the paw. The raised pads can be lightly stuffed before being sewn onto the front panel, which produces the soft three-dimensional texture seen in plush crochet cushions. For an even more playful variation, the large center pad can be transformed into a little cat face with embroidered eyes, nose, mouth, and whiskers. This modular construction also makes customization easier because every element can be adjusted independently. Understanding the structure before crocheting helps you work confidently and makes the final assembly much easier.
Choosing suitable yarn is another important part of achieving a beautiful crochet cat paw pillow. A medium-weight or bulky yarn works particularly well because it gives the cushion enough structure while keeping the stitches soft and comfortable. Cotton blends provide excellent stitch definition, while acrylic yarn is lightweight, practical, and available in many colors. Soft chenille or plush yarn can also be used when you want an especially cuddly result, although beginners may find traditional smooth yarn easier for counting stitches. For the main paw, cream, white, beige, light gray, or pastel shades create a versatile base, while blue, gray, pink, brown, or black can be used for the paw pads. You will also need an appropriately sized crochet hook, fiberfill stuffing, a yarn needle, scissors, stitch markers, and a small amount of black yarn if you plan to embroider the optional cat face. Consistent tension is more important than matching an exact gauge because this decorative cushion can easily be made larger or smaller according to personal preference.
Materials, Crochet Abbreviations, and Preparation
For this Crochet Cat Paw Cushion Pattern, a practical starting point is approximately 400 to 600 grams of yarn for a medium-sized cushion, although the exact amount will depend on yarn thickness, hook size, tension, and the dimensions you choose. Select one main color for the paw body and a contrasting shade for the pads. If you are adding the cat-face detail, reserve a small quantity of black yarn for embroidery. Polyester fiberfill provides a light and washable filling, but any cushion stuffing suitable for handmade projects may be used according to the yarn manufacturer’s care instructions.
DISCOVER MORE FREE PATTERNS HERE!
The main crochet abbreviations used in the pattern are: MR – magic ring, ch – chain, sl st – slip stitch, sc – single crochet, hdc – half double crochet, dc – double crochet, inc – increase, and dec – decrease. An increase means working two stitches into the same stitch, while a decrease combines two stitches into one. When working in continuous rounds, place a stitch marker in the first stitch of each round so you always know where the next round begins.
The body of the cushion is created primarily with single crochet, because this stitch forms a firm fabric that helps prevent the stuffing from showing through. If you prefer a softer and slightly more flexible cushion, you can substitute half double crochet, but remember that the finished dimensions may change. Whatever stitch you choose, maintain the same tension for both the front and back pieces so their edges align properly during assembly.
To begin the main paw shape, you will first crochet a large rounded central section and gradually shape four soft bumps across the top. There are several ways to build a paw silhouette, but working from a central circle or oval is especially manageable because increases can be distributed evenly. Crochet two identical paw panels: one will become the decorated front and the other will form the plain back. Keeping careful notes while making the first panel makes the second one much easier to reproduce.
Before beginning, make a small crochet gauge swatch with your chosen yarn and hook. Gauge is not critical for a decorative pillow, but the swatch allows you to check whether the fabric is dense enough. Stretch it gently between your fingers. If large gaps appear between the stitches, change to a slightly smaller hook. If the fabric feels extremely rigid and difficult to work, move up one hook size.
Color planning can dramatically change the personality of the finished cat paw cushion. Cream with royal blue creates a cheerful modern appearance, while cream with gray gives the cushion a calm neutral style. Pink paw pads make a sweet nursery decoration, and dark brown pads against beige yarn create a warm natural palette. You can even use leftover yarn for multicolored toe beans, provided all yarns have approximately the same thickness.
Step-by-Step Crochet Paw Cushion Body
Start the crochet paw cushion body with a magic ring using your main color. Work 6 single crochet stitches into the ring and pull it closed. In the next round, work 2 sc into each stitch to create 12 stitches. Continue increasing evenly in subsequent rounds: work 1 sc followed by an increase around, then 2 sc followed by an increase, then 3 sc followed by an increase. Continue this progression until the circle reaches approximately 22 to 26 cm in diameter, depending on how large you want the finished cushion.
Once the central circle is large enough, begin transforming the upper portion into the characteristic cat paw shape. Divide approximately the upper half of the stitches into four sections. Each section will form one rounded toe. Work back and forth over the first section using single crochet, gradually decreasing one stitch near each edge until the section becomes gently rounded. Fasten off, join the yarn to the next section, and repeat until four rounded toe areas have been created.
The exact number of stitches used for each toe can be adjusted because yarn weight and cushion size vary. For a balanced appearance, the two center toe sections can be slightly larger than the two outer sections. For example, if an outer toe begins with 12 stitches, a center toe could begin with 14 or 16 stitches. The goal is to create smooth curves rather than sharp corners, so decrease gradually instead of removing several stitches at once.
After shaping all four toes, work a border of single crochet stitches around the entire paw silhouette. This finishing round is important because it smooths the transitions between the toe sections and creates a clean edge for joining the cushion later. Work one stitch into each stitch or row end, adding an extra stitch around tight curves when necessary. If the edge begins to ripple, reduce the number of increases; if it pulls inward, add a few evenly spaced increases.
Create the second panel by repeating exactly the same process. Place the two panels together occasionally while crocheting to check that their dimensions remain similar. Minor differences can usually be corrected during the final border round. The second panel does not require decorative pads unless you want a reversible Crochet Cat Paw Cushion Pattern, so it can remain completely plain for a faster project.
When both pieces are complete, block them lightly if your yarn benefits from blocking. Lay each panel flat and gently shape the toes and curves with your hands. Avoid excessive stretching because the front and back must remain the same size. Allow both pieces to dry completely before attaching the decorative paw pads, particularly when working with cotton or other natural fibers that may temporarily change shape when damp.
How to Crochet the Paw Pads and Cat Face
Begin each small crochet paw pad with the contrasting color. Make a magic ring and work 6 sc into it. Increase to 12 stitches in the second round. Continue with evenly spaced increases until the circle measures approximately 7 to 9 cm across. Crochet one or two rounds without increasing if you want the pad to develop a slightly domed shape instead of remaining completely flat.
Make four small pads using the same method. You can keep them identical or make the two upper center pads slightly larger for a more natural paw appearance. Before fastening off, leave a long yarn tail of approximately 30 cm. This tail will later be used to sew the pad onto the cushion, reducing the number of loose ends that need to be woven in.
The large central cat paw pad should be wider than it is tall. Begin with a foundation chain of approximately 12 to 16 stitches, depending on your yarn. Work sc along the chain, place several stitches into the final chain to turn the corner, crochet along the opposite side, and place several stitches into the starting chain. Continue working in oval rounds, placing increases around both curved ends until the piece reaches approximately 14 to 18 cm wide.
For extra dimension, lightly fill each paw pad with fiberfill while attaching it. Position the four smaller pads around the upper part of the front cushion panel and pin them temporarily or secure them with removable stitch markers. Sew around approximately three-quarters of each pad, insert a small amount of stuffing, and then complete the seam. Avoid overfilling because the pads should look softly raised rather than like hard balls.
The large center pad can remain simple, giving you a traditional paw print crochet cushion, or it can become an adorable cat face. To create the face, use black yarn and a yarn needle to embroider two small rounded eyes. Add a triangular nose near the center, stitch a short curved mouth beneath it, and create three short whiskers on each side. Keep embroidery securely attached, particularly if the cushion will be used around children.
Arrange every decorative element before permanently sewing it in place. Symmetry does not have to be mathematically perfect, but balanced spacing creates a professional result. Step away from the cushion and look at the entire front panel before sewing. This simple check makes it easier to notice whether one toe pad is too high, too low, or too close to the central pad.
Assembly, Stuffing, Finishing, and Customization
Place the completed front and back panels of your Crochet Cat Paw Cushion Pattern together with the wrong sides facing inward. Match all four toes and align the lower rounded edge carefully. Join the panels using single crochet around the outside, or sew them together with a yarn needle and mattress stitch. A visible single crochet seam creates a charming handmade border, while mattress stitch offers a more subtle finish.
Continue joining the panels until approximately 10 to 15 cm remains open along the lower edge. Begin adding polyester fiberfill gradually. Push small amounts of stuffing into each toe first, using your fingers or the blunt end of a crochet hook to distribute it evenly. After filling the toe sections, add stuffing to the center and lower part of the cushion. Working gradually prevents hard lumps from developing.
The ideal firmness depends on how the cushion will be used. For decorative display, moderate stuffing allows the paw to maintain its shape without becoming overly rigid. For a softer sofa pillow, use slightly less filling. Rotate the cushion several times while stuffing and inspect it from the front and side. Add small amounts wherever the surface looks uneven.
When you are satisfied with the shape, finish joining the opening and fasten off securely. Weave the yarn tail through several stitches on the inside edge before trimming it. Massage the cushion gently to redistribute the fiberfill. Pay particular attention to the spaces between the four toes, because clearly defined curves help emphasize the recognizable cat paw cushion silhouette.
The Crochet Cat Paw Cushion Pattern can be customized in many ways without changing the basic construction. Create a smaller version for a child’s decorative pillow, enlarge the rounds for an oversized floor cushion, or make two coordinating paws in opposite colors. Another creative option is to use one color for each toe pad, turning leftover yarn into a playful rainbow design.
For care, always consider the washing recommendations printed on your yarn label. If the selected yarn and stuffing are washable, gentle cleaning can help maintain the cushion over time. Hand washing is often useful for highly dimensional crochet pieces because it reduces unnecessary stretching. Reshape the paw carefully while damp and allow it to dry thoroughly before returning it to regular use.
Frequently Asked Questions About the Crochet Cat Paw Cushion Pattern
Is the Crochet Cat Paw Cushion Pattern suitable for beginners?
Yes. A confident beginner who understands single crochet, increases, decreases, working in rounds, and basic sewing should be able to complete the project. The most important part is keeping track of stitches while shaping the four toes. Using stitch markers can make this process considerably easier.
What yarn is best for a crochet cat paw cushion?
Medium-weight acrylic, cotton-blend, or soft bulky yarn are all good choices. Smooth yarn provides clearer stitch definition and is usually easier for beginners. Plush or chenille yarn can create a very soft cushion, although seeing individual stitches may be more difficult.
How much yarn do I need?
A medium cushion commonly requires approximately 400 to 600 grams in total, but yarn requirements vary significantly according to the yarn thickness, hook size, dimensions, stitch tension, and amount of contrasting color used. Keeping an extra skein of the main color is helpful when making a larger cushion.
How can I make the cat paw cushion bigger?
Continue the increase sequence for additional rounds before beginning the toe shaping. You should also enlarge the paw pads proportionally. When increasing the overall dimensions, compare the pads with the main panel before sewing them down so the design remains balanced.
Why is my crochet circle becoming wavy?
A wavy circle usually indicates that too many increases are being added. Reduce the frequency of increases and check your stitch count. If the circle curls into a bowl shape too early, the opposite problem may be occurring and you may need additional increases.
Can I make the cushion without the cat face?
Absolutely. The facial embroidery is optional. Leaving the large central pad plain creates a classic crochet paw print pillow, while adding eyes, a nose, mouth, and whiskers gives the project a more playful cat-inspired personality.
Should the paw pads be stuffed?
They do not have to be, but a small amount of fiberfill creates the raised three-dimensional appearance seen in plush paw cushions. Use only a little stuffing so each pad remains soft and comfortably rounded.
Can I make the cushion cover removable?
Yes. Instead of permanently closing the bottom seam, you can adapt the back panel by creating overlapping sections or another removable closure system. A removable cover may be particularly useful when the cushion will require frequent cleaning.
What size crochet hook should I use?
Choose a hook that creates a dense fabric with your selected yarn. The yarn label provides a useful starting recommendation, but cushion projects sometimes benefit from using a slightly smaller hook so the stuffing does not show between the stitches.
How do I keep both sides of the paw the same size?
Count every round carefully and record the number of stitches used when shaping each toe. When making the second panel, follow those same counts instead of relying entirely on visual comparison. Placing both panels together periodically also helps identify differences early.
Can leftover yarn be used for this pattern?
Yes, especially for the toe pads, facial details, and colorful variations. Try to combine yarns of similar weight so the pads have consistent thickness and the cushion keeps a balanced appearance.
How long does a Crochet Cat Paw Cushion Pattern take to complete?
The time varies with crochet experience, cushion size, yarn thickness, and the amount of decorative detail. Bulky yarn generally works up more quickly than thinner yarn. Because the pattern is divided into separate pieces, it is also convenient to complete the project over several crafting sessions.
Conclusion
The Crochet Cat Paw Cushion Pattern is a creative way to combine practical crochet techniques with an adorable cat-inspired design. Throughout this tutorial, you learned how to select suitable yarn, understand essential crochet abbreviations, build two paw-shaped panels, crochet dimensional toe pads, create the large central paw pad, embroider an optional cat face, assemble the cushion, and distribute the stuffing evenly. The modular construction makes the project easy to personalize while providing valuable practice with magic rings, single crochet stitches, increases, decreases, oval shaping, sewing, embroidery, and finishing techniques.
EASILY FIND THE PDF FOR THIS PATTERN HERE!
Once you understand the basic construction, the possibilities are almost endless. Experiment with blue, gray, pink, brown, black, pastel, or multicolored paw pads, resize the pattern to create anything from a small decorative cushion to a large floor pillow, or make coordinating versions as handmade gifts. Most importantly, enjoy the process of turning yarn into something comfortable, decorative, and full of personality. If you make your own Crochet Cat Paw Cushion Pattern, leave your sincere opinion about the project and share your suggestions for colors, details, sizes, or variations you would love to try next.