
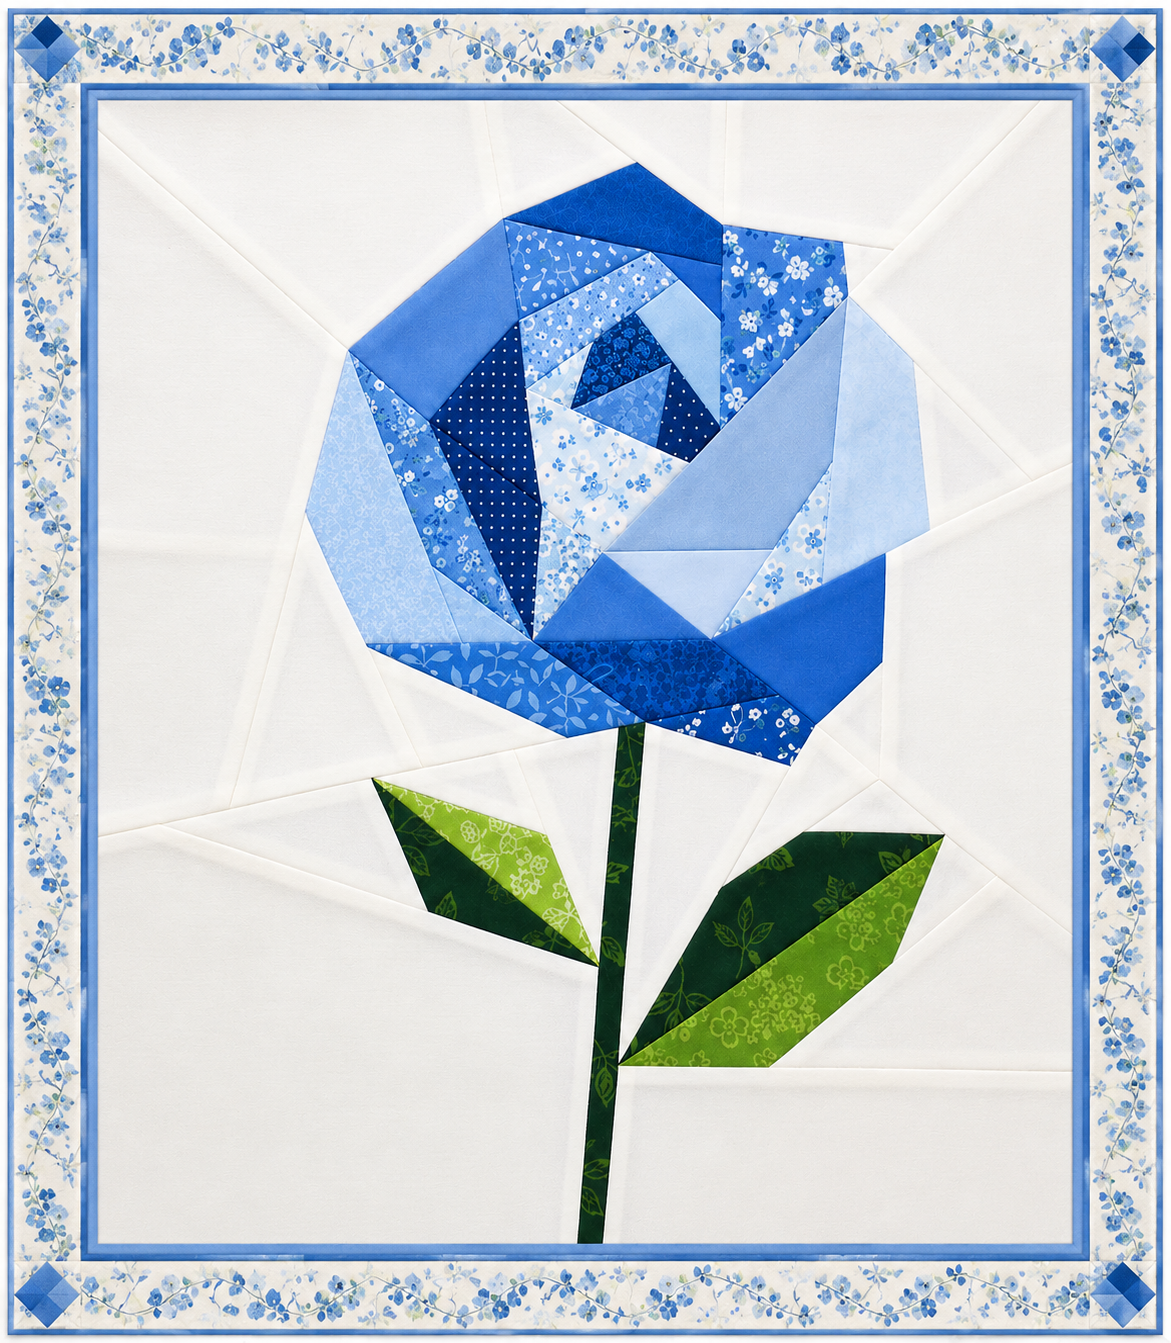
The Blue Rose Quilt using the Paper Piecing Technique Pattern is a beautiful fabric art project that combines the elegance of a blue rose with the precision of foundation paper piecing. The design shown in the reference image features a large geometric rose made with several shades of blue, a slender green stem, two angular leaves, and a clean white background. A delicate floral border completes the composition and gives the quilt a refined, framed appearance. Although the rose includes many small fabric sections, the paper piecing method makes it possible to reproduce sharp angles, accurate seams, and detailed color transitions. With patience and careful organization, even a confident beginner can create a polished wall quilt inspired by this design.
Foundation paper piecing is a quilting technique in which pieces of fabric are sewn directly onto a printed paper foundation. The numbered sections on the pattern determine the order in which the fabrics are added, allowing the maker to construct shapes that may be difficult to achieve with traditional patchwork. In this Blue Rose Quilt using the Paper Piecing Technique Pattern, the method is especially useful for building the irregular petals and the faceted appearance of the flower. The paper stabilizes the fabric while sewing, helping each section remain straight and accurately positioned. After the individual units are completed and joined, the paper is carefully removed from the back of the quilt top.
The finished project can be used as a quilted wall hanging, a decorative panel, the center of a larger quilt, or even the front of a handmade cushion when resized. Blue floral fabrics create the main visual impact, while green prints define the stem and leaves. A neutral background allows the rose to remain the focal point without making the composition feel crowded. Before beginning, read through the complete process, label every paper section, and prepare more fabric than the exact pattern measurements require. Paper piecing pieces are intentionally cut larger because they must cover each numbered area, including the seam allowance, after they are flipped into position.
Materials and Fabric Selection for the Blue Rose Quilt
Begin by gathering cotton quilting fabrics in a coordinated blue palette. Select approximately eight to twelve blue fabrics ranging from very pale blue to deep navy. A combination of solid fabrics, small floral prints, dots, leaves, and subtle tonal patterns will create depth without making the rose look visually confusing. The darkest fabrics can be placed near the center and in selected shadow areas, while lighter blues can be used on the outer petals. This gradual color movement gives the Blue Rose Quilt its dimensional, folded-petal appearance.
DISCOVER MORE FREE PATTERNS HERE!
Choose two or three green fabrics for the stem and leaves. A dark forest green works well for the central stem and the shaded sections of the leaves. A medium or bright green can be used for the highlighted leaf areas. Small botanical prints are especially appropriate because they reinforce the garden theme. Avoid using only one green fabric throughout the design, as slight changes in value will help the leaves look more natural and visually balanced.
For the background, use a white, cream, ivory, or very pale neutral quilting cotton. The reference project uses a light background that includes several large angular sections. These sections are part of the foundation piecing design and create subtle seam lines around the flower. A lightly textured or tone-on-tone fabric can add interest while preserving the clean appearance. Select enough background fabric to cover the complete quilt center and account for oversized paper piecing sections.
You will also need a printed paper piecing pattern, lightweight foundation paper, a sewing machine, neutral sewing thread, a rotary cutter, a cutting mat, quilting rulers, fabric scissors, paper scissors, and an iron. A small fabric glue pen or washable glue stick can help hold the first piece of each unit in place. An add-a-quarter ruler is useful but not essential. A regular quilting ruler can be used to trim seam allowances accurately.
Prepare batting and backing fabric after determining the final dimensions of the quilt top. Low-loft cotton batting is a practical choice for a wall hanging because it provides structure without making the project excessively thick. The backing can be a coordinating blue, green, floral, or neutral fabric. Cut the batting and backing at least 2 to 3 inches larger than the quilt top on every side so the layers remain covered during quilting.
The floral border can be created with a blue-and-white botanical print, a pieced vine design, or a simple printed fabric that resembles the border shown in the image. Add a narrow blue inner border before attaching the wider floral border. Small blue diamond blocks may be inserted into the four corners for an elegant finish. These corner details are optional, but they help repeat the colors and geometric style found in the central paper pieced rose pattern.
Preparing and Organizing the Paper Piecing Pattern
Print the complete Blue Rose Quilt using the Paper Piecing Technique Pattern at 100 percent scale unless the pattern specifically includes different printing instructions. Disable settings such as “fit to page” or “shrink oversized pages,” because these options can change the dimensions of the blocks. Print one test page containing a measurement square and confirm its size with a ruler before printing the remaining pages. Accurate printing is essential for units that must fit together correctly.
Examine the pattern and identify all separate foundation units. The flower will usually be divided into several petal sections, while the leaves, stem, and background may be constructed as additional units. Label every foundation clearly with a letter or descriptive name, such as Rose Center, Upper Petal, Left Petal, Right Petal, Stem, Left Leaf, and Right Leaf. Keep a complete reference diagram nearby so you can check the position of each finished section.
Cut the paper foundations apart, leaving approximately ¼ to ½ inch of extra paper around the outer cutting lines. Do not trim directly on the final edge at this stage. The extra paper makes the units easier to handle while sewing. Fold the paper gently along every printed seam line. Pre-folding creates a guide that makes it easier to trim the fabric before adding the next piece and simplifies paper removal after the quilt top is assembled.
Sort the blue fabrics from lightest to darkest. You can arrange them on a table, photograph the order, and assign each fabric a number. Mark those numbers lightly on a printed color guide. This planning step prevents two identical fabrics from being placed next to each other unintentionally. It also helps distribute the darkest and lightest values around the rose, producing a balanced blue quilt pattern with clear petal definition.
Cut fabric pieces generously rather than cutting them to the exact shape of the numbered sections. Each fabric should extend at least ½ inch beyond the area it must cover. Irregular petal pieces may require larger rectangles or triangles. Hold the paper foundation against a light source or use a light box to check whether a fabric piece covers the complete section after it is flipped. Insufficient coverage is one of the most common paper piecing mistakes.
Set the sewing machine to a short stitch length, approximately 1.5 to 1.8 millimeters. Short stitches perforate the foundation paper and make it easier to remove later. Install a new sharp needle and use a neutral thread that blends with both the blue and white fabrics. Keep a small cutting station and pressing area close to the sewing machine because each paper piecing step involves sewing, trimming, flipping, and pressing.
Sewing and Assembling the Blue Rose Quilt Block
Start with section number one on the first paper foundation. Place the first fabric on the unprinted side of the paper, with the right side of the fabric facing away from the foundation. Make sure it covers the entire first section and extends beyond every seam line. Secure it with a small amount of fabric glue or a flat pin positioned away from the sewing line. The fabric pieces will be sewn on the blank side while the printed side remains visible during stitching.
Position the fabric for section number two with its right side facing the right side of the first fabric. The raw edge should extend approximately ¼ inch beyond the seam line between sections one and two. Turn the foundation so the printed side faces upward and sew directly along the printed line. Begin a few stitches before the line and continue a few stitches beyond it. This secures the seam at both ends and prevents separation when the paper is removed.
Fold the paper back along the newly sewn line and trim the seam allowance to approximately ¼ inch. Return the paper to its original position, flip the second fabric over the seam, and press it flat. Use a dry iron or a wooden seam roller to avoid distorting the foundation. Check that the fabric completely covers section number two and extends beyond all surrounding seam lines. Continue this process in numerical order until the entire foundation unit is covered.
Construct every rose unit using the same foundation paper piecing technique. Pay special attention to the darkest blue pieces near the center of the flower, as they create the visual depth of the rose. Medium blues can connect the central area to the outer petals, while pale blue fabrics soften the outside edges. Rotate prints in different directions to keep the design lively, but avoid placing large motifs where they may be cut into unrecognizable fragments.
After completing a foundation unit, press it carefully and trim around its outer solid line. The outer line should include the required seam allowance, commonly ¼ inch. Do not remove the paper yet because it helps stabilize the bias edges while the units are joined. Arrange all finished sections according to the master diagram. Confirm that the colors flow naturally and that each unit is positioned correctly before sewing the major groups together.
Join smaller units to create larger sections of the rose. Use pins at important matching points and insert them perpendicular to the seam. Sew slowly with the paper side facing upward so you can follow the printed stitching line. Press the joined seams as directed by the pattern, either open or toward one side. Continue assembling the flower, background, stem, and leaves until the complete paper pieced flower quilt block is formed.
Finishing the Quilt, Frequently Asked Questions, and Helpful Tips
Once the quilt center is assembled, carefully remove the paper foundations. Fold the paper along each stitched seam and tear it away gently, beginning with the outer sections and moving toward the center. Hold the stitches with one hand while removing the paper with the other. Tweezers can help remove small fragments trapped near short seams. Avoid pulling aggressively because this can stretch the fabric or loosen the stitching.
Press the completed quilt top from the back and then from the front. Add the narrow blue inner border, measuring through the center of the quilt rather than simply cutting strips to the outside edge measurements. Sew the side borders first and then add the top and bottom strips. Attach the wider floral border in the same manner. For decorative corner diamonds, piece the corner blocks separately and join them to the border strips before attaching the completed border unit.
Layer the backing, batting, and quilt top on a clean flat surface. Smooth each layer carefully and baste with safety pins, temporary basting spray, or long hand stitches. Quilt around the outline of the rose, inside selected petals, along the stem, and around the leaves. The white background can be quilted with straight lines, echo quilting, gentle curves, or simple free-motion designs. Avoid extremely dense quilting if you want the flower to remain softly raised.
Trim the quilt sandwich and attach binding around the outside edges. A medium or dark blue binding coordinates well with the inner border and provides a clean visual frame. Sew the binding to the front by machine, fold it around the raw edge, and finish it by hand or machine on the back. Add a hanging sleeve before completing the upper binding when the project will be displayed as a blue rose quilted wall hanging.
What is foundation paper piecing? Foundation paper piecing is a method of sewing fabric pieces onto a printed paper guide in numerical order. The technique is useful for creating sharp points, unusual angles, and detailed images. In the Blue Rose Quilt using the Paper Piecing Technique Pattern, it allows the many geometric petals to fit together accurately and form a recognizable rose.
Can a beginner make this blue rose quilt? A patient beginner can complete the project after practicing with a small paper piecing sample. The rose contains numerous angles and several joined units, so basic sewing machine experience is recommended. Begin slowly, check fabric coverage before every seam, and label all sections carefully. Precision is more important than speed.
What paper should be used for paper piecing? Lightweight foundation paper is the easiest option because it feeds smoothly through the sewing machine and tears away cleanly. Standard printer paper can also work, although it may be slightly more difficult to remove. Avoid thick cardstock because it can distort the stitches and place unnecessary pressure on the needle.
Why are the fabric pieces cut larger than the pattern sections? The fabric must cover the numbered section after being sewn, flipped, and pressed. Because many paper piecing shapes are angled, a piece that appears large enough before sewing may shift into the wrong position after it is flipped. Extra fabric provides a safe margin and can be trimmed away during construction.
Should the paper be removed before the quilt units are joined? In most cases, the paper should remain attached until the major units are assembled. It stabilizes bias edges and helps preserve accurate dimensions. However, paper trapped inside enclosed seam allowances may need to be removed earlier. Always follow the assembly order included with the specific pattern.
How can bulky seams be reduced in the rose center? Trim seam allowances consistently, press carefully, and remove small paper sections that become enclosed during assembly. Seams can be pressed open when several units meet at one point. A tailor’s clapper or seam roller can help flatten the area without stretching the fabric.
Can different colors be used instead of blue? Yes. The same pattern can create a red, pink, purple, yellow, or multicolored rose. Maintain a clear range of light, medium, and dark values so the individual petals remain visible. The blue rose quilt pattern is distinctive, but the construction method works with any coordinated color palette.
How can the pattern be resized? A paper piecing pattern can usually be enlarged or reduced using printer percentage settings. Remember that the seam allowance will also change unless it is redrawn after resizing. Very small versions require tiny fabric pieces and can become difficult to sew, while enlarged versions may need pattern pages to be taped together.
What quilting design works best for this project? Stitching in the ditch emphasizes the geometric seams and preserves the crisp paper pieced appearance. Echo quilting around the rose helps separate it from the background. Simple free-motion leaves, vines, or gentle curves can add texture to the white sections without competing with the central flower.
How should the finished quilt be cleaned? A wall hanging can usually be maintained with gentle dusting or occasional vacuuming through a protective screen. When washing is necessary, use cool water, a mild detergent, and a delicate cycle or careful hand washing. Dry the quilt flat when possible to preserve its shape and prevent unnecessary stress on the seams.
Why did one fabric piece fail to cover its section? This usually happens when the fabric was too small, positioned at the wrong angle, or placed too close to the sewing line. Before stitching, pin the fabric temporarily, fold it over as though the seam were already sewn, and hold the unit toward a light source. This simple test confirms whether the piece will cover the required area.
How can accurate points be achieved when joining units? Insert a pin through the exact matching point on the first unit and then through the corresponding point on the second unit. Keep the pin perpendicular while adding another pin on each side. Sew slowly across the intersection without stretching the fabric. Accurate pinning is especially important around the center and overlapping petals of the rose.
Conclusion
The Blue Rose Quilt using the Paper Piecing Technique Pattern transforms small pieces of blue and green fabric into an elegant floral composition with impressive geometric detail. The main lessons in this project include organizing fabrics by value, printing the foundations accurately, sewing each section in numerical order, trimming consistent seam allowances, and joining completed units with careful alignment. The narrow inner frame, floral outer border, and corner accents give the quilt a finished appearance while keeping the blue rose as the main focal point.
EASILY FIND THE PDF FOR THIS PATTERN HERE!
Foundation paper piecing may feel unfamiliar during the first few sections, but the repeated process of placing, sewing, trimming, flipping, and pressing soon becomes comfortable. Take time to verify every fabric before sewing and avoid rushing through the central petal units. When completed, this paper pieced blue rose quilt can become a meaningful wall decoration, a handmade gift, or the centerpiece of a larger quilting project. Please leave your sincere opinion about this design and share suggestions for colors, borders, quilting styles, or future floral patterns you would enjoy creating.