
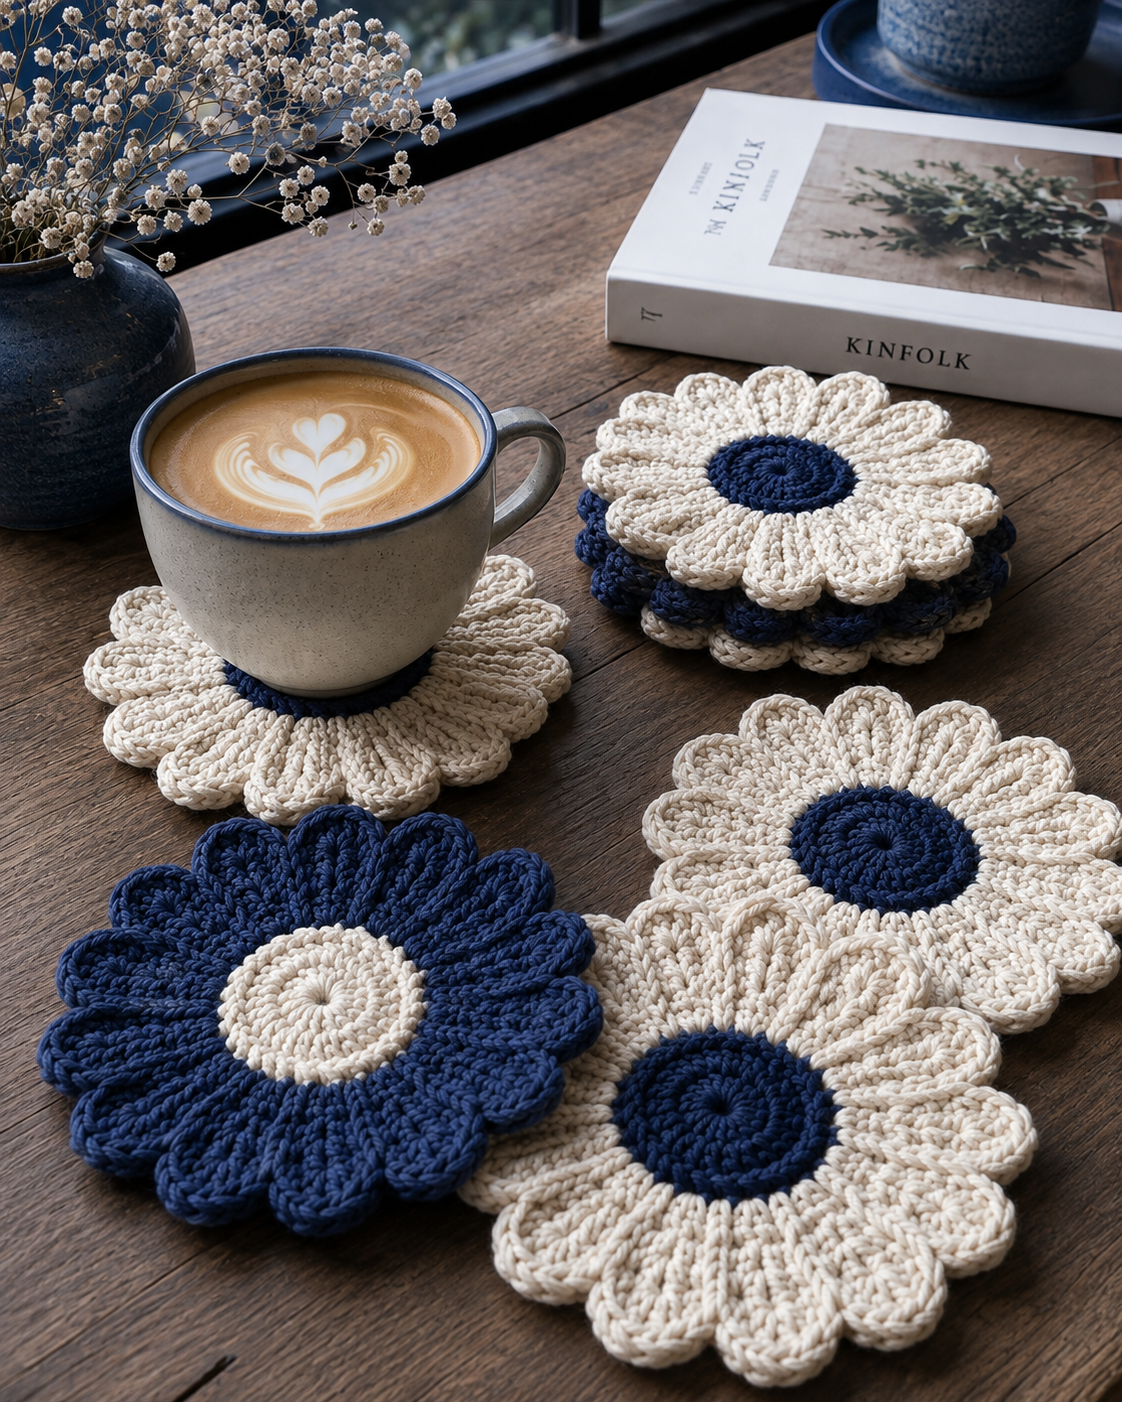
The Crochet Daisy Coaster Pattern is a charming handmade project that combines practical table protection with the timeless beauty of a blooming daisy.
With a round center, textured petals, and a soft floral shape, this coaster can brighten coffee tables, dining areas, breakfast trays, and handmade gift sets.
It is also an excellent project for using small amounts of leftover cotton yarn in cream, white, pink, green, yellow, or any color combination that matches your home décor.
Because the pattern is worked in rounds, you can easily follow the growth of the flower from the center outward while practicing essential crochet techniques.
The finished piece is compact, washable, reusable, and suitable for holding coffee cups, tea mugs, glasses, small bowls, or decorative candles.
Throughout this tutorial, you will learn how to crochet the center, shape the petals, control the tension, finish the coaster neatly, and personalize the design.
This crochet flower coaster is suitable for confident beginners and experienced crocheters who want a relaxing project with a polished result.
The main techniques include making a magic ring, crocheting in joined rounds, increasing stitches, working into front or back loops, and creating rounded petals with different stitch heights.
The design can be completed quickly, but taking time to count the stitches will help the daisy remain flat and symmetrical.
Cotton yarn is usually the best choice because it absorbs moisture, tolerates frequent washing, and provides enough structure to hold the floral shape.
A finished daisy coaster can be made individually or combined with several coordinating pieces to create a complete handmade table set.
The Crochet Daisy Coaster Pattern is therefore both a decorative craft and a useful everyday accessory.
Before beginning, read the full pattern and become familiar with the crochet abbreviations used in the instructions.
This project uses standard US crochet terminology, and each abbreviation will be explained so that you understand exactly how the stitches are formed.
The finished size may vary according to yarn weight, hook size, tension, and the number of petals included in the final round.
A typical coaster measures approximately 4.5 to 5.5 inches across, which is large enough for most mugs and glasses.
Always create a small test section when using unfamiliar yarn, especially when combining different brands or fiber contents. Careful preparation will make the Crochet Daisy Coaster Pattern easier to follow and will produce a balanced flower with smooth, attractive petals.
Materials, Crochet Abbreviations, and Preparation
Choose a medium-weight or light worsted cotton yarn for the main part of the coaster. Cotton is recommended because it is absorbent, durable, and less likely to melt when placed beneath a warm mug. You will need one color for the center and another for the petals, although additional shades may be used for a more colorful result.
A practical combination is mustard yellow for the daisy center and cream, white, dusty pink, or sage green for the petals. Approximately 20 to 35 yards of yarn should be enough for one coaster, depending on the yarn thickness and your personal tension. Small yarn scraps are often sufficient, making this a useful stash-busting project.
Use a crochet hook that works well with your selected yarn. A 3.5 mm to 4.5 mm hook is generally appropriate for cotton yarn in this category. Select a slightly smaller hook when you want firm stitches, but avoid crocheting so tightly that the coaster becomes stiff or the petals begin to curl.
The pattern uses several basic abbreviations: ch means chain, sl st means slip stitch, sc means single crochet, hdc means half double crochet, dc means double crochet, and tr means treble crochet. The abbreviation st means stitch, sts means stitches, sp means space, and rep means repeat.
You will also see inc, which means increase by working more than one stitch into the same stitch. The instruction FO means fasten off. When the pattern says to join, insert the hook into the indicated stitch, yarn over, and pull the yarn through both the stitch and the loop already on the hook.
Additional supplies include scissors, a yarn needle, stitch markers, and a measuring tape. A blocking mat and rust-resistant pins are optional but helpful. Place a stitch marker in the first stitch of every round, even when working with joined rounds, because this simple habit prevents counting mistakes.
Crocheting the Round Daisy Center
Begin the Crochet Daisy Coaster Pattern with the center color. Make a magic ring by wrapping the yarn around your fingers, inserting the hook through the loop, pulling up a strand, and making one chain to secure it. The magic ring allows the opening in the center to be tightened completely.
For Round 1, chain two, which does not count as a stitch unless you prefer another joining method. Work 12 double crochet stitches into the magic ring. Pull the starting tail firmly to close the center, then join with a slip stitch to the top of the first double crochet.
For Round 2, chain two and work two double crochet stitches into every stitch around. This is an increase in each stitch and creates a total of 24 double crochet stitches. Join with a slip stitch and check that the circle lies flat before continuing.
For Round 3, chain one and work one single crochet into the first stitch, followed by two single crochet stitches into the next stitch. Repeat the sequence of one single crochet and one increase around. You should finish with 36 single crochet stitches before joining with a slip stitch.
If your center begins to ruffle, there may be too many increases or your tension may be too loose. If it forms a bowl shape, your stitches may be too tight or there may not be enough increases. Adjust the hook size or remake the round before adding the petals, because the center determines the final shape of the coaster.
Fasten off the center color, leaving a tail long enough to weave in securely. Thread the tail onto a yarn needle and pass it through several stitches on the wrong side. Change direction at least once before trimming the yarn so that the center remains secure after washing and regular use.
Creating the Textured Daisy Petals
Attach the petal color to any stitch from the final center round. To begin the first petal, chain two, then work one half double crochet, two double crochets, one treble crochet, two double crochets, and one half double crochet into the same stitch or designated petal space. This combination creates a softly rounded tip.
Chain two and slip stitch into the next stitch to anchor the petal. The short chain adds flexibility between the petals and prevents the outer edge from becoming overly tight. Keep the slip stitches relaxed so that each petal can spread naturally during blocking.
Repeat the petal sequence around the entire center. Depending on the stitch count and the width of each petal, you may create 12, 15, or 18 petals. For a balanced daisy crochet pattern, maintain the same number of stitches and the same stitch order in every petal.
When working the treble crochet, yarn over twice before inserting the hook into the stitch. Yarn over and pull up a loop, then yarn over and pull through two loops three times. This taller stitch forms the highest section of the petal and gives the flower its characteristic rounded outline.
After completing the final petal, join with a slip stitch at the base of the first petal. Fasten off, leaving a long tail for weaving. Inspect the flower and gently pull each petal into shape with your fingers before securing the remaining yarn ends.
For fuller petals, work the stitches into a chain space rather than a single stitch, or add another double crochet on each side of the treble crochet. For narrower petals, remove one double crochet from both sides. These small adjustments allow you to personalize the Crochet Daisy Coaster Pattern without changing its basic construction.
Finishing, Blocking, Care, and Creative Variations
Weave in every yarn end carefully on the wrong side of the coaster. Avoid carrying a dark center color beneath light-colored petals because it may show through the stitches. Use several small passes with the yarn needle rather than creating large, bulky knots.
Blocking improves the shape of the finished crochet daisy coaster. Lightly dampen the piece, place it on a blocking mat, and arrange the petals evenly around the center. Pin each petal gently without stretching it beyond its natural size, then allow the coaster to dry completely.
To make the coaster thicker, crochet a simple flat circle in a matching color and sew it to the back. A double-layer construction protects delicate surfaces and hides the yarn ends. Make sure the backing circle is slightly smaller than the flower so that it does not appear beyond the petals.
You can create a coordinated set by using one center color and several different petal colors. Cream, blush pink, sage green, pale blue, lavender, and warm beige produce a soft farmhouse-inspired palette. Brighter shades can transform the same Crochet Daisy Coaster Pattern into cheerful decorations for spring and summer.
These coasters can also be used as small appliqués, gift toppers, plant-pot mats, candle mats, or decorative accents for handmade baskets. Before placing one beneath a candle, use a stable container and keep the yarn away from an exposed flame. The project should be treated as a decorative textile rather than a heatproof safety product.
Wash cotton coasters by hand or use a gentle machine cycle according to the yarn label. Reshape the petals while damp and dry the coaster flat. Avoid very high heat, strong bleach, or aggressive twisting, as these methods can distort the center and weaken the petal stitches.
Frequently Asked Questions About the Crochet Daisy Coaster Pattern
Is the Crochet Daisy Coaster Pattern suitable for beginners?
Yes. A beginner who already knows how to make chains, single crochet stitches, half double crochet stitches, and double crochet stitches should be able to complete the project. The treble crochet may be unfamiliar, but it follows the same basic process as a double crochet with one additional yarn over. Using stitch markers and counting every round will make the pattern much easier.
What yarn is best for crochet daisy coasters?
Cotton yarn is generally the most practical option for a Crochet Daisy Coaster Pattern. It absorbs condensation, provides good stitch definition, and can usually be washed repeatedly. Cotton blends may also work well, but check the yarn label for care and heat recommendations. Avoid yarn that sheds heavily or becomes slippery when wet.
Can acrylic yarn be used for this pattern?
Acrylic yarn can be used for decorative coasters, but it does not absorb moisture as effectively as cotton. It may also react poorly to very hot objects. When using acrylic, keep the coaster away from cookware, open flames, and extremely hot containers. For everyday coffee and tea mugs, cotton remains the preferred choice.
Why is my crochet coaster curling?
Curling usually occurs because the tension is too tight, the hook is too small, or the center has too few increases. Petals may also curl when the anchoring slip stitches are worked too tightly. Try using a larger hook, relaxing the slip stitches, or adding an extra increase to the center round. Blocking can correct mild curling but may not fix a severe stitch-count problem.
Why does the center of my coaster look wavy?
A wavy or ruffled center often indicates too many increases. It can also happen when the yarn is too soft for the chosen hook size. Remove the most recent round and repeat it with fewer increases, or use a smaller hook. The center should lie flat before you begin crocheting the petals.
How many petals should a crochet daisy coaster have?
There is no single required number. Twelve large petals create a simple, bold flower, while 15 or 18 smaller petals produce a fuller appearance. The correct number depends on the center stitch count and the number of stitches used to anchor each petal. The most important point is to space the petals evenly.
How large should the finished coaster be?
Most handmade coasters measure between 4 and 5.5 inches across. A larger flower may be useful for oversized mugs, small bowls, or decorative purposes. Measure across the widest points of two opposite petals after blocking. Changing the yarn weight and hook size is the easiest way to adjust the overall dimensions.
Can I make matching placemats with the same design?
Yes, but the center must be expanded with additional increase rounds before the petals are added. Continue working a flat circle while distributing the increases evenly. A larger project needs more structural planning because excessive increases can create waves, while too few can cause cupping. Use sturdy cotton yarn and consider adding a backing layer.
How can I make the petals more defined?
Use a hook that creates firm, even stitches and choose a cotton yarn with clear stitch definition. You can also work the petals into the front loops only, leaving the back loops available for an additional decorative round. Blocking each petal individually will improve the final appearance and make the outline more consistent.
Can these coasters be sold as handmade products?
Handmade daisy coasters can be attractive items for craft collections, gift baskets, and seasonal table sets. Calculate the cost of yarn, packaging, labor, and finishing before setting a price. Photograph the actual finished product, provide accurate measurements, and include clear washing instructions for the customer.
How do I stop the magic ring from coming undone?
Leave a generous starting tail and weave it through the wrong side in several directions. After tightening the ring, pass the tail around the center stitches before weaving it back through nearby loops. Do not simply cut the tail close to the center, because regular washing and movement may loosen the ring.
Can the Crochet Daisy Coaster Pattern be made without a magic ring?
Yes. Chain four and join the first chain with a slip stitch to create a small ring. Work the first round into the center of that ring. This method may leave a slightly larger opening, but it is a useful alternative for crocheters who prefer not to use a magic ring.
Conclusion
The Crochet Daisy Coaster Pattern offers a simple and enjoyable way to transform small amounts of cotton yarn into a practical floral accessory. You learned how to choose suitable materials, understand important crochet abbreviations, create a flat circular center, shape textured petals, weave in the ends, block the finished flower, and adapt the design with different colors and sizes. By maintaining consistent tension and checking the stitch count after every round, you can produce neat daisy coasters that are both decorative and useful.
EASILY FIND THE PDF FOR THIS PATTERN HERE!
A single coaster can add a handmade touch to a coffee break, while a complete set can become a thoughtful housewarming, birthday, spring, or holiday gift. Experiment with cream petals for a traditional daisy, pink petals for a romantic style, or green petals for a modern botanical look. Please leave your sincere opinion about this Crochet Daisy Coaster Pattern and share your suggestions for new colors, petal styles, or creative ways to use the finished flowers.