
Gingham Apron Style Wrap Dress Fabric Pattern is a charming sewing project that combines the comfort of a loose apron, the elegance of a wrap dress, and the timeless appeal of black-and-white gingham fabric.
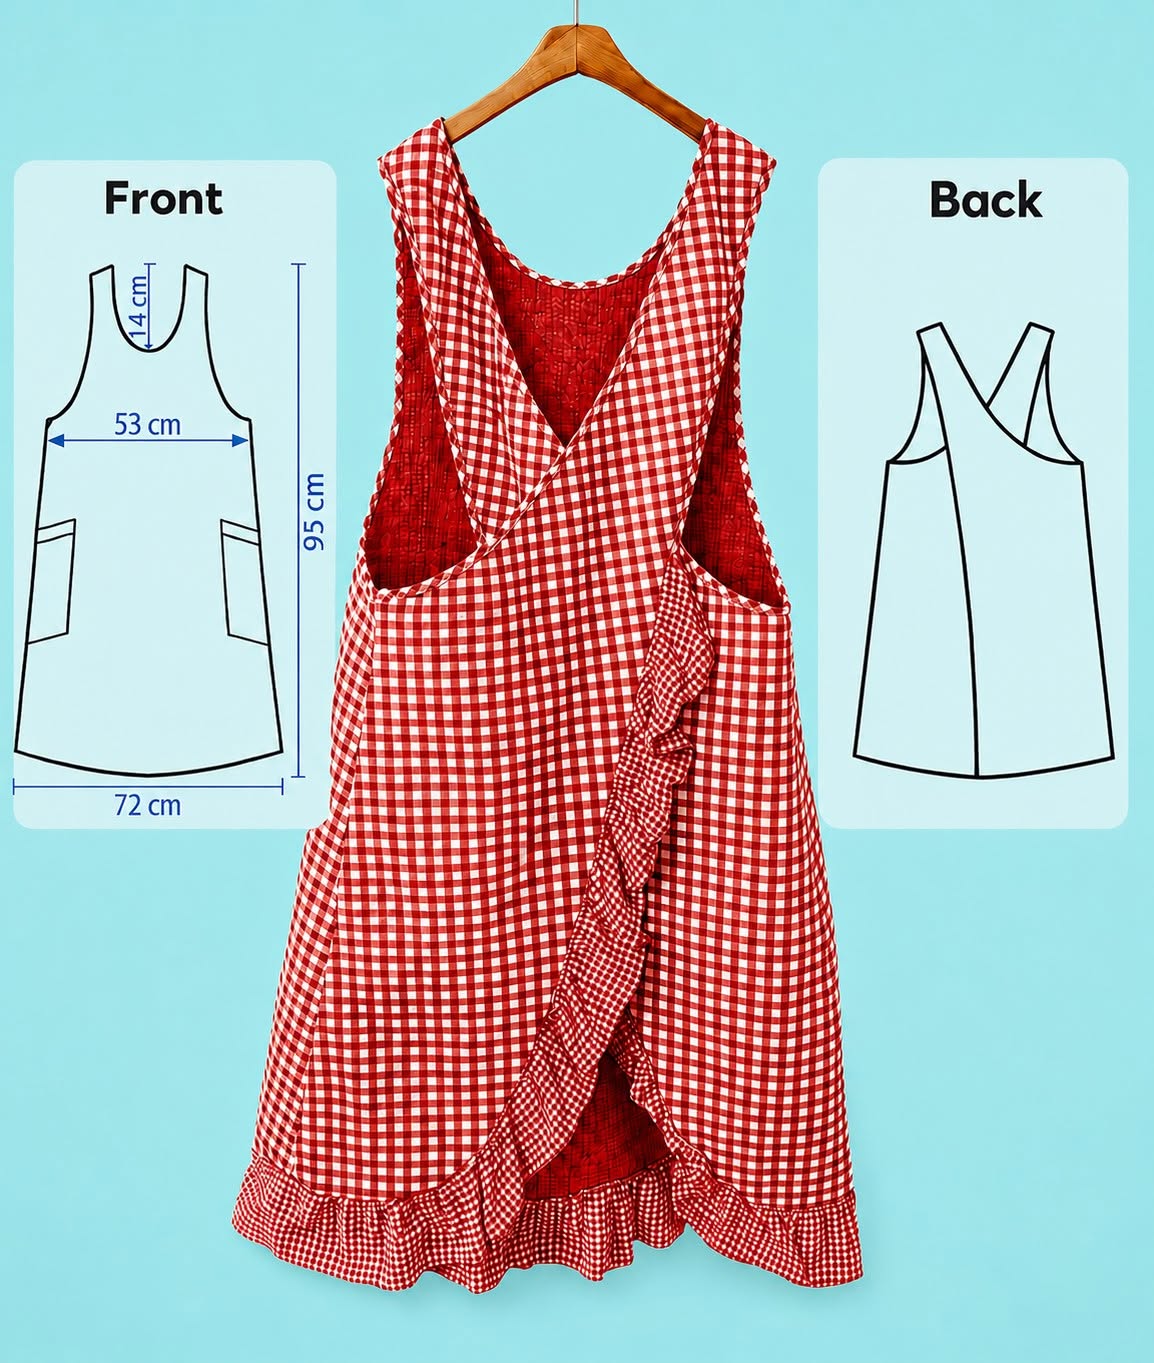
The finished garment has a relaxed A-line silhouette, wide shoulder straps, practical side pockets, and a softly gathered ruffle around the lower edge.
Its overlapping back panels create the distinctive wrap effect while allowing freedom of movement and making the dress easy to layer over shirts, blouses, or lightweight sweaters.
This design is suitable for everyday household activities, creative studio work, gardening, casual outings, or simply adding a handmade touch to a comfortable wardrobe.
Although the construction looks detailed, the main pattern pieces are uncomplicated and can be adapted to different body measurements.
By working carefully through the measuring, cutting, fitting, and finishing stages, an intermediate beginner can successfully recreate the project shown in the reference image.
The term Gingham Apron Style Wrap Dress Fabric Pattern describes both the appearance and the construction of the garment.
“Gingham” refers to the classic checked fabric, which is traditionally woven with alternating colored and white threads to form evenly spaced squares.
“Apron style” describes the roomy shape, functional pockets, and practical layering design rather than a closely fitted dress structure.
“Wrap dress” refers to the overlapping panels, especially at the back, where the straps cross and the body sections wrap naturally around the wearer.
Finally, “fabric pattern” means the set of shaped templates and measurements used to cut each piece before sewing begins.
Understanding these terms makes it easier to visualize how the separate pieces will come together during construction.
The sample design is approximately 95 cm long, with a front width of about 53 cm at the upper body and a lower width of approximately 72 cm.
The neckline depth shown in the reference is around 14 cm, although all measurements should be adjusted according to the wearer’s height, bust, preferred coverage, and desired ease.
The dress is intentionally loose, so it should not feel tight across the chest, waist, or hips.
A successful version depends less on complex tailoring and more on balanced proportions, clean seam finishes, and accurately placed overlapping panels.
Making a test version from inexpensive cotton can help confirm the length, armhole depth, pocket position, and amount of back overlap before cutting the final gingham.
This preparation protects your fabric and gives you the confidence to personalize the Gingham Apron Style Wrap Dress Fabric Pattern.
Understanding the Shape and Measurements
The front section begins with a gently curved neckline and two wide shoulder straps. The neckline should be deep enough to create a comfortable apron-like appearance without becoming too low when the garment is worn over another top. A depth of approximately 14 cm can be used as a starting point, measured from the top shoulder line to the lowest point of the neckline curve. Smooth curves are important because sharp corners can make binding and topstitching more difficult.
DISCOVER MORE FREE PATTERNS HERE!
The upper front width in the reference design is approximately 53 cm. This measurement can be adjusted by measuring across the fullest part of the wearer’s bust and adding generous wearing ease. Because this is a relaxed layering garment, adding between 12 and 20 cm of total ease may provide a comfortable result. Divide the finished measurement appropriately when drafting pieces on folded fabric.
The lower front widens gradually to approximately 72 cm, producing the soft A-line shape. To create this silhouette, extend the side seams outward from the armhole area toward the hem. Avoid making the flare too sudden, as a gradual line will hang more naturally. Use a long ruler or gently curved pattern ruler to connect the upper and lower points smoothly.
The overall length shown is approximately 95 cm before considering personal adjustments or the exact width of the ruffle. Measure from the top of the shoulder to the desired finished hemline. Remember that the dress may appear slightly shorter after the back straps cross because the fabric is pulled diagonally across the body. Add seam allowances only after confirming the finished length.
The back consists of two overlapping sections that extend into shoulder straps. These sections cross over one another, creating a secure but flexible fit. Each back panel should be wide enough to overlap comfortably at the center back without pulling the side seams out of position. The crossing angle can be changed during the fitting stage before the straps are permanently attached.
The pockets are positioned near the side seams at a comfortable hand level. To determine the best placement, try on a paper or muslin version and allow your arms to rest naturally. Mark where your hands fall, then place the upper pocket opening slightly below that point. The pockets can be rectangular, gently slanted, or slightly curved depending on the look you prefer.
Choosing Fabric, Tools, and Pattern Pieces
Medium-weight cotton gingham is an excellent choice for this apron style wrap dress because it is breathable, stable, washable, and easy to sew. Look for fabric that is soft enough to drape but firm enough to support the pockets and ruffle. Very thin gingham may require lining, while heavy upholstery fabric could make the crossed back uncomfortable.
Prewash and dry the fabric using the same method that will be used for the finished garment. Cotton often shrinks during its first wash, and skipping this step may cause the completed dress to become smaller or uneven. After washing, press the fabric carefully so the checks remain straight and the grainline is easy to identify.
Basic supplies include matching thread, fabric scissors or a rotary cutter, pins or sewing clips, tailor’s chalk, measuring tape, a long ruler, an iron, and a sewing machine. Bias tape may be used to finish the neckline and armholes. Alternatively, you can make coordinating bias binding from the same gingham or from a contrasting solid cotton.
The main pattern pieces are one front body, two back wrap panels, two patch pockets, and one or more long ruffle strips. Depending on the finishing method, additional binding strips may also be required. Draft the pieces on pattern paper before placing them on the final fabric, especially when altering the measurements from the reference design.
Add a seam allowance of approximately 1 to 1.5 cm around the side seams, shoulder connections, pocket edges, and panel seams. The neckline and armhole allowances depend on the selected finishing method. When using bias binding, a narrower allowance may be sufficient. Add a hem allowance only if the ruffle will not completely enclose the lower raw edge.
Gingham checks should be aligned carefully during cutting. Place the pattern pieces so the center front follows a straight vertical line of checks. Match the horizontal rows at the side seams whenever possible. Pattern matching is not essential for a casual apron dress, but thoughtful alignment creates a cleaner and more professional-looking gingham dress pattern.
Step-by-Step Sewing Instructions
Begin by cutting all pieces and transferring important markings, including the center front, pocket placement, side seam notches, strap connections, and back overlap points. Mark the wrong side of each piece with removable chalk if the gingham looks similar on both sides. Keeping the pieces organized prevents accidental reversal during assembly.
Prepare the patch pockets before joining the body sections. Finish the raw edges with a zigzag stitch or serger, fold the upper edge to the wrong side, and stitch it securely. Press the remaining edges inward by approximately 1 cm. Pin each pocket to the front at the marked position and topstitch around the sides and lower edge, leaving the top open.
Finish the neckline and armholes while the garment can still be laid relatively flat. Bias binding is a practical option because it follows curved edges without creating bulky facings. Sew the binding to the right side, fold it over the raw edge, press it toward the wrong side, and stitch close to the folded edge. Work slowly around curves to avoid puckering.
Join the front and back sections at the side seams, matching the upper edges and pocket positions. Sew with the chosen seam allowance, finish the raw edges, and press the seams toward the back. Check that both sides are equal in length and that the garment hangs evenly. Small differences should be corrected before attaching the lower ruffle.
Cross the back panels and determine the most comfortable strap position. Pin the straps temporarily, then try on the garment over the type of clothing you plan to wear underneath. Adjust the overlap until the neckline sits smoothly, the armholes feel comfortable, and the side seams remain vertical. Sew the straps securely and reinforce the connection with a second row of stitching.
To make the ruffle, join long strips until they measure approximately 1.5 to 2 times the circumference of the dress hem. Finish the short ends, sew two rows of long gathering stitches along the upper edge, and pull the bobbin threads gently to distribute the gathers. Attach the ruffle to the lower edge with right sides together, finish the seam, press it upward, and topstitch for a neat result.
FAQ About the Gingham Apron Style Wrap Dress Fabric Pattern
Is the Gingham Apron Style Wrap Dress Fabric Pattern suitable for beginners? Yes, it can be a good project for confident beginners who already know how to sew straight seams, apply bias binding, gather fabric, and topstitch pockets. Making a practice version is recommended because the crossed back may require fitting adjustments.
How much fabric is needed for this wrap dress? The amount depends on fabric width, dress size, pattern matching, and ruffle fullness. For many adult sizes, approximately 2.5 to 3.5 meters of fabric may be needed. Additional fabric should be purchased when matching large checks or creating an extra-full ruffle.
Can the pattern be made without the bottom ruffle? Yes. The main body can be lengthened and finished with a simple turned hem. Removing the ruffle creates a cleaner, more modern apron silhouette, while retaining it produces the romantic and decorative appearance seen in the reference project.
What should I wear under an apron style wrap dress? It can be layered over a fitted T-shirt, blouse, long-sleeved top, turtleneck, or lightweight dress. Neutral solid colors work especially well with black-and-white gingham. The layering piece should be comfortable and not excessively bulky around the armholes.
How can I prevent the crossed back from opening too much? Increase the width of the back panels, deepen the overlap, or adjust the angle of the shoulder straps. A small hidden snap, fabric tie, or internal button can also be added if greater security is desired. Test the garment while sitting, bending, and walking before making the final decision.
Can I resize the Gingham Apron Style Wrap Dress Fabric Pattern? Yes. Adjust the upper width according to the bust measurement, widen the lower edge for additional hip room, and change the overall length according to height. Maintain smooth transitions between altered points and make a muslin to test the revised shape before using the final fabric.
Conclusion
The Gingham Apron Style Wrap Dress Fabric Pattern offers a practical way to create a comfortable handmade garment with a distinctive vintage-inspired appearance. The project begins with a simple A-line front, overlapping back panels, wide shoulder straps, convenient patch pockets, and a gathered lower ruffle. Careful measuring, prewashing, grainline placement, seam finishing, and fitting will help the dress hang naturally and remain comfortable during everyday wear. Throughout the process, the most important steps are adjusting the pattern to the wearer, checking the back overlap, finishing the curved edges neatly, and distributing the ruffle gathers evenly. The black-and-white gingham gives the design its recognizable farmhouse character, but the same pattern can also be made with linen, chambray, floral cotton, lightweight denim, or another stable woven fabric.
EASILY FIND THE PDF FOR THIS PATTERN HERE!
This project can be personalized through contrasting binding, deeper pockets, a shorter or longer hemline, decorative topstitching, or a less gathered bottom edge. Once the basic construction is understood, the Gingham Apron Style Wrap Dress Fabric Pattern becomes a versatile foundation for many creative variations. Please leave your sincere opinion about this project and share any suggestions, fabric ideas, or adjustments that could make the design even more useful for other sewing enthusiasts.