
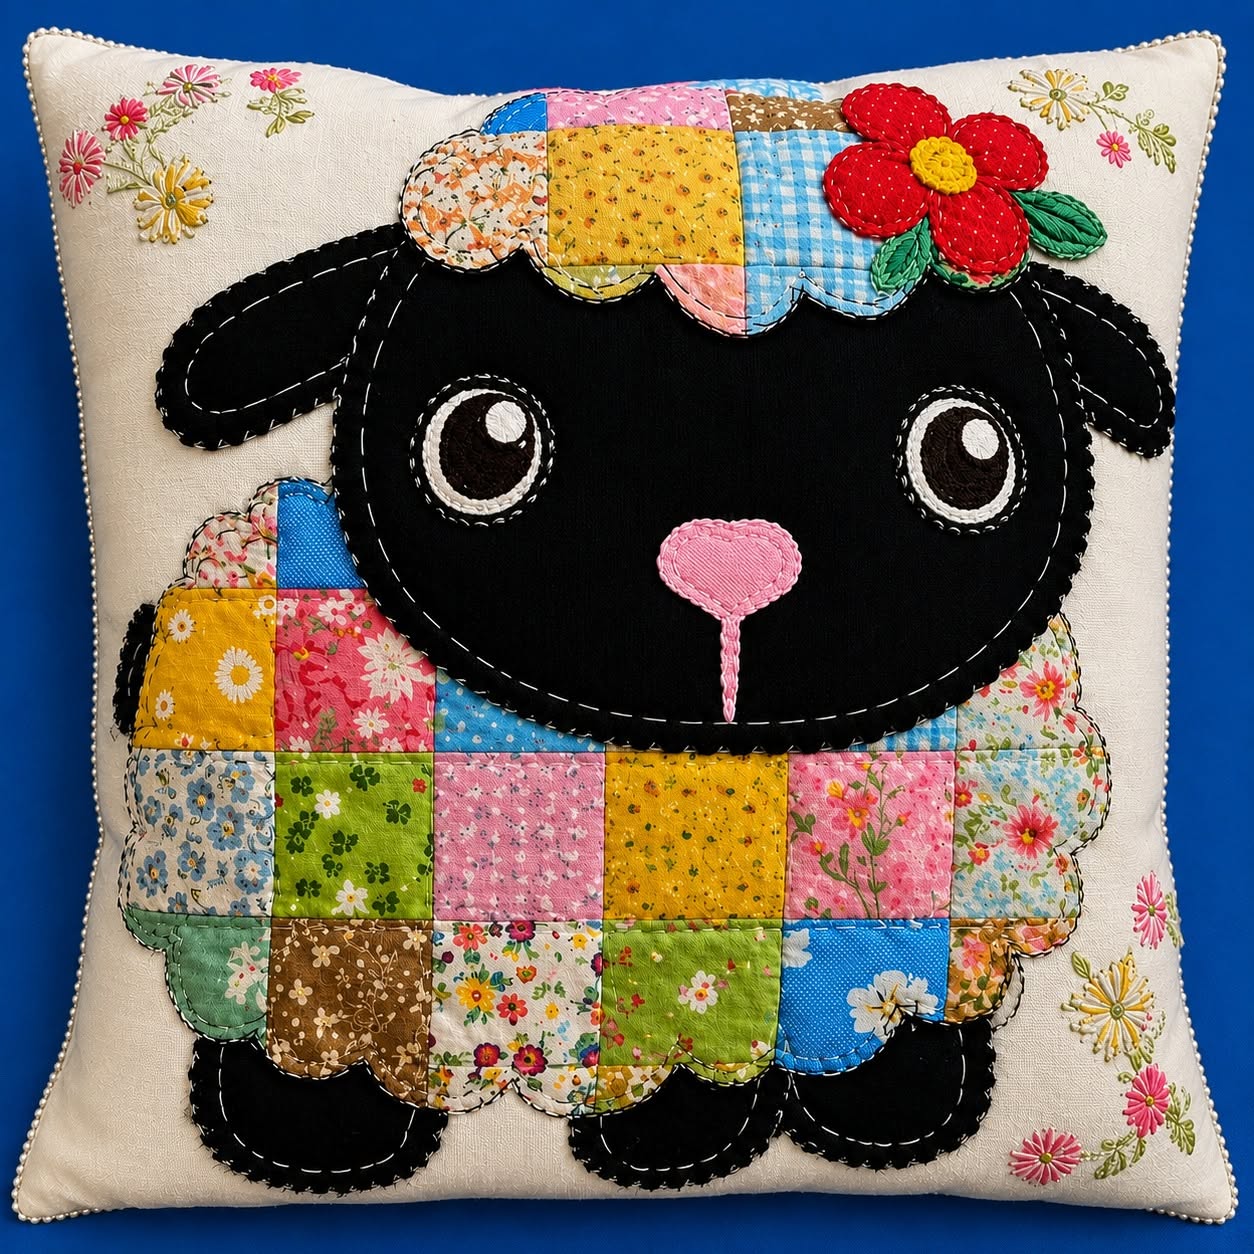
The Patchwork Sheep Cushion Fabric Pattern is a charming sewing project that combines colorful fabric scraps, simple appliqué techniques, decorative stitching, and practical cushion construction. Inspired by the handmade cushion shown in the reference image, this design features a cheerful sheep with a patchwork body, a black fabric face, expressive embroidered eyes, a small pink nose, floppy ears, and a colorful hat decorated with a bright flower. The finished cushion has a warm country style that works beautifully in nurseries, sewing rooms, living rooms, reading corners, and handmade gift collections. Because the body is assembled from small fabric squares, this project is also an excellent way to reuse leftover cotton pieces from previous sewing and quilting projects.
Creating a patchwork sheep cushion may look complicated at first, but the project becomes manageable when it is divided into clear stages. You will begin by selecting coordinating fabrics and preparing the individual pattern pieces. Next, you will sew the patchwork grid used for the sheep’s body, create the face and decorative elements, and arrange everything on the cushion front. Finally, you will secure the appliqué pieces with visible stitching, assemble the cushion cover, and add the filling or insert. Small irregularities are welcome in this project because the slightly rustic stitching gives the sheep its friendly, handmade personality.
The term Patchwork Sheep Cushion Fabric Pattern refers to both the visual layout and the sewing templates required to recreate the design. “Patchwork” describes the technique of joining smaller fabric pieces to form a larger decorative surface. “Sheep cushion” identifies the final object and central appliqué character, while “fabric pattern” refers to the printable or hand-drawn templates used to cut the body, head, ears, legs, hat, flower, and facial details. By understanding each part of the term, beginners can approach the project with greater confidence and experienced sewists can easily adapt the pattern to their preferred colors, dimensions, and finishing methods.
Materials, Fabric Selection, and Pattern Preparation
Begin by choosing a durable base fabric for the cushion front and back. Medium-weight cotton, cotton canvas, linen blend, or quilting cotton reinforced with lightweight interfacing will work well. For a cushion similar to the reference image, select a cream or off-white background with a subtle floral print. A lightly patterned background adds visual interest without competing with the colorful sheep. Prewash and press all washable fabrics before cutting so the completed fabric cushion cover keeps its shape after cleaning.
DISCOVER MORE FREE PATTERNS HERE!
For the sheep’s body, gather a variety of small cotton scraps in cheerful colors. Floral prints, tiny dots, gingham, leaves, geometric patterns, and miniature novelty fabrics can all be combined. The design works best when the fabrics contain a mixture of yellow, pink, blue, green, brown, cream, and soft red. Try to distribute light, medium, and darker values evenly. This creates a balanced scrap fabric patchwork surface and prevents one section of the sheep from appearing visually heavier than the others.
You will also need black fabric for the head, ears, feet, and tail. Felt, wool-blend felt, cotton, denim, or black linen can be used depending on the texture you prefer. Felt is beginner-friendly because the edges do not fray, while woven cotton creates a more traditional raw-edge appliqué appearance. Prepare small pieces of white, brown, pink, red, yellow, and green fabric for the eyes, pupils, nose, flower, leaves, and hat details. Fusible web is optional, but it makes positioning the appliqué pieces much easier.
Basic sewing supplies include fabric scissors, paper scissors, pins or fabric clips, matching and contrasting thread, a hand-sewing needle, a sewing machine, an iron, a ruler, a removable fabric marker, and cushion filling or a premade insert. Decorative thread or embroidery floss is useful for outlining the face and adding visible stitches. For the rustic look shown in the image, black, cream, and white threads can be used to create deliberately noticeable blanket stitches or running stitches around the appliqué shapes.
Choose the finished cushion size before drawing the pattern. A practical size is approximately 16 x 16 inches, although an 18 x 18-inch version will provide more room for detailed appliqué. Add a ½-inch seam allowance around the outer edges of the front and back cushion panels. The sheep appliqué should fit comfortably inside the cushion front with at least 1½ to 2 inches of visible background around it. This spacing keeps the design from disappearing into the cushion seams.
Draw the individual pattern pieces on paper before cutting the fabric. You will need one rounded rectangular shape for the sheep’s patchwork body, one large oval shape for the head, two long floppy ears, four short legs or two combined foot shapes, one small tail, one curved hat or cap, one five-petal flower, two leaves, two large eye circles, two smaller pupils, and one oval nose. Label each piece clearly and mark the grain direction when working with woven fabric. These templates form the foundation of the Patchwork Sheep Cushion Fabric Pattern.
Sewing the Patchwork Body and Sheep Appliqué
To make the sheep’s body, cut small fabric squares of equal size. Squares measuring 2 x 2 inches are suitable for a medium cushion, but they may be adjusted according to the final design. Remember that seam allowances reduce the visible size of each square. Arrange the pieces in rows before sewing and move them around until the colors feel balanced. Avoid placing several similar prints or identical colors directly beside one another unless you want a more organized repeating pattern.
Sew the squares together one row at a time using a consistent ¼-inch seam allowance. Press the seam allowances in alternating directions so the seams will nest neatly when the rows are joined. After completing all the rows, sew them together to create one patchwork panel. Press the finished grid carefully from the back. The panel should be slightly larger than the sheep body template because it will be trimmed after quilting or stabilizing.
Place the body template over the patchwork panel and check which squares will appear along the outer edges. Trace the shape onto the wrong side or onto the paper backing of fusible web. Cut out the patchwork body, leaving a narrow extra margin if you plan to trim it after attaching the stabilizer. Lightweight fusible interfacing can be added to the back of the patchwork to prevent the small seams from stretching. This step helps the patchwork appliqué remain smooth when it is stitched to the cushion front.
Cut the sheep’s head, ears, feet, and tail from black fabric. For the handmade raw-edge effect visible in the reference cushion, the edges can remain unfinished and be secured with decorative stitching. When using fabric that frays heavily, apply fusible web to the back or turn the edges under by approximately ¼ inch. The head should overlap the upper-right area of the body, while the ears extend outward from both sides. The feet can be positioned underneath the body so they appear to support the sheep.
Create the facial details before permanently attaching the head to the cushion. Layer the white eye circles onto the black face, followed by brown or dark pupils and tiny white highlights. Place the pink oval nose near the lower center of the face and add a vertical embroidered line below it. The oversized eyes are an important feature because they give the sheep appliqué cushion its sweet and playful expression. Stitch each layer securely with small blanket stitches, zigzag stitches, or hand embroidery.
Prepare the hat using several small scraps or a narrow strip of miniature patchwork. Position it across the top of the head so it follows the curved shape. Add a bright red or pink flower near one side, place a yellow circle in the center, and attach two green leaves. The flower may be made from felt or cotton fabric. Secure every piece individually, working from the lowest layer to the highest. Press carefully with a pressing cloth to protect the appliqué and avoid flattening dimensional embroidery.
Assembling and Finishing the Cushion Cover
Cut the cushion front panel to the desired size, including seam allowances. Mark the center lightly with a removable fabric pen by folding the panel into quarters and pressing gently. Arrange the patchwork body first, keeping it slightly below the vertical center so there is room for the hat and flower. Add the feet and tail behind the body, followed by the head, ears, facial features, and hat. Step back occasionally and view the layout from a distance before attaching anything permanently.
Use fusible web, temporary fabric adhesive, pins, or small basting stitches to hold the pieces in place. When applying fusible web, follow the manufacturer’s temperature instructions and protect the fabric with a pressing cloth. Do not slide the iron because this may distort the appliqué. Press each section briefly, lift the iron, and place it in the next position. A stable arrangement makes the decorative stitching much easier and prevents the layers from shifting under the presser foot.
Outline the patchwork body with a narrow zigzag, blanket stitch, satin stitch, or deliberately uneven hand stitch. The reference design uses visible stitching that emphasizes the handcrafted character of the cushion. You can use black thread around the colorful body and cream or white thread around the black head. Stitch slowly around the curves and stop with the needle down whenever you need to rotate the fabric. A shorter stitch length gives better control around small shapes and tight corners.
Add optional embroidered details after the main appliqué has been secured. Small lines can represent eyelashes, eyebrows, mouth details, wool texture, or decorative accents. Running stitches around selected patchwork squares can produce a quilted effect. You may also add tiny flowers to the cushion background, echoing the soft floral motifs in the image. Keep the extra embellishments subtle so the Patchwork Sheep Cushion Fabric Pattern remains the central focus.
For the cushion back, choose either a simple envelope closure or an invisible zipper. An envelope back is ideal for beginners because it does not require zipper installation. Cut two back panels that overlap by approximately 4 to 6 inches. Hem one long edge of each panel, place both pieces over the cushion front with right sides together, and align all outer edges. Pin carefully, especially where the overlapping back pieces meet.
Sew around the entire cushion using a ½-inch seam allowance. Reinforce the corners and the areas where the envelope panels overlap. Trim excess fabric from the corners without cutting through the stitches, and finish the raw seams with a zigzag stitch or serger if desired. Turn the cover right side out and shape the corners gently with a blunt tool. Press the completed cover, insert the cushion form, and adjust the filling until the sheep design sits smoothly on the front.
Frequently Asked Questions About the Patchwork Sheep Cushion Fabric Pattern
What fabric is best for a Patchwork Sheep Cushion Fabric Pattern? Quilting cotton is one of the best choices because it is easy to cut, sew, press, and combine with other prints. Cotton canvas and linen blends are useful for the cushion background because they provide more structure. Felt works especially well for the black head and small facial details since it does not fray. When combining different fabric weights, add lightweight interfacing behind delicate pieces to create a consistent surface.
Can a beginner make this patchwork sheep cushion? Yes. A beginner can complete the project by working slowly and dividing it into stages. The easiest method is to use cotton squares for the patchwork body, felt for the appliqué shapes, fusible web for placement, and an envelope-style cushion back. Beginners should practice the blanket stitch or zigzag stitch on fabric scraps before sewing around the actual sheep. Simple, slightly uneven stitching will still look attractive because the project is designed to have a handmade appearance.
How large should the patchwork squares be? The ideal square size depends on the final cushion dimensions. For a 16-inch cushion, squares cut between 1¾ and 2½ inches are generally suitable. Smaller squares create more detail but require additional sewing and careful seam matching. Larger squares are faster to assemble and show fabric prints more clearly. Always construct a patchwork panel larger than the body template so you have enough space to position and trim the final shape.
Do I need a sewing machine to make this cushion? A sewing machine makes the patchwork assembly and cushion construction faster, but the design can also be completed by hand. Hand piecing requires small, strong backstitches and consistent seam allowances. The appliqué can be secured with blanket stitch, whipstitch, or running stitch. A fully hand-sewn version takes longer, but it often has a beautiful heirloom quality. Use strong polyester or cotton thread for the main seams.
How can I wash the finished sheep cushion? Use prewashed fabrics whenever possible and make the cushion cover removable. A removable cover with an envelope or zipper closure is easier to maintain than a permanently stuffed cushion. Wash it gently in cold water with mild detergent, preferably inside a laundry bag. Avoid harsh bleach because it may fade the colorful patchwork fabrics. Reshape the cover while damp and air-dry it flat before inserting the cushion form again.
Can the sheep pattern be customized? Absolutely. The sheep can be created in pastel fabrics for a nursery, bright rainbow scraps for a child’s room, neutral farmhouse prints for rustic décor, or holiday fabrics for a seasonal cushion. You can change the flower, replace the hat with a bow, embroider a name on the background, or adjust the facial expression. The fabric pattern can also be enlarged or reduced, provided all pieces are resized proportionally.
Conclusion
The Patchwork Sheep Cushion Fabric Pattern brings together scrap-friendly patchwork, expressive appliqué, decorative embroidery, and practical cushion-making skills in one enjoyable project. Throughout this tutorial, you learned how to select coordinating fabrics, prepare pattern templates, piece the colorful body, build the sheep’s face, add the hat and flower, secure the appliqué, and construct a removable cushion cover. Each stage can be adapted to your preferred sewing method, making the project suitable for both beginners and experienced makers.
EASILY FIND THE PDF FOR THIS PATTERN HERE!
The most appealing feature of this design is its flexibility. No two patchwork sheep need to look exactly alike because every collection of fabric scraps creates a different combination of colors and prints. Use the instructions as a foundation, then add your own creative details and personality. After completing your cushion, please leave your sincere opinion about the project and share suggestions for future fabric patterns, appliqué animals, or patchwork tutorials you would enjoy making.